|
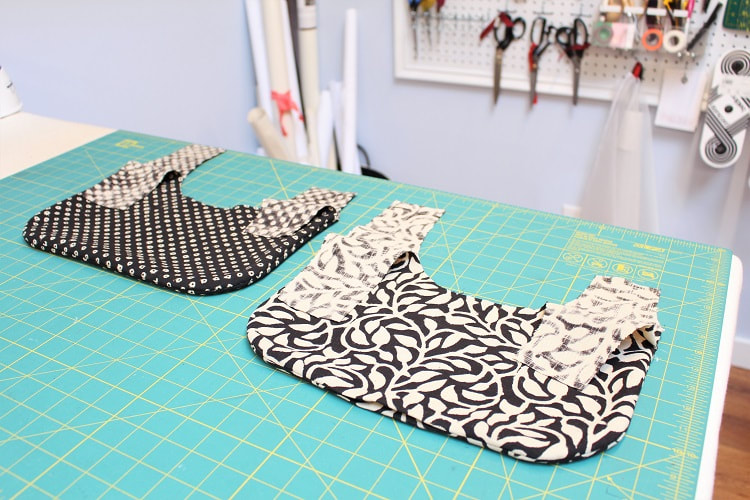
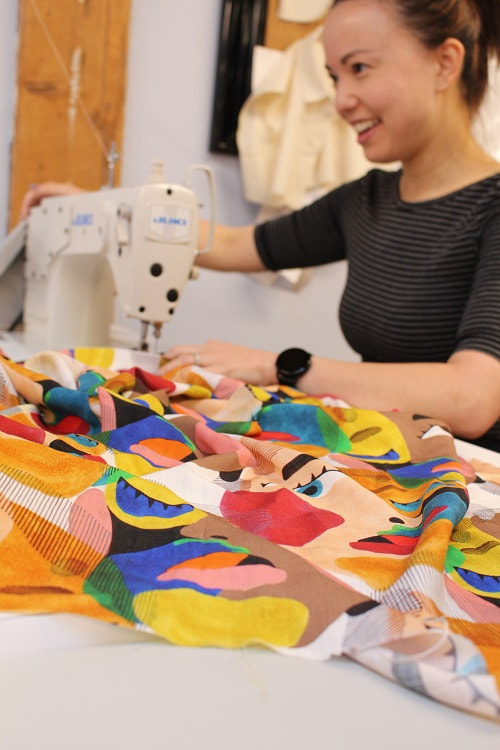
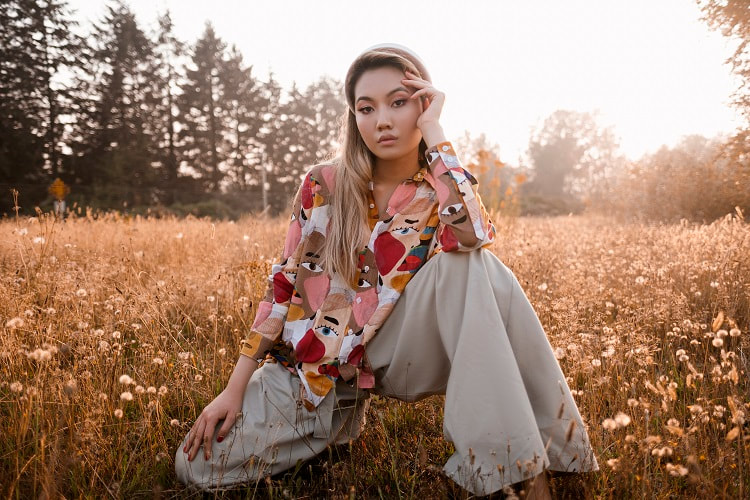
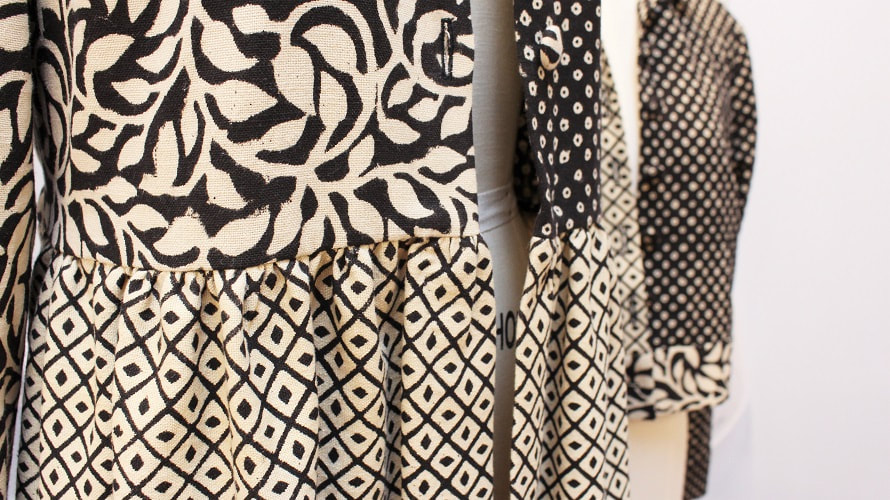
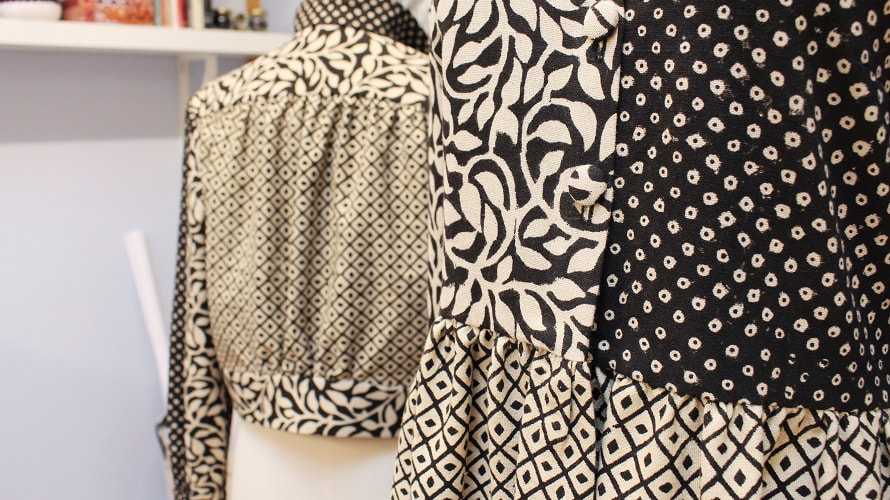
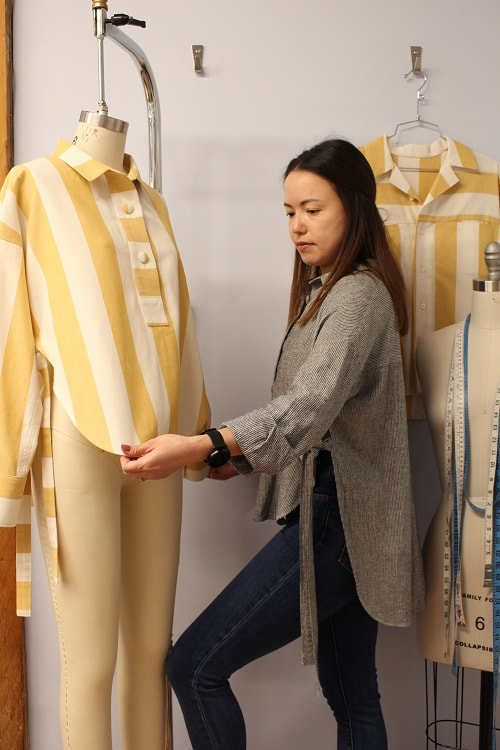
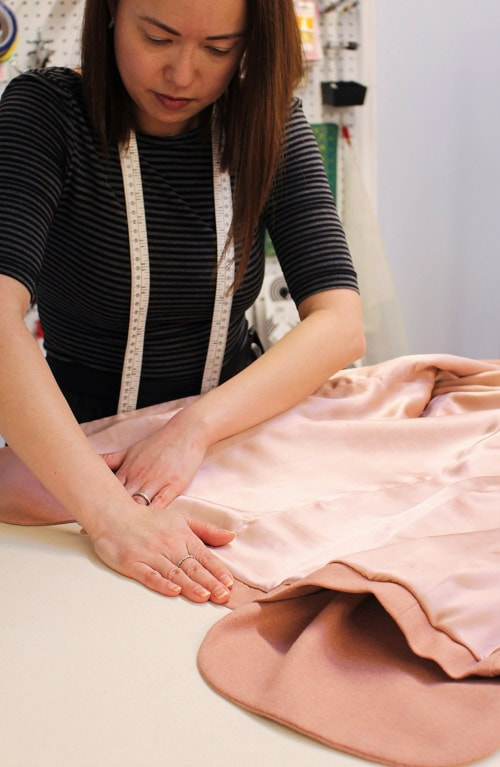
Two for one for you! Original concept for this 'one' coat was let's make it long, let's play around with mixing similar prints like color blocking (print blocking), and create shape where possible with gathering. I did explore the original concepts and achieve them in the final long version design. But inspiration hit as the waist seam was about to get stitched on the longer version. The upper body (bodice) of the coat looked amazing on its own. What do I do?! Do I proceed with the long or do I make it cropped? Well why not both, cause I can and because I was curious. So here are both versions for you. 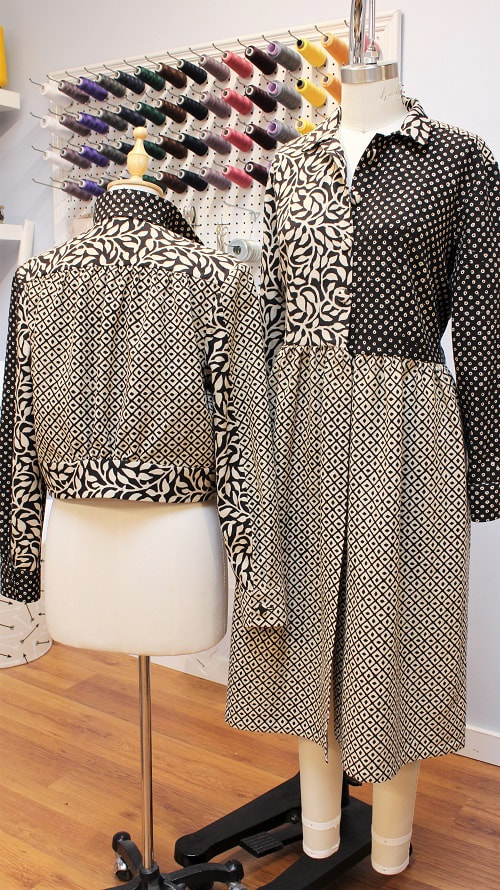 During this process, it reminded me that it is completely fine to let a design evolve. Being curious is a beautiful trait. Let yourself be curious in the creative process, it will yield new and exciting results. It could also yield a disaster, but then I just let myself learn from the new mistake. In this post, I go over some of my mistakes but I cannot wait to go forward and make the next versions even better!
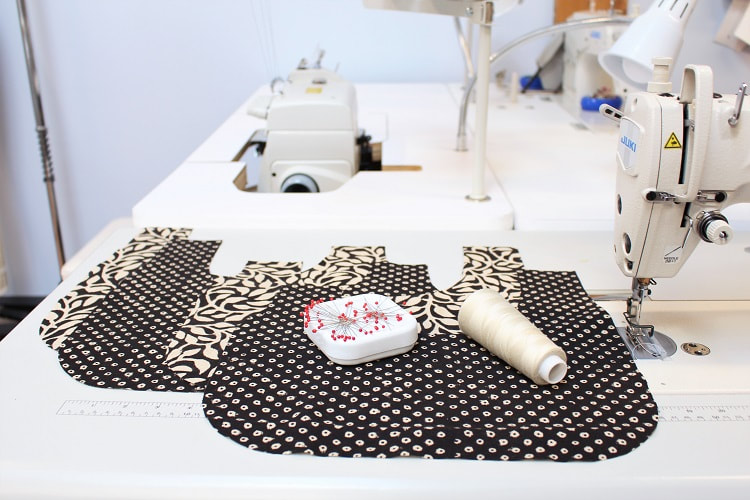
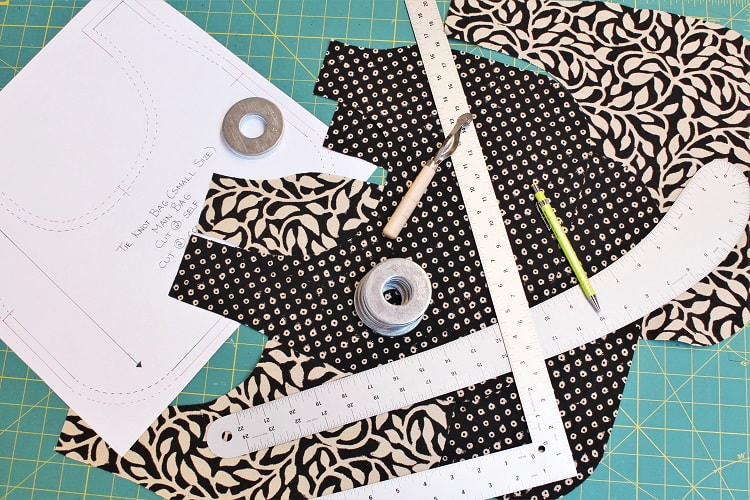
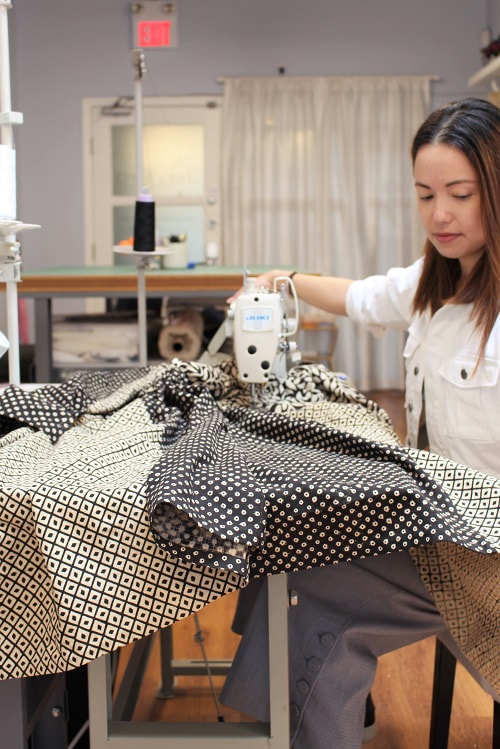
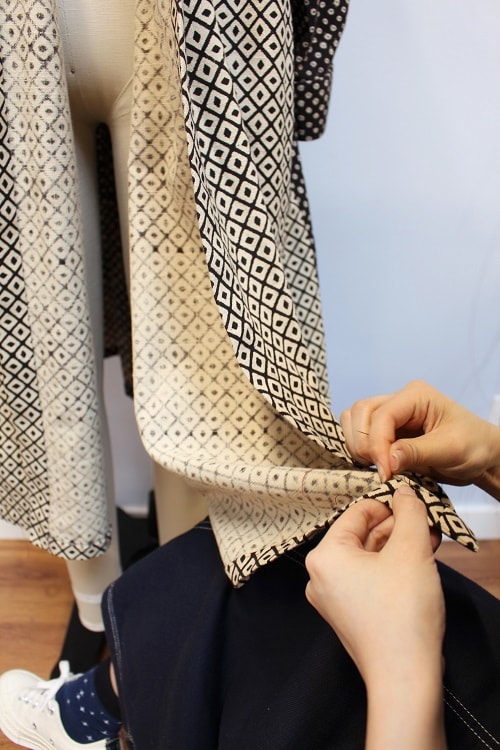
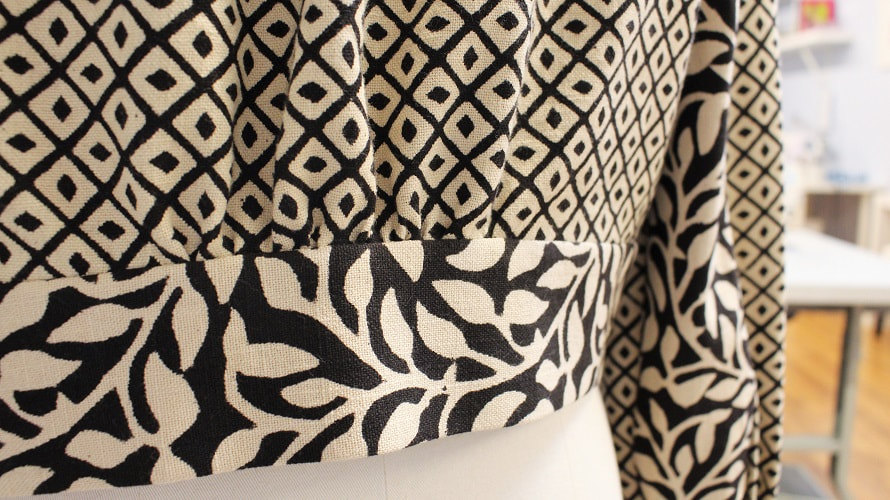
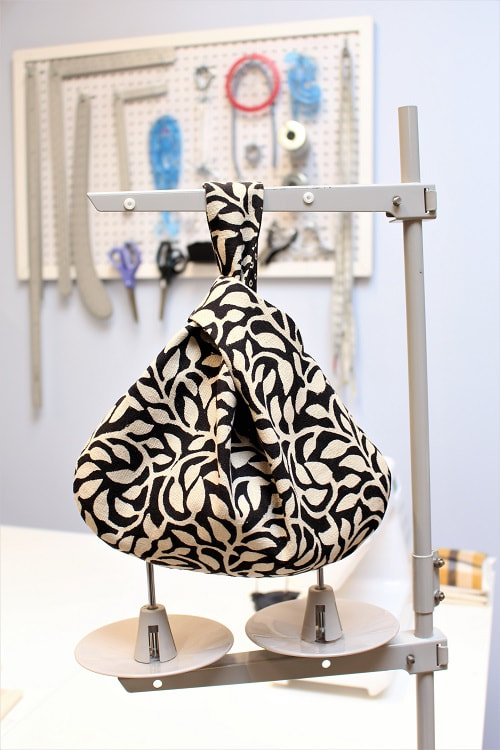
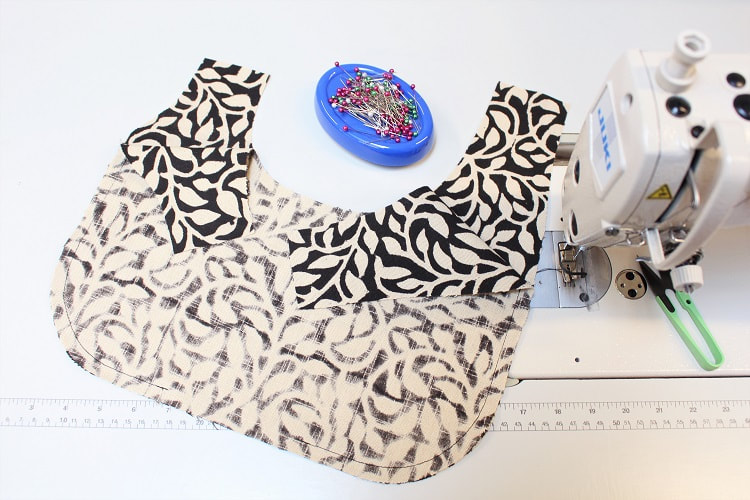
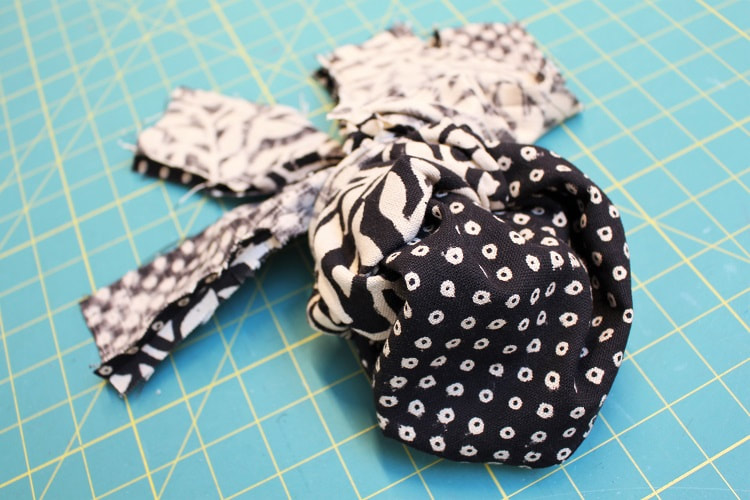
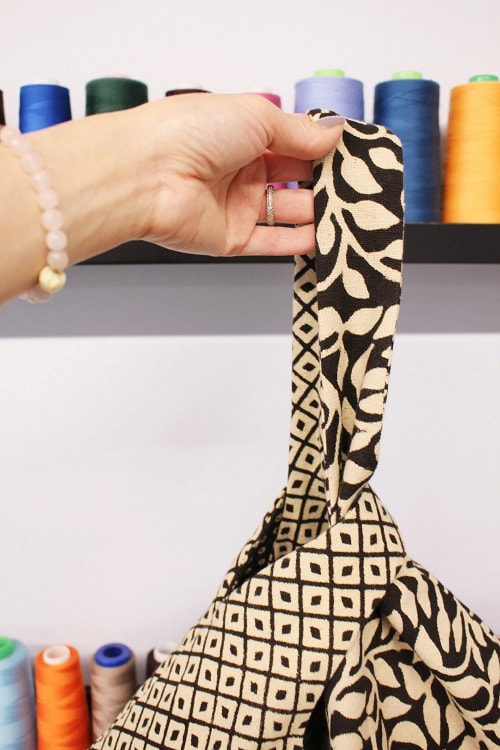
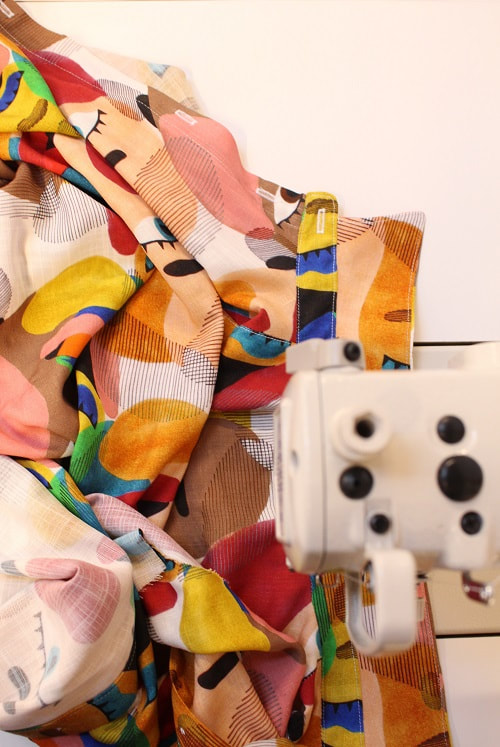
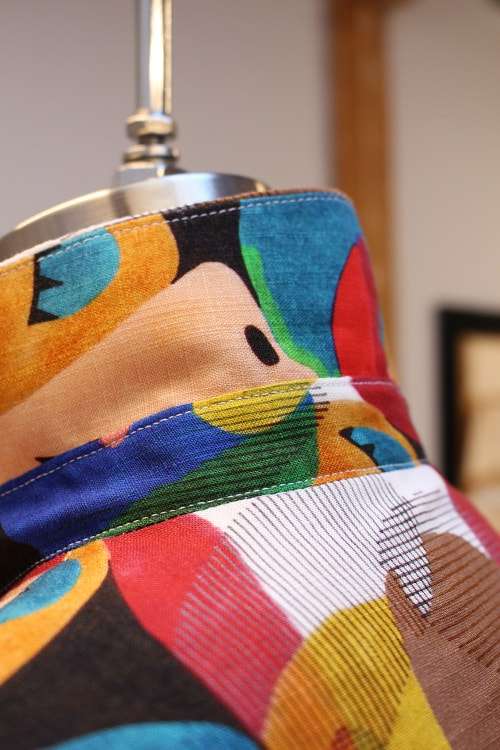
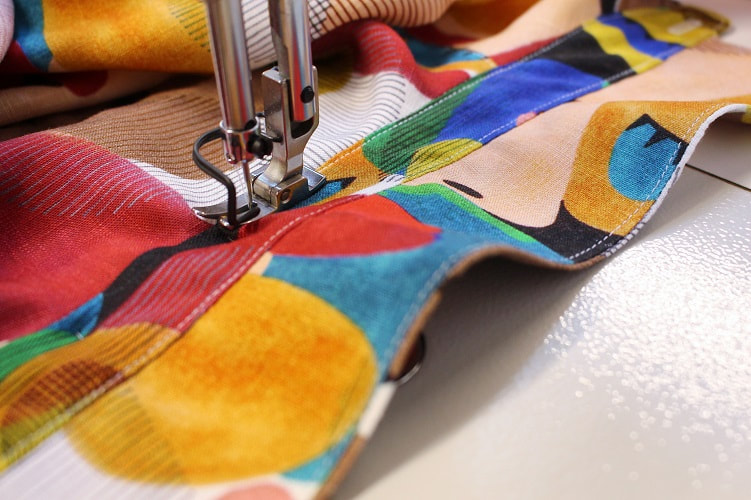
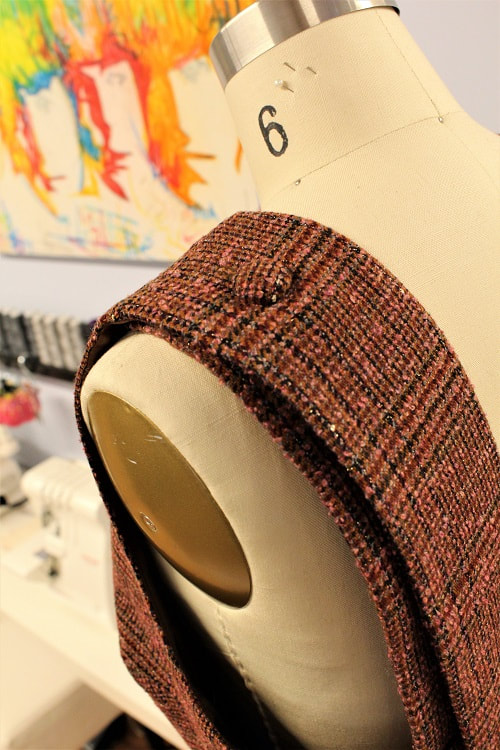
FabricIn late Feb, I visited Maiwa Supply Store on Granville Island, after having taught a workshop at their School of Textiles. While browsing the store, three separate black and ivory hand blocked fabrics caught my eye. Each was so different and yet they complimented each other well. I felt inspired to create something that combined these fun prints. So I did! If you’ve been following us, you might remember our Draft and Sew-a-Long series for the Tie Knot Bag. Well, we decided to take this lovely combo even further by creating matching coats! Hand block printing is the technique of imprinting a desired design onto fabric by means of wooden blocks and is one of the earliest known techniques for textile printing. A hand carved wooden block is dipped into color trays and then stamped onto fabric, thus leaving a permanent print design. This technique is applied by use of hands only. You will notice slight inconsistencies in the print, but I think this makes it more beautiful- just like life. 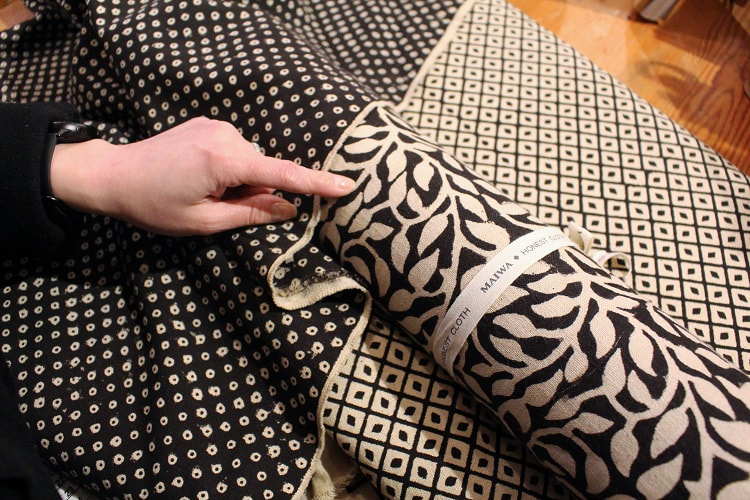 Project Specs
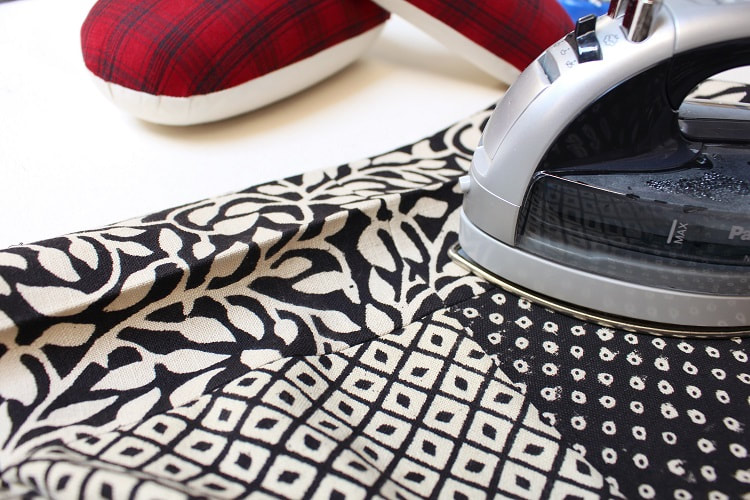
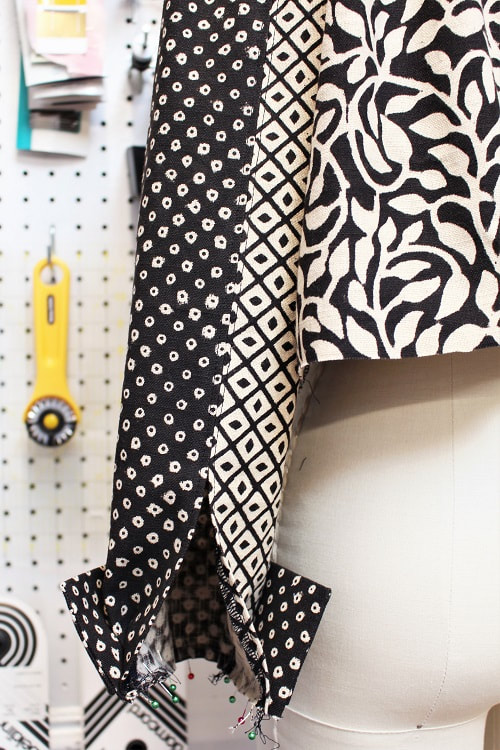
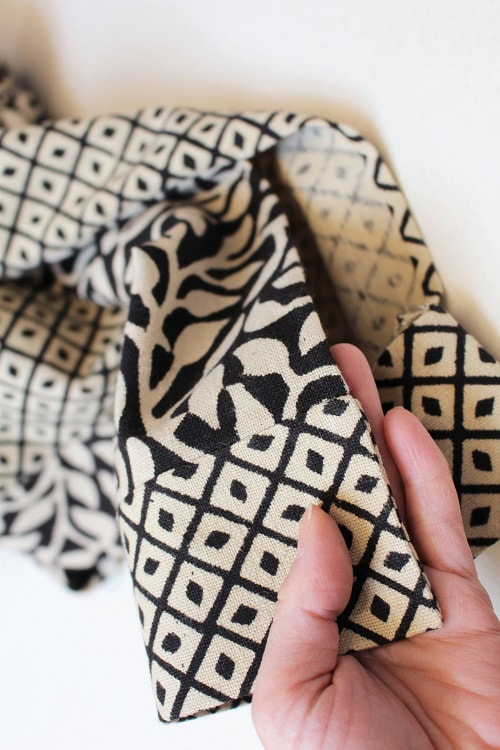
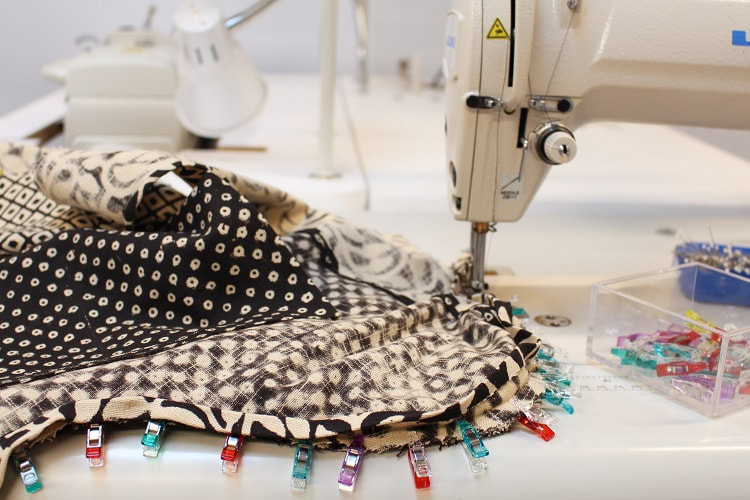
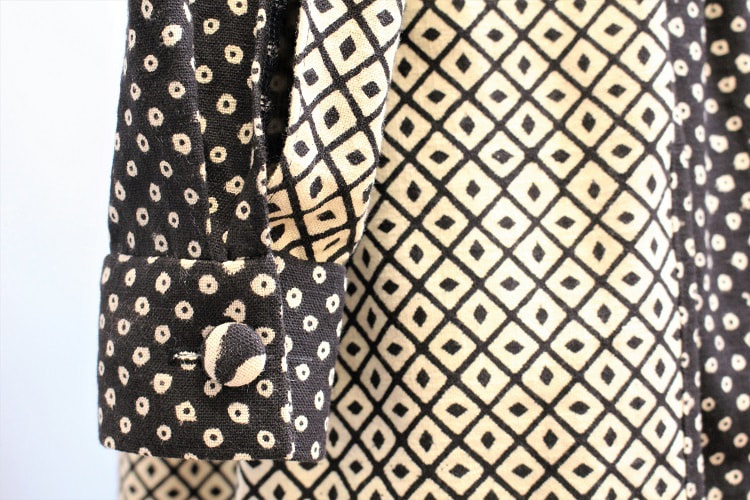
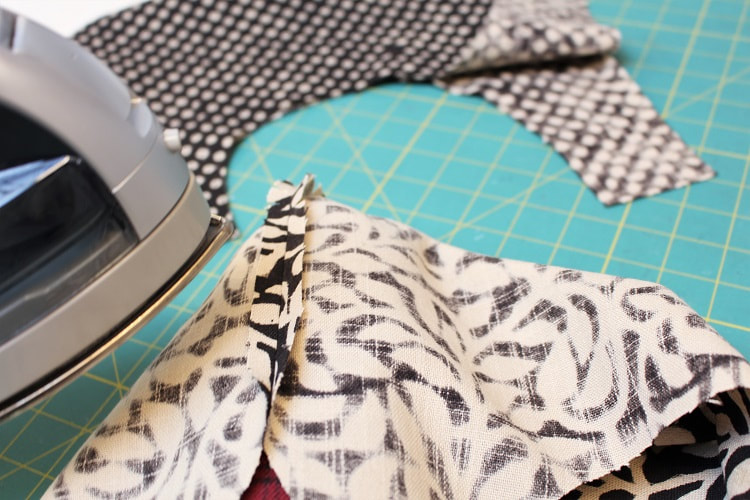
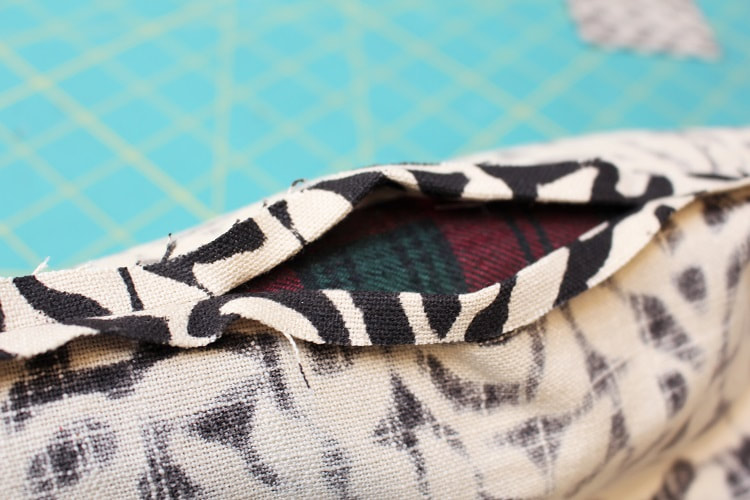
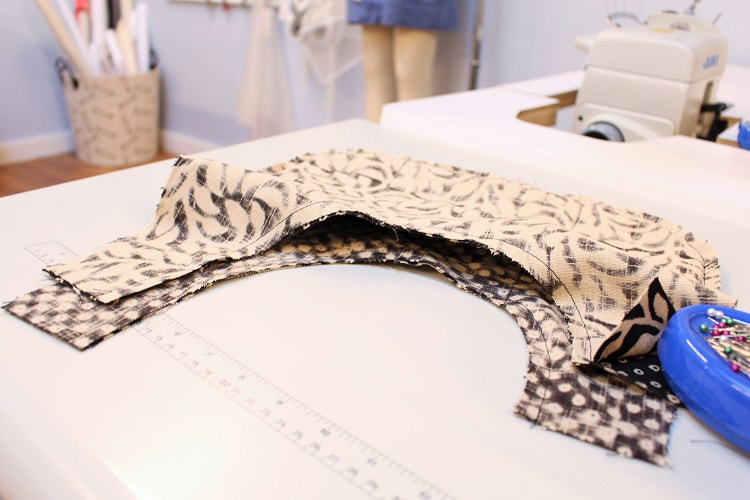
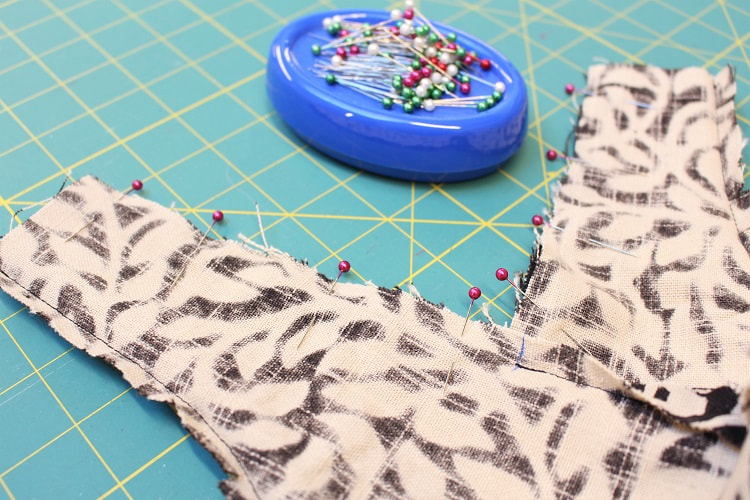
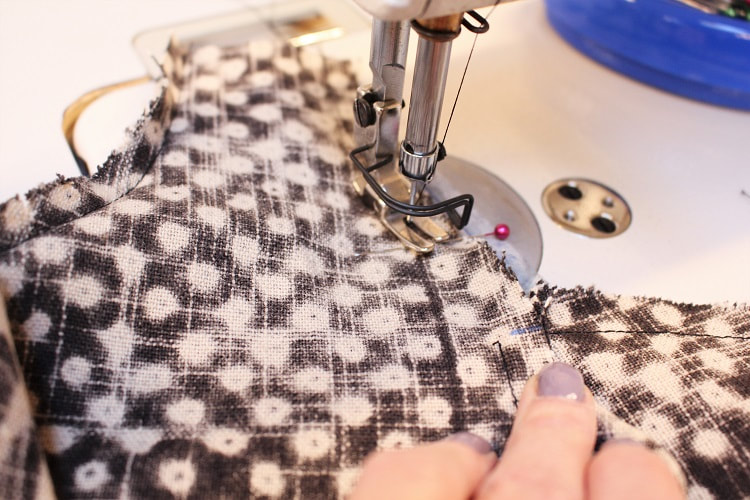
Design ElementsAs usual, there are a ton of design elements within these two coats, but I want to focus on the elements that I learned the most about and the elements you can learn from as well. Below, I chat about fake two piece sleeves, how to sew a clean seam finish, experimenting with gathering and how inspiration can hit you when you least expect it. Two Piece SleevesThe sleeve appears like it has an upper and a lower sleeve, but it's all an illusion. It still has an under arm seam but I placed a back seam to provide the visual of a two piece sleeve. This back seam runs right into the placket opening and cuff area. 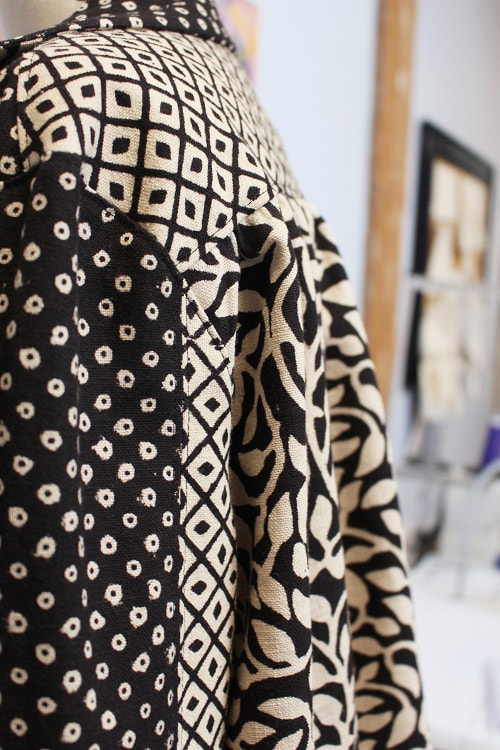 Typically a placket opening is finished with a tower or a bound seam finish. But because we have a seam running right into the placket we can simply apply a clean seam finish to the full length of the seam. Never heard of a clean seam finish? To me, it is like a mix between a hemming and a seam finish. It is the complete opposite to a French seam but just as clean and beautiful. To sew a clean seam finish, follow these steps. 1. With right sides of fabric facing each other stitch seam from top of sleeve cap down to placket opening notch. 2. Press seam open and continue pressing into placket area the width of the allocated seam allowance. 3. Turn raw edge in and under the pressed open seam allowance and press the entire length of seam from top of sleeve cap down to bottom of placket opening at wrist. 4. Edge stitch along folded edge or slip stitch down to garment.
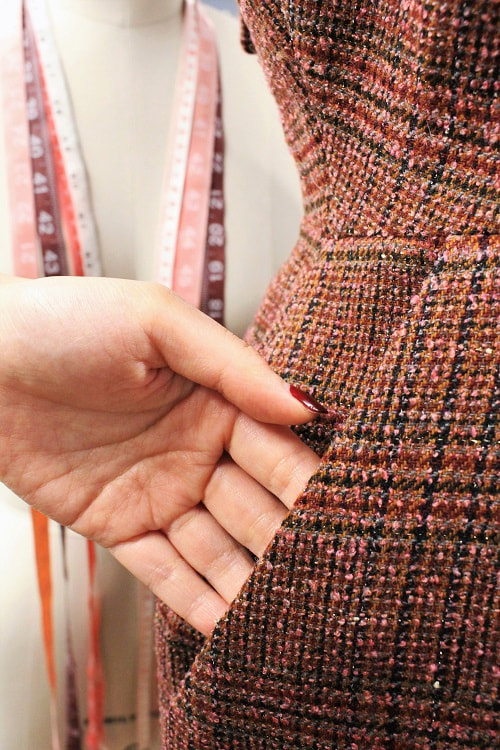
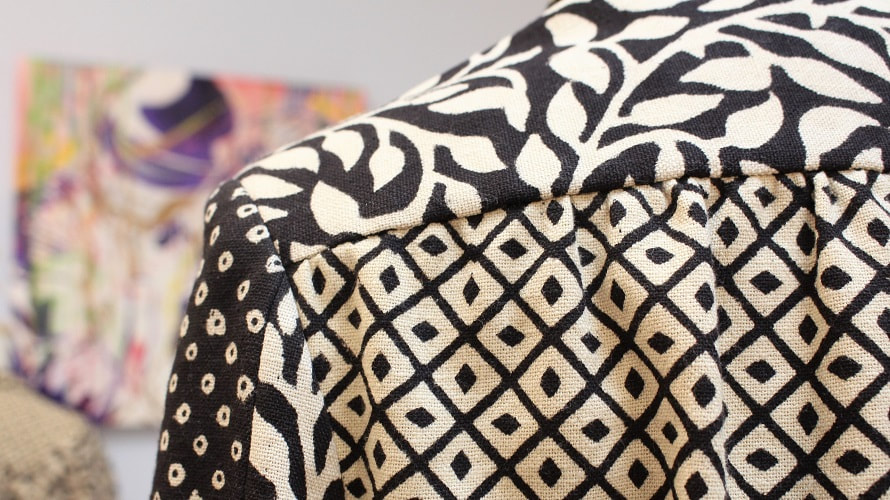
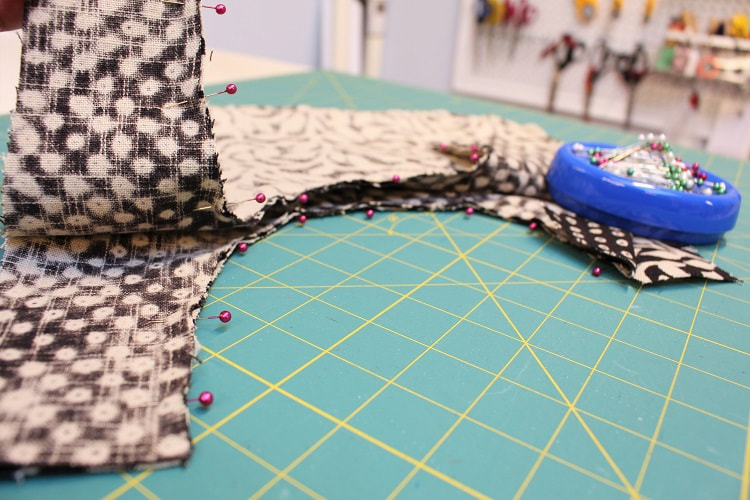
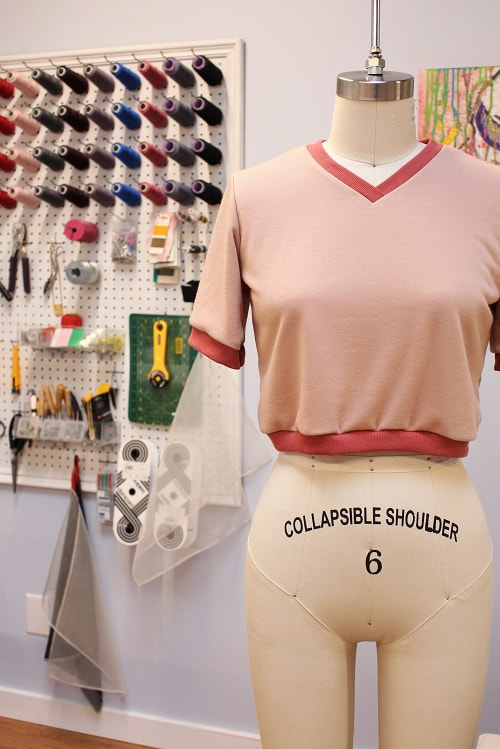
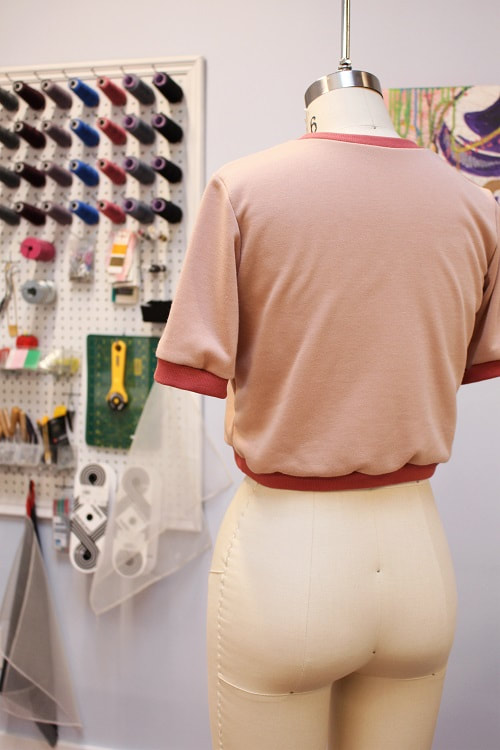
Gathering DetailsGathers can be found in many areas of both coats. I wanted to really explore the element of gathers in a variety of ways. In the short coat, gathers are evenly distributed along the upper back bodice towards the yoke, but at the bottom of the back bodice, I centered the gathers just at the center back above the hem facing. I think in the future it would be nicer to distribute the gathers evenly across the whole width of the back to create more of an architectural silhouette. There are no gathers in the front of the short coat. Going forward I want to put gathers at the bottom of the front bodice to create some shape there. I have worn this coat already and it’s a bit too flat in the front.
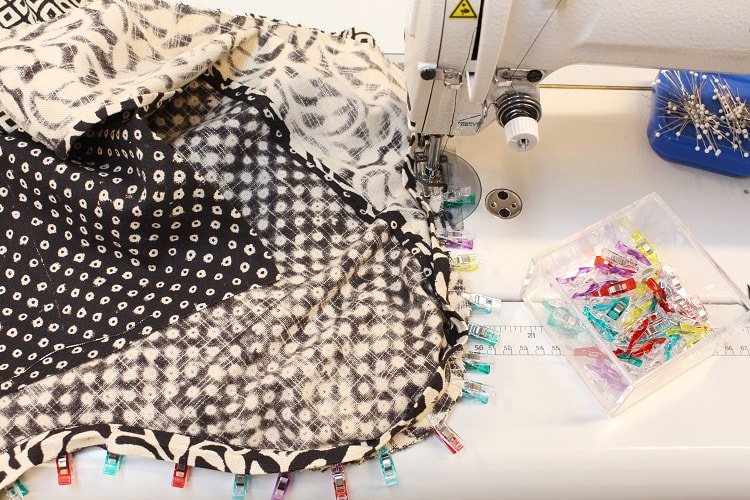
With the long coat, I went all out with the gathers. I wanted to see how two gathered pattern pieces would interact with each other. The gathering in the front skirt section worked lovely as it was stitched to a stable bodice with no gathers. BUT the back had gathers along the waist in both the bodice and the skirt. Obvious now, but at the time I thought the gathers would hold with a secure straight stitch while sewing the waist seam. NOPE! This was not the case. I had to secure the seam with a bound seam finish to ensure the gathers would not just fall out over time.
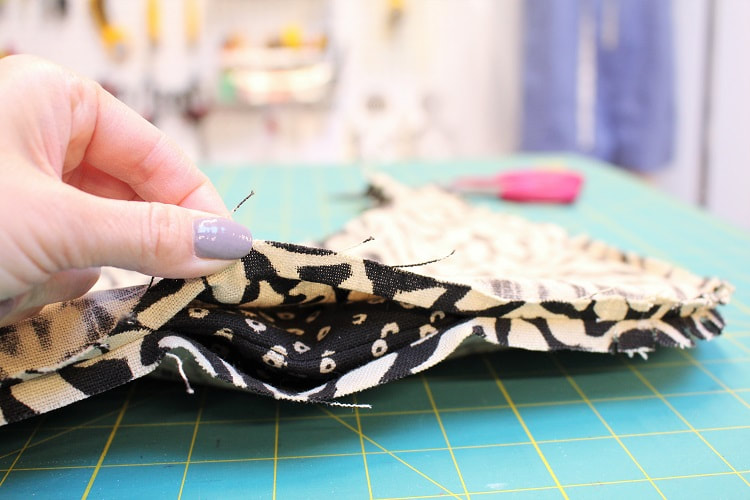
Another problem I ran into was along the front waist at front opening. I gathered the skirt all the way to the front opening. Do not do this if you have a fold back button/buttonhole extension. When it folds back there should be no gathers in that section to allow the area to lay flat. I still made it work by pressing just so, and hand sewing the back to gain full control over the fabric. Bound Seam FinishesIn both coats, bound seam finishes can be found along the waistline, armholes/sleeve cap and bottom of yoke seam. It is a great way to hide away the gathered edges of fabric. 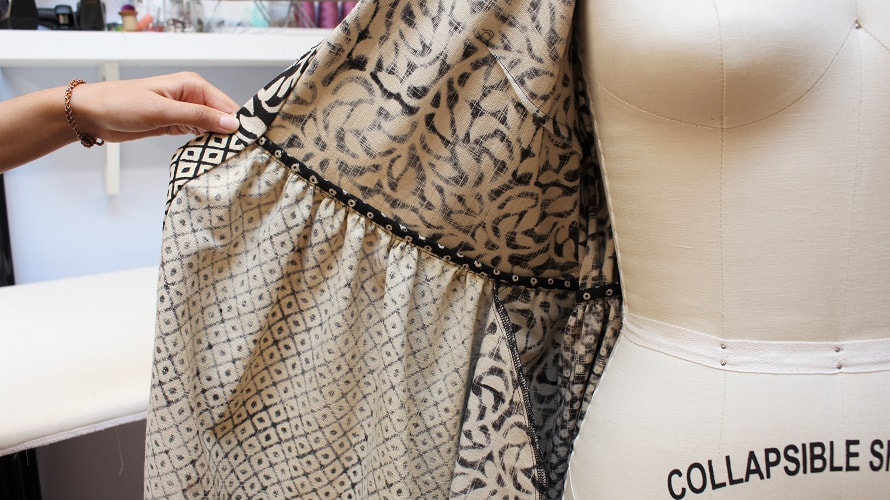 As mentioned above, this was done to secure the seam with a bound seam finish to ensure the gathers would not just fall out over time.
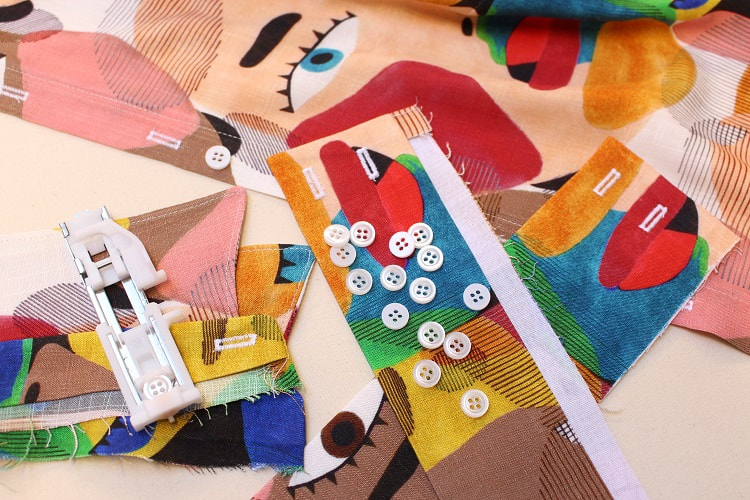
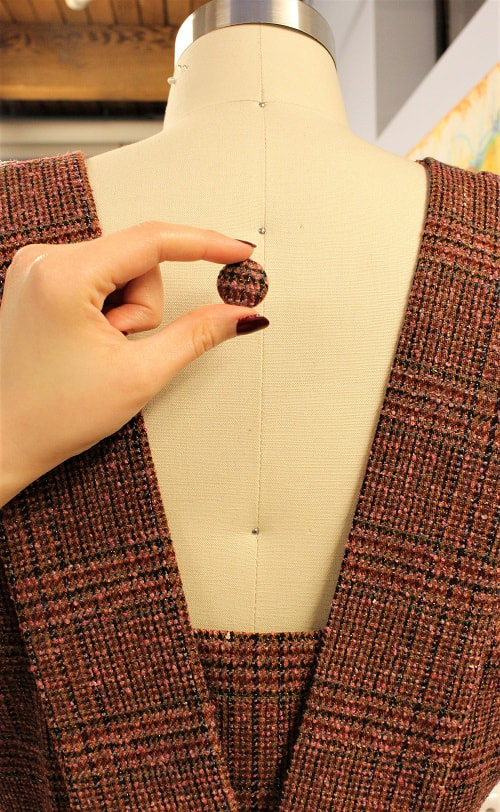
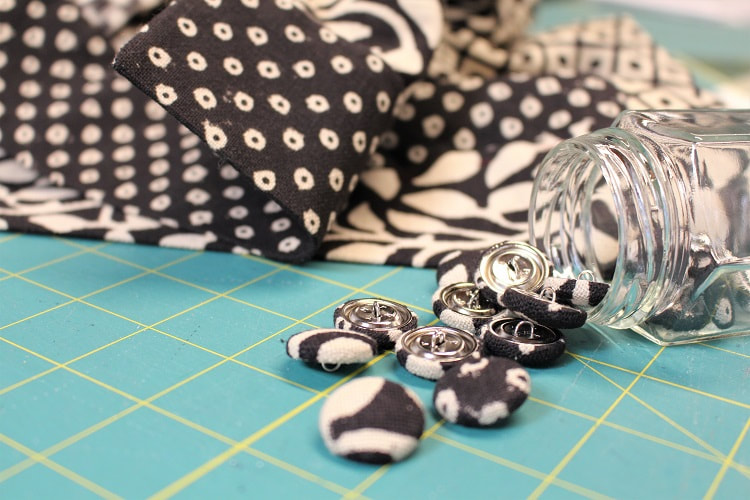
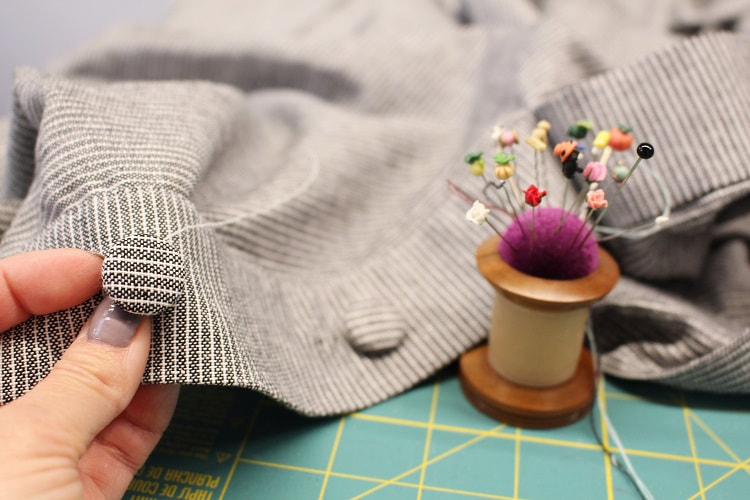
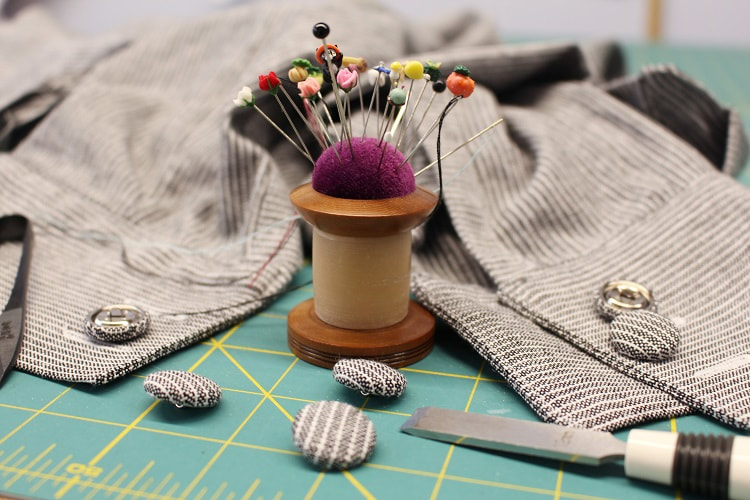
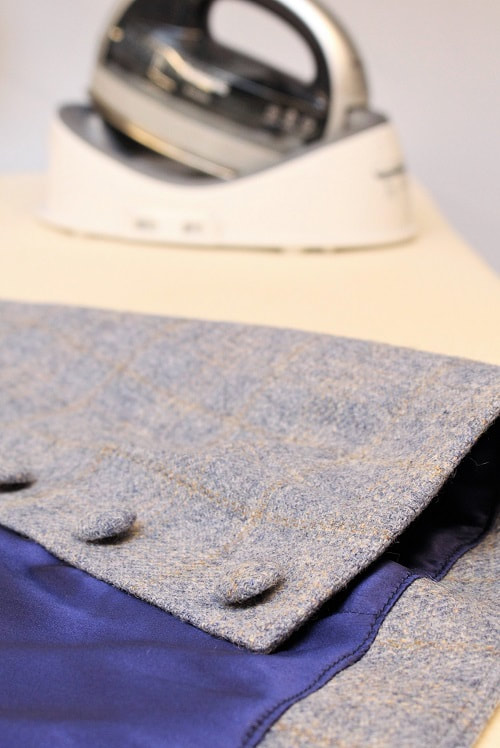
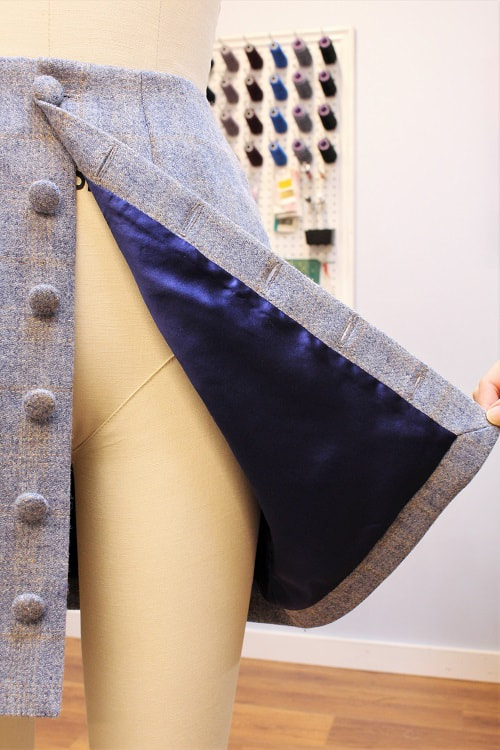
Fabric Covered ButtonsWe have an ongoing love for fabric-covered buttons here at the studio. Fabric-covered buttons can add a special touch to any design and are also a great way to use up fabric scraps! You can find a button-covering kit at most fabric and craft stores.
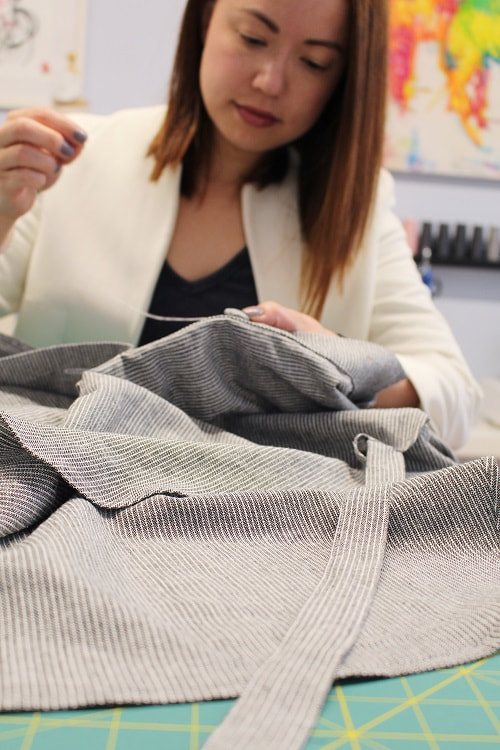
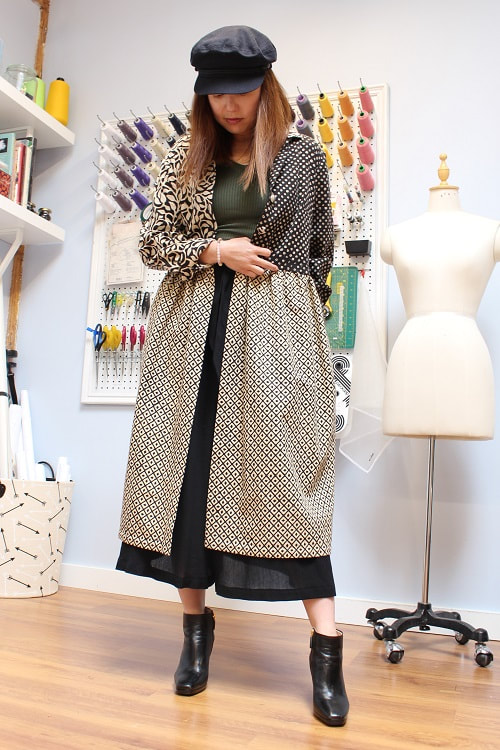
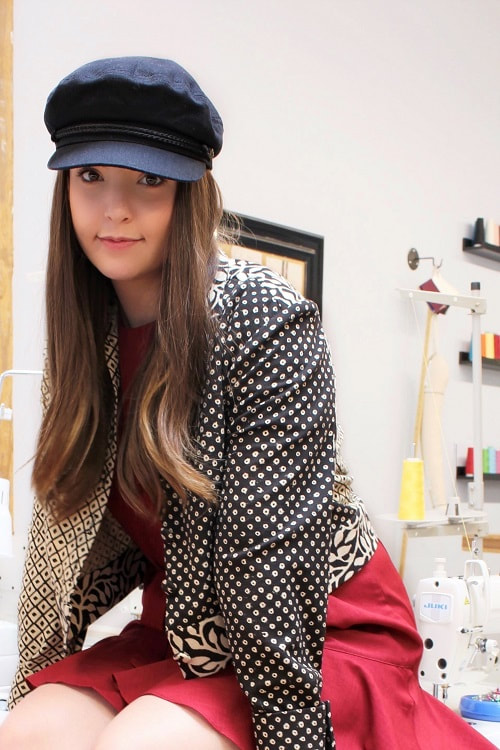
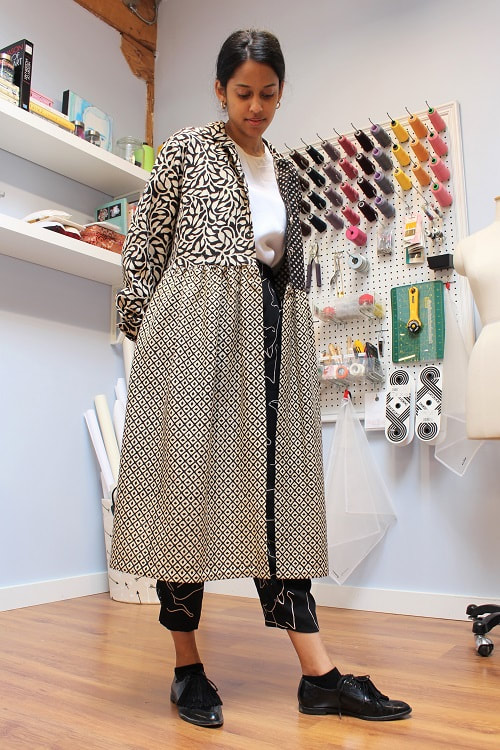
Optional SilhouettesSo...initially I was only designing the long version coat. BUT midway through the construction process, inspiration hit and I had to follow. The exact moment came right before I stitched the waist seam of the bodice to the skirt section. I placed the bodice with sleeves on the dress form and it just looked so good on its own that I immediately started drafting a hem facing for a shorter version to be made. I was lucky that I had just enough fabric to cut out a second coat. 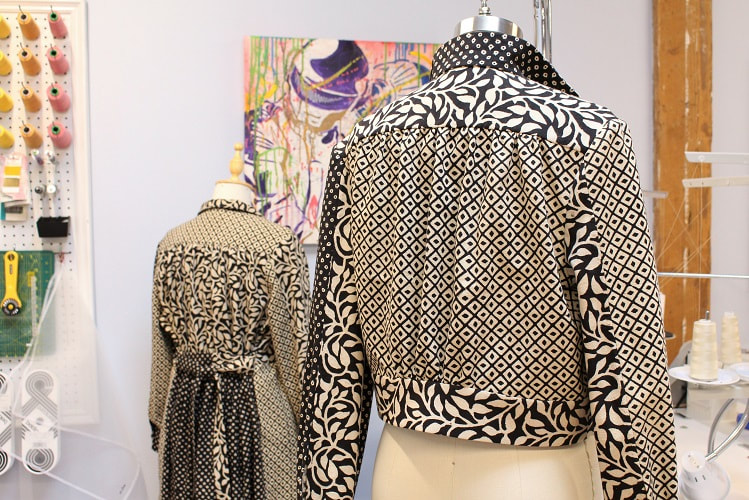 StylingAll dressed up with nowhere to go (due to self-isolation) but that hasn’t stopped us from brainstorming future fall outfits! The studio staff agree that fall is our favorite fashion season anyways, so why not plan ahead? The first look features Sheila wearing the long coat with a forest green shirt, black paper bag pants, and black heeled booties. Black pants balance out a statement piece like our block print coats. For a pop of color, Natasha chose a rose red dress to pair with the cropped coat. Both completed their looks with a black baker boy hat.
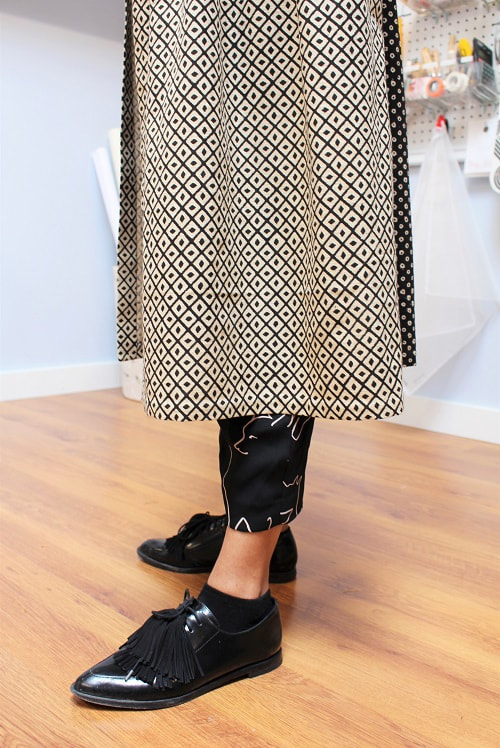
For our final look, Sujitha took the matchy matchy route and paired the long coat with a simple white tied t-shirt and black printed dress pants. At first glance, we wondered if introducing yet another print into the mix would overwhelm the eye but this was actually our favorite look overall!
Final Designs & What I LearnedI think it is very important to allow yourself to explore and make mistakes freely. This provides you with better insight into your design aesthetic and improves your technical skills in both drafting and constructing. With these two coats, I gained a better understanding about different types of gathering and collar dimensions. Gathering is essentially a very simple concept— excess fabric pulled together to create shape or volume around the body or in a specific area for movement (ease). As you read earlier, I experimented with different variations of gathers in different seams. Going forward, I would never place two gathered pieces together (ex: bodice and skirt) with a woven fabric. The straight stitch that connects the two does not control the gathers and the gathers will just fall out. You need to secure a gathered piece always into a solid pattern piece like a waist band or in my case; I improvised with binding the interior waist seam allowance to ensure the gathers did not fall out. 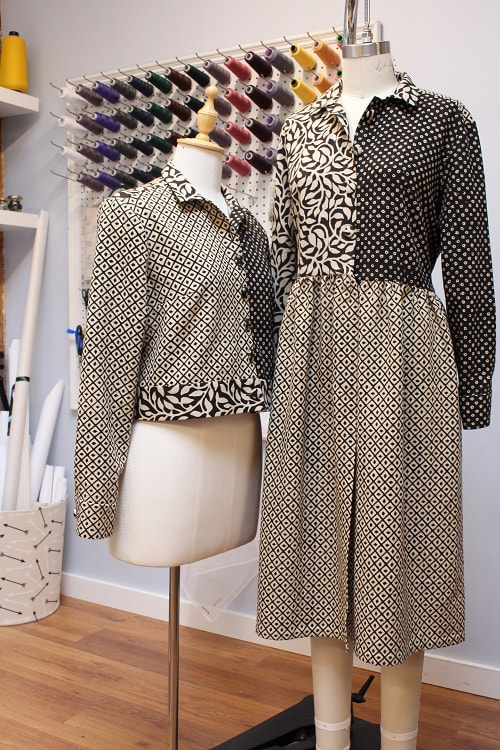 A small change I would make to the collar is the width. The collar is currently 2", which is a traditional width for a tailored shirt. However, due to the nature of the garment, a 3"+ width would sit nicer as it rolls away from the neckline. I may also experiment with adding slash lines in the collar to create a bit of flare around the collar. The wider a collar is made, the more flare is required to sit with ease around the neckline of the garment. 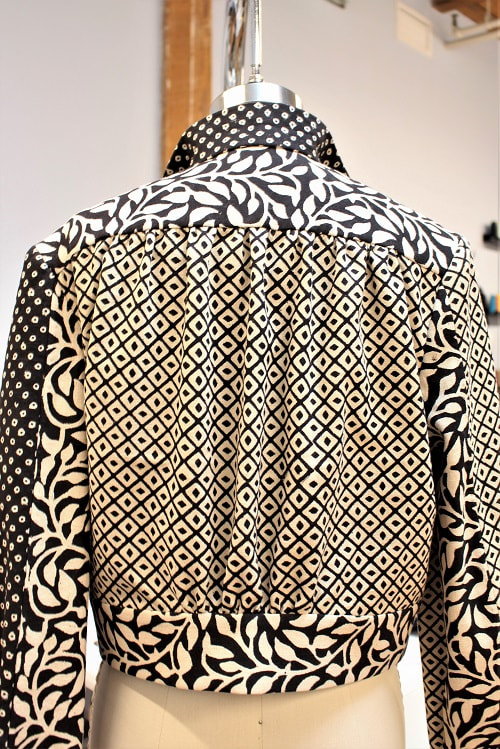 Designing your own wardrobe and wearing your personal creations is an empowering experience. If you would like to learn how to draft and construct outerwear, contact us to book lessons.
Happy Sewing! Designed, photographed and written by Sheila Wong Studios.
2 Comments
Welcome to part 2 of 2 on creating a tie knot bag. In our previous blog post "Draft-a-Long: Tie Knot Bag", we taught you how to draft the pattern for this design. In this blog post, we give you the step-by-step instructions on sewing your very own tie knot bag!
Learn more about tie knot bags by reading: Draft-a-Long: Tie Knot Bag (Part 1 of 2) Fabric ShoppingIn late Feb, I visited Maiwa Supply Store on Granville Island, after having taught a "Pattern Drafting: Make your Own Blocks" workshop at their School of Textiles. While browsing the store, three separate black and ivory hand blocked fabrics caught my eye. Each were so different and yet they complimented each other well. I felt inspired to create something that combined these fun prints. For this particular design, we did just that! Keep reading to see how we incorporated all three fabrics. 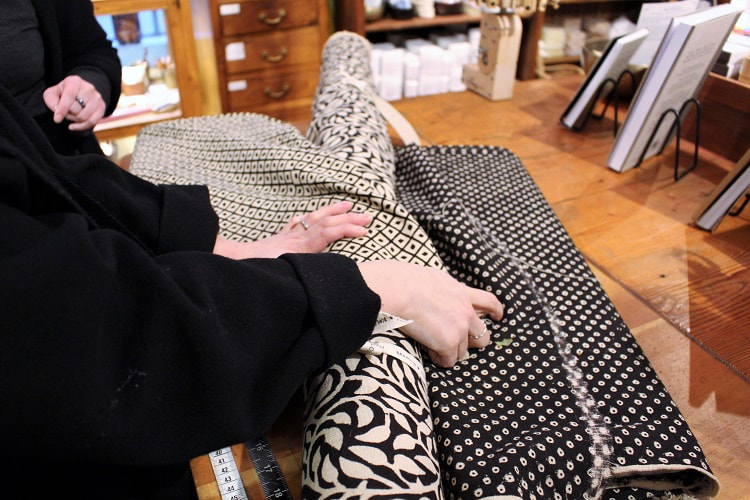 Unfortunately, the rest of my 2020 workshops were cancelled due to COVID-19, but that doesn't mean we have to stop designing during this time. We hope this Sew-a-Long will provide you with some creative inspiration. If you are just joining us, see the pattern drafting instructions for the tie knot bag, found on our Draft-a-Long: Tie Knot Bag (Part 1 of 2) blog post. Sewing Supplies
MaterialsYou will require the following materials to sew our Tie Knot Bag. This is for the 13” width version.
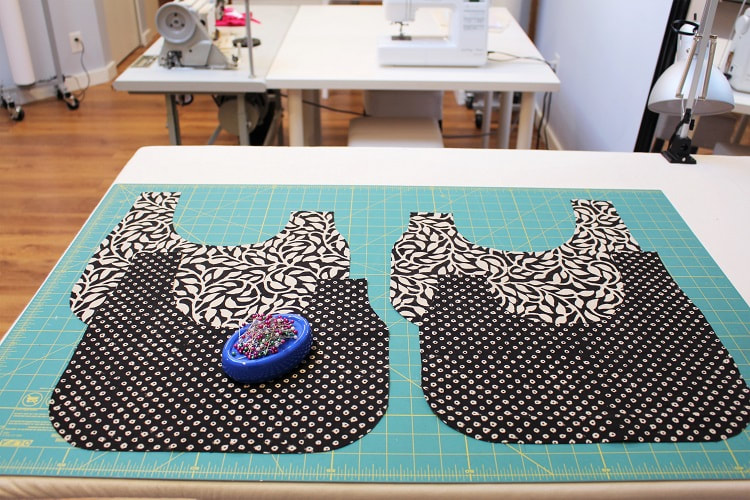
 Cutting FabricThis bag is fully reversible to allow for a SIDE A (MAIN/SELF fabric) and a SIDE B (CONTRASTING fabric). You will essentially be sewing two bags and having them come together around the openings. This is an asymmetrical bag. One strap is longer than the other so before you begin sewing, ensure you have four cut bag pieces. Each SIDE option should have mirror image pattern pieces of each other. Mark all notches on the wrong side of the fabric. A reminder that notches are points E, F, N and U from your drafting.
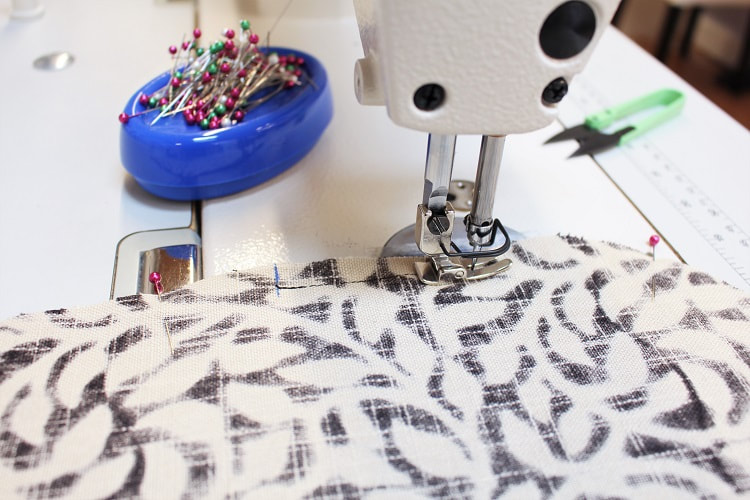
Sewing StepsStep 1With right sides of the fabric facing, line up SIDE A pieces, pin and sew from strap notch (Point E from drafting) around the bottom of bag to other strap notch (Point F). Ensure you back stitch at the beginning and end of the stitch line. Repeat the same step to SIDE B pieces. 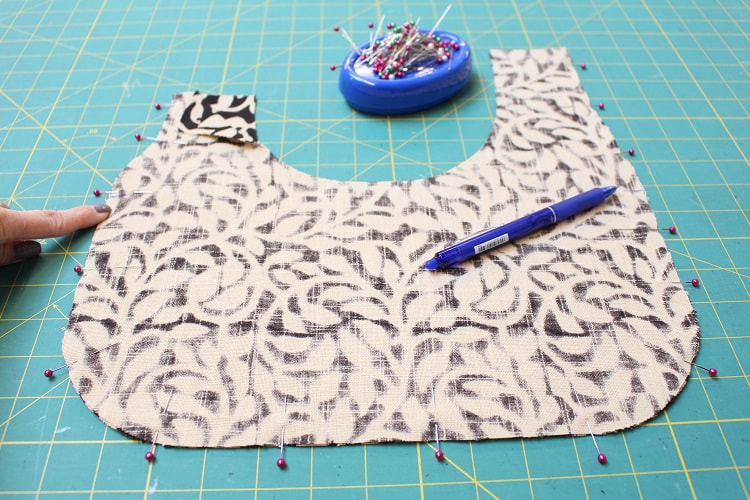
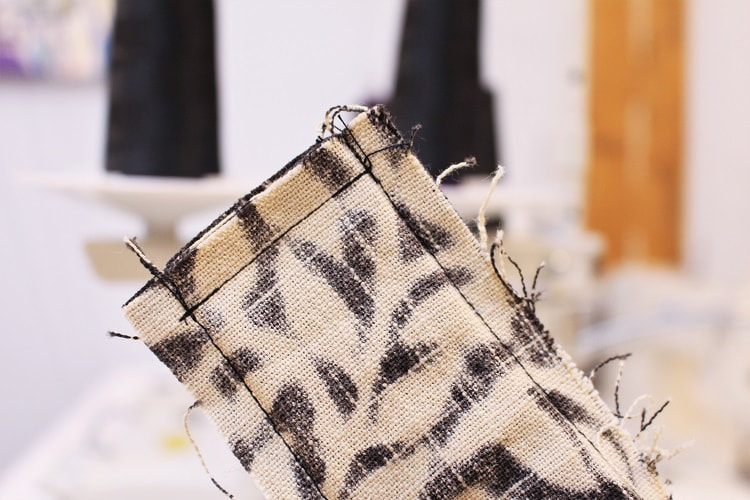
Leave a 2-3” opening at the bottom of one of the bags. In the end, this opening will allow you to create a fully reversible option bag. 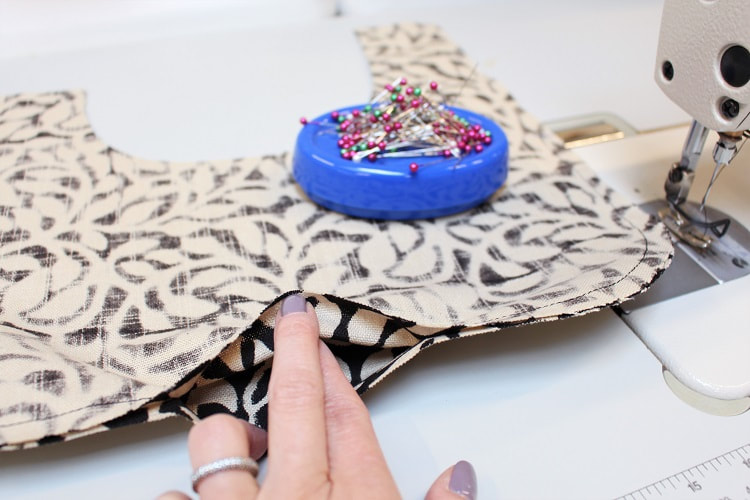 A reminder to sew at your chosen seam allowance. We are using ⅜” seam allowance.
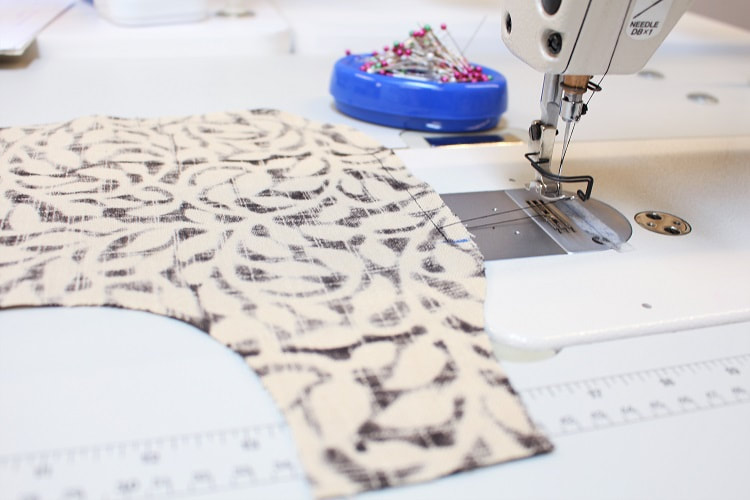
Step 2Along the curved section of the seam allowance, create straight clips from the raw edge towards the stitch line. Stop the clippings approximately 1/16” away from the stitch line. Have each clippings ½” away from the next and feel free to stagger the clippings from the upper and lower seam allowance layers to decrease weakness along stitchline. 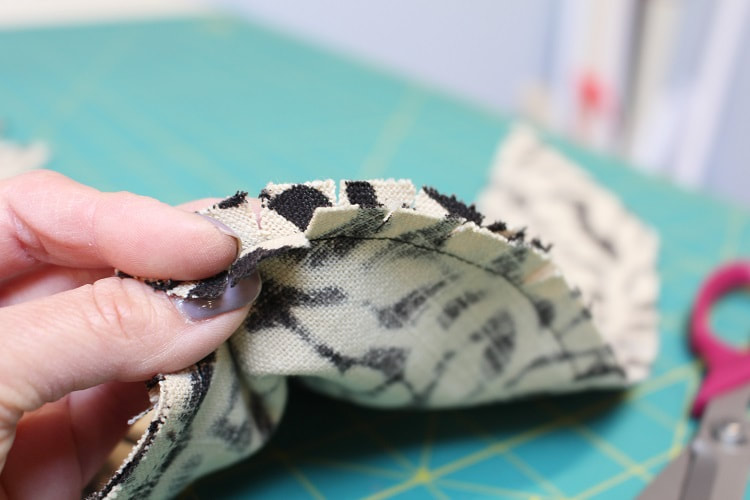 Step 3Press seam allowances open all along the stitch line. Do not press above your beginning and end areas of the stitch line (into straps). Pre-press in place the 2-3” opening at the bottom of one of the bags. This will help you later when you need to hand sew the opening shut.
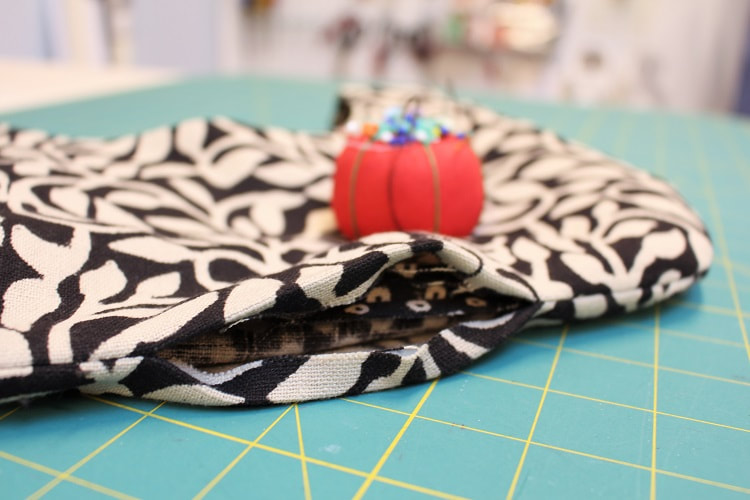
 Step 4Slide one of the bags inside the other. Ensure the right sides of SIDE A and SIDE B fabric are facing each other. 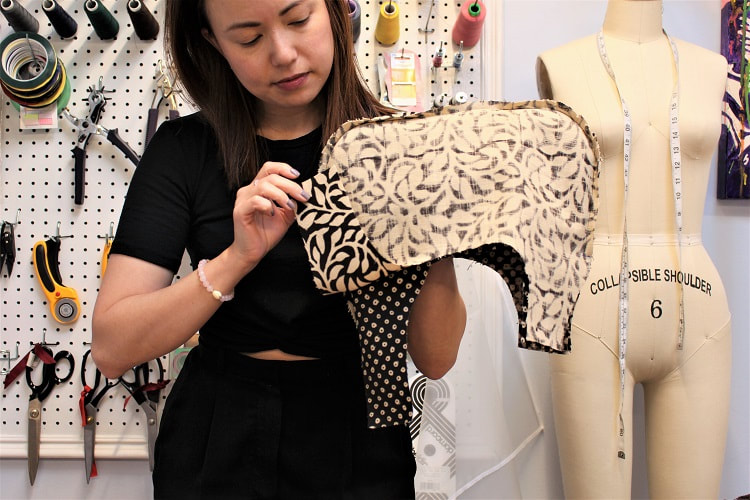 Pin and sew the interior bag opening curve from the top of the handle strap, around the curve, to the top of the other handle strap. Line up your center notch (Point N). You should have two seams to sew. They each separately sew SIDE A (SELF/MAIN fabric) to SIDE B (CONTRASTING fabric). Ensure you back stitch at the beginning and end of the stitch line.
Step 5Create straight clips along the curved sections of the seam allowance. Same concept as Step 2. This will help the curved shape of the bag sit smoothly when flipped right side out. 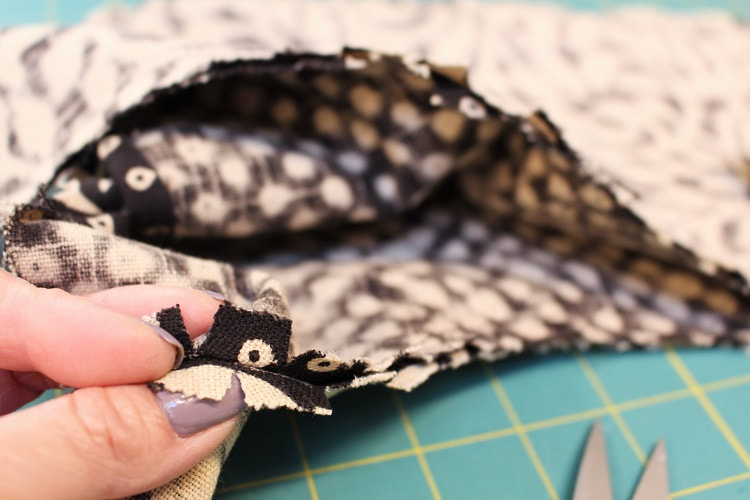 Step 6Press seam allowances along the interior bag opening, open. Feel free to pop a seam roll or the edge of your ironing board under the seam to help with pressing. Refrain from flipping the bag right side out just yet! We need to keep the bag as is for the next step-- sewing the exterior edges of the handle straps.  Step 7Using the same concept as Step 4, where the right sides of SIDE A and SIDE B fabric are facing each other, pin and sew the exterior handle straps from the top of the strap down to just before the exterior side seam stitch line. Hold back any pesky seam allowances that try to creep in as you get closer to the top of the side seam stitching line. Back stitch at the beginning and end of the stitch line. You should have four seams to sew. They each separately sew SIDE A (SELF/MAIN fabric) to SIDE B (CONTRASTING fabric).
Step 8Create straight clips along the curved sections of the seam allowance. Same concept as Step 2 and 5. This will help the curved shape of the bag sit smoothly when flipped right side out. Step 9Flip the bag so that all layers are right sides of fabric facing or how the bag would sit when complete. Press exterior sides of the handle straps and interior bag openings flat.
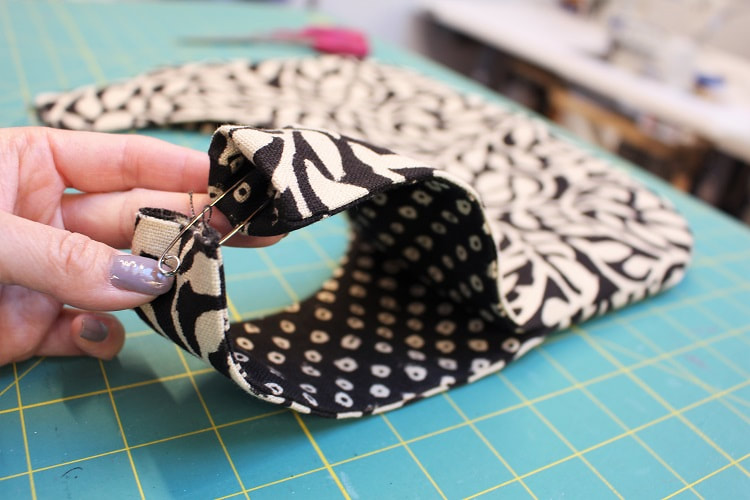
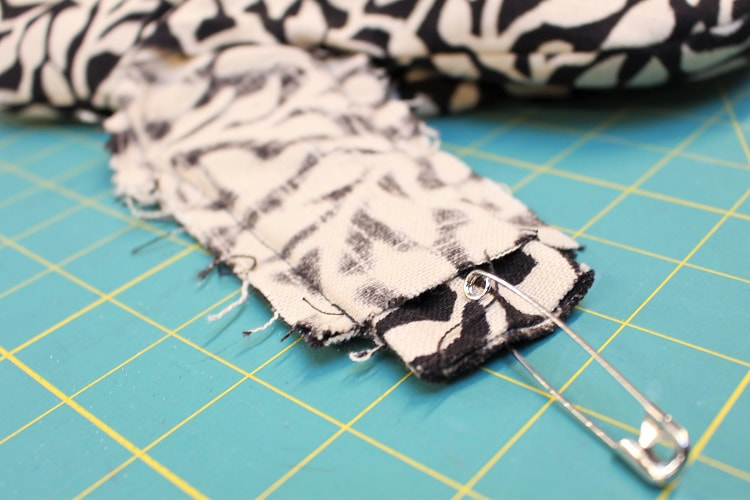
Step 10At the moment we have four unfinished strap ends hanging freely. We need to create a left and a right handle strap. We can organize the four ends as follows: left front, left back, right front, and right back. 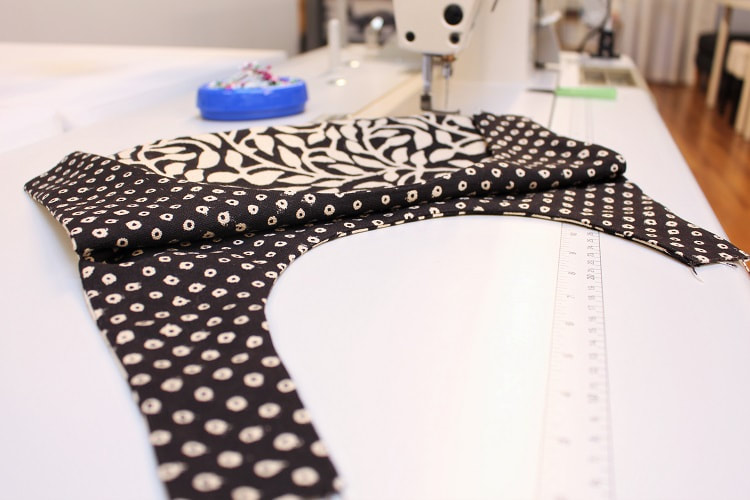 Starting with the left handle strap, feed the back strap into the front strap with right sides of fabric facing each other. You will need to gently start turning in some of the front strap raw edge fabric inside itself. Using our 2-3” opening at the bottom of the bag, pull through front/back strap ends. Feel free to use a safety pin attached to the back strap edge to help feed into the front strap.
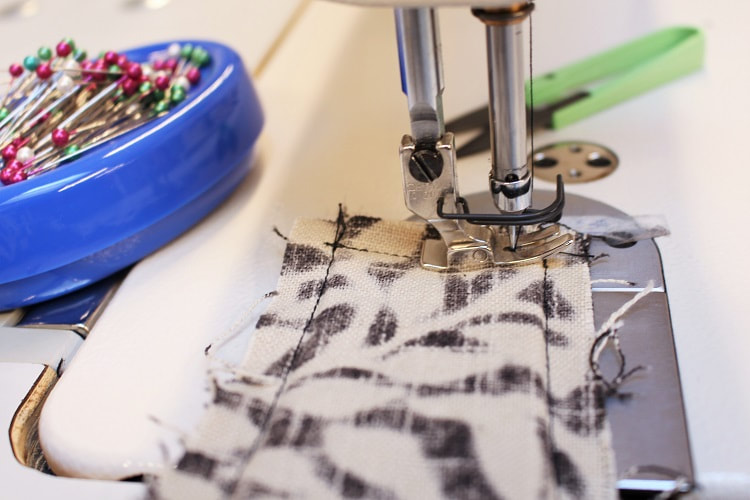
Line up the interior and exterior vertical seams of the front and back strap, pin and sew across through all four layers in between the vertical seams. Back stitch at the beginning and end of the stitch line.
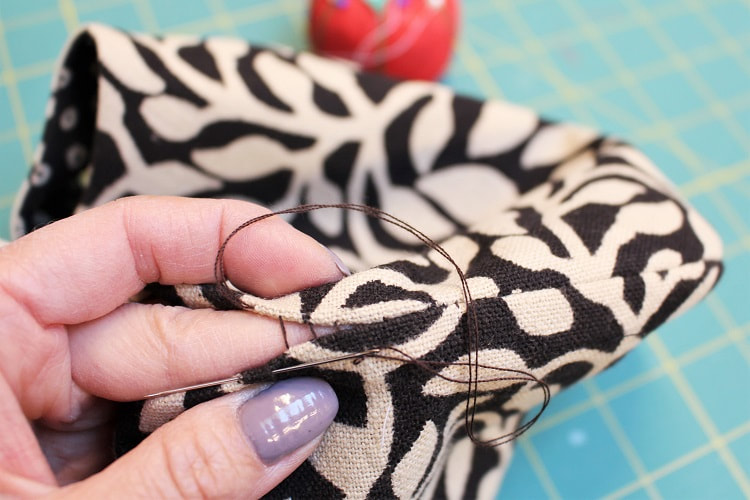
Step 11To reduce bulk along the top strap seam, trim seam allowance down to ¼”. To ensure straps lay flat front to back, trim away a diagonal piece of the seam allowance starting approximately 1” down from top of strap seam tapering to ⅛” away from strap seam. Repeat steps 10 and 11 to right handle strap. Flip bag right sides out and press the top of the strap seam. 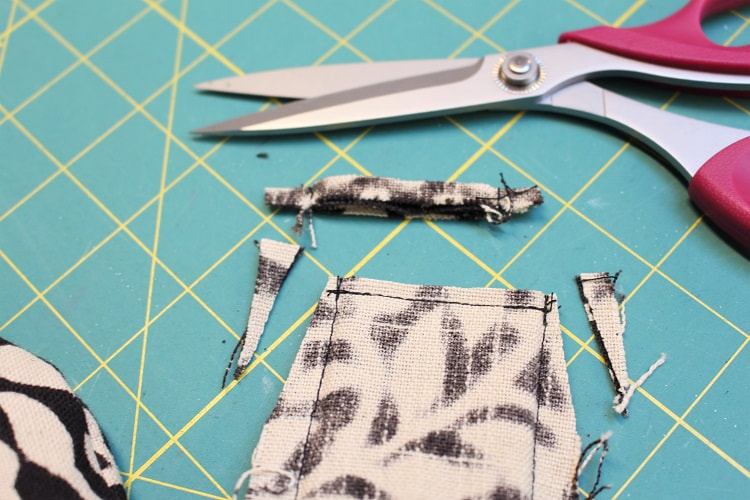 Step 12By hand, draw-stitch closed the 2-3”opening at the bottom of the bag. A draw-stitch is an invisible hand sewn stitch that “draws” together two layers of fabric seamlessly. Sewing Tip: Go through one side at a time for each stitch and when going across to the other side enter directly across where your thread exited. This will ensure no threads are visible. Tie your knot and voila! Tie knot bag complete!!!
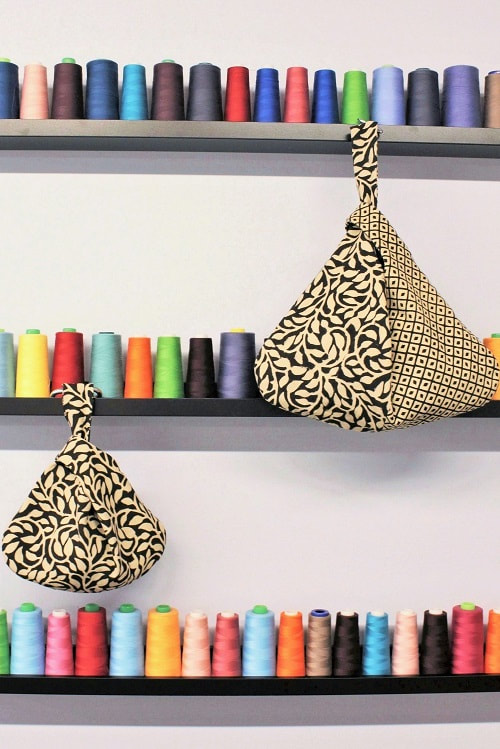
Final Design/ Size Variations2 bags are better than 1! We wanted to test out the larger size (17” x 17”) as per our previous blog post, Draft-a-Long: Tie Knot Bag (Part 1 of 2). BUT...we didn't stop there! As mentioned above, we wanted to combine all three hand blocked printed fabrics. So for our larger bag, we went with a patchwork design. Even the interior side is patchwork! Combing different prints and/or color combos is a great way to use up household scraps! Especially, if you're unable to buy fabric at the moment.
We can't decide which version we love more! Do you prefer the small or large tie knot bag? Tell us in the comment section below.  Isn't it so cute?! Tag us in your final make on Instagram! If you want to get booked in for a digital live streaming lessons during this time CONTACT us. Happy Sewing!
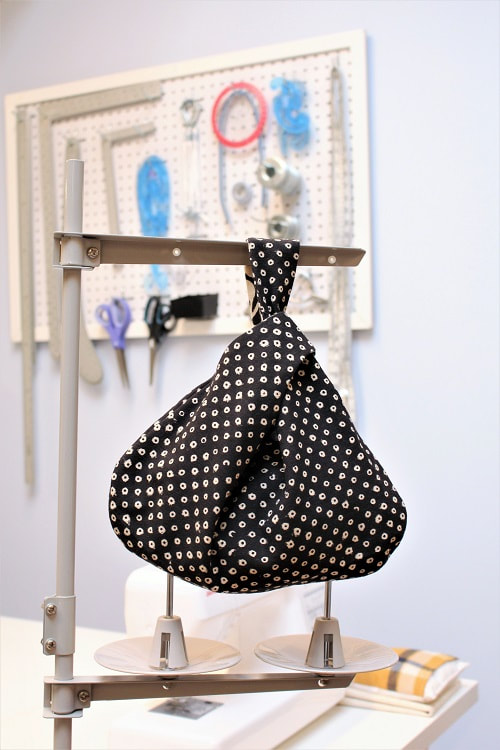
Designed, photographed and written by Sheila Wong Studios. The tie knot bag is a small open tote that is meant to be carried over your wrist. The name comes from its unique design. Tie knot bags consist of one long handle strap and one short handle strap. The short handle strap slides over the long handle strap, creating a knot-like closure. You then slide your hand through the long handle strap and voila! Cutest accessory ever! Tie knot bags can be reusable/washable and come in a variety of sizes. They are often used as grocery and lunch bags. In this two-part blog series, we will share the step-by-step pattern drafting and sewing instructions to help you create your own tie knot bag. Welcome to part one, the draft-a-long.
Drafting Supplies
 In these instructions, we will use the starting size for a small bag which is 13” x 13”. This size yields a final bag size of 13” x 6 ½” in the main body area. For a larger size try 17” x 17” as your starting size. 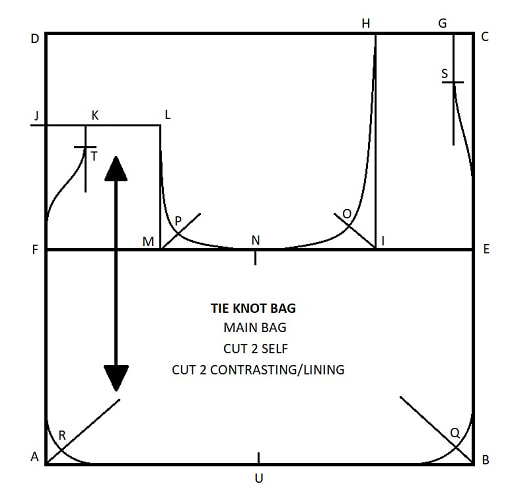 Drafting StepsA to B to C to D= Create a perfect rectangle (our example is 13” x 13”). Label each corner with A, B, C and D as illustrated. E= Midway of B to C (13” divided by 2= 6 1/2") F= Midway of A to D (13” divided by 2= 6 1/2") C to G= ½” G to H= Measure in 1 ¾”. From H, square down a guideline to E to F line, label I. F to J= Midway of D to F plus ¾” (6 ½” divided by 2= 3 ¼” plus ¾”= 4”). From J, square in a 3 to 4” guideline J to K= 1” K to L= Measure in 1 ¾”. From L, square down a guideline to E to F line, label M. N= Midway between E to F (13” divided by 2= 6 1/2") I to O= Draw a 45 degree guideline in the NW direction from I. Measure along guideline 1 ¾”, label O. M to P= Draw a 45 degree guideline in the NE direction from M. Measure along guideline 1 ¼”, label P. Draw a curved line connecting L – P – N – O – H. Stay on guidelines at L for approximately ½” and at H for approximately 1”. Level off at the center of the bag opening (M) for approximately 1”. B to Q= Draw a 45 degree guideline in the NW direction of B. Measure along guideline 1 1/8”, label Q. Draw in bottom corners of the bag with a curve. Use any circular item in your home like a pot lid or round plate. A to R= Draw a 45 degree guideline in the NE direction of A. Measure along guideline 1 1/8”, label R. Draw in bottom corners of the bag with a curve. Mimic a similar curve you used on the other corner. You can also fold the paper along the N to S line later and use a tracing wheel to transfer the same curve. G to S= Square a guideline down from G. Measure down a quarter of the C to E measurement. (6 ½” divided by 4= 1 5/8”), label S. Draw a slightly curved line from S to E. You will need to draw an S style curve for a natural look. S style curve incorporates a concave and a convex curve together. K to T= Square a guideline down from K. Measure down a quarter of the F to J measurement. (4” divided by 4= 1”), label T. Draw a slightly curved S style curve connecting F to T. U= Midway of A to B (13” divided by 2= 6 ½”) Mark Sewing Notches= Using a colored pen/pencil highlight points E, F, N and U Draw in Grain-line= Parallel to A to D line This completes your working pattern! To create your final pattern to use for sewing, place a blank piece of paper under your working pattern, weight it down and transfer your pattern using a tracing wheel. Ensure that you transfer not only the shape of the pattern but also the highlighted notches and grain-line. Add your desired seam allowance to the final pattern. We suggest using a 3/8” seam allowance. Draw in notches, grain-line and label as follows: TIE KNOT BAG (SMALL SIZE OPTION) MAIN BAG CUT 2 SELF (MAIN) CUT 2 CONTRASTING Ready to cut your fabric? Click this link: Sew-a-long: Tie Knot Bag (Part 2 of 2).
Happy Drafting!
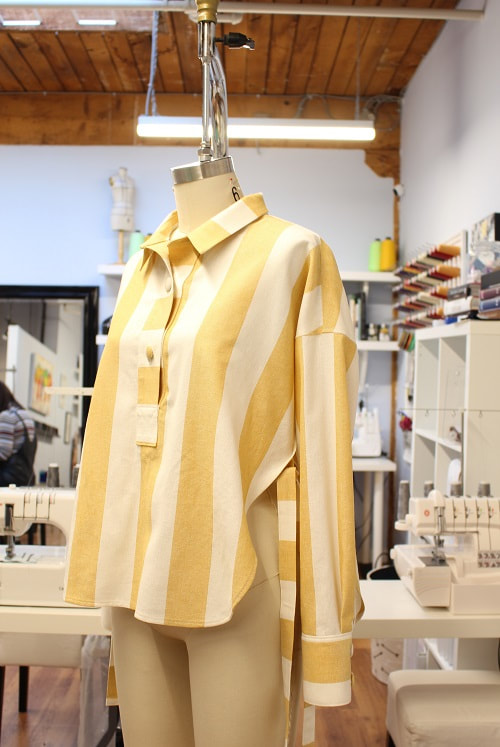
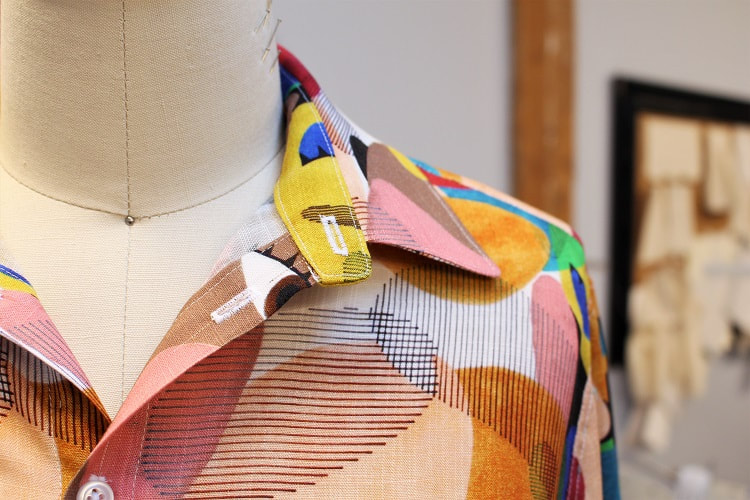
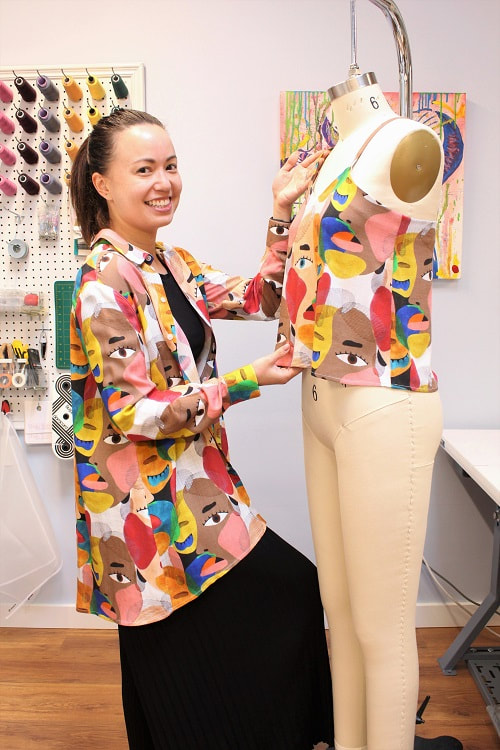
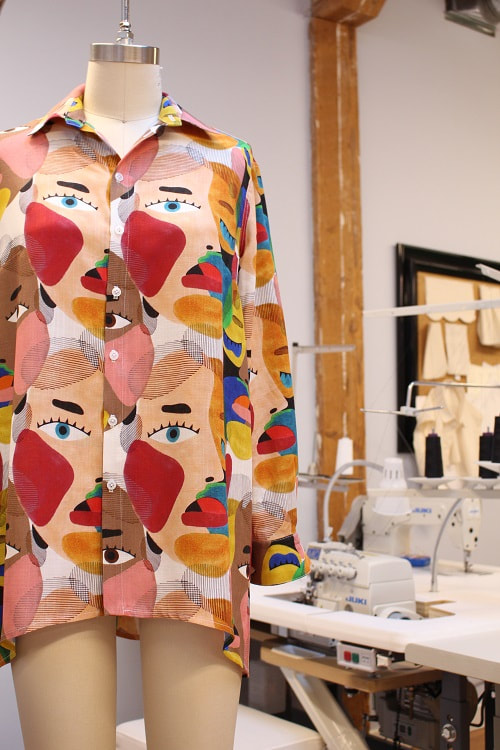
Designed, photographed and written by Sheila Wong Studios Our latest design has the cutest name— Jellyfish Tailored Shirt. The name was inspired by my favorite design element on this shirt, the high side seam slits with ties! The long side ties remind me of a jellyfish floating around the ocean. Did you know? Jellyfish is a symbol of love, acceptance, and balance. If it appears before you, it means you should have faith in your heart and follow your instincts! That's exactly what I wanted to do with this design!  Our shirt design was reverse drafted from a white tailored shirt I bought in Tokyo back in 2018. I am obsessed with the architectural look of how the hem falls and how the collar pulls back gently to reveal a bit of the neck. The pattern was drafted in 2019 while I taught a Reverse Pattern Drafting workshop at Maiwa School of Textiles. I was demoing the drafting steps during the workshop. Unfortunately, this year, my workshops were cancelled due to COVID-19, but you can still learn how to draft during this time through our live streaming lessons. Contact us to learn more. FabricIn late Feb, I visited Fabricana in Coquitlam with tailored shirts in mind. During this shopping trip, I picked up 3 fabrics in total. So far, 2/3 tailored shirts are complete! The Jellyfish Tailored Shirt and the Rainbow Faces Tailored Shirt. Check back for round 3!  Project Specs
 Design ElementsTraditional tailoring techniques are all over this design. Below, I walk you through some of the stand out elements that make this shirt not so traditional. Pull-over Front PlacketTraditionally, a front opening extends down to the hem with the left and right front to be separated. Having this design only extend down the center front midway provides a more casual feel. If the placket looks familiar, it is because it is a large version of a tower placket normally seen with a cuff. Instead of a pointed tower, we opted for a square finish. 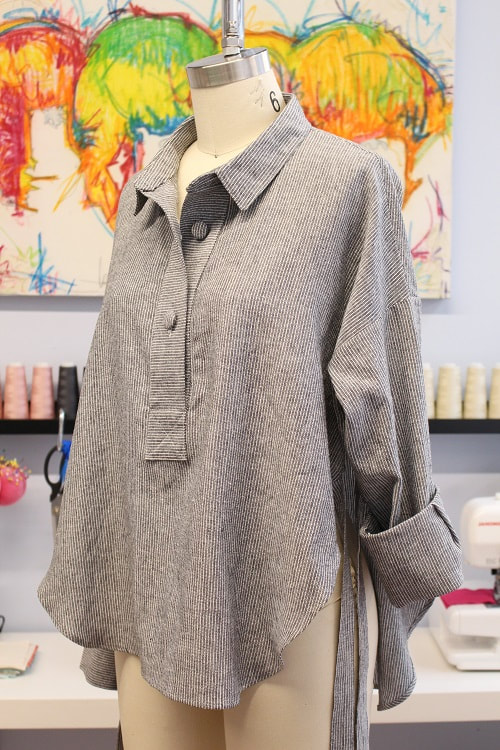 Fabric Covered ButtonsYou have seen this type of button with us before in many designs. I just couldn't find the right button or snap for this top, so no choice- fabric covered buttons for a perfect match. Love fabric covered buttons as much as us? Check-out the these blog posts: Tear-Away Jumpsuit, Plaid Button-Up Skirt, and Plaid Button-Up Dress.
Side Seam TiesThis is what I believe makes the design unique! The lack of side seams (only 2 " from armpit) allows for mobility and the playfulness of a fabric tie. It is also the ties that inspired the name for this shirt-- Jellyfish Tailored Shirt. 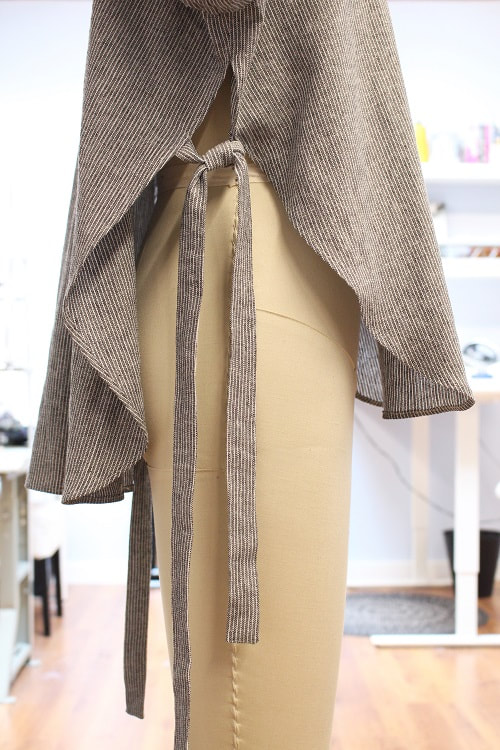 Final DesignCuff rolled-up or cuff rolled-down? Tie or no tie? Button-up or button-down? So many options!!! One of the reasons I love this design so much is it’s versatility. There are so many different ways to wear this shirt depending on how you want to style it. I think it looks best with a high waisted pant! How would you style our Jellyfish Tailored Shirt? Let us know in the comments. 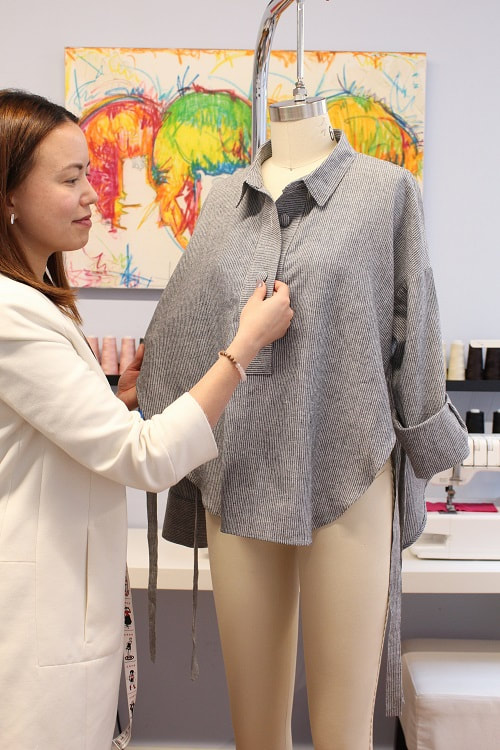 New Addition (Feb 2021)Yes you are seeing double! We had leftover fabric from our Beach Vibes Tailored Shirt. Just enough to make another Jellyfish shirt. We are fairly certain many more versions are to come over the next few years. Floral perhaps?! Follow us on Instagram to keep up to date with our designs.
If you would like to learn how to draft and construct a tailored shirt, contact us to book lessons.
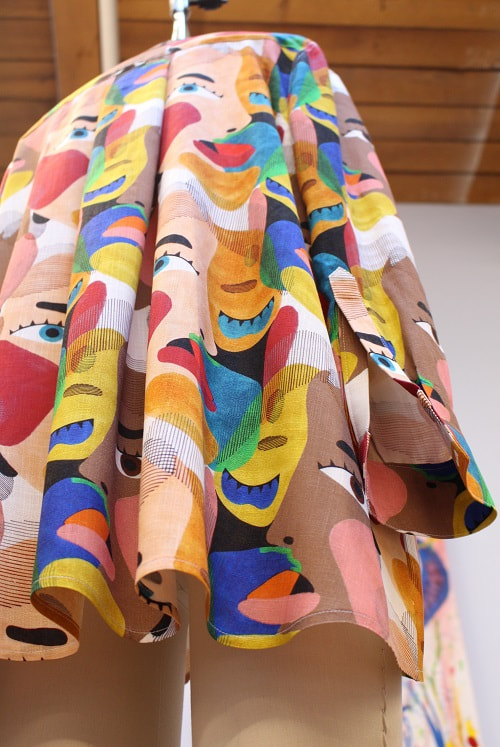
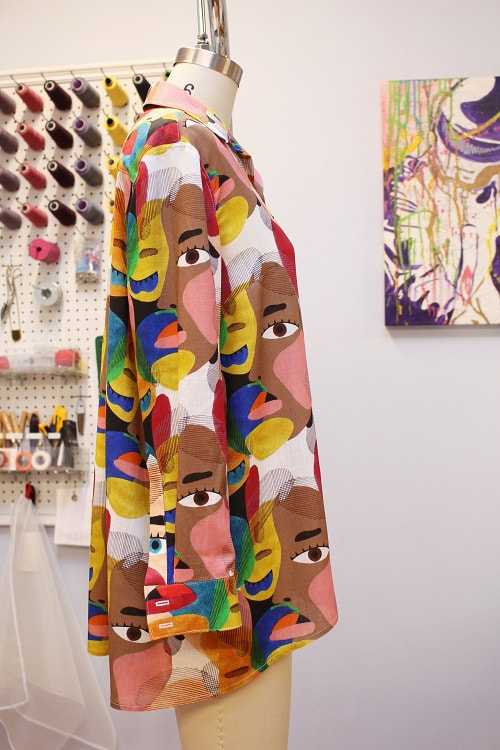
Happy Sewing! Designed, photographed and written by Sheila Wong Studios. Color is not my go-to but for some reason the color and faces on this print were just too stunning to walk away from. In this case, the fabric was the main inspiration! The energy I felt from this fabric was that we are all unique in our on way and that we should embrace our own uniqueness and that of others. 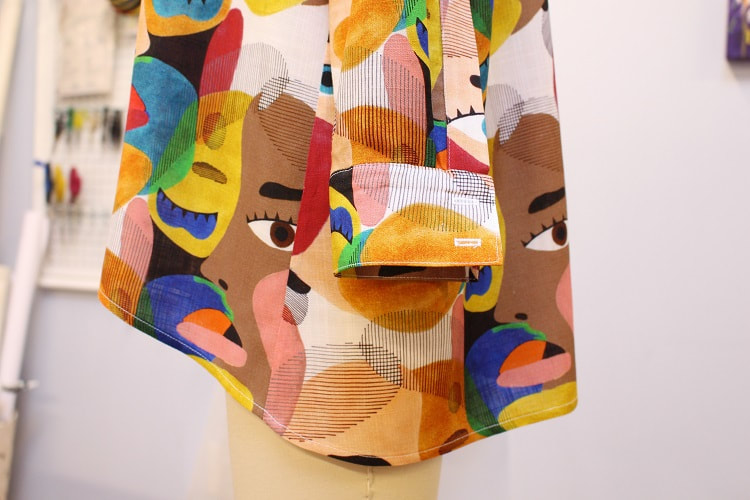 Drafting this design was not very complex as I already drafted a basic tailored dress shirt in the past. I traced out a copy of that pattern and made the following adjustments to the new pattern.
FabricIn late Feb, I visited Fabricana in Coquitlam for the first time. Normally I frequent their Richmond location, but that location has been closed since Oct 2019 for renovations. I do prefer the set up of the Richmond location but it was nice to explore a new store to me. During this fabric shopping trip, my focus was on tailored shirt fabrics. I picked up 3 in total, so be prepared to see more tailoring techniques over the next month or so. 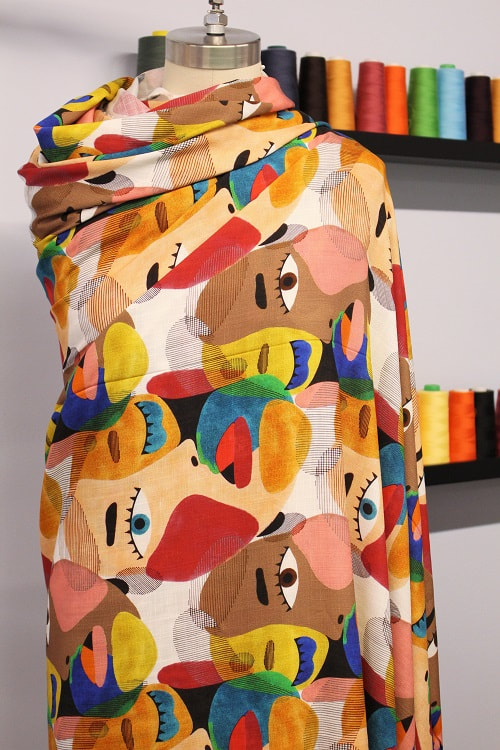 Project Specs
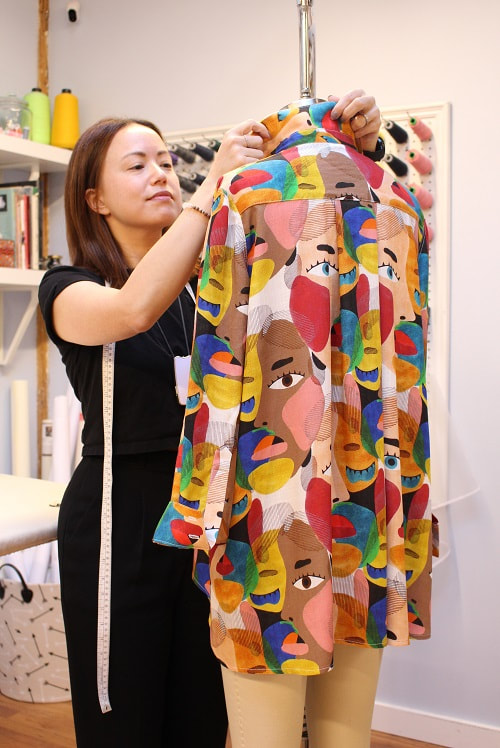
 Design ElementsTraditional tailoring techniques are all over this design. Below, I walk you through some of the stand out elements and share a few essential button hole tips I discovered that have changed my opinion on how easy sewing a tailored shirt is. The only non traditional elements are the light weight fabric, extra flare in the back and the asymmetrical hem. Top-Stitching and Seam FinishesAfter you take in the beauty of the fabric, you will notice the top stitching flowing throughout the entire shirt. Top-stitching is important in a tailored shirt as it holds each area stable and adds strength to over-worked areas such as the armhole, shoulders and back yoke. In addition to the top stitching, french seams and flat felled seams where applied to all exposed seams in the garment.
Tower Placket and CuffsThe term "placket" refers to any opening in a garment that opens up for the wearer to easily get in and out of in more fitted areas. Do not confuse it with the hem opening of a garment though. Typically, the placket has a closure of some sort— button, snap, thread/fabric loop, etc. A "tower placket" is recognizable for the tower like point at the top and is one of the most traditional tailoring elements found in a shirt. If you have ever constructed one, you will know that you have to be extremely accurate in the cutting, marking and pressing of the tower. If you are off by an 1/8" it will make for a leaning tower. 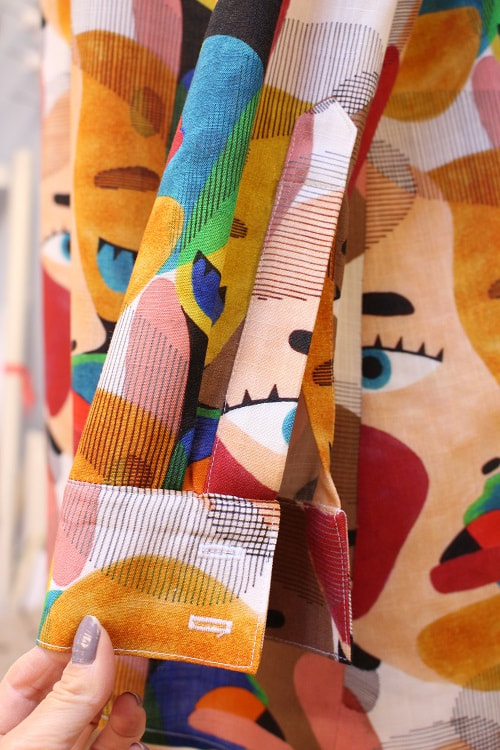 CB Box Pleat w/FlareI have made several tailored shirts, so I decided to inject some femininity through a few changes. Added flare to the back panel, and created a larger center back box pleat. No flare was added to the front. I think we could all use a built in cape once in a while! Lengthening the hem and creating an asymmetrical hem makes for more of a shirt dress or tunic silhouette as well.
Sewing Tip: ButtonholesMachine sewn buttonholes can be unpredictable for a number of reasons— fabric thickness inconsistency under the foot, too thick of fabric, and weight of certain areas in the garment pulling it from the sewing foot areas. BUT, it is possible! I discovered recently that if you follow these sequence of steps, your life will be easier!
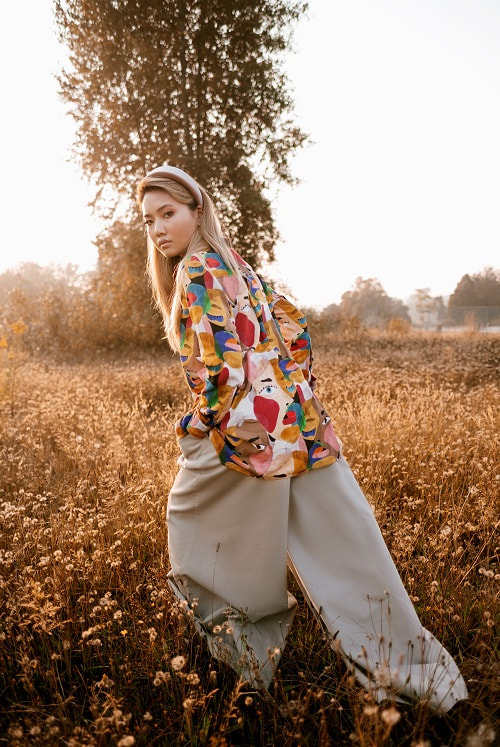
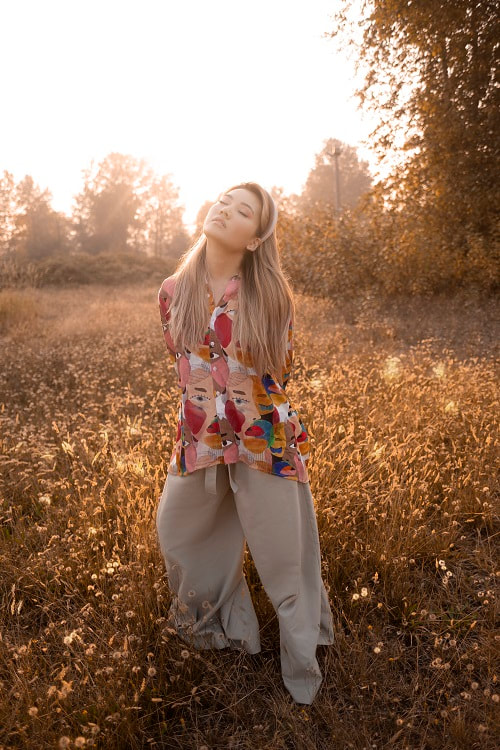
 Photoshoot CollaborationI am so happy to be collaborating with local Vancouver photographer Paulo Miguel (@paulomguel) again. More to come this year, so stay tuned and check out his Instagram page for more lovely shots. Below are our favorite shots of our Rainbow Faces Tailored Shirt from this set. Modelled on @joannazhg.
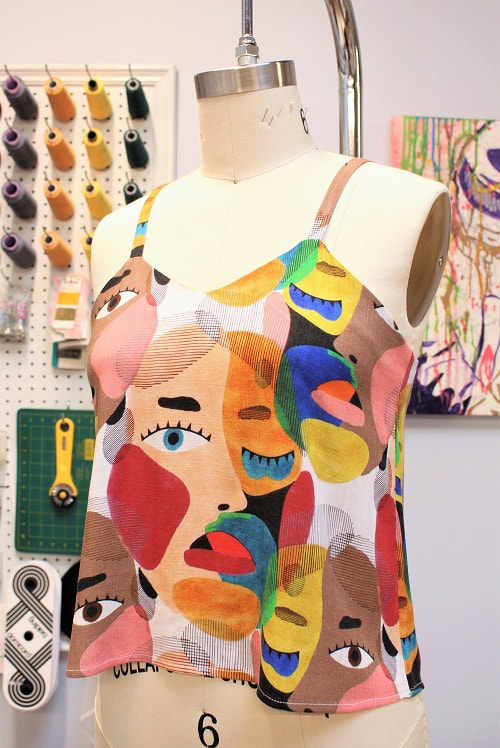
 Rainbow Faces Slip TopWe had enough fabric leftover, and this is how we made use of the scraps! This design was drafted while working with our client Anita (@anita.early). We drafted a slip top together via her digital lessons and this was the outcome. Pretty fun we think!
The more i work with this print, the more it reminds me of a Pablo Picasso painting during the Cubism movement of the 20th century. Combining different art forms is one of my favorite ways to design and is something I’d like to continue exploring. Garments are wearable art after all! Final DesignThis design was a real pleasure to stitch up. Our world got turned upside down very quickly with the spread of COVID-19. Sewing reminded me that we all need our therapy to help process our feelings. This design provided me with time to slow down and enjoy each stitch. May we all find joy in the little moments each day, as they do exist if we open our eyes— kinda like the faces in this design.
If you would like to learn how to draft and construct a tailored shirt, contact us to book lessons.
Happy Sewing! Designed, photographed and written by Sheila Wong Studios. Does this jacket have good jeans or what?! Spring is right around the corner, so we figured why not add some color to our ongoing Denim Jacket Series. In this blog post, we will share the bold details of our latest design— Color Block Denim Jacket. 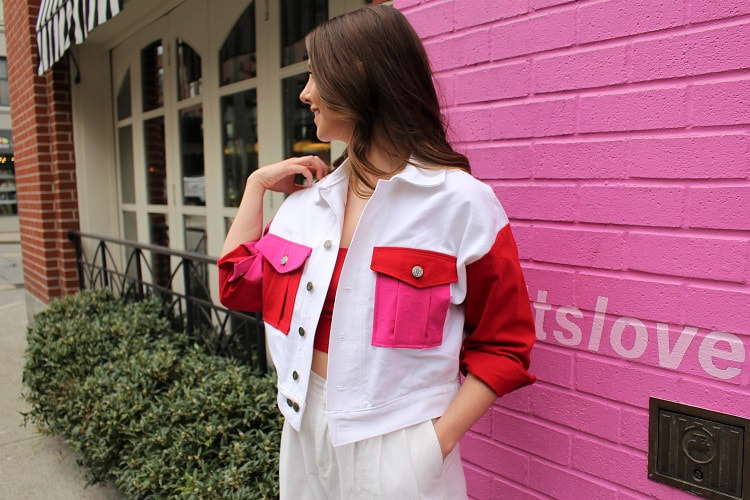 Inspiration for this jacket came from our marketing coordinator Natasha. While on a trip to Japan in 2018, Natasha fell in love with the bold yet feminine color combos found in Tokyo. Natasha is moved by what she sees, so she wanted to create something based around her travel photography. Pictured below is the photo that inspired this color combo.  Project Specs
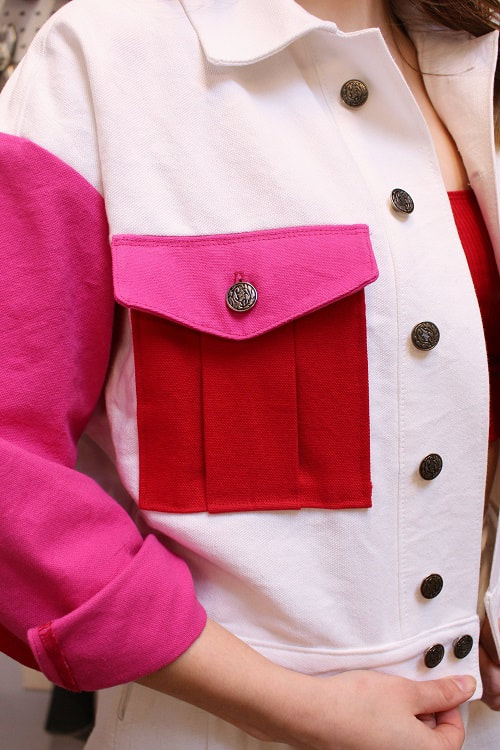
Design ElementsOur color block denim jacket has several design details involved. The pattern was first created while teaching two of our clients how to reverse pattern draft their favorite denim jackets. In this section we will go through our top details that make up this jacket. 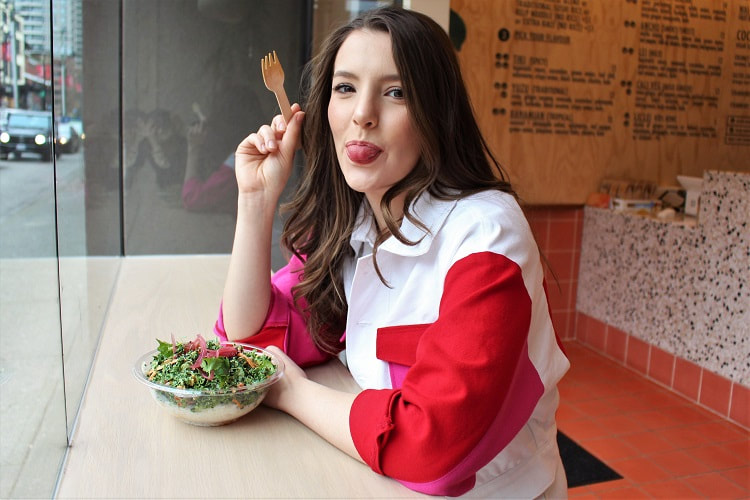 Color BlockingThis was the most important design detail and basically what inspired the jacket. During a studio field trip to Fabricana, white, pink and red denim fabric were perfectly stacked together. The color combo looked so good together, we couldn’t resist. Natasha (our marketing coordinator) was always taught that “red and pink should never be seen, unless it’s in the washing machine”. Well...challenge accepted mom!!! 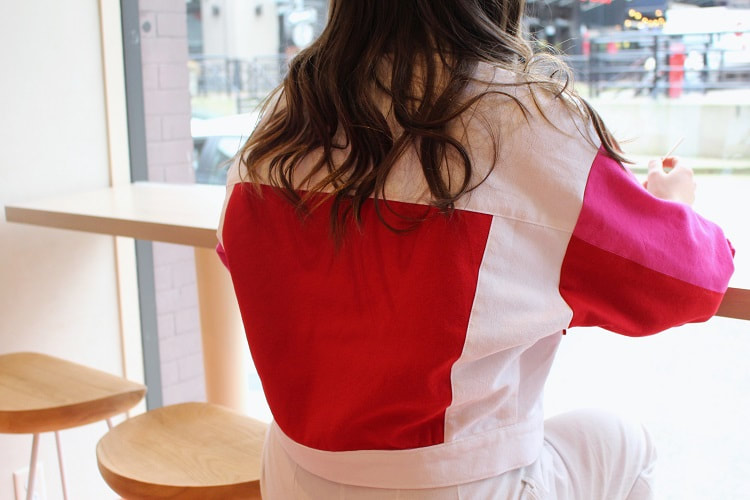 One of the easiest and most fun ways to create a bold look is to use the technique of color blocking. Color blocking is thought of as the exploration of taking colors that are opposites and pairing them together to make complementary color combinations. Be prepared to swap your thread colors back and forth! 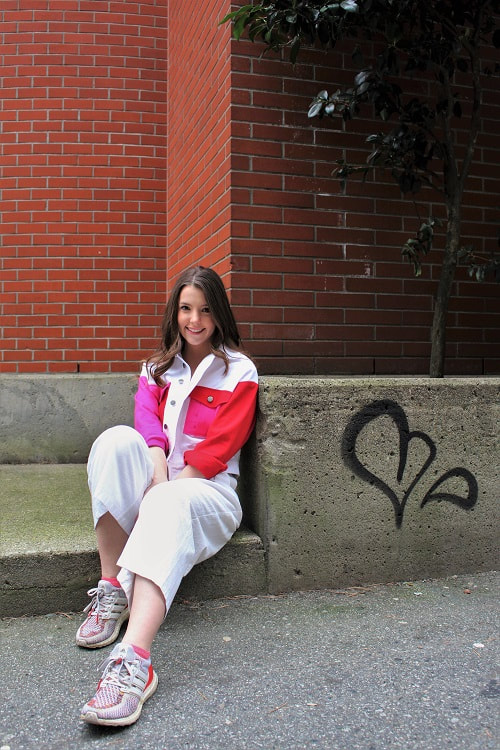 Metal ButtonsWe wanted a clean look for the front of this jacket, so metal buttons were ideal. We even added a bonus button at the hem, just for show! Funny story: Natasha had never installed metal buttons before and she accidentally hammered a button to a rotary mat...WOOPS!!! If it's your first time installing metal buttons, proceed with caution. 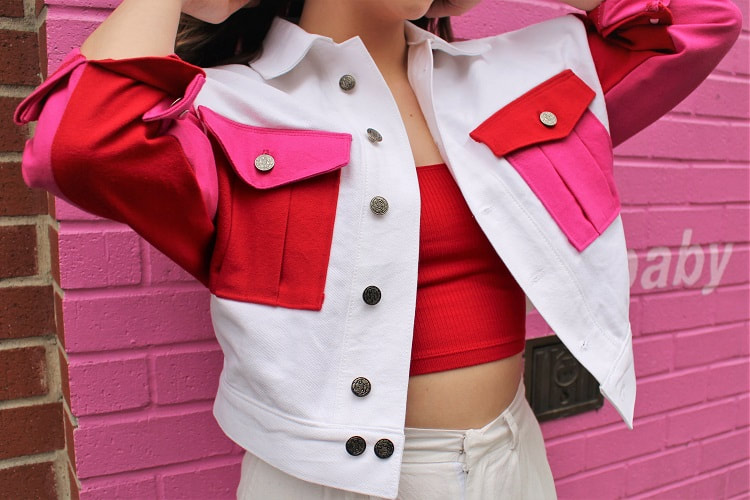 When sewing the buttonholes, we found that the denim was too thick for the machine. We really had to push to help move the fabric through the presser foot. This is common when working with denim. For an easy guide to help you sew stubborn buttonholes, click HERE. Top StitchingTop stitching gives this bold jacket a clean finish. All thread colors match their corresponding pattern pieces. 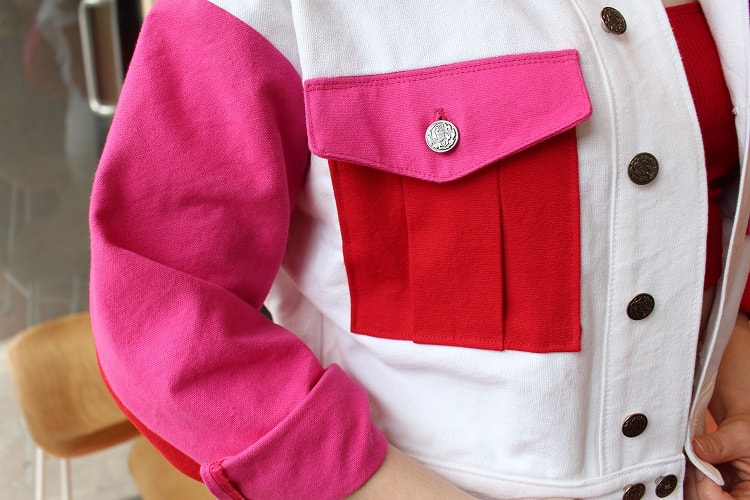 Sewing Tip- When using top stitching thread (thicker thread), use regular size thread in the bobbin if you are having trouble with tension issues. Keep the upper thread thick though. Box Pleat Patch Pocket with FlapThe most traditional pockets found on a denim jacket- a box pleat pocket with a flap. This design element is our personal favorite. At first, we considered keeping the flap the same color as the box pleat, but figured that would be too boring. This jacket is a statement piece, so go big or go home right?!?
Cropped HemThe cropped body on our denim jacket is both flattering and versatile. We paired it with white high waisted pants to complete the full ensemble. How would you style this? 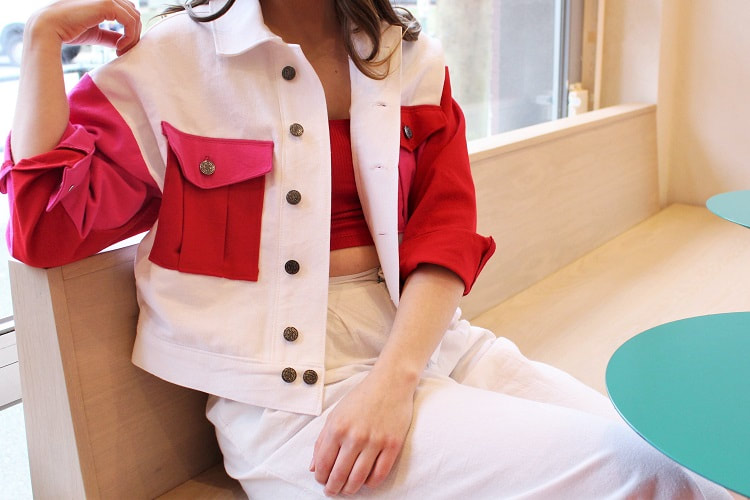 Final DesignWe’re obsessed with the back view of our color block denim jacket! This is actually our third time making this denim jacket. So far we have made it in all white and all blue- the usual denim suspects. Our next version will be as colorful as this one...once we throw some paint on it!!! Coming soon... 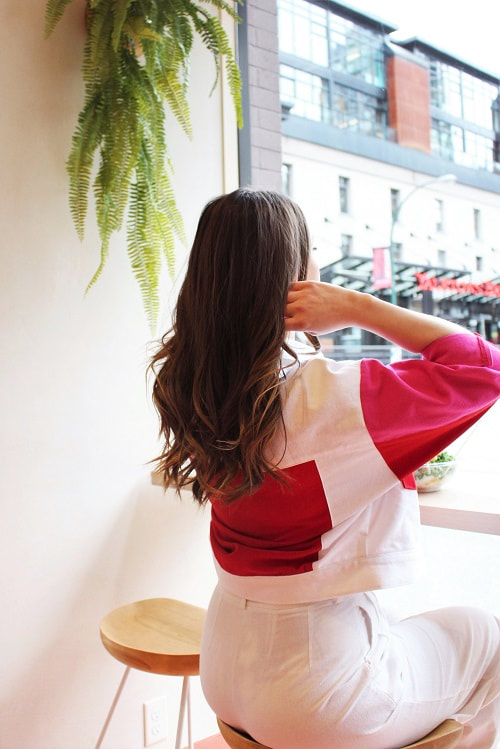 Color blocking is one of the easiest and most fun ways to create a new look. If you would like to learn more about color blocking in garment construction, contact us to book lessons. Happy Sewing!
Designed, photographed and written by Sheila Wong Studios Some trends never die, and the blazer is definitely one of them. Dress it up or dress it down, the blazer has remained the ultimate preppy fashion statement since the 1950’s. No matter where we go, we seem to run into them! This tailored trend inspired us to design our own, but with a twist— Over-sized doubled patch pockets. Keep reading to see how we made this basic wardrobe staple, not so basic. 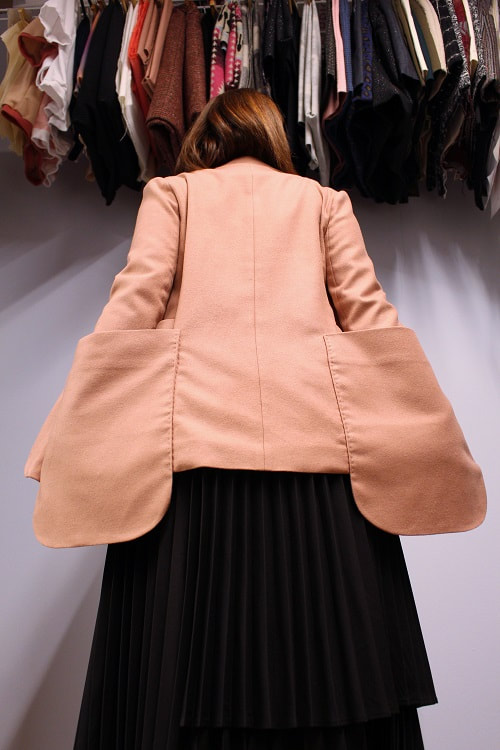 Project Specs
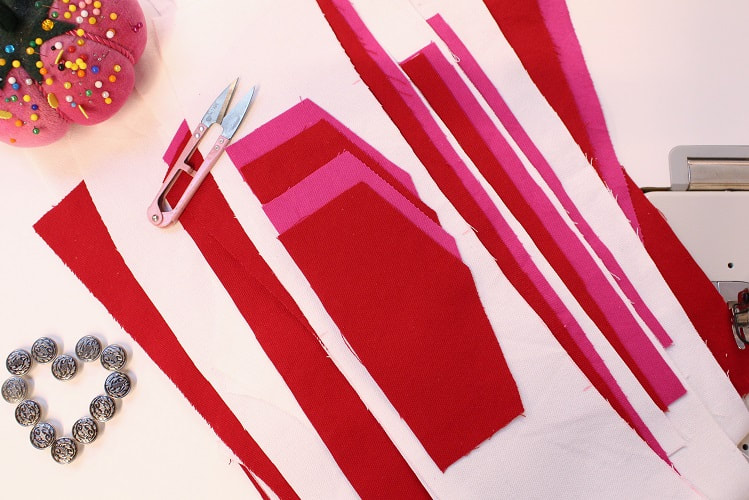
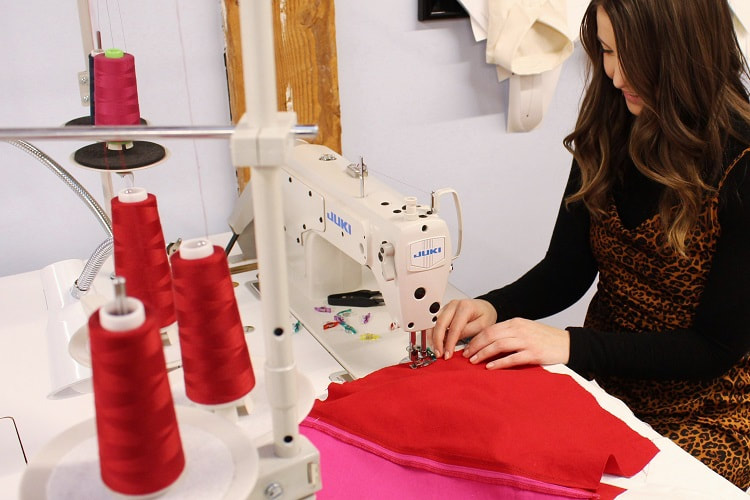
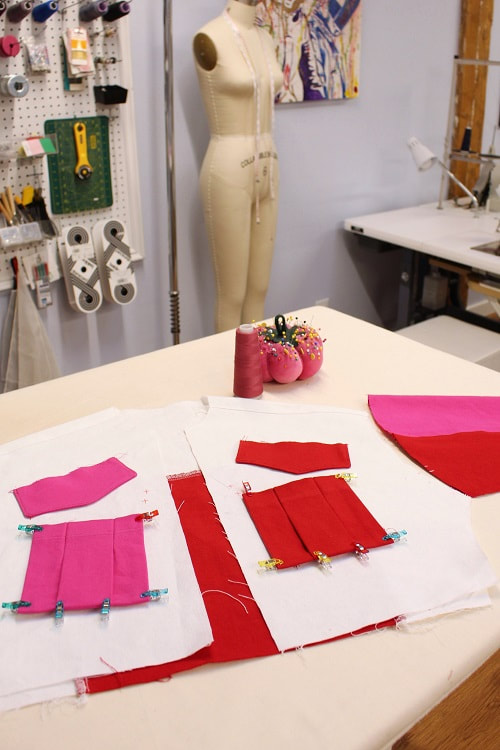
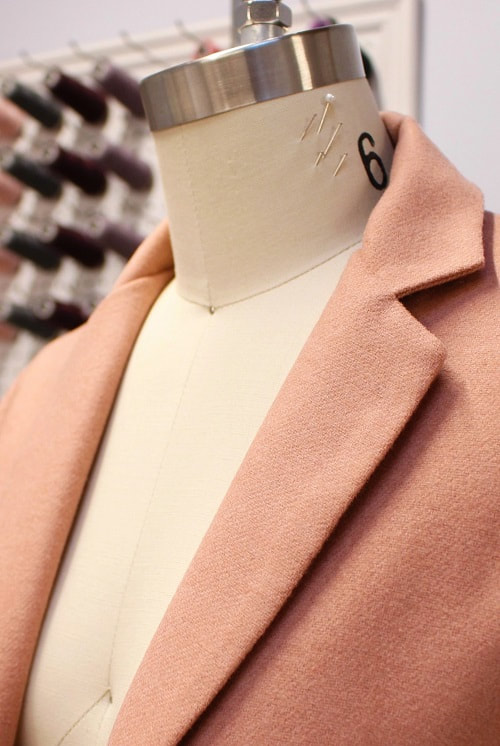
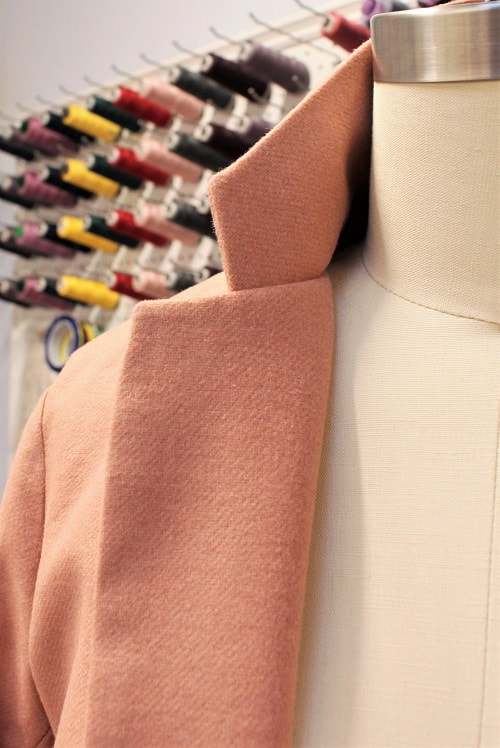
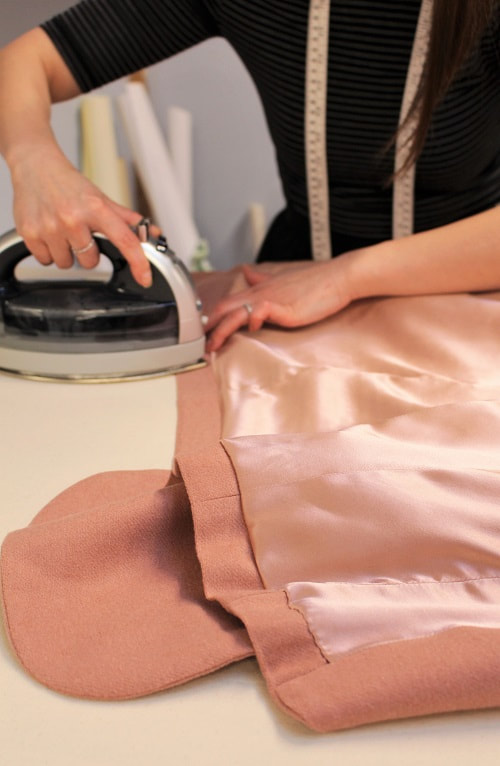
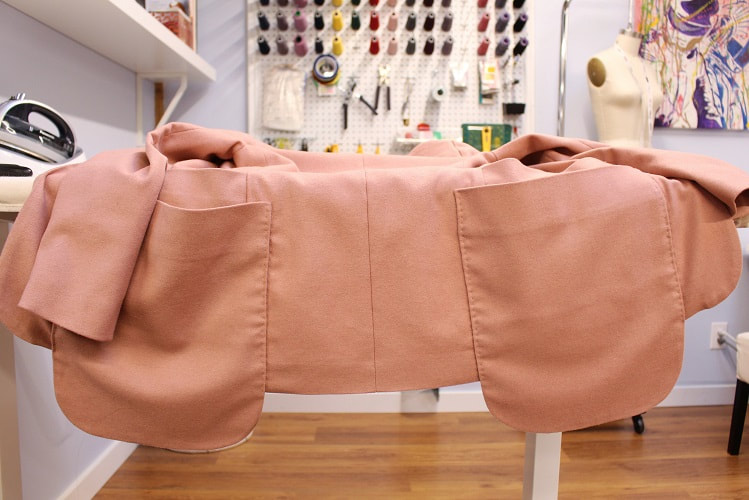 We recently visited Atex Designer Fabrics in Gastown. They are our go-to for quality wool. If you’re in town, say hello to the Dave the shop owner! This is one of many wool fabrics we picked up. Design ElementsThis blazer was drafted when Sheila taught a reverse pattern drafting workshop at Maiwa School of Textiles on Granville Island. Sheila has offered this workshop for 5 years in a row, among others. This one always sells out. In fact, this year’s March workshop is already sold out! Drafting Tip: A super hack for those who pattern draft their own designs, is to use what you have. There is no need to draft from scratch for every design. Look at your past drafting and see if you can modify a design to create a whole new look or a variation of an already drafted design. For blazers, try experimenting with different types of lapels, pockets, and lengths. In this case, we modified the pocket to create the over-sized double patch pocket. 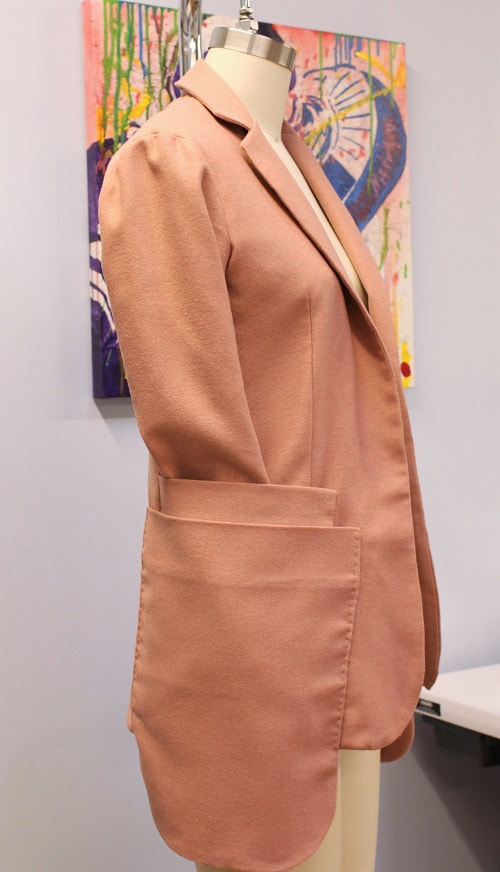 Fully LinedAnytime we design with wool, we think its best to line the garment fully. Who wants to scratch all day? Certainly not us, so silk charmeuse only made sense! Pink silk charmeuse lining was purchased from Fabricana. Pairing natural fibers together will lend to the garment aging in a similar fashion. Pictured below are the MAIN and LINING pieces before "2 become 1"- Spice Girls. 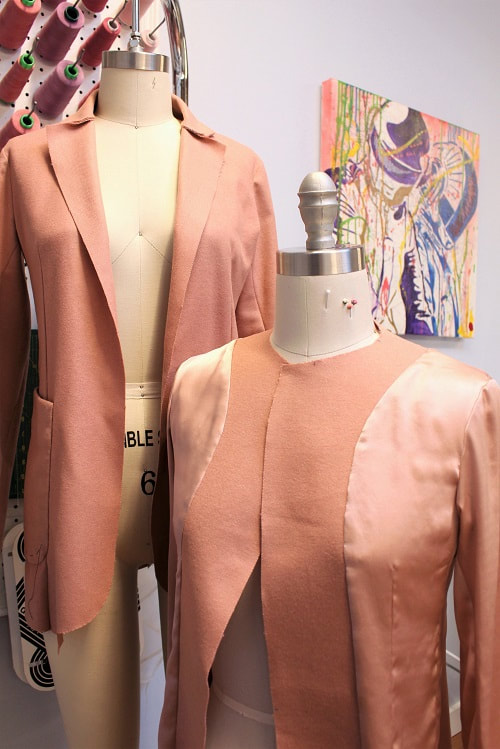 Notched LapelUsed in women's and menswear, a notched lapel is commonly used on single breasted jackets and blazers. A notched lapel is sewn to the collar at an angle, creating a triangle or step effect between the two.
The size of the notch can vary - when it is very small, it is referred to as a “fishmouth”. We personally think it looks more like a bird with their mouth open. 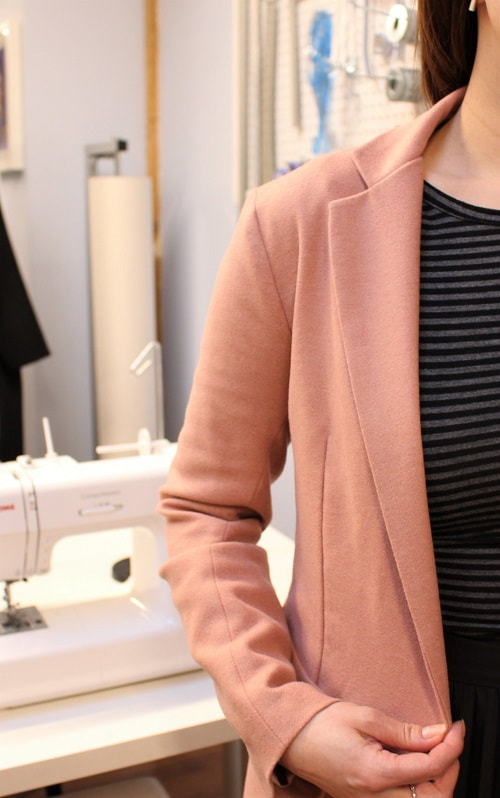 Over-Sized Double Patch Pocket“Pocket-ception”— a pocket within a pocket. On her last trip to Tokyo, Sheila noticed that over-sized double patch pockets were all the rage. It was double trouble on every turn! This inspired us to experiment with the drape of this visual element. Our blazer design features an over-sized double patch pocket on both side seams. The second larger pocket hangs past the hem. 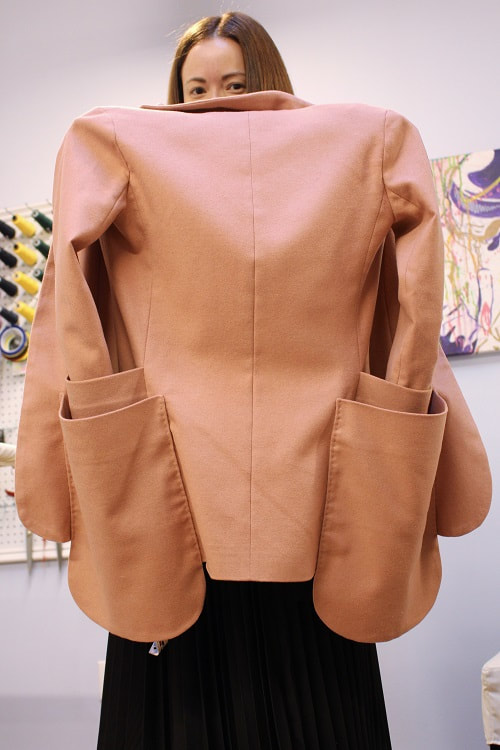 Not all pockets are supposed to be functional. Although, we did test it out and YES, you can fit a tablet in the larger pocket. 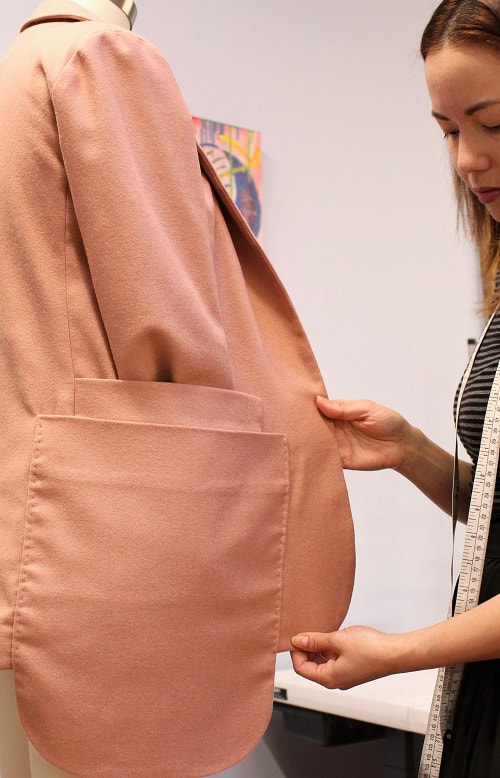 This is our second time experimenting with over-sized double patch pockets. Check out our Military Culottes to see this element applied to pants. Sewing TipWhen pressing, to ensure fibers bend the way you want them to, hold them as they're cooling. Its during the cooling process that sets the fibers in place. Think of styled hair... when you curl it, you typically hold the curl in place before setting it with hairspray.
Final DesignVoila! Blazer finito. We could even say this design is... blazing hot!?! We plan on making another wool blazer to match our plaid wool skirt, sans the over-sized double pockets. Stay tuned. 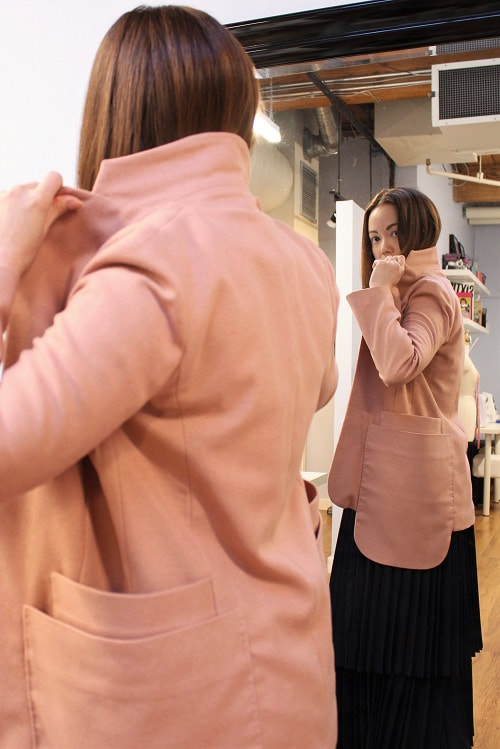 Tailoring techniques involve attention to detail at every step from marking the fabric to pressing. Contact us to book lessons in tailoring techniques. Happy Sewing!
Designed, photographed and written by Sheila Wong Studios. Basic t-shirts are just that- basic! So we decided to change a few elements to our basic t-shirt pattern. Now, its not so basic. In this blog post, we will share our insights into the make up of our V-Neck Crop Top and several things to keep in mind. 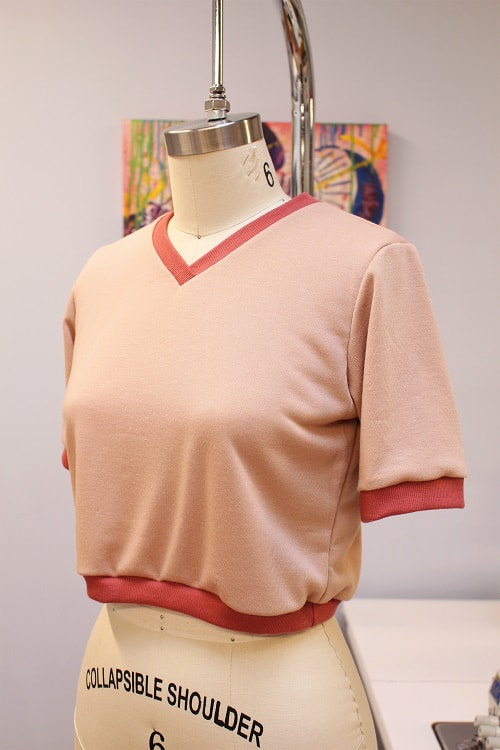 Project SpecsDesign ElementsOur not so basic t-shirt has several fun design elements including a cropped silhouette, a retro inspired rib hem finish, mid length sleeves and a V neckline. What is your favorite element? V-NecklineThis design was inspired by a knit t-shirt pattern we drafted in the past. This time, we took the plunge by swapping out the neckline to help while instructing how to install a V-neckline. 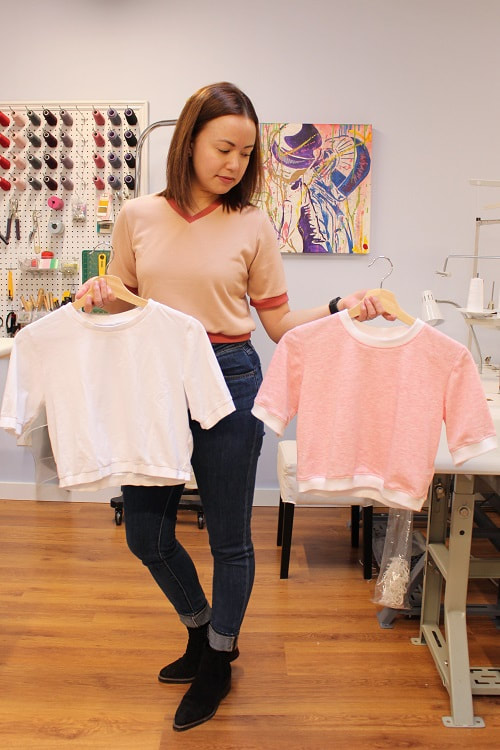 Achieving a perfect V-neckline takes practice. Here are the sequence of sewing steps to achieve your next perfect V. Please note a 1/2" SA was applied to neckline seam. A regular sewing machine and an over-lock sewing machine are required: 1. With wrong sides of the fabric facing each other, over-lock the raw edges of the neckline ribbing together, do not cut anything off. This stitch will act as a stay-stitch. Overlap the CF ends of the Ribbing when sewing to create the V. 2. On the Front Shirt stitch a security stitch using 1.5mm approximately 2" out from V pivot point. This will mark the V for you to follow and strengthen the area when we clip into SA. 3. Carefully clip the SA towards the pivot point stopping 1/16" away. This will allow you to pivot easily when attaching Ribbing. 4. Mark pivot point on Ribbing, and extend markings 2" out from pivot point along SA. 5. Pin and sew Ribbing onto Front Shirt starting 2" out, pivot at V point. Note- you will only be able to pin one side of V, other side will get pinned after pivoting at the machine. 6. Pin the remainder of the Ribbing to Front Shirt and over-lock at your allotted SA. Make it a point to line up over lock stitch to the straight stitch. If you're interested in a more detailed tutorial on how to sew a V-neckline, let us know below. 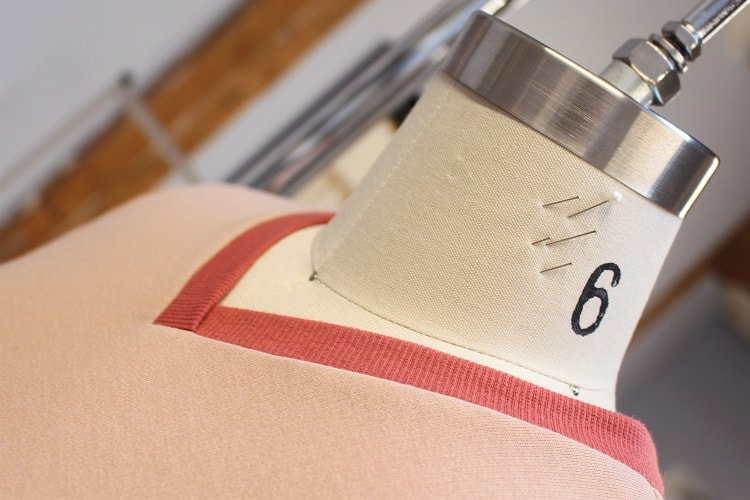 Cropped FitCropped and Cuddly. This design features a cropped fit with a slight cinched waist. Crop tops are typically on the tighter side. We didn't want this, so we gave ourselves extra room with extra ease, creating a semi over-sized silhouette. The perfect combination of cute and comfy!  We're big fans of this silhouette and it shows in our designs. This is actually the fourth time we've made this crop top! Previous designs that have used this pattern are shown below. 
 RibbingIf you do not own a cover stitch machine, ribbing or self bound hem finishes are the best! This type of finish is also great for lengthening a garment that is too short. 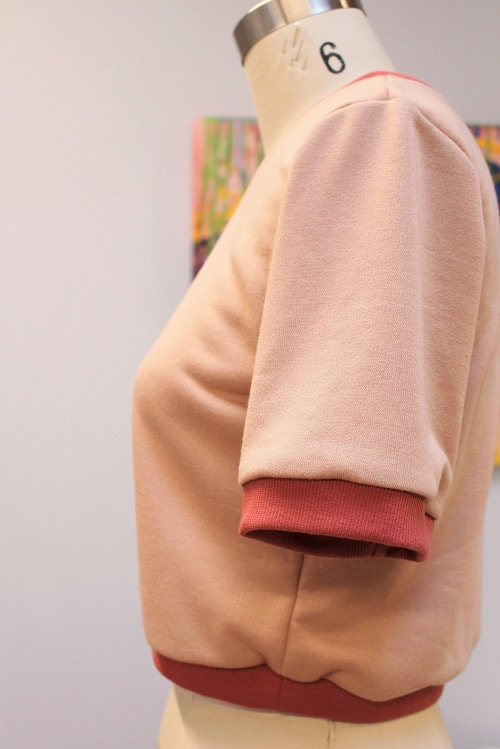 Final DesignIn between lengthy and complex designs, it's fun to sew up an easier design to provide you with motivation. Easier designs include accessories, basic knit tops (like this one!), 2D tops, etc. Check out our Blog Archive HERE for stress-free sewing tutorials!
Learning how to sew a basic T-shirt design like this can be easy and fun! If you want to learn how to achieve a perfect V-neckline, contact us to BOOK lessons. Happy Sewing!
Designed, photographed and written by Sheila Wong Studios. This design might look sneakingly familiar! WHY? Well it is because we combined two designs into this hybrid dress. Remember the tailored tear-away jumpsuit and the plaid button up skirt? We combined the bodice of the jumpsuit and the skirt to make this dress. The only drafting involved was adjusting the front opening of the skirt to be aligned with the surplice bodice opening. This created an asymmetrical front opening on the dress. A super hack for those who pattern draft their own designs, is to use what you have. There is no need to draft from scratch for every design. Look at your past drafting and see if you can modify a design to create a whole new look or a variation of an already drafted design. Many apparel manufacturers do this to decrease development costs, why can't you!  Did you know? This type of dress can also be called a jumper? A jumper is technically a dress that you throw over another piece of clothing like a blouse or shirt. Also, you can jump around in this dress! Project Specs
 Design ElementsAsymmetrical Front Opening As mentioned above, the only drafting involved in this design was adjusting the front opening of the skirt to be aligned with the surplice bodice opening. This created an asymmetrical front opening on the dress. 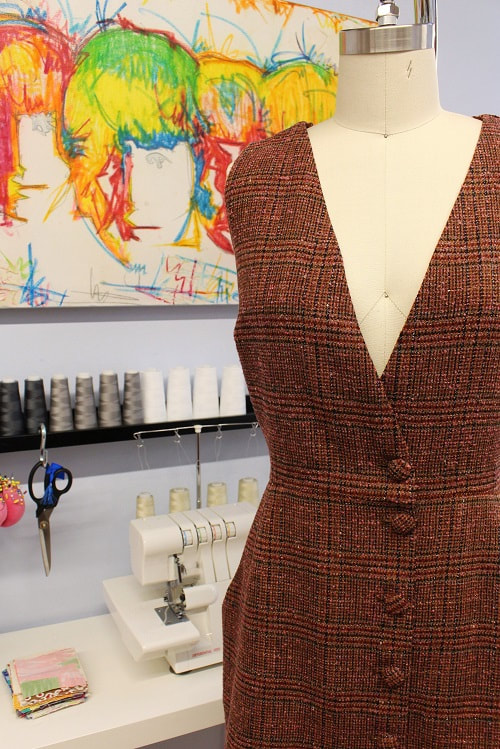 Superhero Shoulder StrapsWe can’t get enough of the superhero shoulder straps—Two long shoulder straps that button-up at the shoulder seam and drape down the back of the garment. This visual element is a personal fave that makes this dress so special!
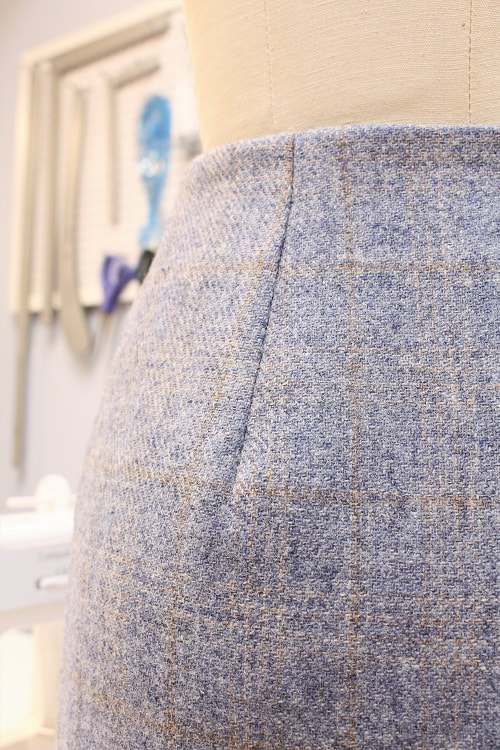
Plaid MatchingHere we go again with our recent plaid obsession. We graciously thank Atex Designer Fabrics for killing it in their plaid choices as of late. This plaid has a much looser weave than we normally work with. While sewing the seams, we hand wheeled over pin matched plaid seams to ensure the lines would line up from piece to piece. 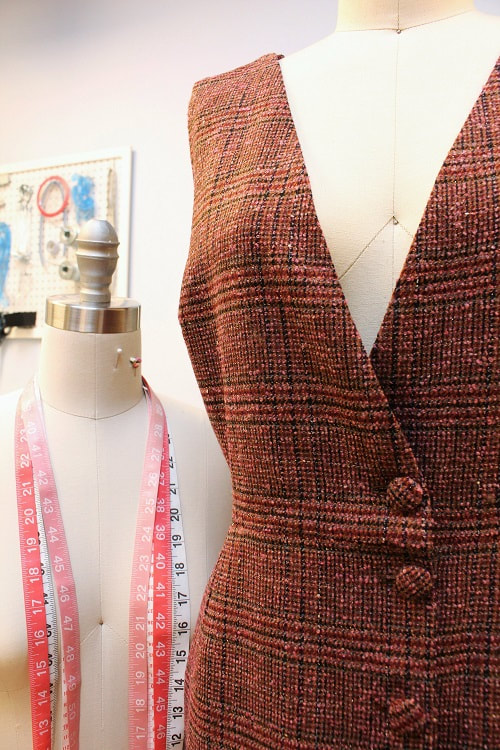 Do you notice the slash pocket? As usual, we matched the plaid from front skirt panel into the pocket facing. To achieve this perfect match follow these steps.
 Fully LinedYou may have noticed we love to line our wool designs with silk. In particular silk charmeuse. Pairing natural fibers together will lend to the garment aging in a similar fashion. What are your go-to lining fabrics? Let us know in the comments below. 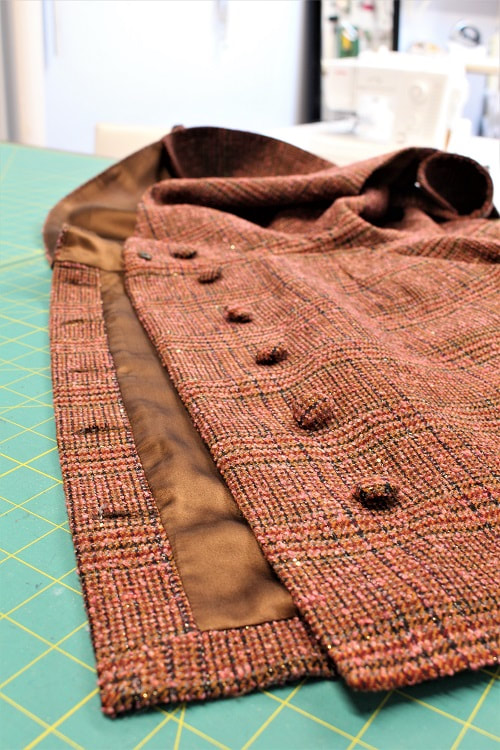 Final DesignThis jumper is definitely cute and wearable. Wearable being key here. We loved the surplice bodice of the tailored tear-away jumpsuit, but despised the time it took to button and unbutton to go to the restroom. This dress solved all our problems. 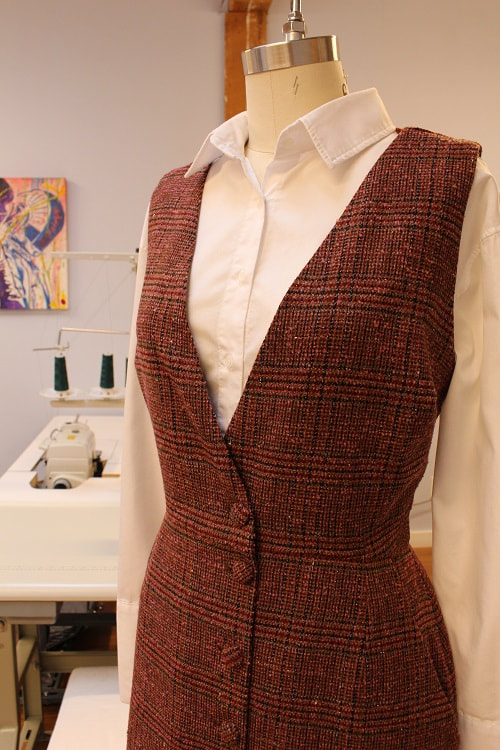 Learning how to pattern draft for your body is empowering and fun! If you want to learn how to pattern draft a dress, contact us to BOOK lessons.
Happy Sewing! Designed, photographed and written by Sheila Wong Studios. We recently visited Atex Designer Fabrics in Gastown. They are our go-to for plaids, wools and all things warm and fuzzy. It also helps that the owner Dave is a super chill dude. This is one of many plaid fabrics we picked up. Lets just say we are exploring a very 1970's and/or 1990's vibe right now. Read on about our latest design- Plaid Button-Up Skirt. 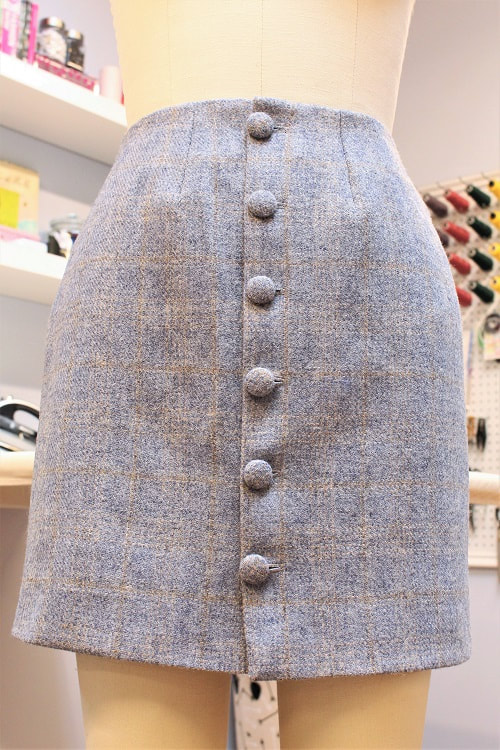 Project Specs
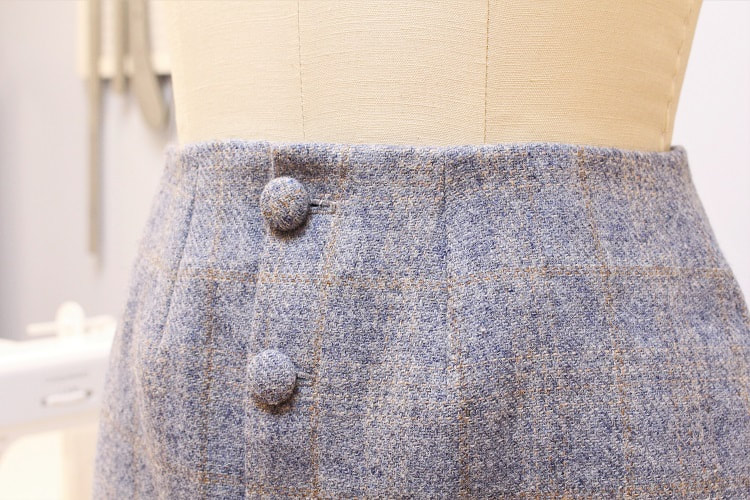
 Design ElementsDrafted from skirt blocks, we kept the silhouette simple but amped-up the quality of the design elements. We kept some waist darts to maintain shaping, got rid of the traditional CB seam and extended the CF edge to create a front opening.
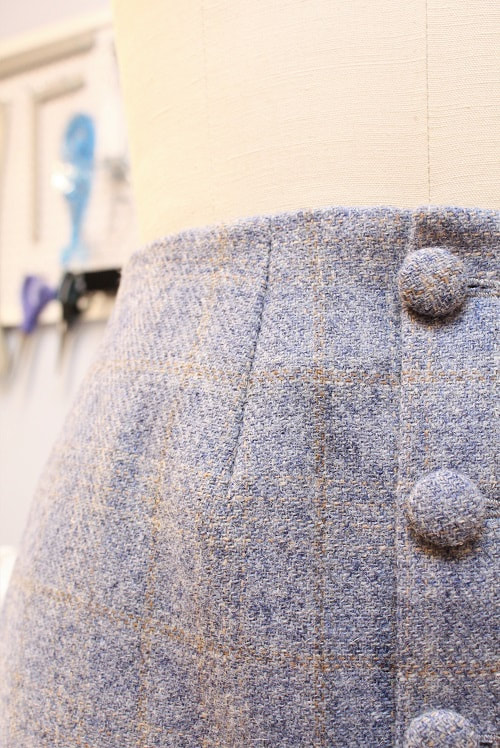
Facings (Waist & CF)Anytime we design with wool, we think its best to line the garment fully. So in turn, facings are an important element. Although they cannot be seen, facings are all around in this skirt. Separate pattern pieces were drafted for the front and back waist facings because of the curved waist and the darts. Along the center front (CF) button extension, we drafted a built in folded facing. Same on the hem. The waist facings and the CF facings were interfaced as well to provide stability to these areas.
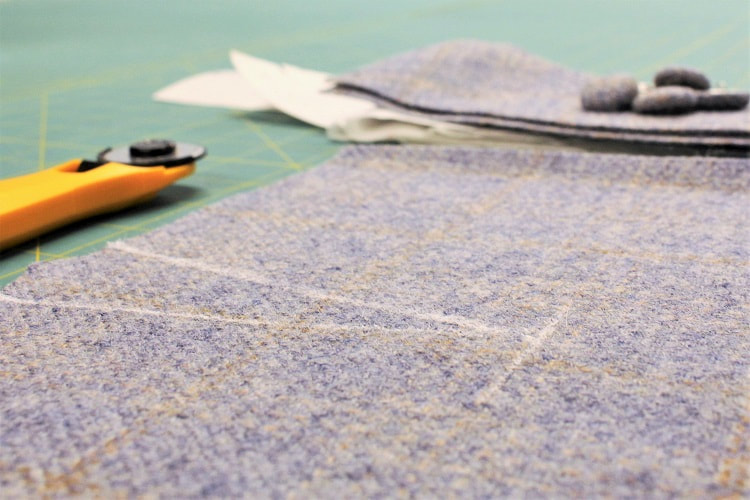
CF Button OpeningFront openings on garments of all sorts are so in right now! It makes a simple plaid skirt not so simple anymore. What do you think of this type of opening? Do you prefer back, side or front openings on a skirt? 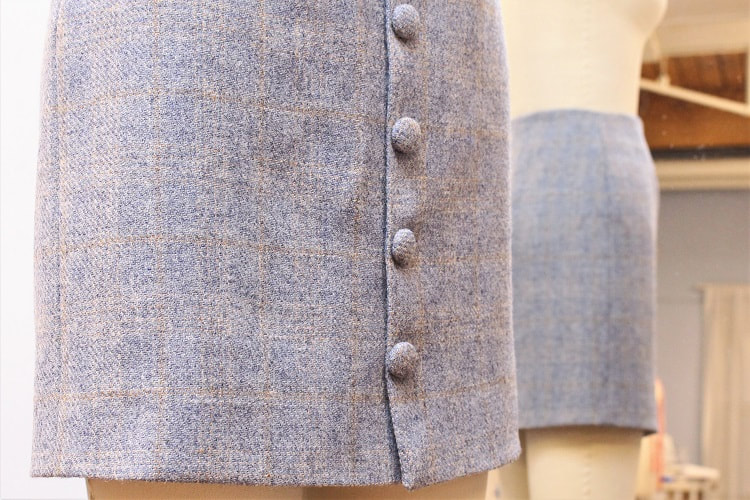 You may have noticed we are in a fabric covered button phase right now. Well get ready for more because we bought wholesale a large pack of buttons to fabric cover. This is the perfect choice when you just cannot find the perfect button to match your fabric. 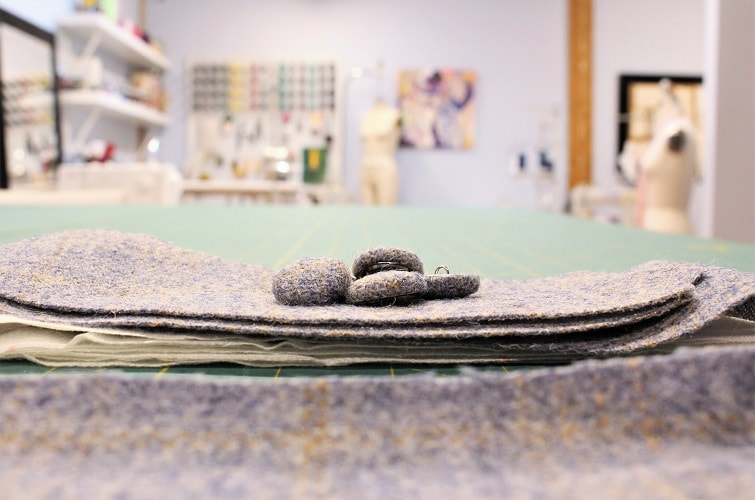 Matching PlaidThere is no way we are going to design a plaid skirt and NOT have the plaid match perfectly around the body.  Tips for matching plaid fabric.
 Final DesignWe are loving this subtle plaid print! So much that we are making a matching tailored blazer. Stay tuned for that one in the new year. 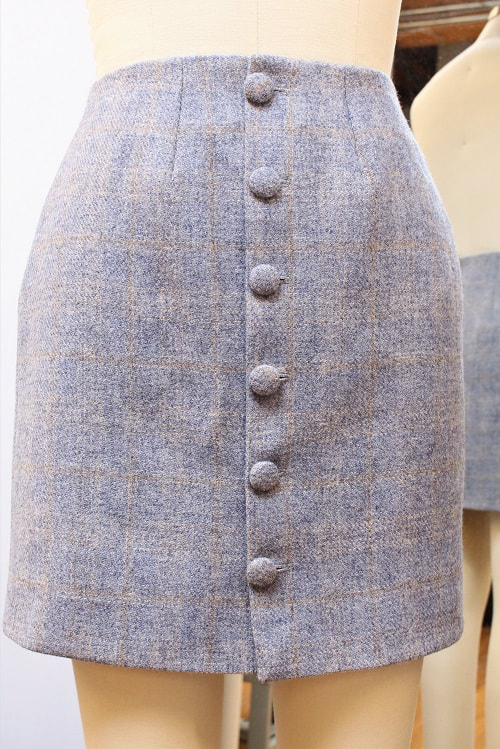 Matching printed fabric is challenging! We would love to have you in studio for a lesson on how to match prints on your next design. Contact us to book lessons!
Happy Sewing! Designed, photographed and written by Sheila Wong Studios. |
Archives
November 2022
|


 RSS Feed
|
|
Copyright © 2024 Sheila Wong Fashion Design Studio Ltd. All rights reserved.