|
Our team is all fairly new to dying fabric. This was an experiment to see how each member of our team would want to dye a blank canvas. Only rules were to use the same white knit fabric and to utilize what you either have at home or what you could order-in to dye the fabric or garment with. 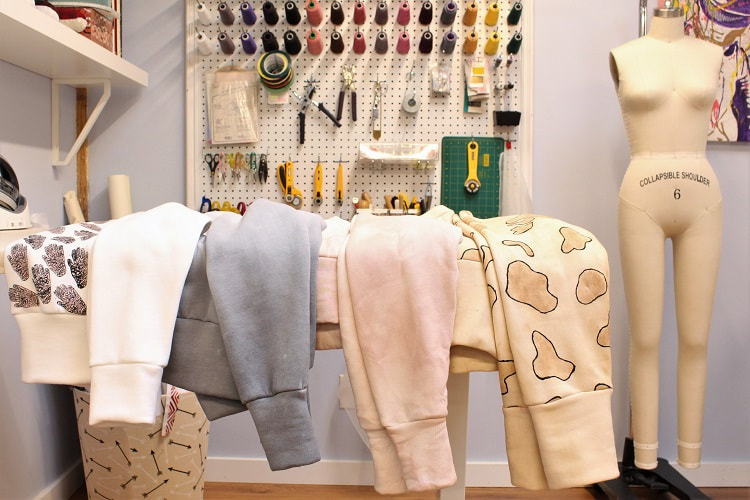 Blank Canvas5.2 M of white knit sweatshirt fabric was purchased from Designer Fabrics (Atex) in Vancouver. That’s approximately 1.3 M per sweatshirt. This is as clean as it gets! 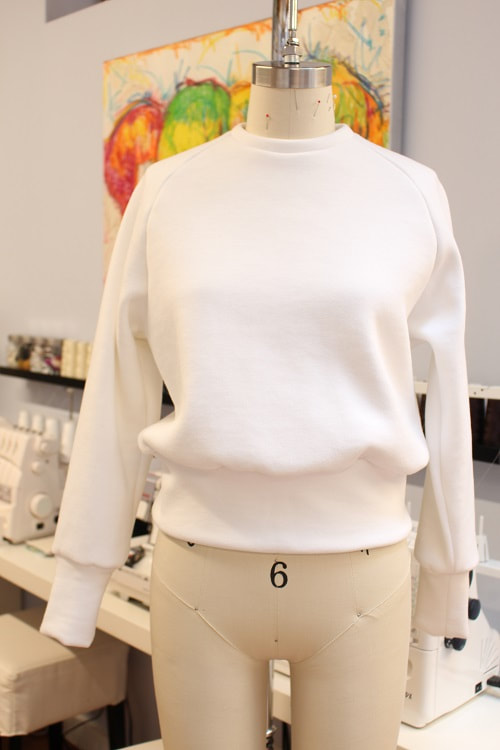 Inspiration & Dye ProcessTime to add some color! Each of us had a unique inspiration to make the blank canvas sing. Read on as each of us break down our dyeing process, what we learned and where our inspiration came from. If you have not met our full team yet, read more about each of us in the OUR TEAM section of our website. Sheila's SweatshirtInspiration: Rainy day in Vancouver with rain droplets hitting the window.
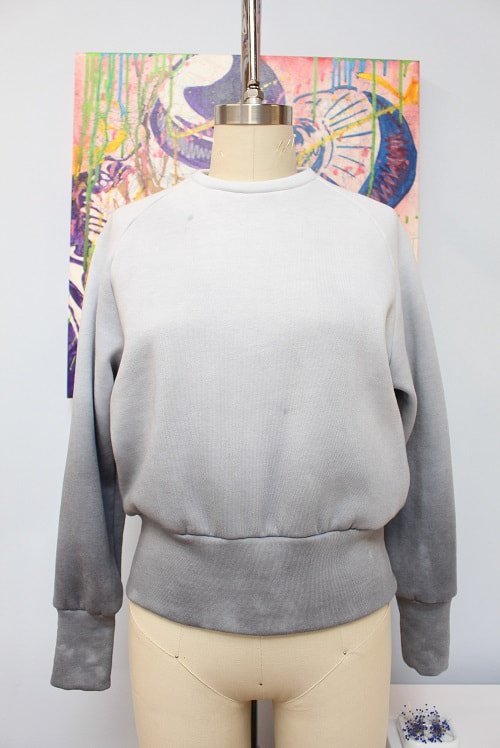
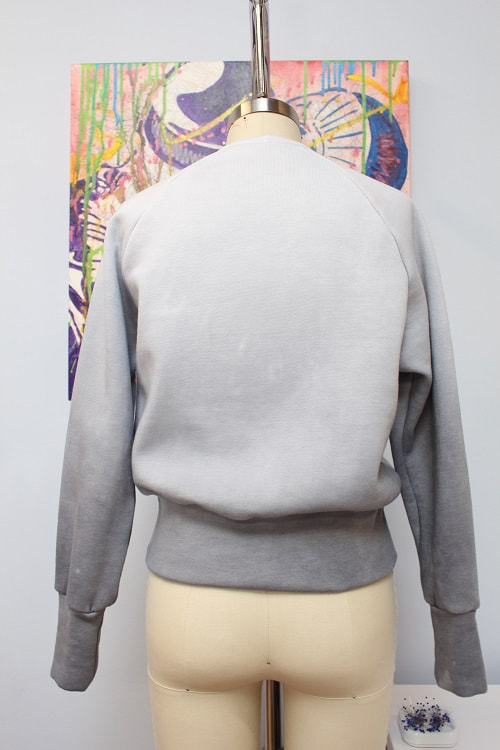
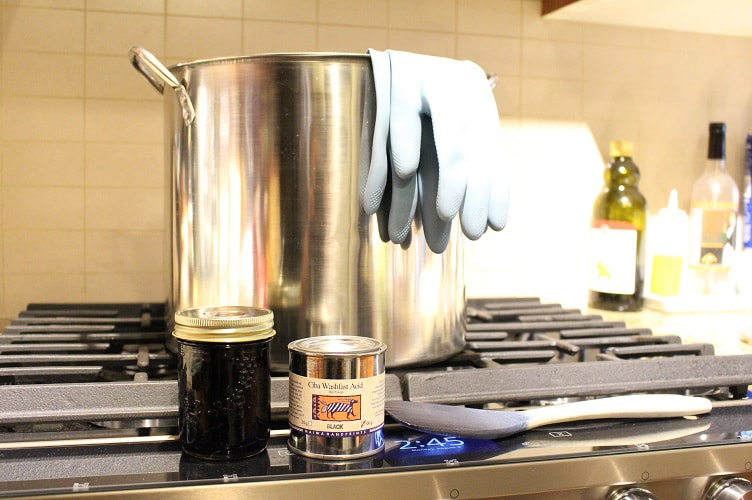
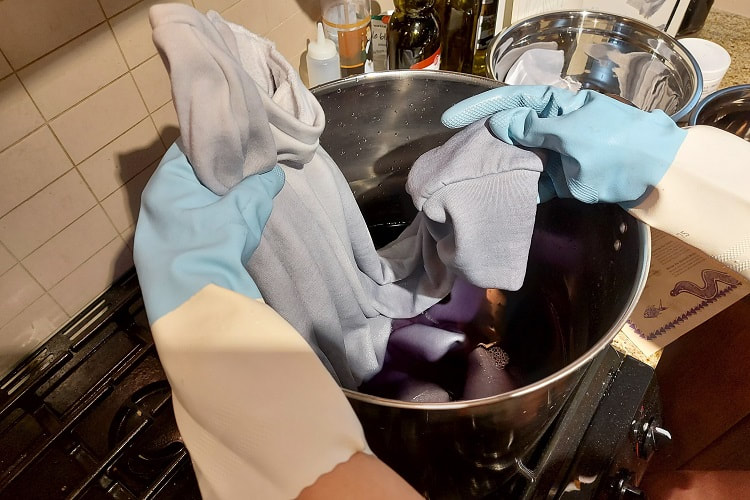
Process: Sweatshirt was fully sewn prior to the dye process. The idea was to go from light grey at the neckline then transition to a dark grey at the hem. I created a black stock solution prior to dyeing the sweatshirt. I used Ciba Washfast Acid in Black from Maiwa Supply Shop. To achieve the ombre look, I had to dye each shaded segment of the sweatshirt slowly. I started first with dropping the entire sweatshirt in a heated dye pot with only 15 ml of black stock solution, in order to get the light grey base shade.
I divided up the sweatshirt (eyeballing) into 8 shade segments. Each shade segment I would lift out of the pot and add 15-25ml of additional black stock solution, to produce a deeper shade every time. I held each segment for approximately 15-20min then mixed the solution into the dipped area of the garment. 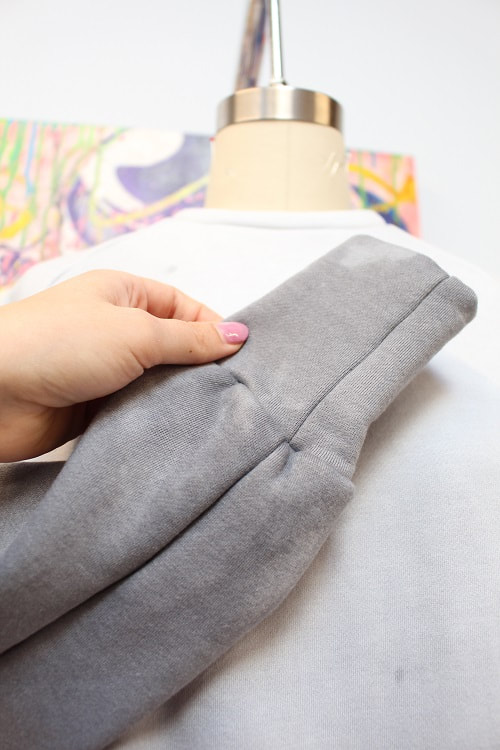 What I learned: I have dyed silk and cotton fabric with the same black dye in the past but creating an ombre effect was a total experiment for me. In hindsight, I should have tested a large swatch of fabric prior to dying the sweatshirt, but I didn't mind making some mistakes and learning through the process! My mistakes were getting a few splotches of the darker grey dye on the light grey area. 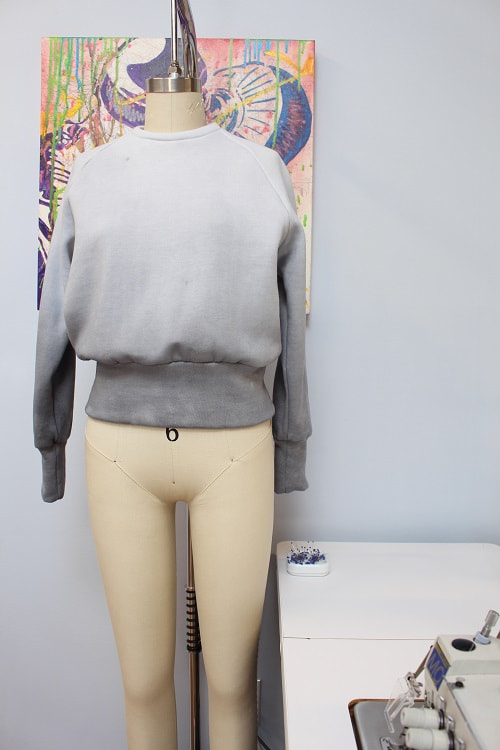 Caitlyn's SweatshirtInspiration: Pink and summery.
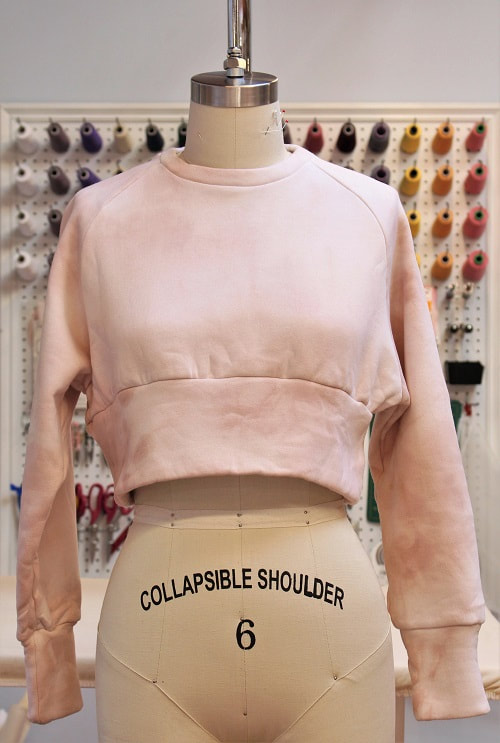
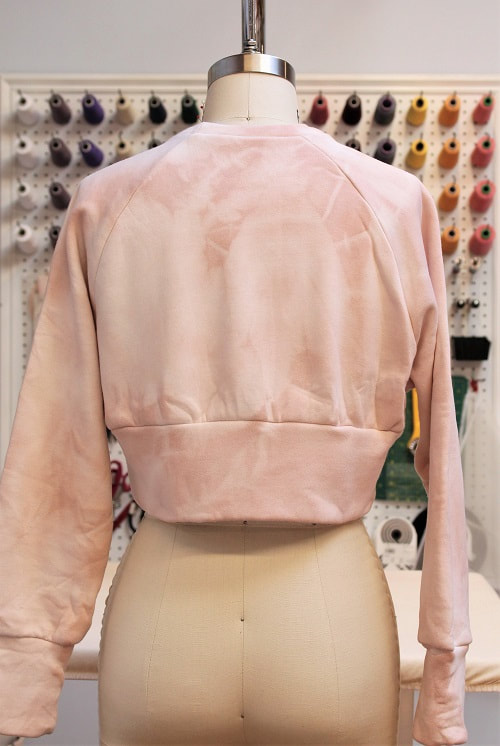
Process: I sewed my sweatshirt prior to the dyeing process, then used avocado pits and skins to dye the finished garment. I simply put them in a pot of water, brought it to a boil, and let it simmer until the tannin's were extracted and the water turned a dark pink. I then tied my sweatshirt into a scrunched-up ball and placed it in the dye pot to soak for 2 days.
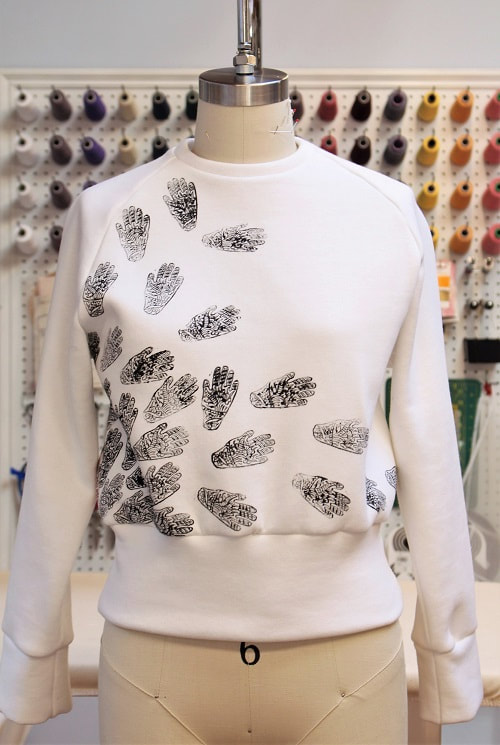
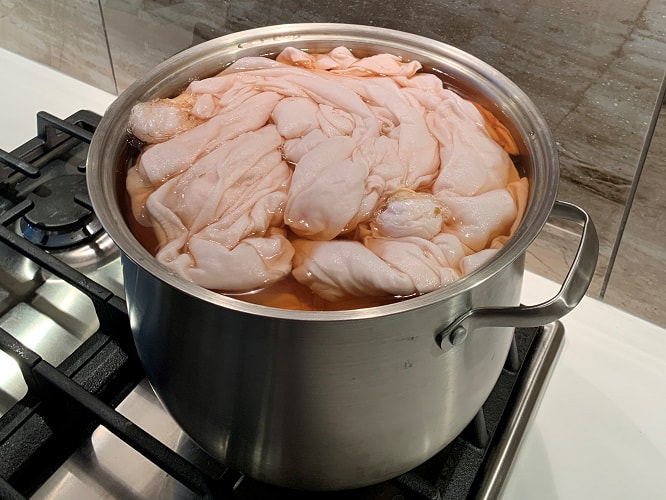 Adjustments were made to the original pattern. I cropped the sweatshirt by taking 5” off the front bodice but left the hem as is for an oversized appearance. I also dropped the neckline by ½ “ overall and adjusted the neckline pattern accordingly. 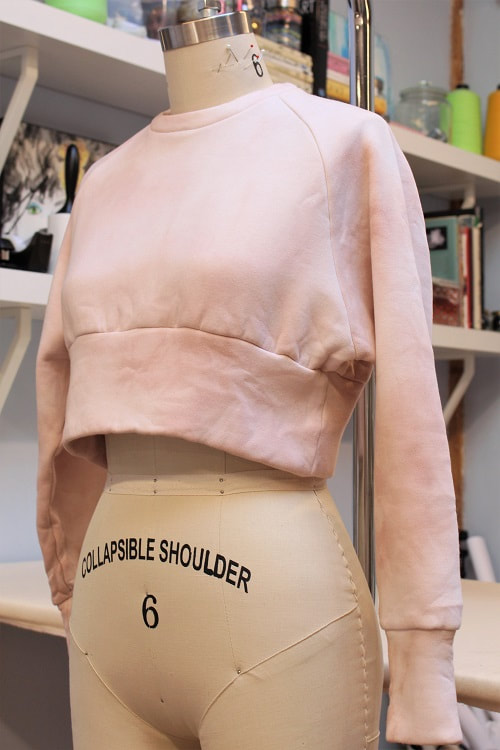 What I learned: Overall, it was a simple and fun project that’s inspired me to play with other natural dyes in the future. For instance, tea or flowers. 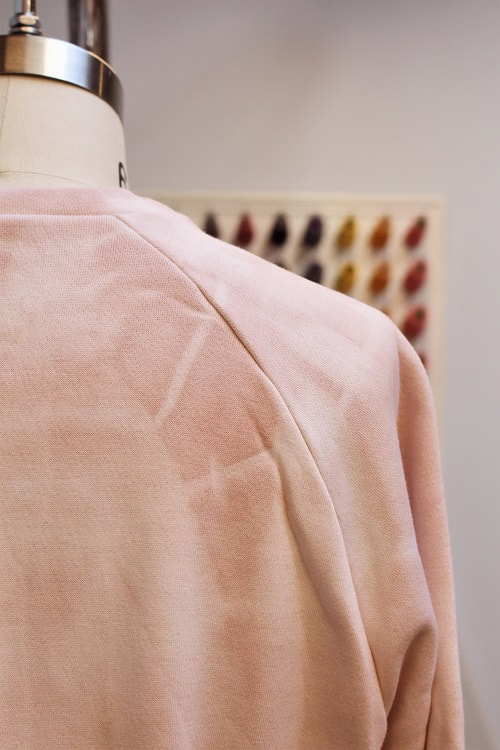 Sujitha's SweatshirtInspiration: I wanted to go beyond dying my entire garment and explore block printing with natural dyes. Block printing adds an authentic hand made feel to any garment. There is simply no guarantee that each print will be the same and that notion is extremely exhilarating. You start off with an image in mind and when you get going, the results are beyond anything you could have imagined.
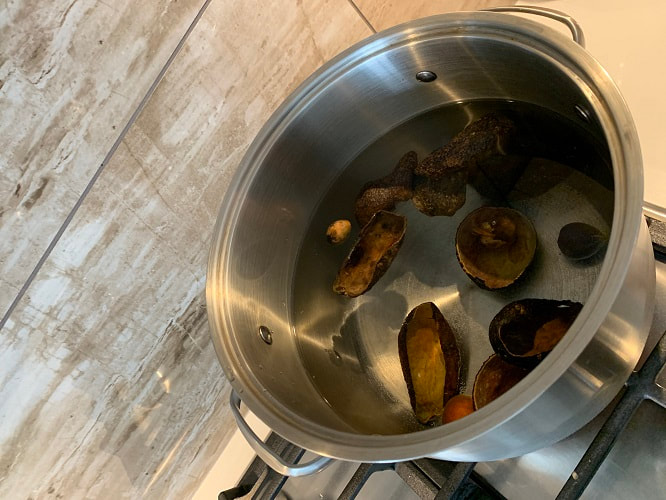
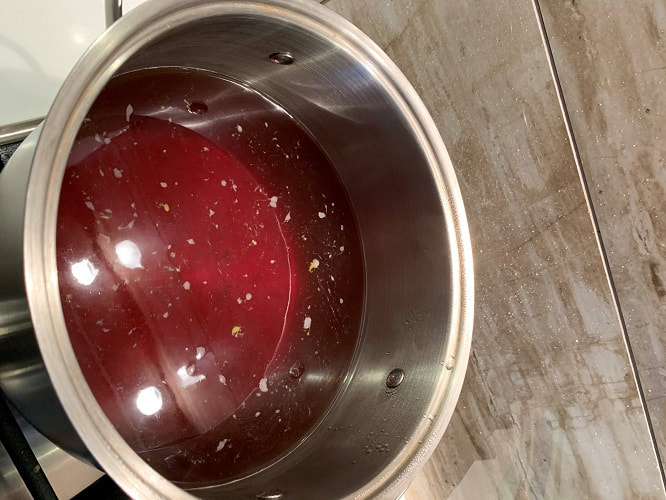
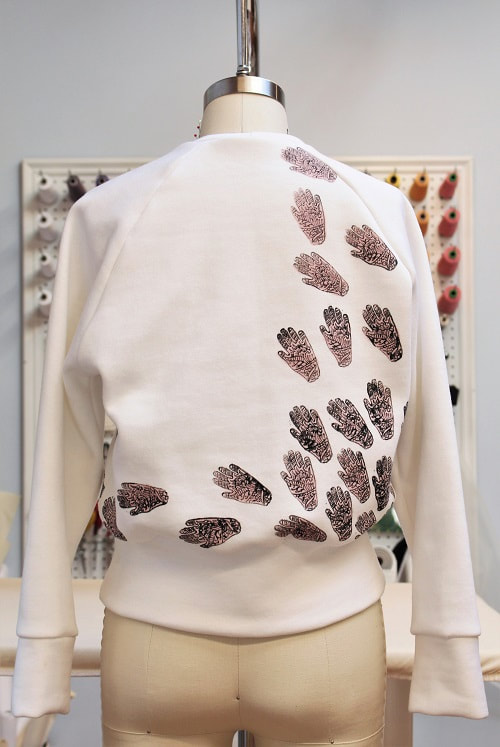
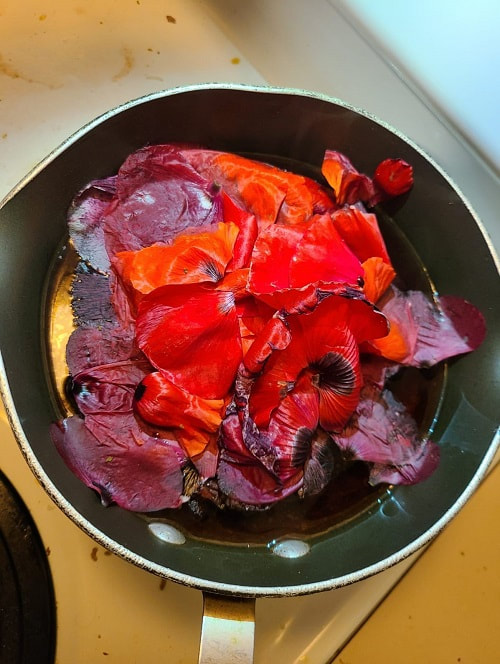
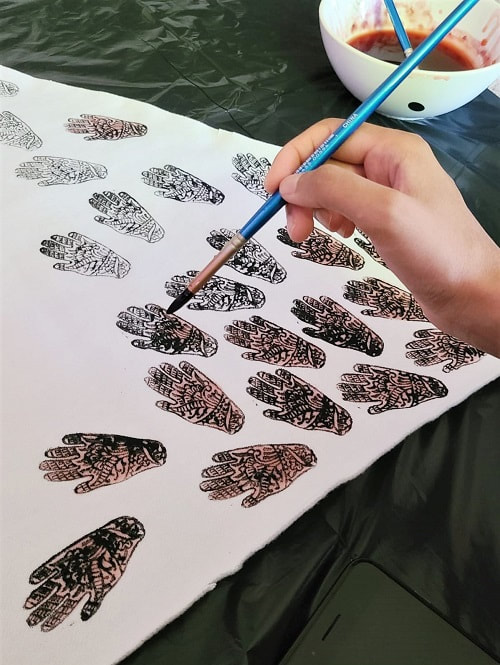
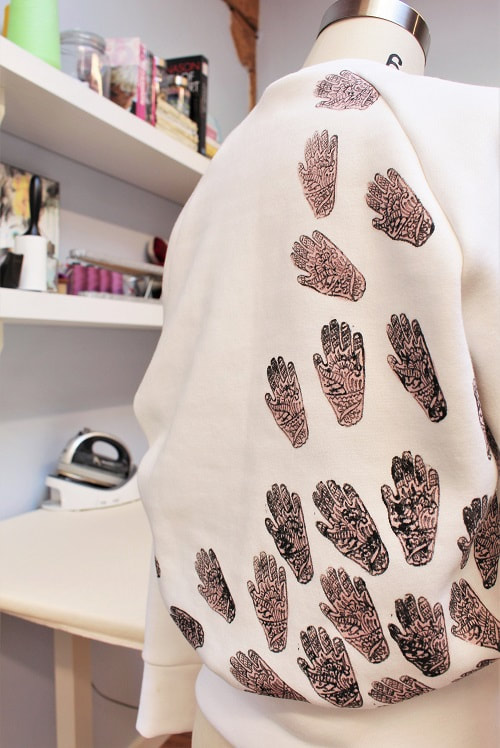
Process: For my garment, I utilized the use of natural dyes in order to block print and paint. I scavenged my neighborhood and household to find items I could transform into a natural dye. Subsequently, the dye was created by boiling down an entire beetroot and red flowers. In order to achieve the dark red hue I desired, I allowed the pot to simmer for an extended period of time.
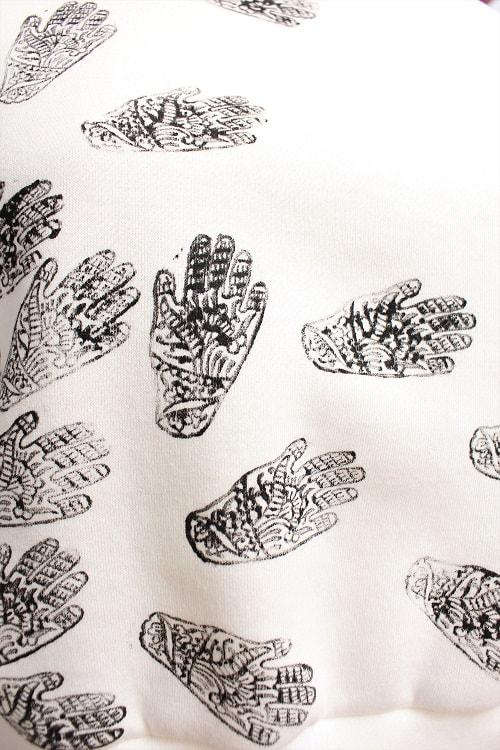
With the use of a carved block and fabric paint, I was able to stamp my garment in the desired sections and paint over the print with my dye. 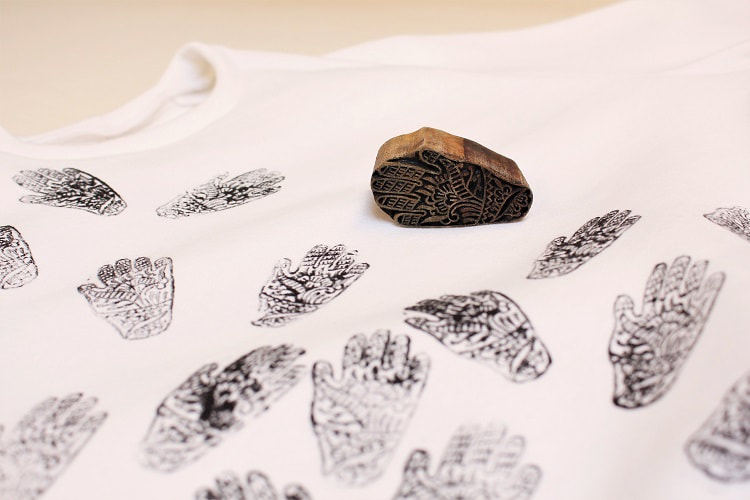 I opted to keep the front of my sweatshirt black and white and only add the dye to the back. This created the perfect contrast and really made the natural dye pop. It’s safe to say, fabric dyeing is no easy feat and takes patience and a great deal of trial and error. I’ll be exploring this element more on future designs!
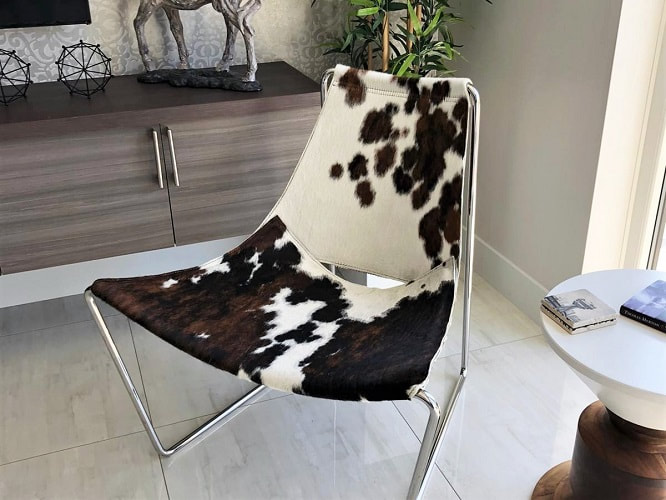
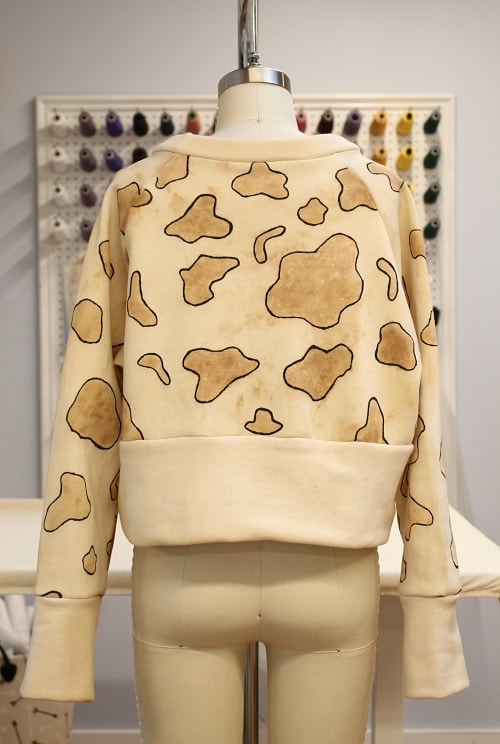
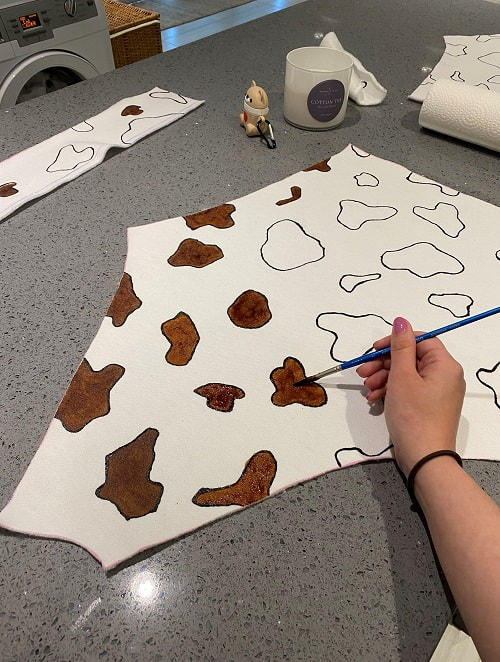
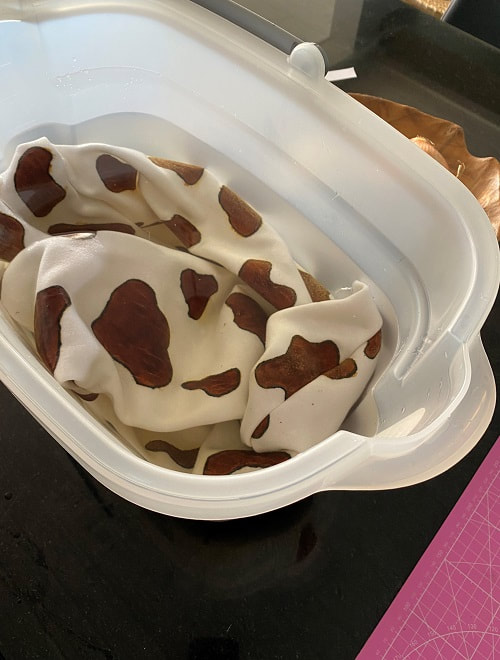
What I learned: Next time, I will certainly explore more with natural dyes that will provide me with richer colors. Though the red poppies I used were a vibrant shade of red, the final color on the fabric was rather faint. You cannot anticipate what the final color will be, until the dye hits your fabric and dries! By embarking on this project, it opened my eyes to a new world of natural dyes. In a city like Vancouver where we are surrounded by luscious greenery, you can literally take anything you find and turn it into a dye!  Natasha's SweatshirtInspiration: Cow printed chair from home.
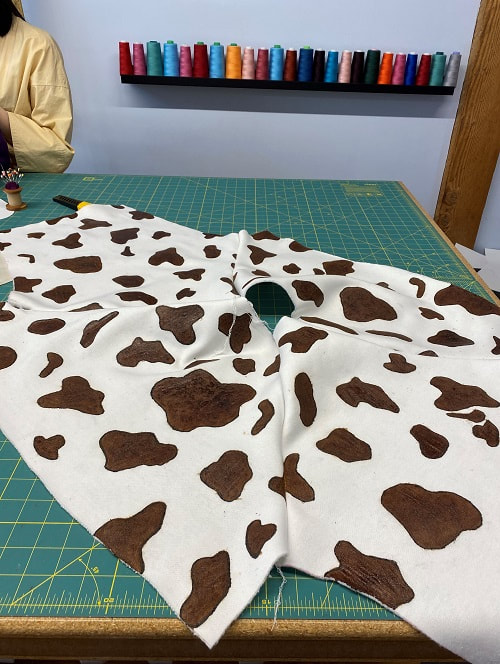
 Process: I cut my pattern pieces first, then traced out the cow spots using homemade paper stencils. I then outlined the spots with black fabric paint in order to make the print pop. Once outlined, I painted-in each cow spot using brown chestnut powder, mixed with guar gum. 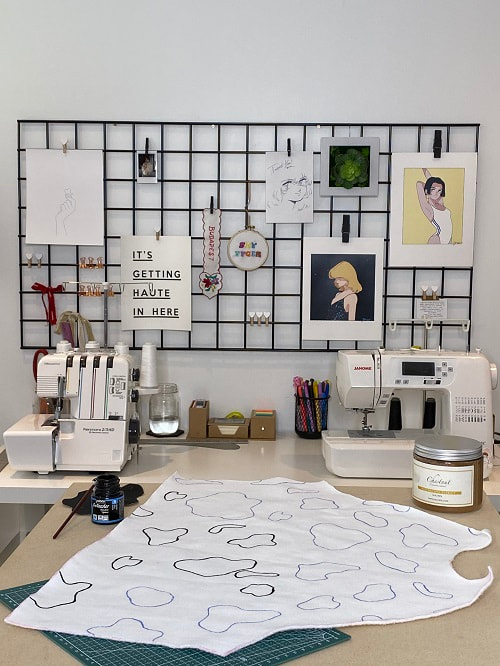
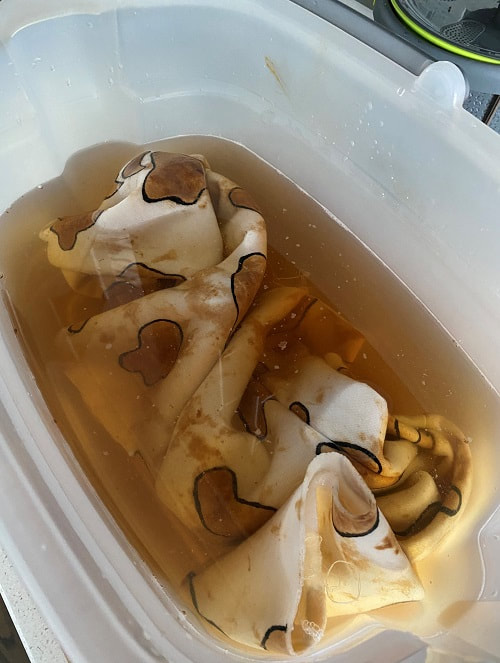
I painted 3-4 layers onto each spot to attempt to achieve a rich dark brown, then left it to dry for 2 days. I found this made my spots too thick and crusty, so I rinsed my pattern pieces in cold water and vinegar. This is how I achieved the final colors- nude overall with light brown cow spots.
For sewing, I cropped the sweatshirt by taking 4” off the front bodice. I left the hem alone for an oversized appearance. I also altered the neckline by dropping it by 1” however, it stretched out when I rinsed my pattern pieces. This resulted in an almost boat neckline.  What I learned: Originally, I had planned for the cow spots to be dark brown like my chair inspiration. Dark enough so that the black paint would almost blend in. Because the guar gum made the dye really thick, it caused my spots to become chunky and stiff. I needed to rinse my dyed fabric in water and vinegar in order to soften them up, BUT the spots bled out. Although the spots themselves are still darker than the remainder of the fabric, the final outcome was not the initial look I was going for. However, sometimes things turn out to be happy accidents and I still really love the end result!  FinalGroup sweatshirt photo op! Our team members have such unique personalities and it really shows in each sweatshirt design. We think it’s great to showcase individuality within a team every once and awhile and this project was a great (and fun) opportunity to play around with this! Should we do another team-based project in the future?? What should we make? Let us know in the comments below! 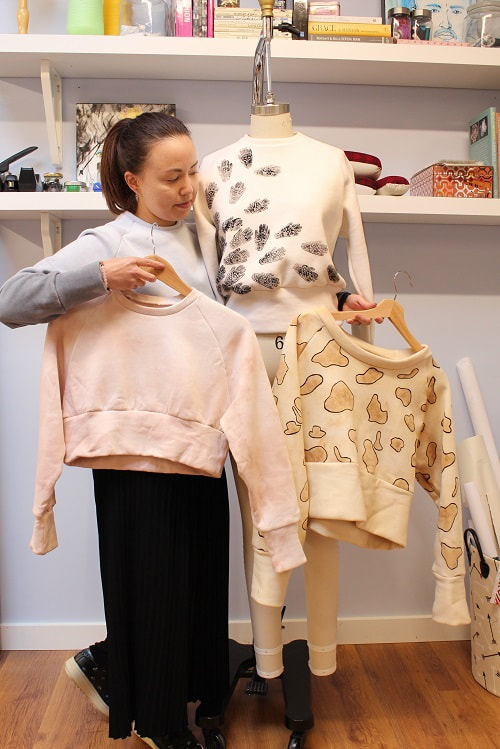 Happy Sewing!
Designed, photographed and written by Sheila Wong Studios
1 Comment
|
Archives
November 2022
|

 RSS Feed
|
|
Copyright © 2024 Sheila Wong Fashion Design Studio Ltd. All rights reserved.