|
Welcome to part 2 of 2 on creating a reversible crossback apron. In our previous blog post Draft-a-Long: Crossback Apron, we taught you how to draft the pattern for this design. In this blog post, we give you the step-by-step instructions on constructing your very own reversible crossback apron with adjustable button straps!
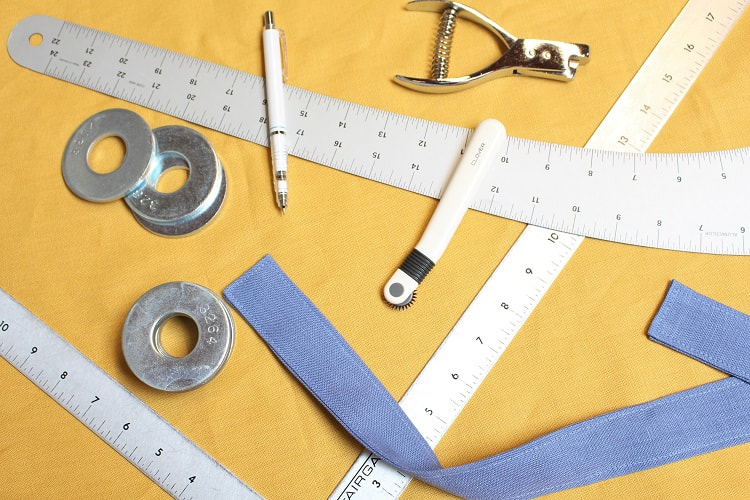
Learn more about the drafting process by reading, Draft-a-Long: Crossback Apron (Part 1 of 2). MaterialsYou will require the following materials to sew our reversible crossback apron.
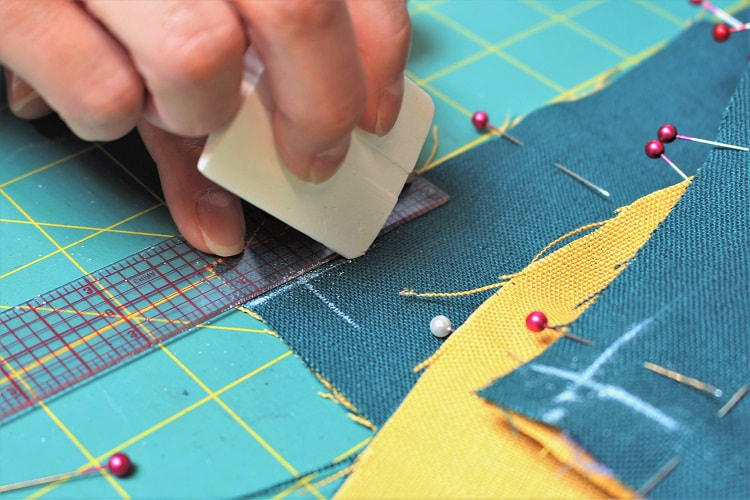
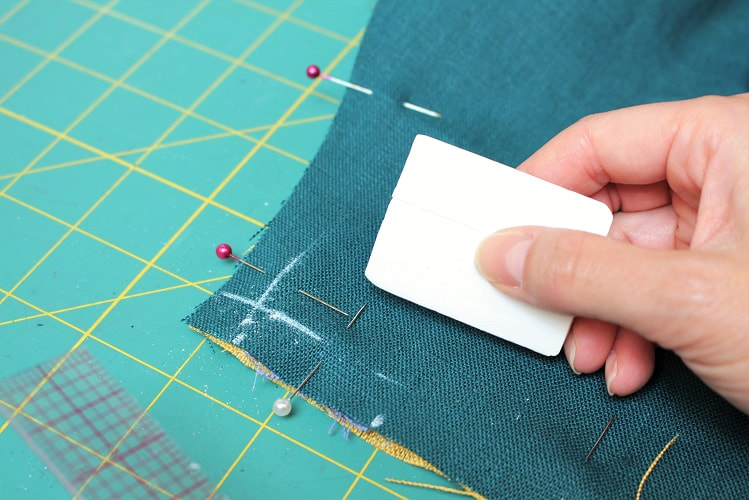
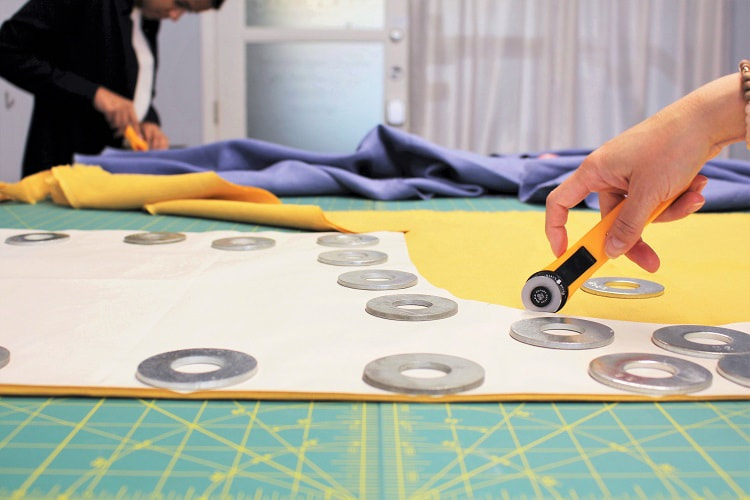
If you want contrasting color straps like us, you will need an additional 0.8 M if cut on grain or 0.15 M on the cross-grain (optional).  Cutting FabricThis apron is fully reversible to allow for a SIDE A (MAIN/SELF fabric) and a SIDE B (CONTRASTING/LINING fabric). We will be demonstrating how to sew this apron with the adjustable button straps. Make note of the alternative steps for the sewn in straps. Mark all notches on the wrong side of the fabric. Buttonhole placements can be marked on the right side of the fabric. A reminder that notches are points H, K, L, M, N, S and T from your drafting.
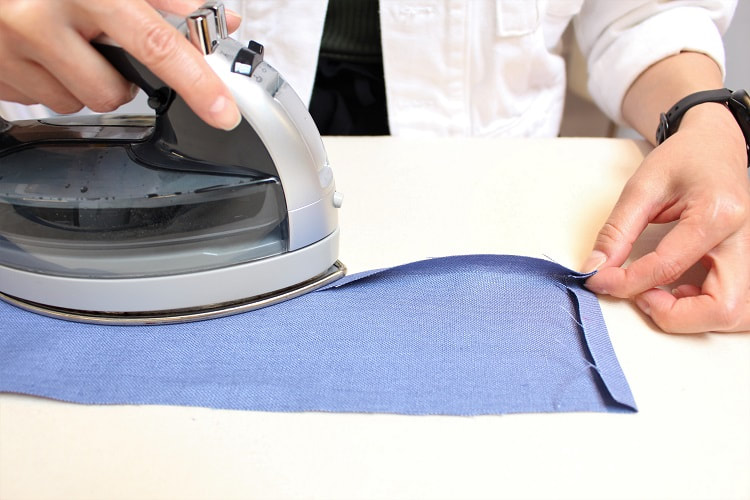
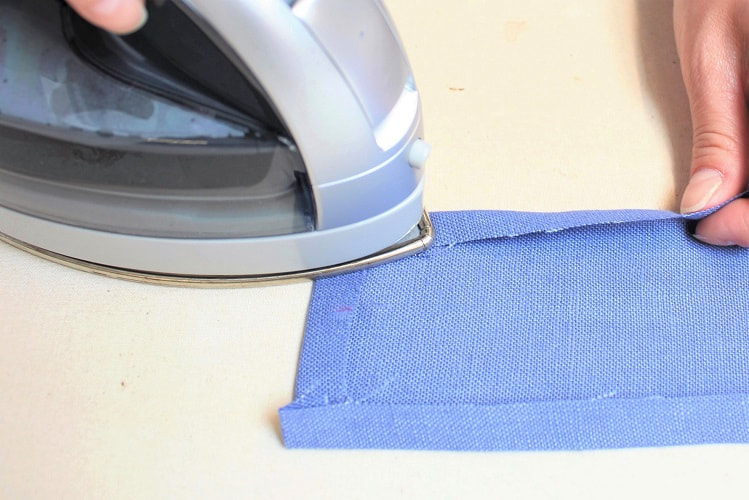
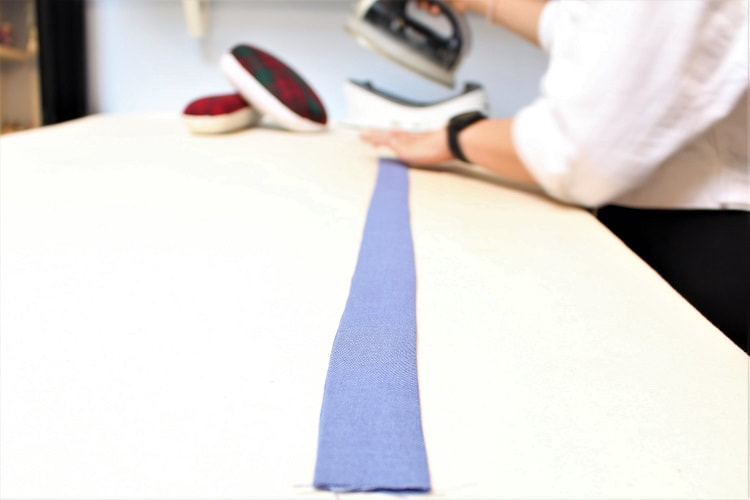
Sewing StepsStep 1Let's begin by preparing the straps! A reminder to sew at your chosen seam allowance (SA). We are using 3/8" SA. With the wrong side of the fabric facing up, press in one of the shorter edges of the strap by your allotted SA. This helps us prepare to finish off the hanging ends of the strap for the button version. Feel free to mark in your SA on the right side of the fabric for accurate pressing. For the sewn in strap option, do not press in this edge. 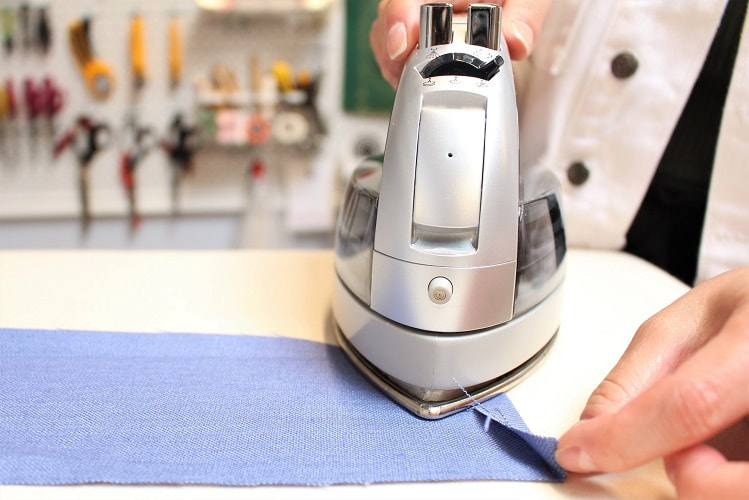 Step 2Press in the longer edges of the straps by your SA.
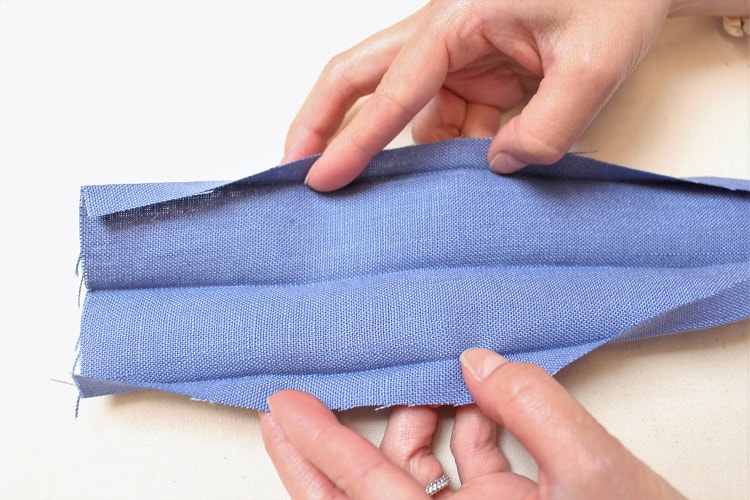
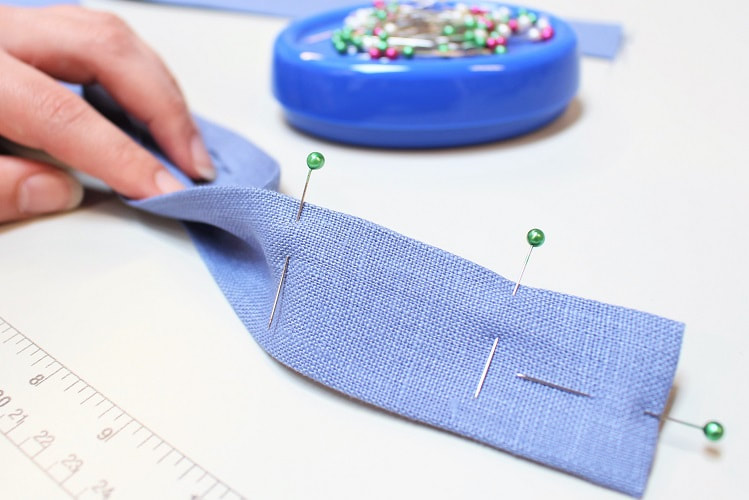
Step 3Fold the strap completely in half, pressing the two folds you created together. Try to get the two folds aligned for a balanced strap. 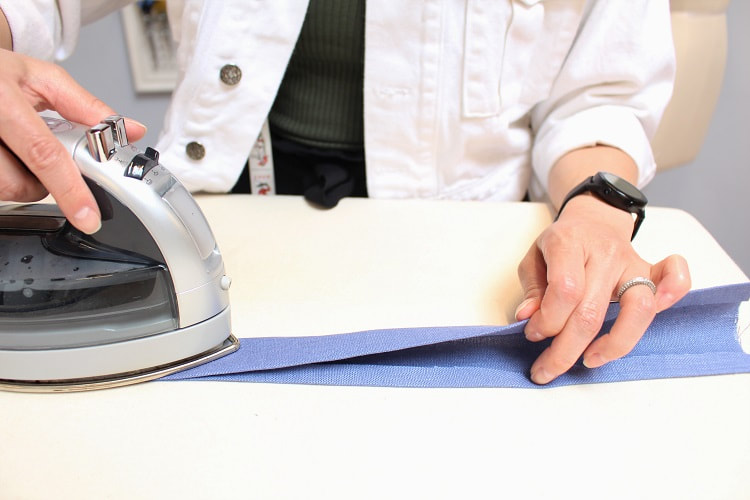
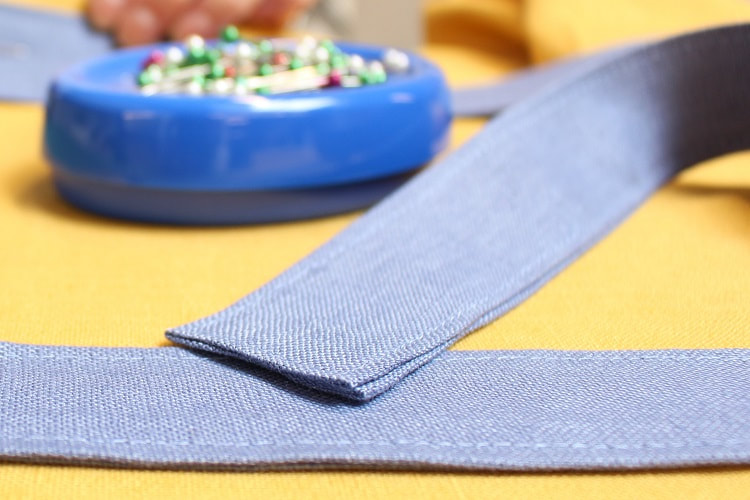
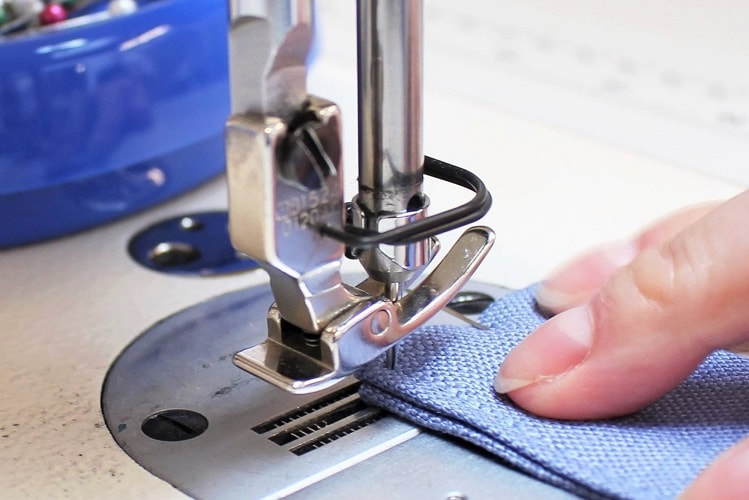
Step 4Pin and edge stitch around the entire strap. Edge stitching is a visible top stitching done 1/16" - 1/8" away from the edge. If you are edge stitching the buttonhole version, you have 3 edges to complete, pivoting at the two corners. If you are edge stitching the non-buttonhole version, you only have to stitch the two longer edges.
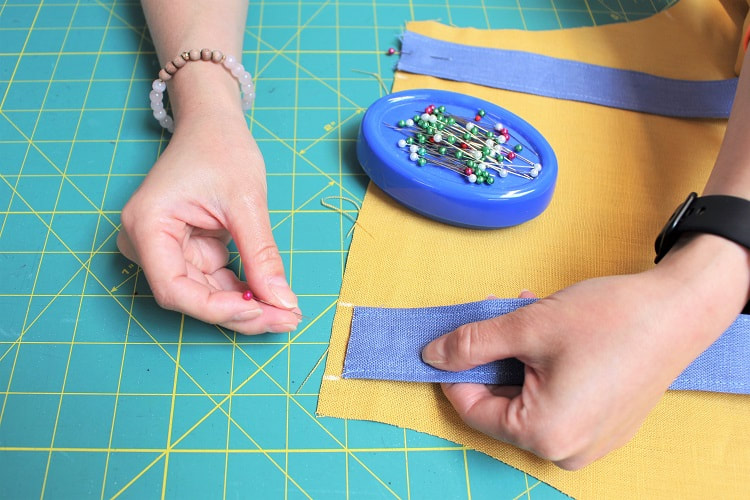
 Repeat steps 1 through 4 for second strap. 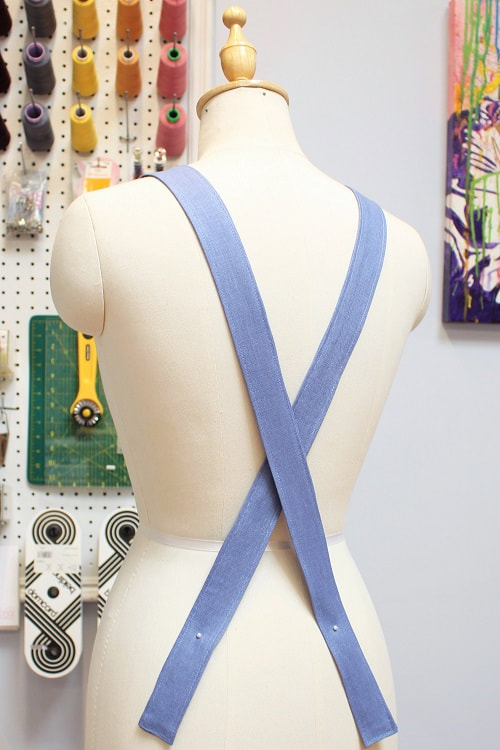 Step 5With the right side of the fabric facing up on one of the main apron pieces, baste ends of straps along the upper front edge at a 1/4" SA. Align strap in between the marked notches (letters L and K from drafting). A stay stitch is a temporary stitch line used to hold multiple layers of fabric in place prior to the next step in construction. It can be done at a longer stitch length of 4mm. Skip to Step 6 if you are creating the buttonhole version. Continue reading below if you are creating the non-buttonhole (sewn in strap) version.
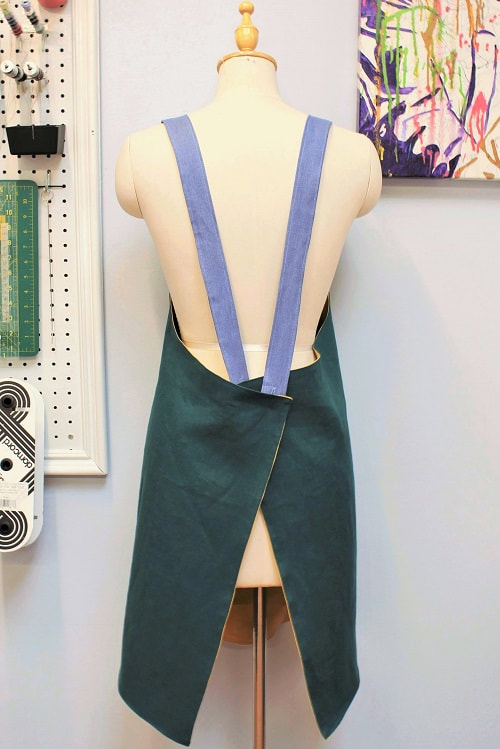
With remaining two strap ends, stay stitch them along the lower part of the armhole at a 1/4" SA. Align strap in between the marked notches (letters N and M from drafting). Ensure you cross the straps to create the crossback design element. Step 6With the right sides of fabric facing, sandwich the straps between side A and side B of the main apron pieces. Mark all pivot corners of the apron for ease of sewing. Pin all the way around the entire apron. 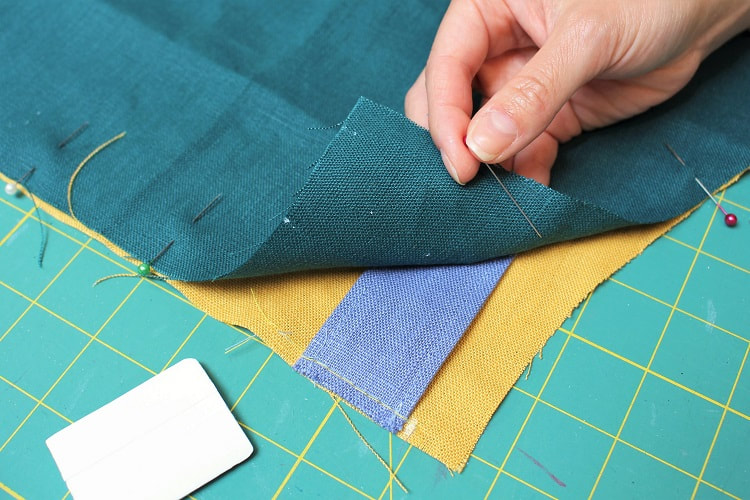
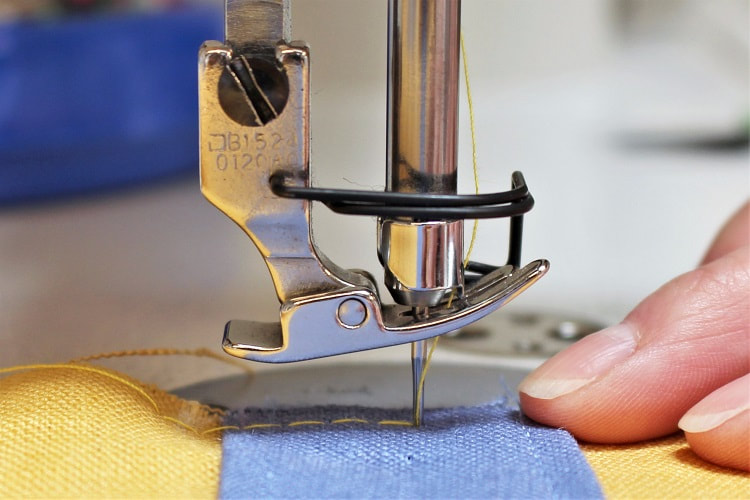
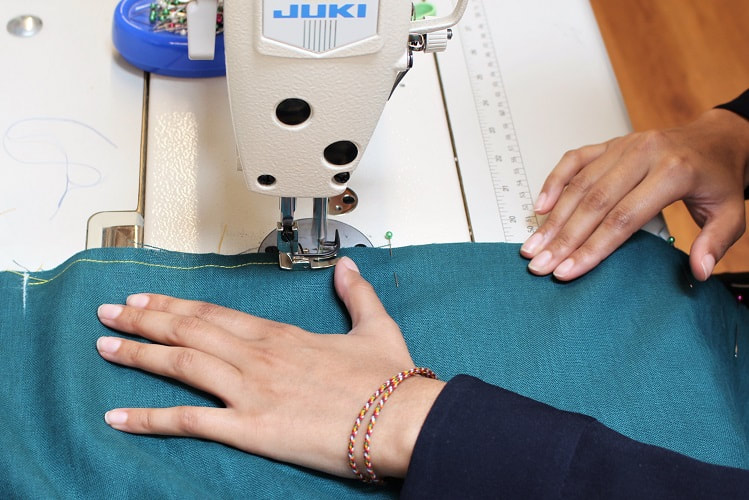
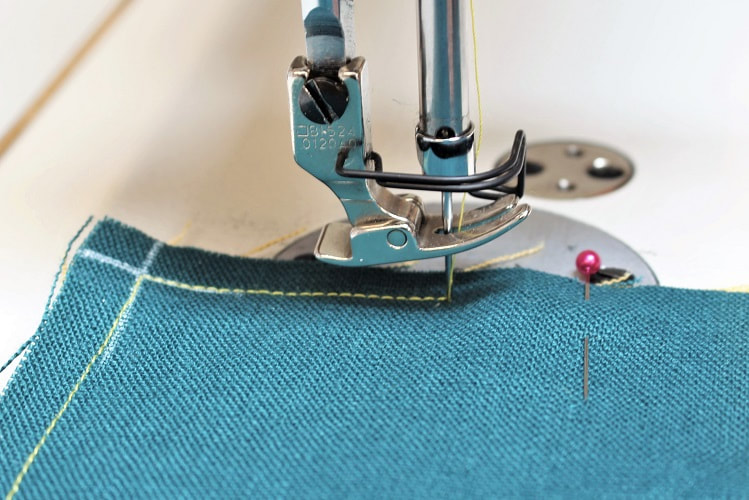
Step 7Stitch around the entire apron at your SA, leaving a 4 - 5" opening somewhere along the bottom of the apron away from the corners. To secure corners, drop stitch length down to 1.5mm, approximately 1" before and after each corner point. Pivot with your needle down when turning the corner.
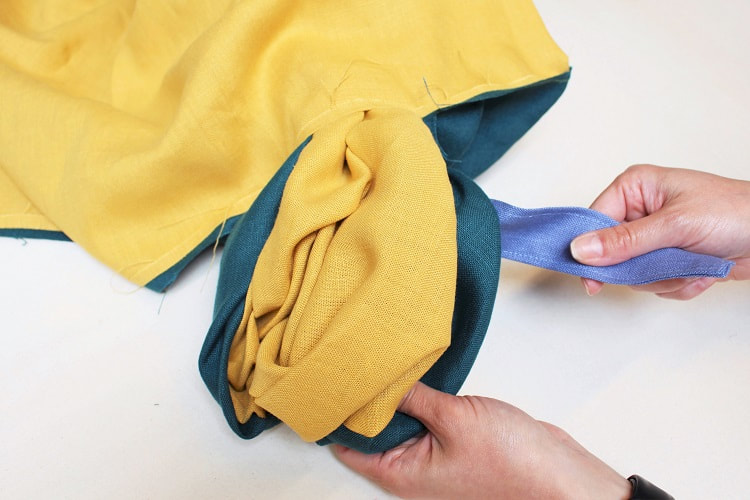
Step 8To reduce bulk in the SA and ensure the apron layers lay flat while worn we need to complete some trimming and clipping within the SA at the corners and along the curved seams. At each SA corner trim away excess fabric on a diagonal, staying approximately 1/16" to 1/8" away from the stitched corner. There are 6 corners to trim.  Along the curved seams (armholes), create small straight clips using the end of your scissors from the raw edge in towards the stitch line, staying at least 1/16" away from the stitch line. Clipping width is approximately 1/2" away from each other and staggered to decrease weak points in the SA. 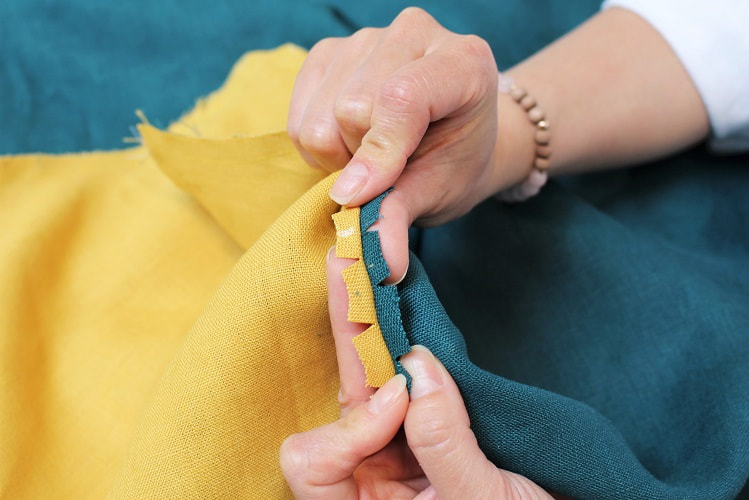 Step 9It’s now time to give birth to our apron! Flip the apron so that all layers are right sides of fabric facing out. Press the apron flat balancing side A and side B.
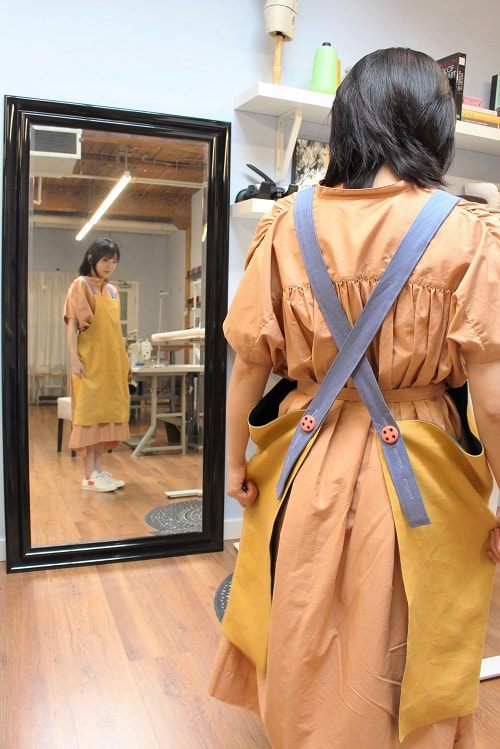
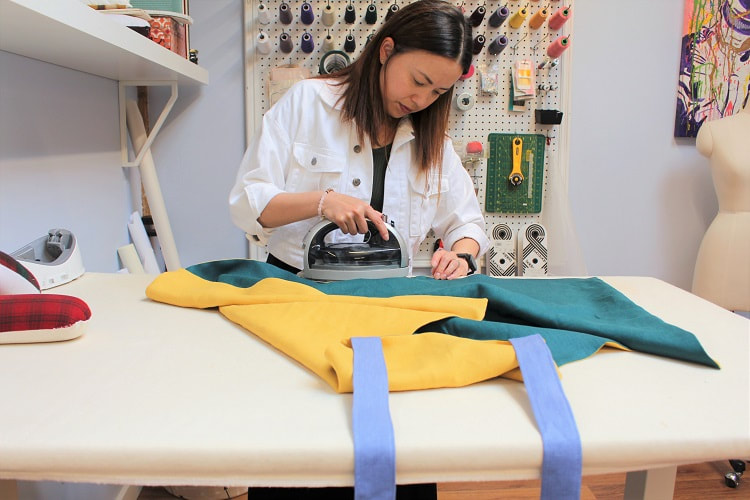
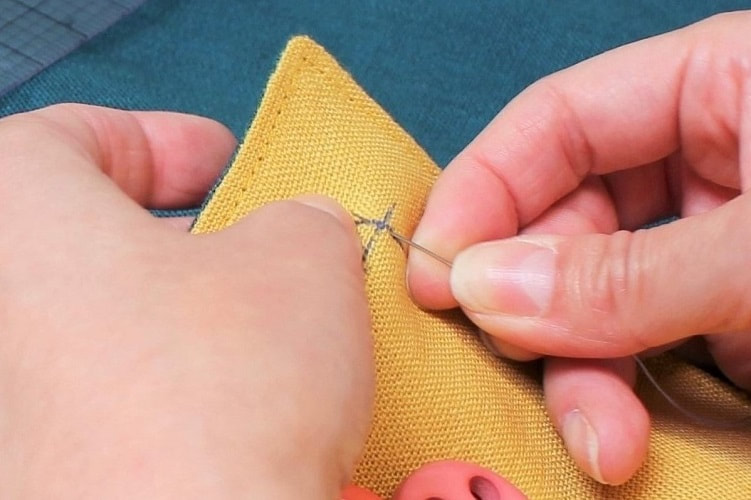
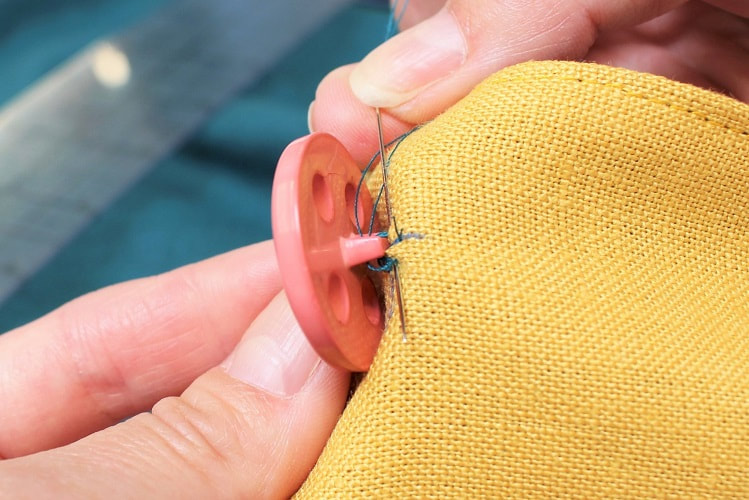
Step 10 (Final step to non-button version)Edge stitch around the entire apron, pivoting at each corner. This step will also close up the opening at the bottom of the apron. Feel free to place a few pins along the opening to ensure the layers of fabric stay put. A great place to start/stop your stitch line is at the bottom of the armhole so the back stitching is not visible from the direct front or back of the apron while worn. 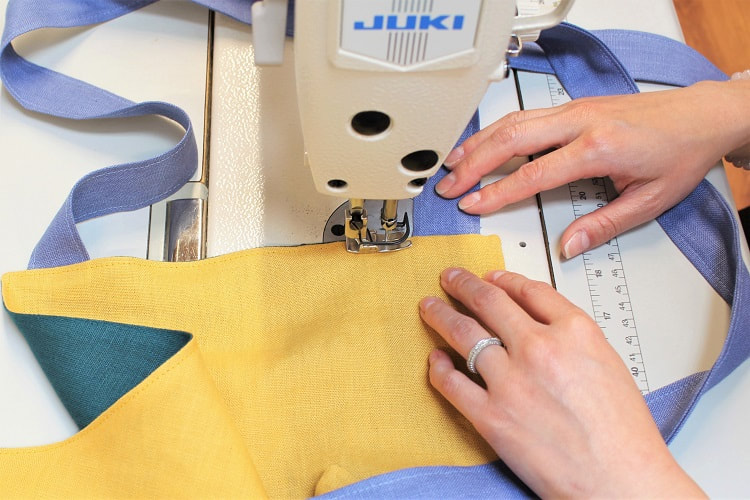 If you are creating the non button version (straps stitched in) you are now done. YAY! Continue on if you are creating the button version for this apron. Step 11 (Button option only)You will require 2 buttons. We have used 1" width vintage buttons. During the drafting process we suggested 3 buttonhole spots to allow the apron to be worn by multiple members of your household. A reminder that the buttonhole markings are indicated by letter V, W and X in your drafting. Mark your buttonholes, set up your buttonhole foot and sew as many buttonholes as you wish on the straps. 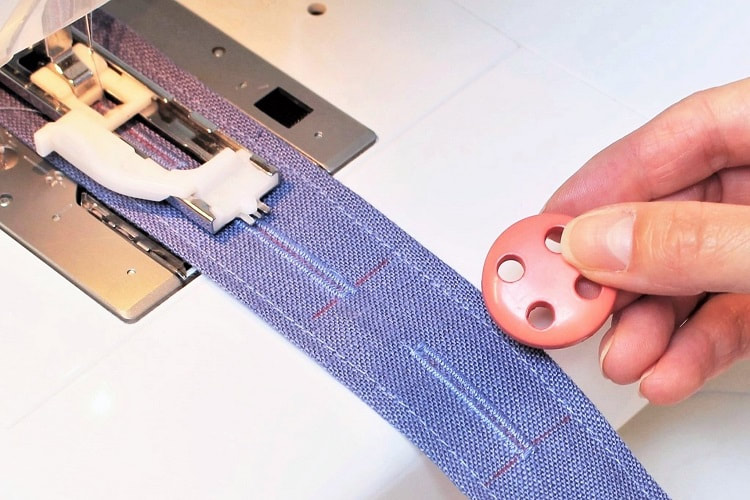 Step 12 (Button option only)Hand sew buttons onto the top corner of the back seam. This apron has the option to be reversible so you could potentially sew 4 buttons onto this design creating back to back buttons. To learn more about back to back buttons check out one of our latest designs— Couture Striped Jacket.
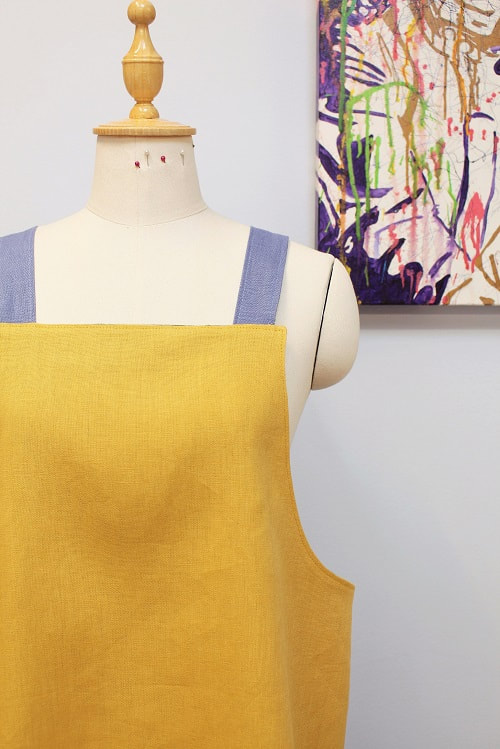
Final DesignTa Da! Your reversible crossback apron is complete.
Tag us in your final make on Instagram and be sure to sign up for our Insider Newsletters to keep up to date with our latest designs and future draft and sew-a-longs. Happy Drafting and Sewing!
Designed, photographed and written by Sheila Wong Studios.
1 Comment
Time for another draft and sew-a-long with me, Sheila Wong! When we are not sewing, many of us have taken to baking and cooking as a means to stay creative over the last few months. This month we are making a reversible crossback apron! In this two-part blog series, we will share the step-by-step pattern drafting and sewing instructions to help you create your own reversible crossback apron. Welcome to part one, the draft-a-long.
A crossback apron (sometimes referred to as a Japanese-style apron) is a no-tie, pinafore style apron that is typically made of a lightweight fabric such as cotton or linen. Grab your supplies and let’s start drafting! 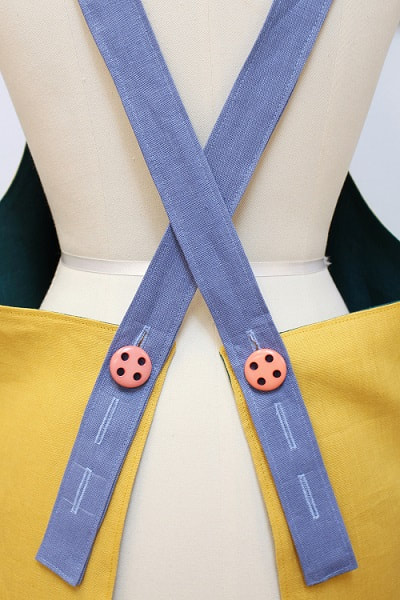 Drafting Supplies
 Drafting StepsIn these drafting instructions, we will be suggesting lengths and widths to fit a range of body types. Please note if you wish to personalize certain areas, go for it! We will make a note where you can personalize.  A to B= Draw a long vertical line close to the left hand side of your paper. Create A and B cross-marks equal to the desired length of the apron (30"). You can personalize this measurement. Our team in the studio averages a height of 5' 4", so we have used 30" for this example. B to C= From point B, square out a guideline creating the bottom of the apron. Measure out 20", label C. This measurement can also be personalized. We recommend measuring your hip circumference and divide by two. The wider this measurement the more overlap the back of the apron will have. Play around with this number to achieve the desired level of crossback. C to D= A to B measurement minus 9” (30" - 9" = 21”). From point C, square up a guideline. Measure up 21", label D. From point D, square in a guideline towards A to B line, label E where it hits the A to B line. A to F= From point A, square out a guideline creating the top of the apron. Measure out 5", label F. F to G= From point F, square down a guideline towards D to E line. Label G. G to H= Draw a 45 degree guideline in the NE direction from G. Measure along guideline 3”, label H. D to I= 5" E to J= 1" Draw in armhole connecting F - J - H - I - D. Curved section is between J - H - I. F to K= 1/4" K to L= 1 1/2". Please note K and L will become the shoulder strap notch placements. D to M= 1/4" M to N= 1 1/2". Please note M and N will become the end of strap back notch placements. 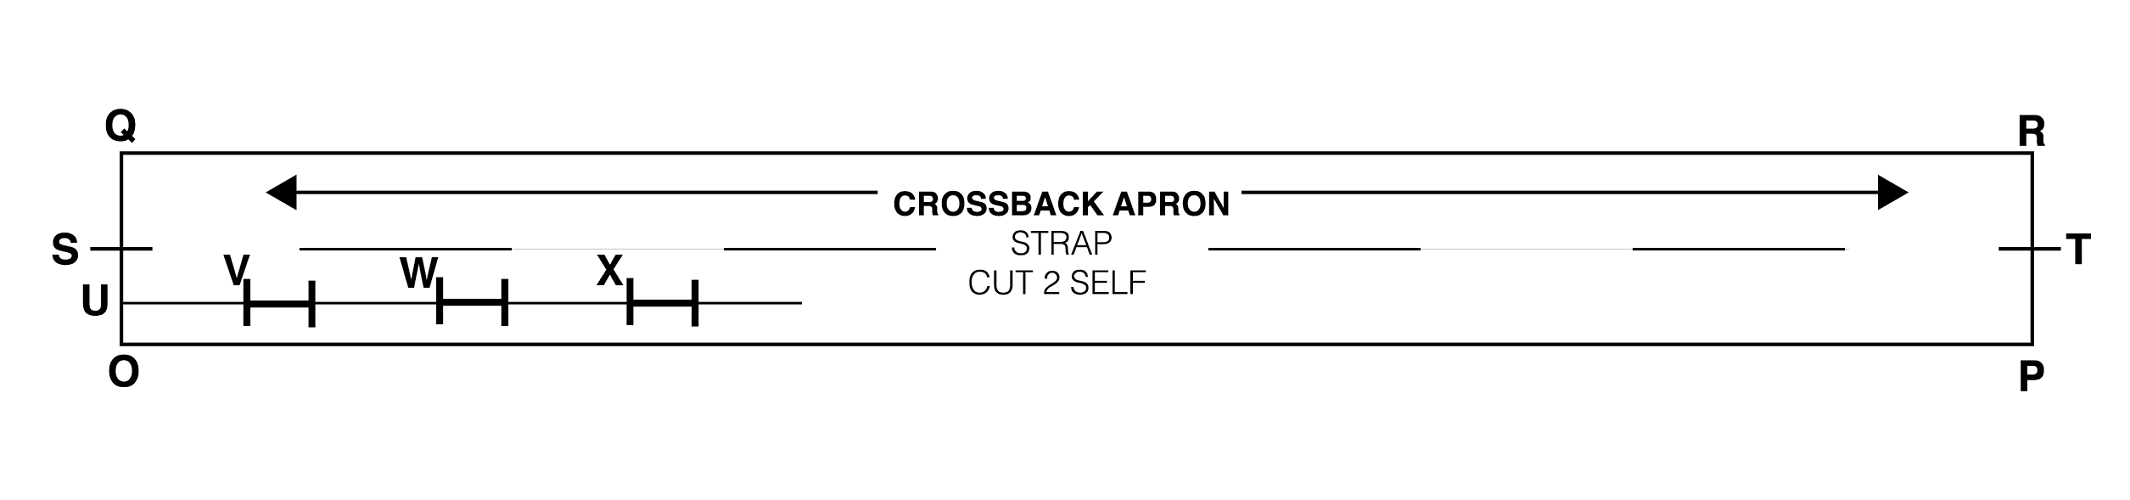 O to P= Draw a horizontal guideline close to the bottom of the paper. Create O and P cross-marks equal to the desired length of the strap (30"). 30" works well if you are creating an adjustable button strap option. If you are opting for a sewn in strap version, we recommend using a length between 22-25". Please personalize accordingly. O to Q= From point O, square up a guideline. Measure up 3", label Q. P to R= From point P, square up a guideline. Measure up 3", label R. Draw a line connecting Q and R. S= Midway between O and Q (3" divided by 2= 1 1/2") T= Midway between P and R (3" divided by 2= 1 1/2") Feel free to draw in a dashed line connecting S and T. This creates a fold line in the strap. Stop drafting here if you are creating a sewn in strap. Continue on if you are creating an adjustable button strap option. U= Midway between O and S (1 1/2" divided by 2= 3/4". Square right a guideline for buttonhole placement. U to V= 2" V to W= 2" W to X= 2". Point V, W and X are the starting points of each buttonhole. Buttonhole length is personalized to the size of your button. Mark Sewing Notches= Using a colored pen/pencil highlight points H, K, L, M, N, S, and T. Include V, W, and X buttonholes. Draw in Grain-lines= On MAIN APRON, draw in a parallel line to A to B line. Bend ends of grain-line towards center front to represent on fold position on fabric. On STRAP, draw in grain-line parallel to O to P line. This completes your working pattern. To create your final pattern to use for sewing, place a blank piece of paper under your working pattern, weigh it down and transfer your pattern using a tracing wheel. Ensure you transfer not only the shape of the pattern but also the highlighted notches and grain-line. Add your desired seam allowance to the final pattern. We suggest using a 3/8” seam allowance. Draw in notches, grain-lines and labels as follows. CROSSBACK APRON MAIN APRON CUT 1 SELF (MAIN) ON FOLD CUT 1 CONTRASTING (LINING) ON FOLD CROSSBACK APRON STRAP CUT 2 SELF (or contrasting if you are feeling jazzy!) Ready to cut your fabric? Click this link: Sew-a-long: Crossback Apron (Part 2 of 2).
Happy Drafting!
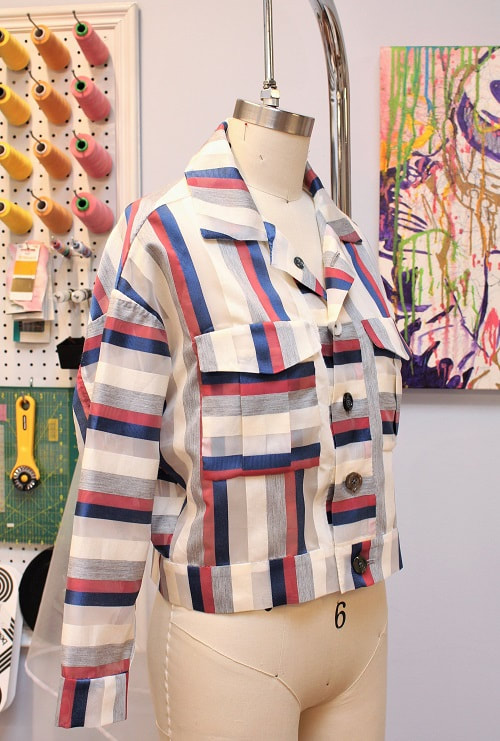
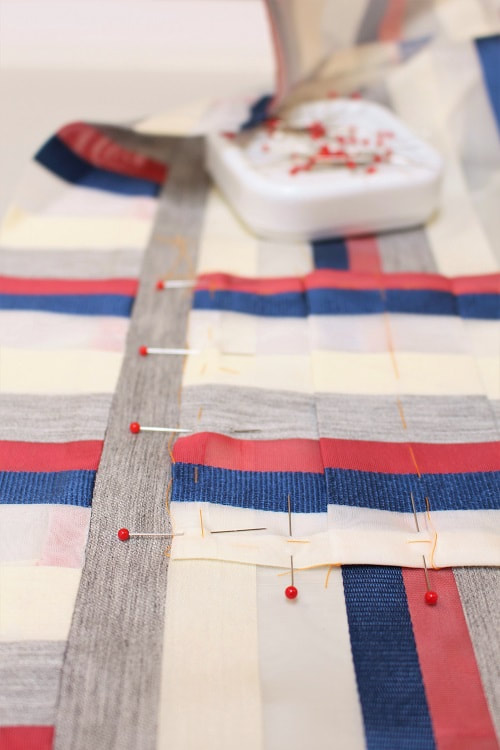
Designed, photographed and written by Sheila Wong Studios Tis the sea-sun! Our latest sun worthy design is a couture cropped jacket featuring contrasting stripes (vertical vs horizontal). This design might look familiar and that's because we used the same pattern as our denim jacket series. Only this time, we went full-couture (almost)! In this blog post, we discuss how we adjusted the pattern so we applied couture sewing techniques to this design, as well as highlighting our favorite design elements.  Pattern adjustments were made to accommodate for the thread marking application of this fabric. Adjustments included removing all seam allowances off the original pattern so we can easily thread mark around each pattern piece, directly on the fabric. Thread marking is the process of basting around each pattern piece or the stitching lines in contrasting thread color. Thread marking stitches are inserted in prior to cutting out fabric, as they frame each pattern piece. They are also used to clearly display any notches. This allows you to construct the garment with precision. The thread markings come out after your permanent seam is installed. Fun Fact: In the last 5 years, we have explored over 15 garments with full couture sewing techniques. You can find some of these designs on our Blog Archive.
FabricOne of my favorite textile shops in the world is Nagato Fabrics in Nippori Textile Town in Tokyo, Japan. They have 3 shops within one block of each other. Each shop specializes in specific categories of fabric. One shop for knits, one for heavy weight woven's like wool, and the main shop has a variety of garment fabrics. 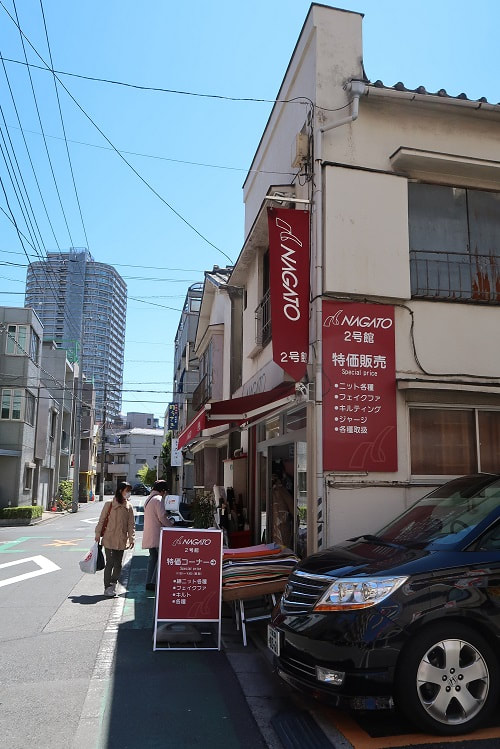 Originally, I picked up this striped organza fabric in 2017 with the intention of using it as an overlay for a full mid-calf length skirt. But as you know, designs can change and its now 2020. This fabric is a mixture of cotton, silk and polyester. Base is silk organza. 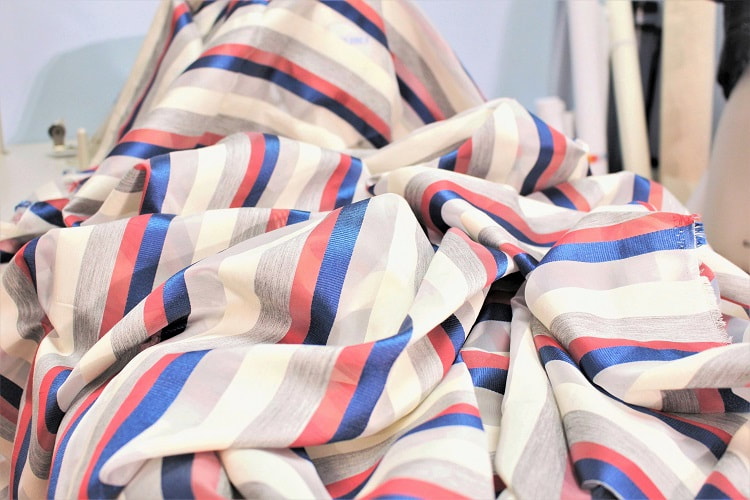 Want a mini glimpse into the streets and textile eye candy of Nippori Textile Town? Check out our video below. Project Specs
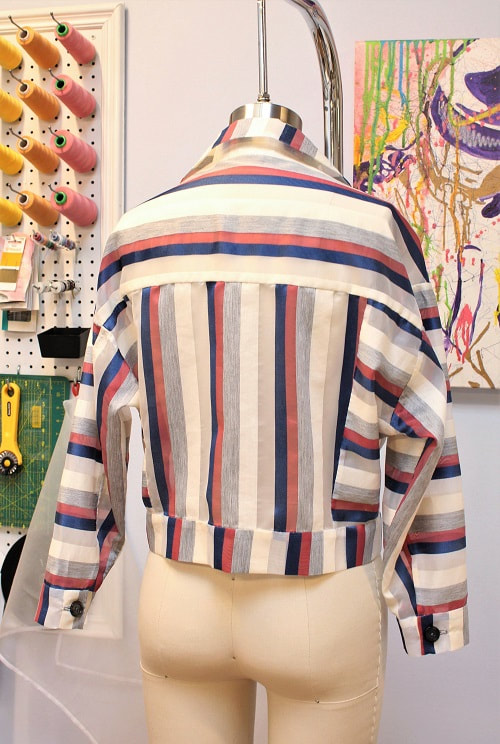
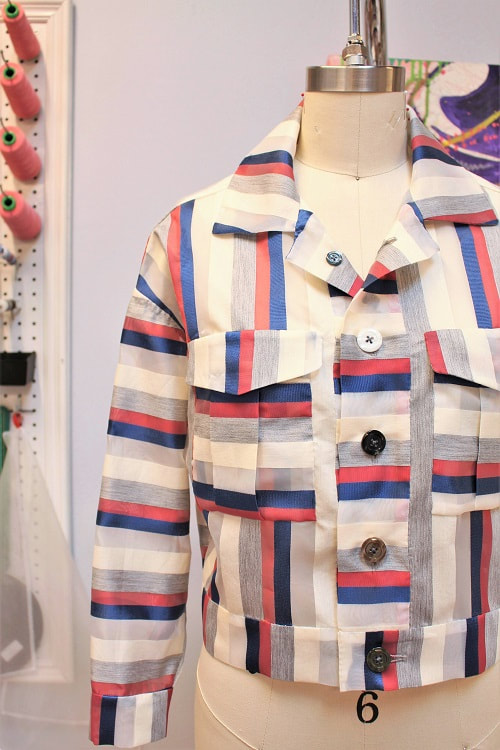
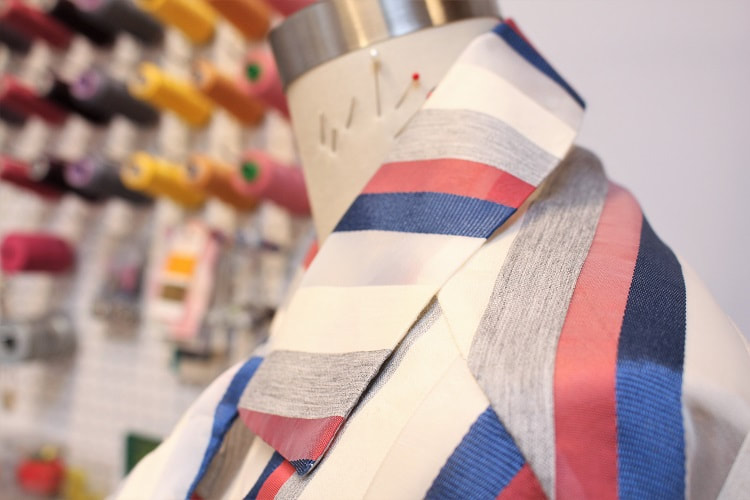
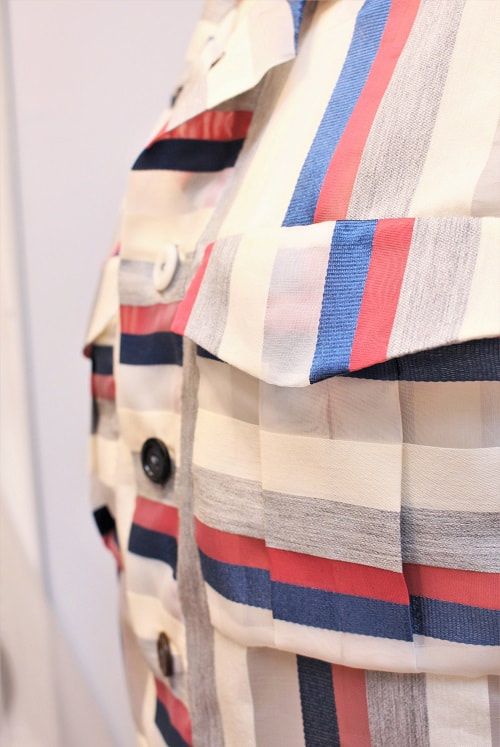
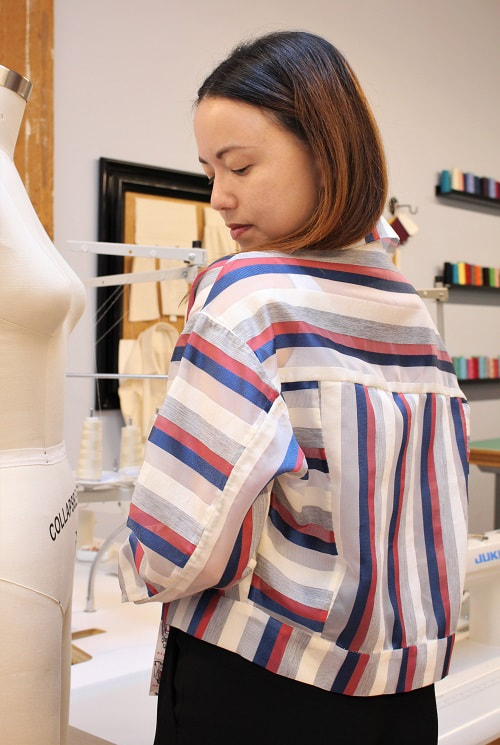
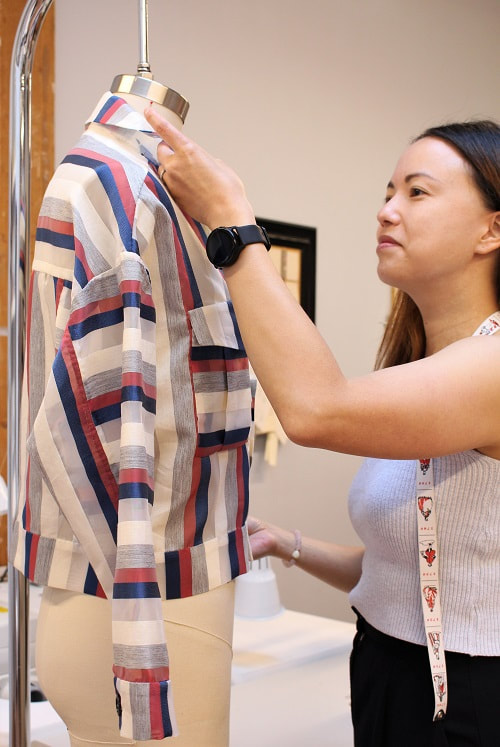
Design ElementsThis jacket is made up of over 10 pattern pieces, so yes there are a ton of design elements involved. Below, I highlight my favorite elements and share my thought process on new techniques you might want to try. Playing with StripesPerhaps a visual assault to the eyes, but playing around with vertical vs horizontal stripes from one panel to the next lets you see all the seam work involved in this design. When you have a look at this exact design with just solid color fabric, you miss out on noticing the 2 piece sleeves, the cuff or even the box pleat pockets.
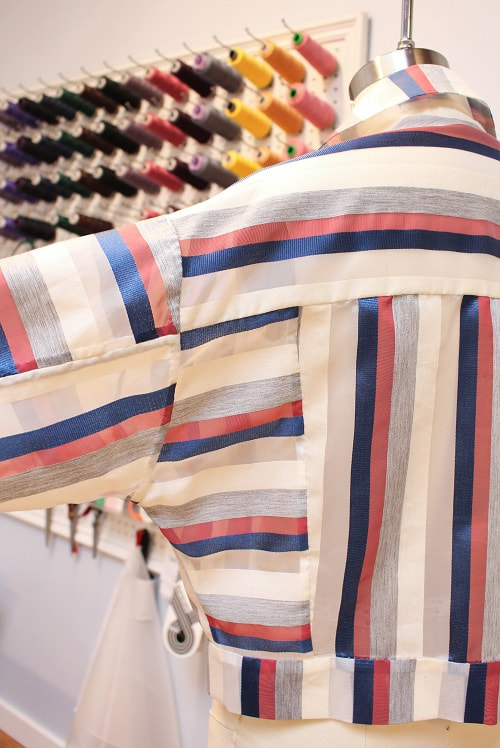
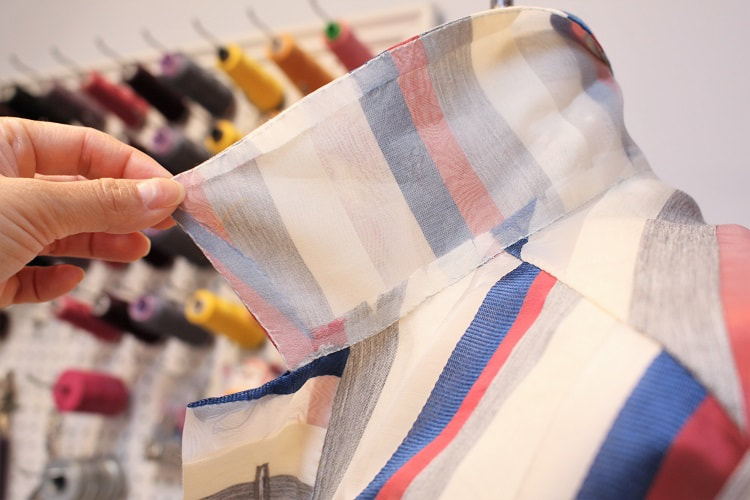
Looking at the final design, I am contemplating changing out the cuff hem facing to be horizontal instead of vertical. What do you think? Maybe I am overthinking it! CollarThis fabric is slightly shear, so we could not cut the under collar in the same striped fabric. We used a solid color of ivory silk organza as the under collar and under the pocket flap to ensure the stripe does not get compromised visually.
Something really special about using see-through fabric is the ability to see the inside workings of a garment. You can see the graded seam allowances around the neckline and the clipped areas around the curve. Great as a visual aid for teaching my clients! Box Pleat Patch Pocket with FlapOne of the most traditional pockets found on a denim jacket— a box pleat pocket with a flap. Due to the delicate nature of the fabric and the hand sewing techniques applied, we had to avoid traditional denim jacket techniques such as top stitching and buttons. Pocket components were basted, then slip stitched down to front panel. The pocket flap received an extra step with a false French seam finish to avoid any exposed raw edges under the flap. In addition, each corner of the pocket opening and flap opening received extra slip stitches as back stitching for strength.
Originally, I had intentions of placing buttons and button holes on the pocket just as a traditional denim jacket would have, but once a button was placed down it didn't make sense. The button would take away from the playfulness the vertical and horizontal stripes had going on. There is a possibility the weight of the button would be too much for the pocket as well. ButtonsTime for some truth. This jacket sat on a rolling rack for weeks because the thought of buttons and button holes on this not so stable fabric terrified me. Many factors were involved where...
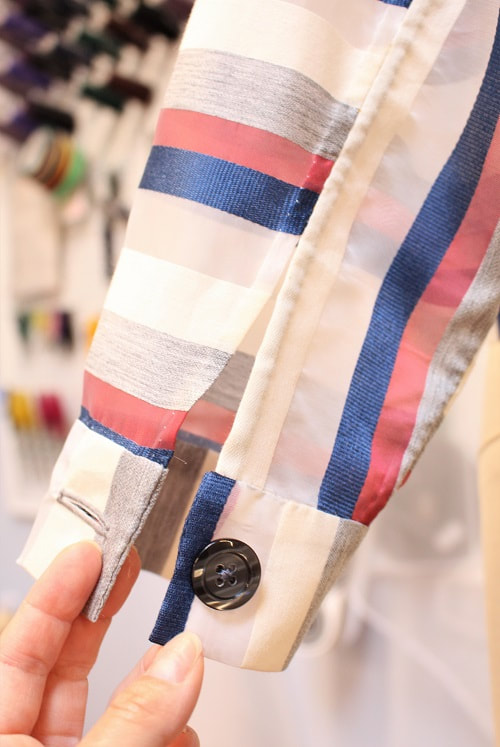
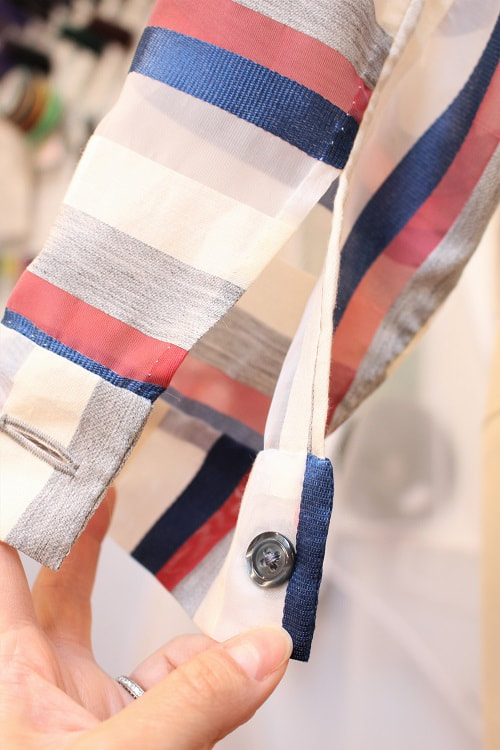
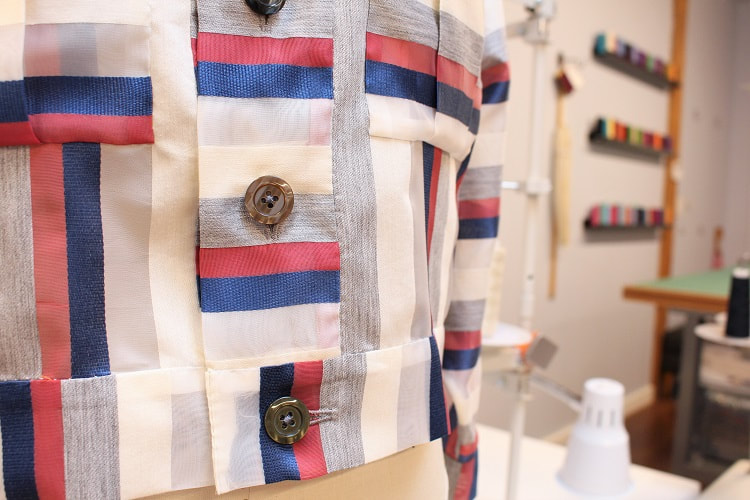 Have you ever stabilized a button with another button?! This was the perfect solution to my delicate fabric vs button weight concern. Main (larger) button on the exterior of the garment and a secondary (smaller) button on the interior of the garment but stitched together. This ensured the buttons do not tug or weigh the fabric, but rather balance and stabilize each other. Below you can see the exterior and interior view.
A fun little side (but still related) story is that all the buttons used on this jacket were of different colors but same style/family of buttons. Button colors ranged from brown, blue, green, black, white and grey. All kinda worked with the multi-colored stripes going on. Final DesignWe're ready to wear our design out and about! How would you style with this jacket? Let us know your thoughts in the comments.
If you would like to learn more about couture hand sewing techniques, feel free to CONTACT the studio. It is easy enough to inject small bits of couture techniques in a project or go full out on a fully hand stitched garment. You decide! Happy Sewing!
Designed, photographed and written by Sheila Wong Studios. |
Archives
November 2022
|


 RSS Feed
|
|
Copyright © 2024 Sheila Wong Fashion Design Studio Ltd. All rights reserved.