|
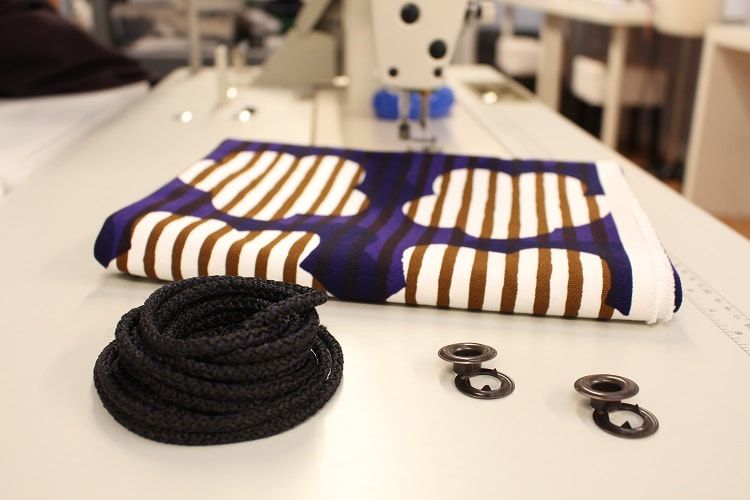
Time to stitch with us in our latest sew-a-long! We received a ton of requests for a tutorial on our drawstring backpack, so here it is.  Materials
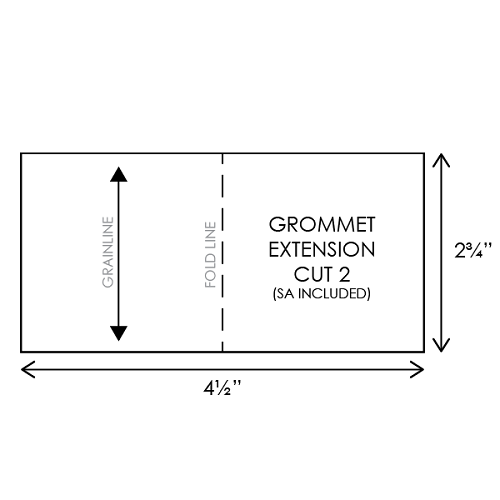
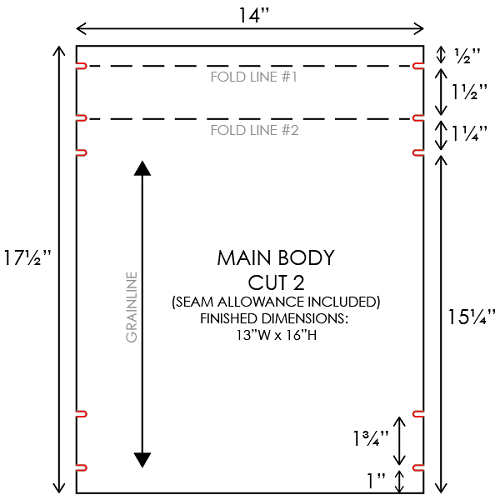
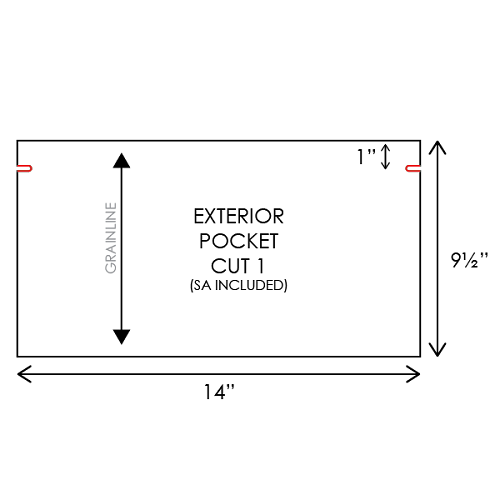
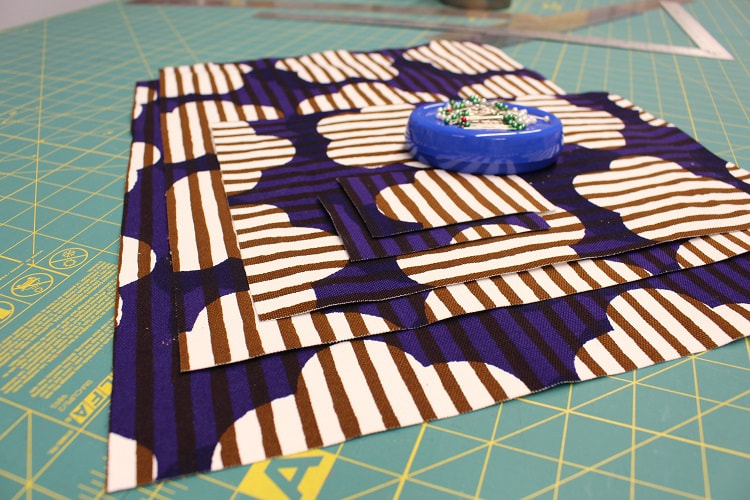
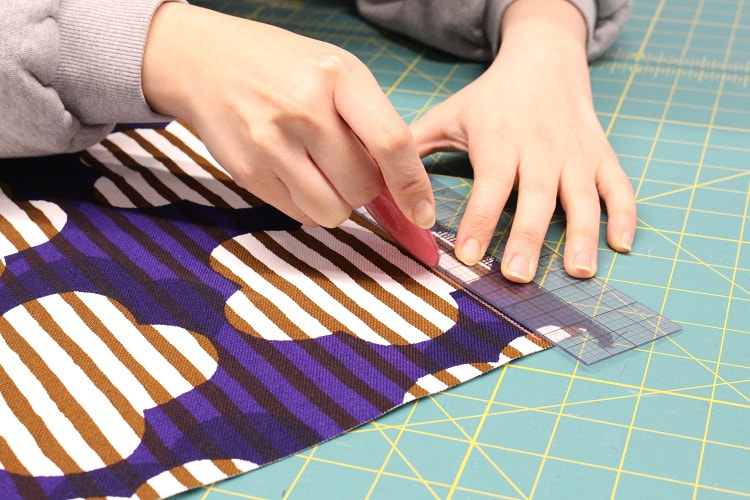
 Step 1Create paper patterns for the following patterns, or mark directly onto fabric. Seam allowance included in dimensions: MAIN BODY, EXTERIOR POCKET & GROMMET EXTENSION.
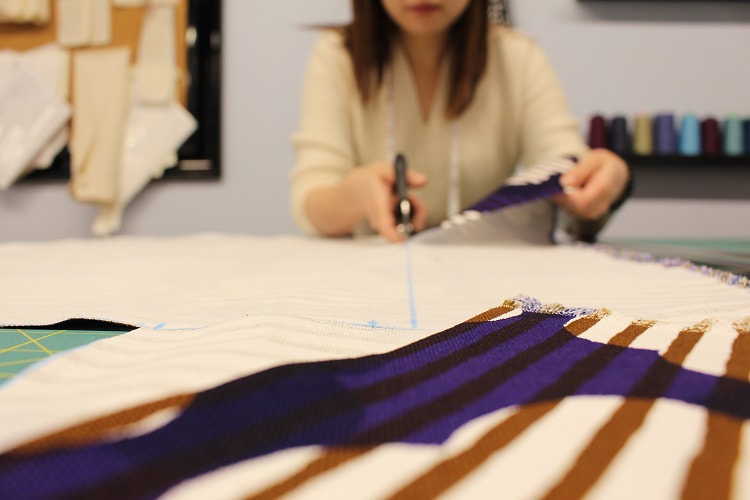
Step 2Cut out all fabric and mark notches. 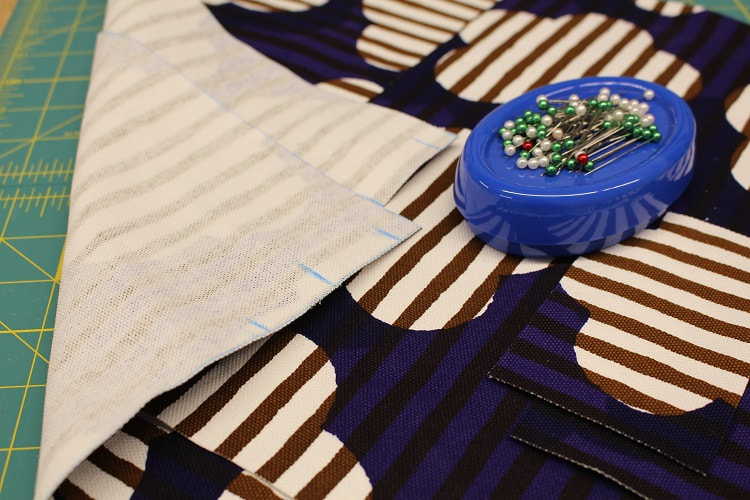 Step 3 Over-lock top raw edge of the EXTERIOR POCKET piece. Alternatively, you can zig-zag or pink your raw edges too to avoid fraying. 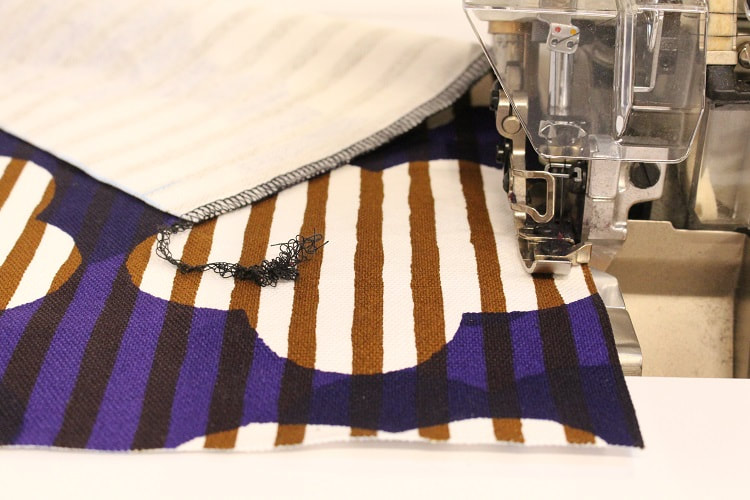 Step 4Mark and fold in top of the EXTERIOR POCKET by 1”, press in place. Pin and stitch at ¾” seam allowance.
Step 5Place the EXTERIOR POCKET on top of one MAIN piece, lining up the side seams and bottom. Pin and stay-stitch pieces together. Stay-stitching is a stitch done to hold two layer of fabric together prior to being attached onto another layer of fabric. It is typically done in a longer stitch length (4mm) and done within the seam allowance to hide it away.
Step 6Create separate pockets on the EXTERIOR POCKET. Mark a vertical line wherever you wish, pin and top-stitch in place. We decided to create 2 pockets equal in size. 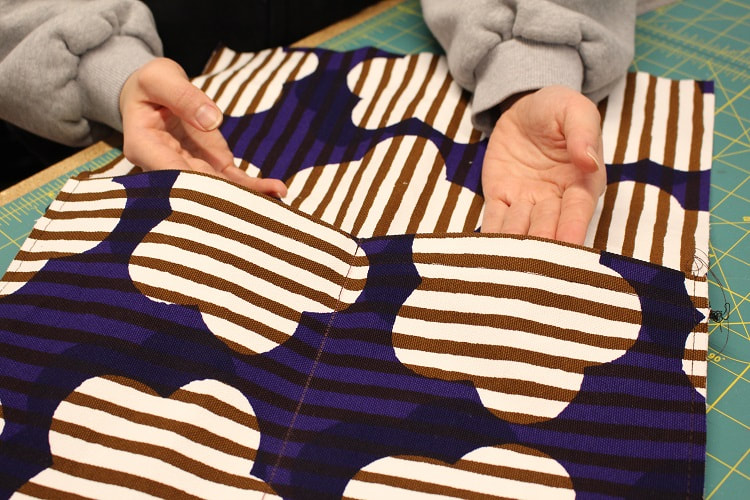 Step 7With right sides of the fabric facing each other, pin and stitch the top and bottom seams of the GROMMET EXTENSION pieces. Repeat to the other piece so you have two in total. Clip away excess fabric in the corners. Flip and press.
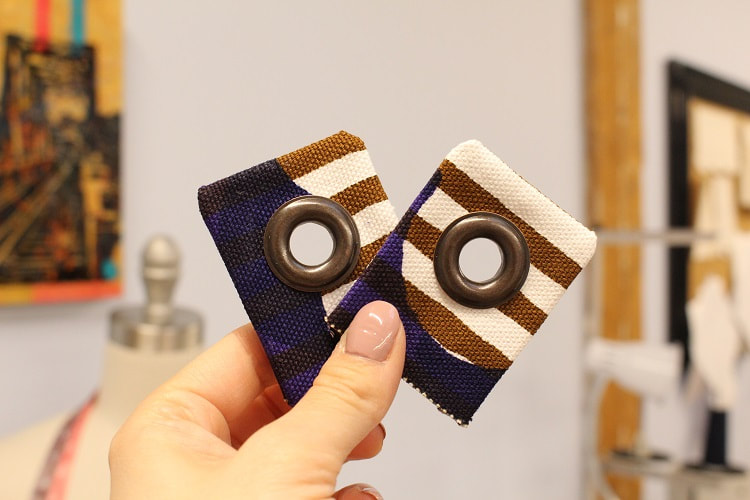
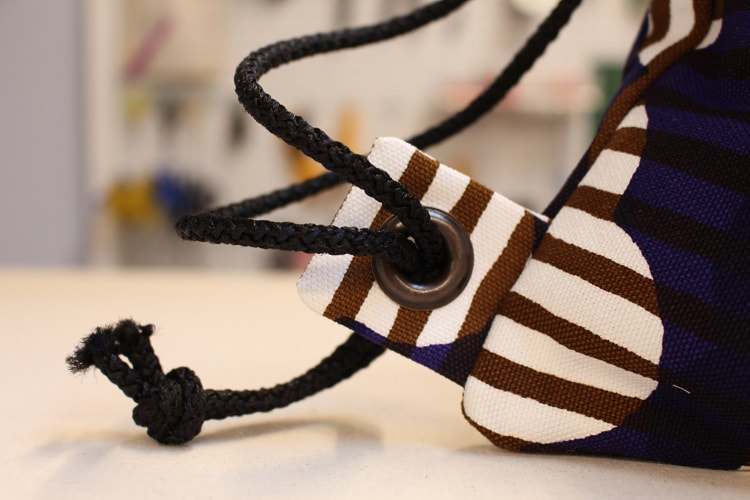
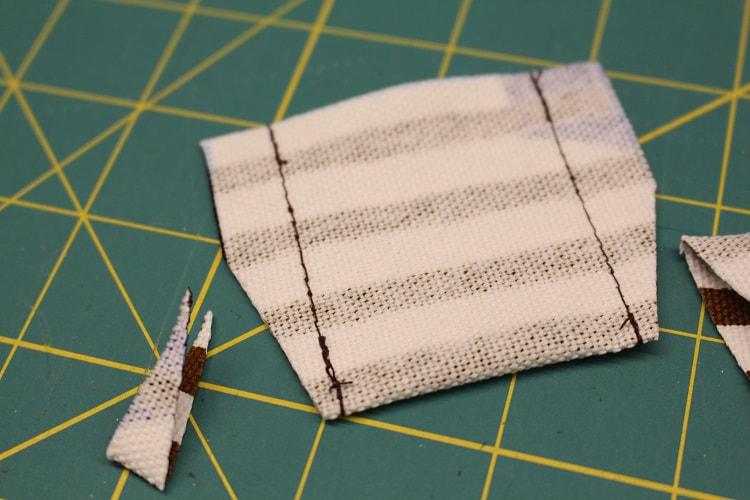
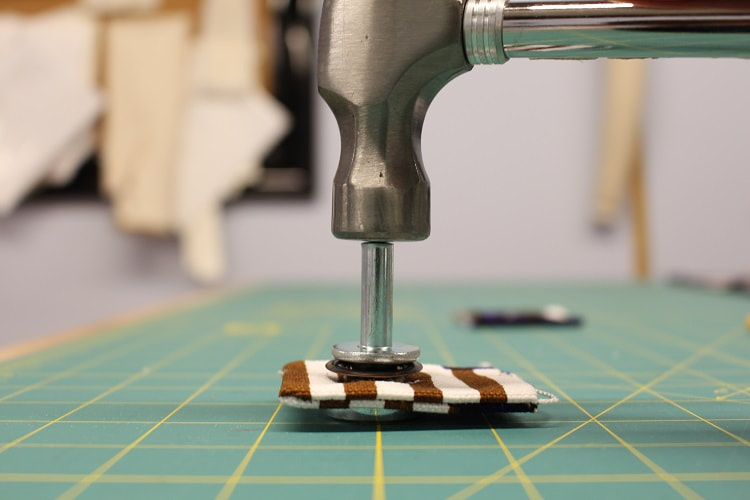
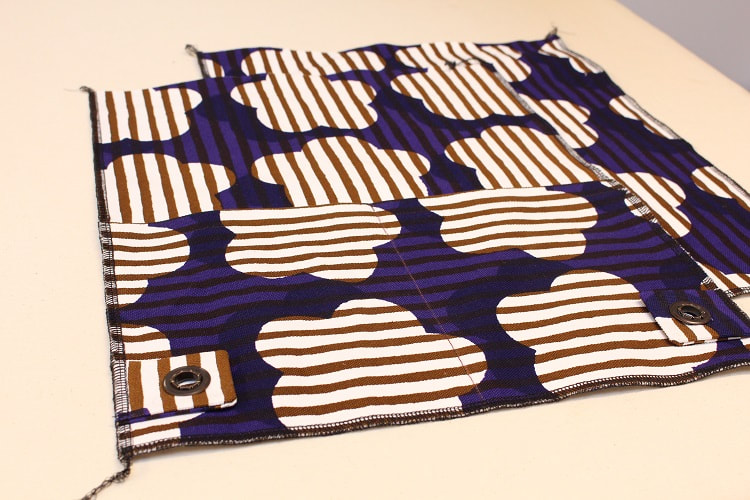
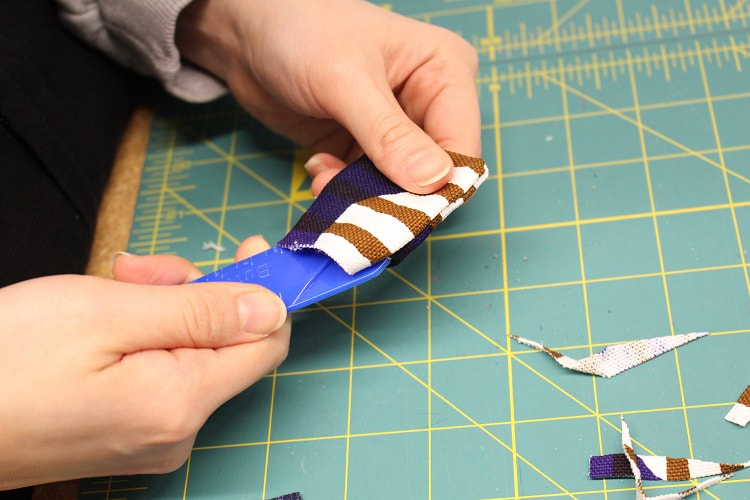 Step 8Create a small hole in the center of the GROMMET EXTENSION, just enough for the male piece of the grommet to fit through. Place the female grommet under and hammer in place securing the grommet.
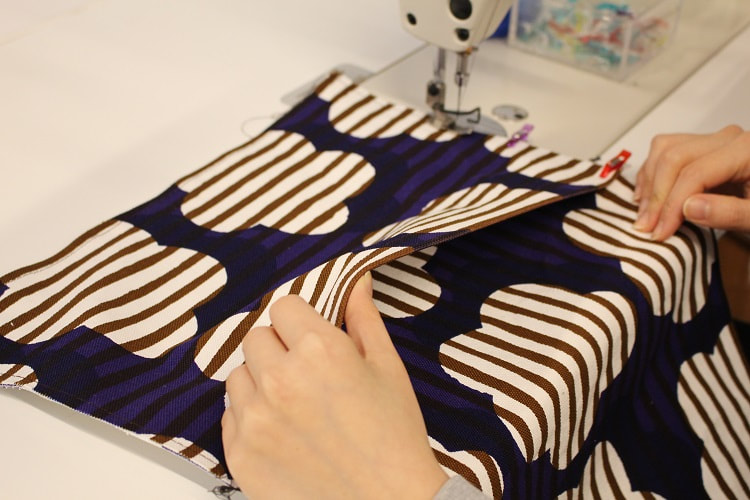
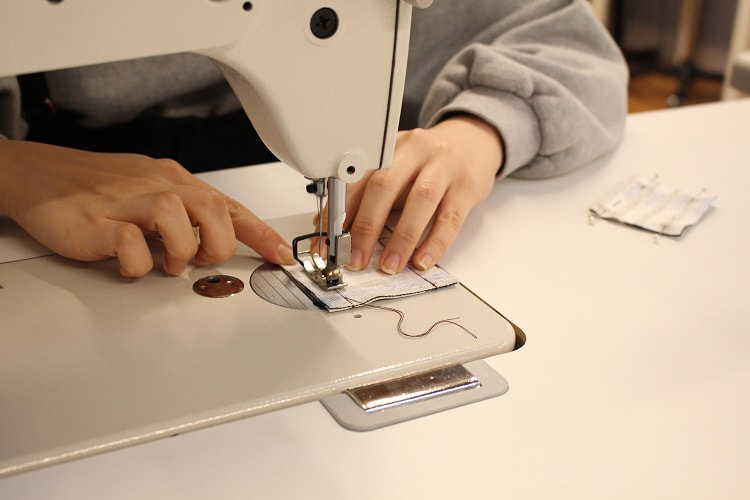
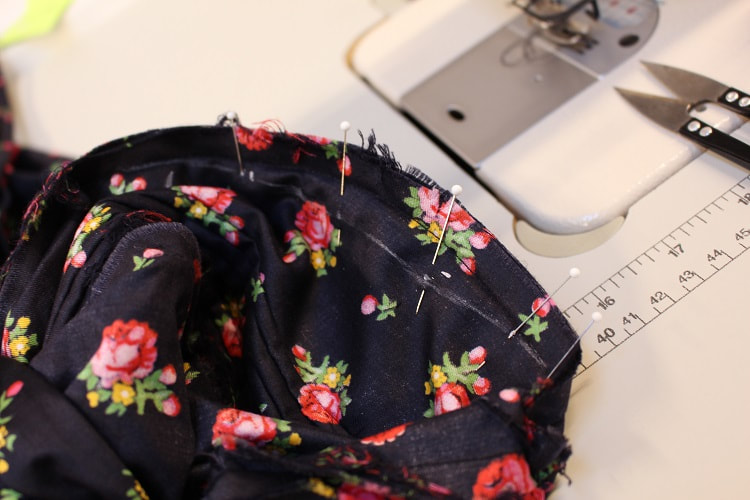
 Step 9Stay stitch the GROMMET EXTENSION to the side seams of the MAIN piece, lining up to notches marked on the MAIN pattern piece. 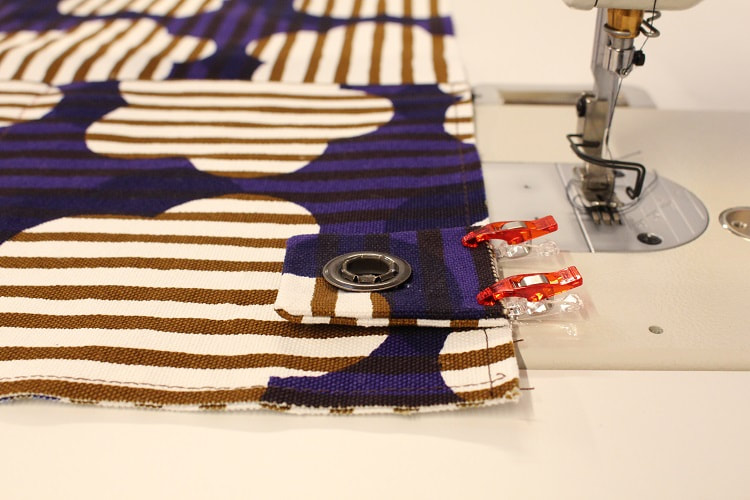 Step 10Over-lock separately each side seam and bottom of the MAIN pieces.
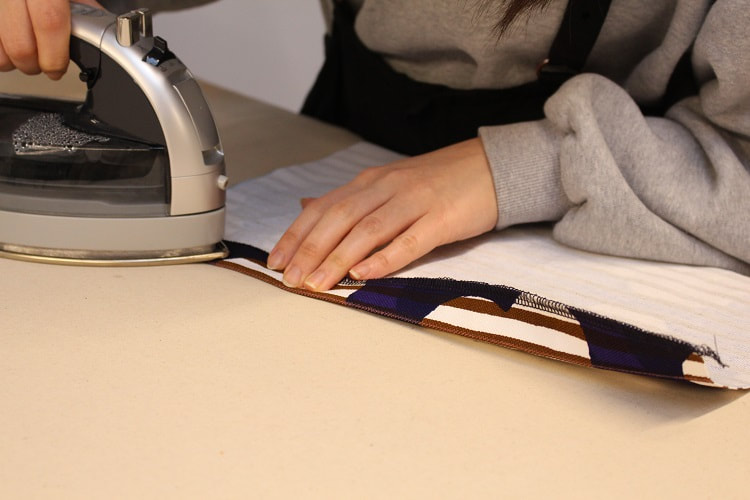
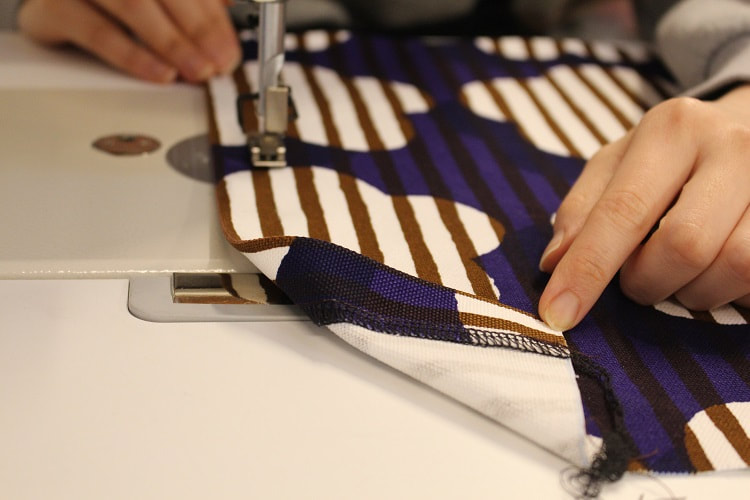
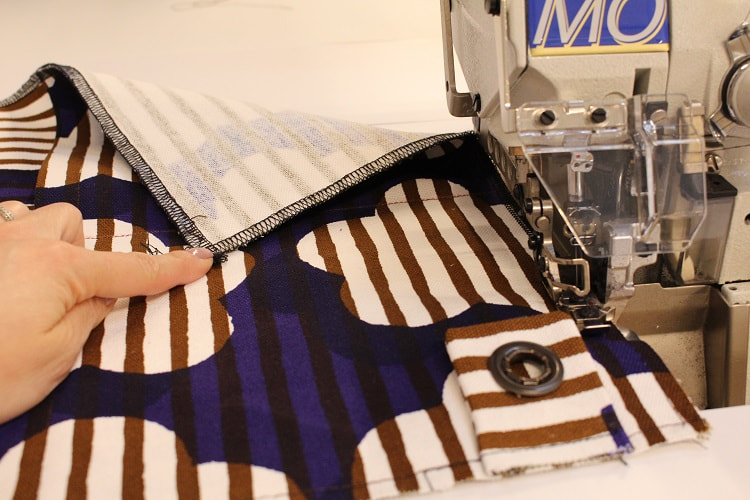
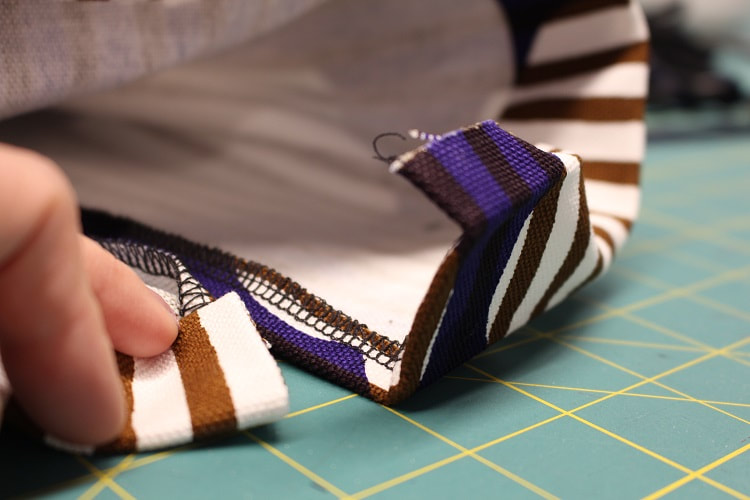
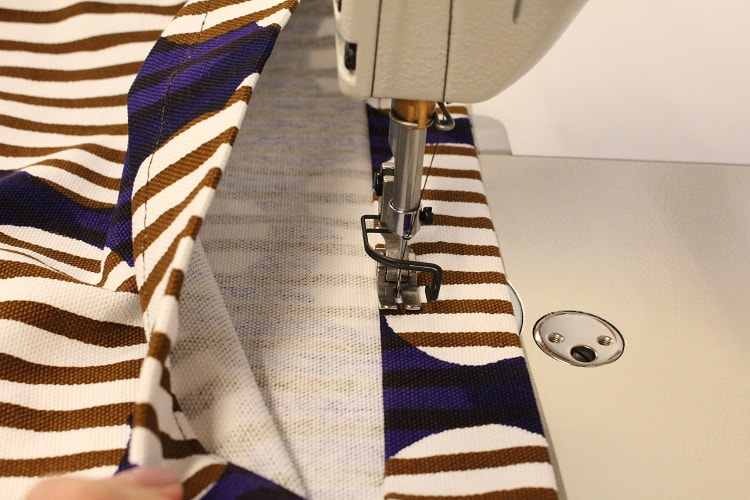
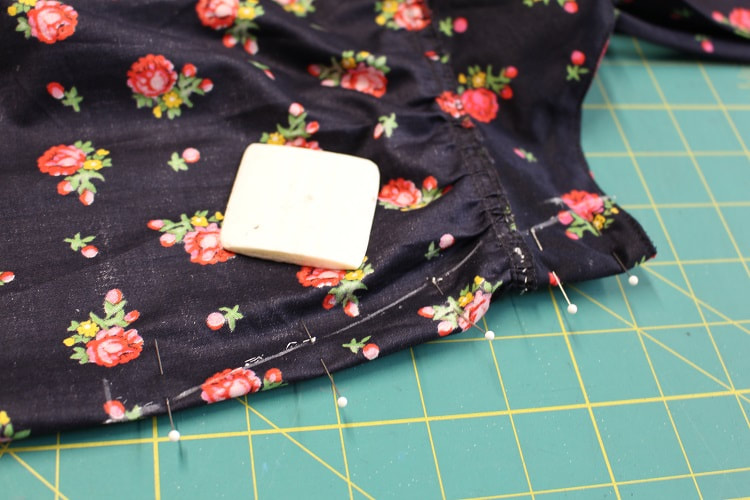
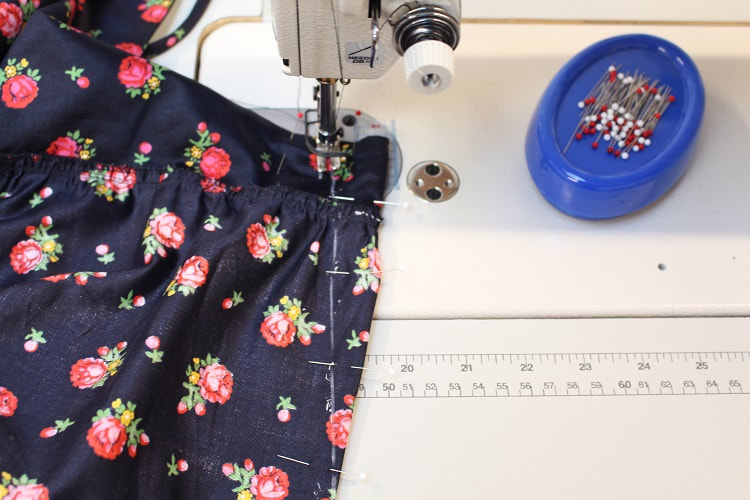
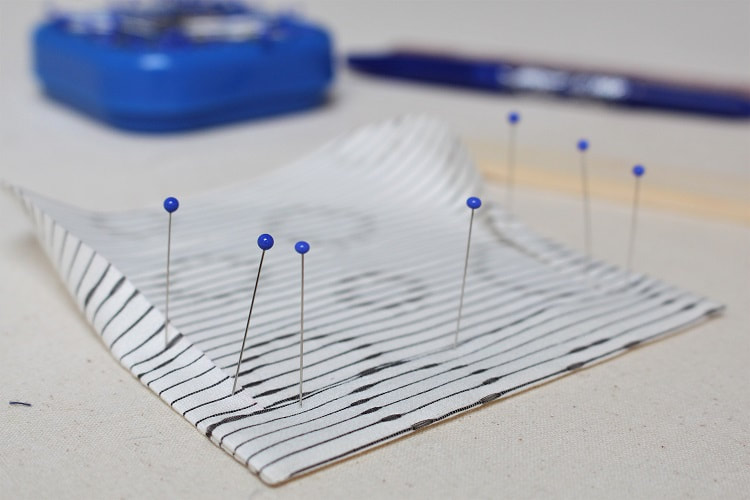
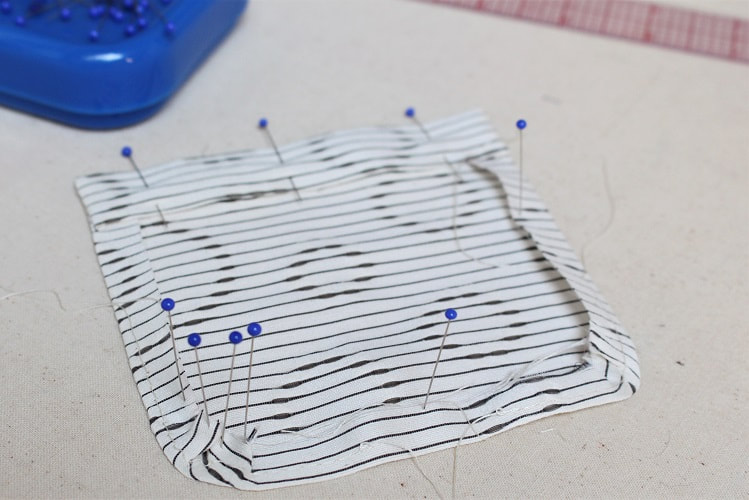
Step 11With right sides of the fabric facing each other, pin and stitch the MAIN pieces together. Starting at the top opening notch, going down a side seam, pivoting at the corner, across the bottom, pivoting again and back up the other side seam stopping at the opposite notch. 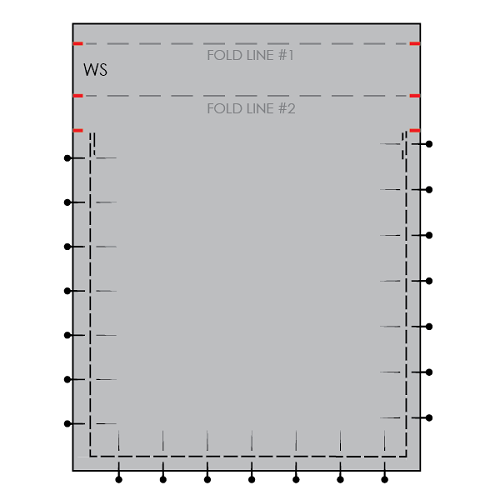 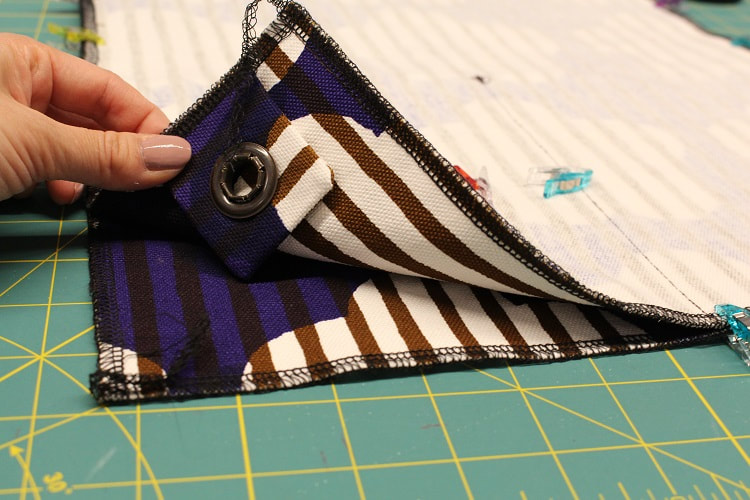 Step 12Press seam allowances open, continue to press the remainder of the side seam up to the top edge of the bag by the ½” seam allowance. 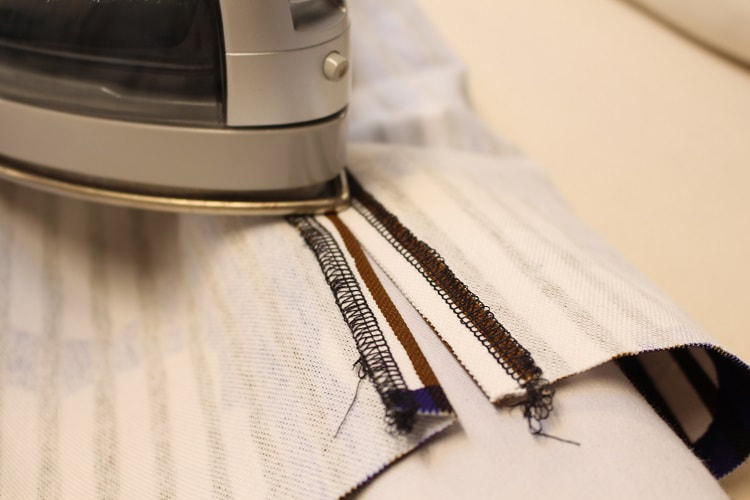 Step 13Press in top along fold line #1(½” seam allowance) and then fold line #2 (1 ½” seam allowance). Pin top of bag folded edge in place and edge stitch.
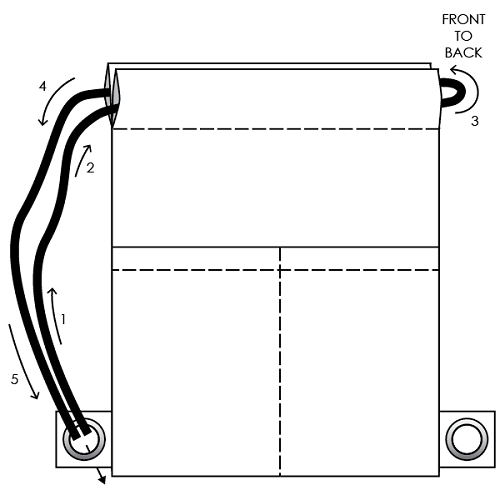
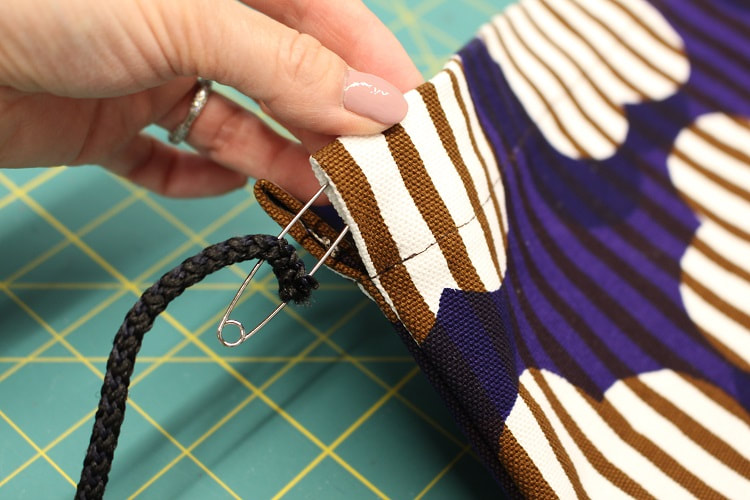
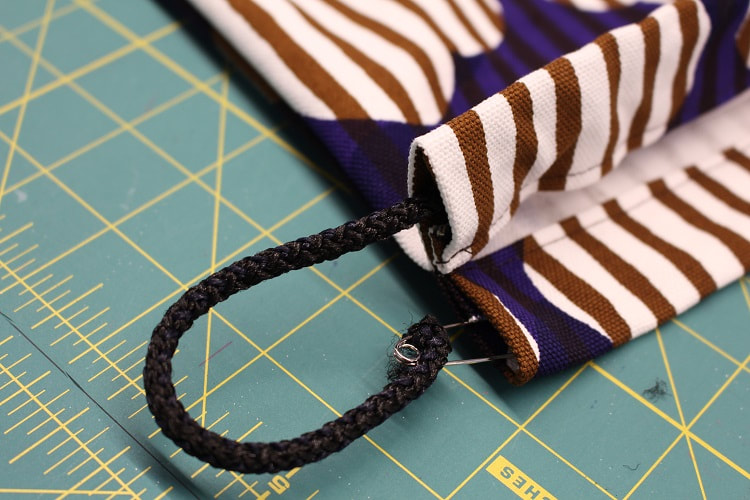
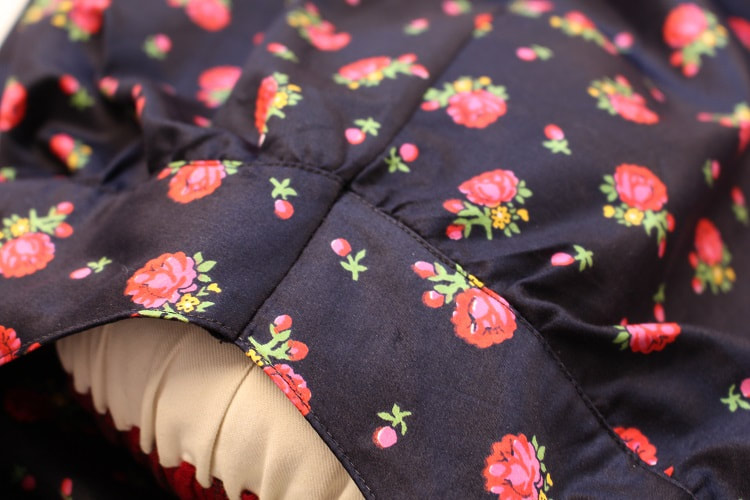
Step 14Divide your cording in half, so you have 2 pieces that are approx 1.8 m in length each. Depending on your height, you may need a longer amount. This size is good for a 5' 4" person.  Step 15One piece of cord will have its ends tied together and live behind one grommet. Starting with one piece of cord, feed it through the front top hem tunnel, turning in towards the back top hem tunnel. The two ends of the same cord should be coming out the same side of the backpack. Take those ends and feed them through the grommet and tie them together to create a knot. Repeat the same to the opposite side using your second cord piece. Use a safety pin to help feed cord through.
  Final DesignTa-da! You've just made your own Draw-String Backpack. Tag us on social media to show us your creation. 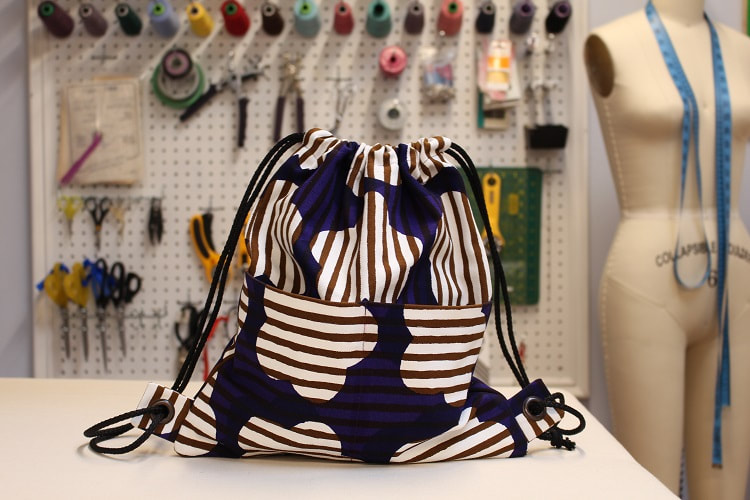 Happy Sewing!
Designed, photographed and written by Sheila Wong Studios
0 Comments
Going into 2019, we are still deeply in love with wide pants. Our latest design pushes the limits on how "wide" wide pant legs can be. Do you think there is such a thing as too wide? We believe that if you can imagine it, you can make it. This blog post will give you an insider view of our Tailored Culottes. By the way, the fabric was purchased from Nippori Textile Town in Tokyo, Japan. 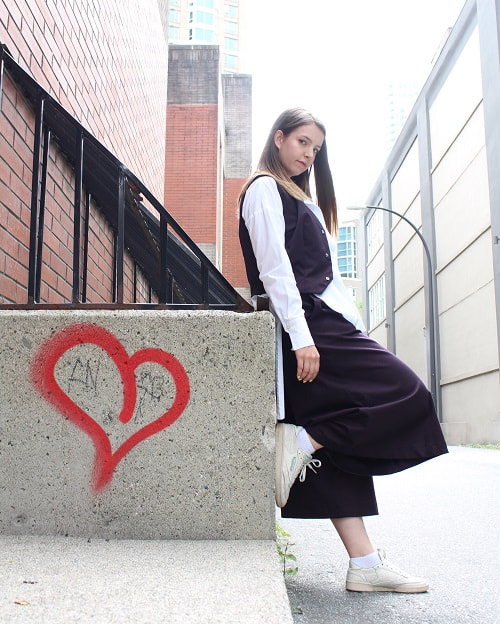 Project Specs
Design ElementsThere is nothing super fancy about these pants. The usual elements of a waistband, pocket, zipper, hook closures and darts are present. The following elements are our favorite elements to share with you. Fully Enclosed Waistband Getting the waistband to sit cleanly takes a ton of pinning, stitching, pressing, clipping and REPEAT. We wanted to reduce bulk in the waistband, therefore the initial waistband seam was graded (SA's cut at different widths). We also over-locked and exposed the interior waistband edge on the inside of the garment. From the exterior, we 'stitched in the ditch' to maintain a really clean look.
Slash PocketsA slash pocket is very common in commercially made clothing. BUT if you have ever pattern drafted one, you can easily get confused. When drafting the working pattern, we color co-ordinate each pattern piece nestled on top of each other. By doing this, it makes it easier to extract the final pattern pieces. 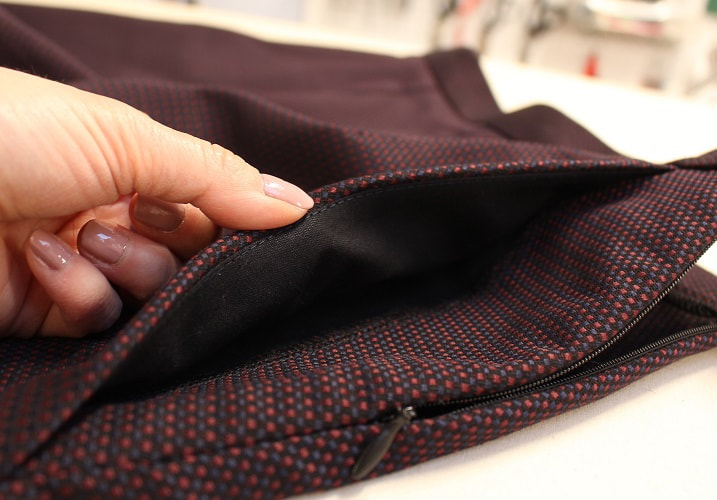 A slash pocket involves main fabric, lining fabric and interfacing. It can also be comprised of up to five pattern pieces. We recommend creating a color legend on your working pattern like us! 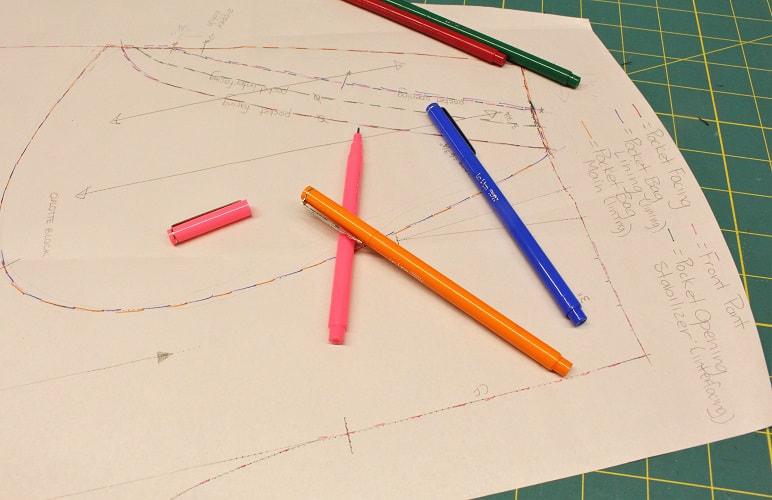 Waist DartsDamn girl! Not going to lie, the back view is the best view on these culottes. The darts create shaping around the waist and hips, while the slash pocket creates a very slimming line along the side seam. 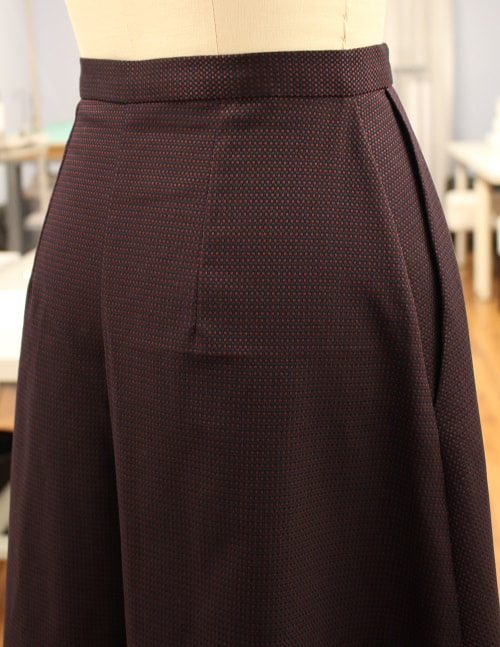 Wide LegsJust to give you an idea of how wide these pants are, we had to photograph them in widescreen like this for ya! One leg opening has a circumference of 42". That measurement beats many of the skirt hems we've designed. 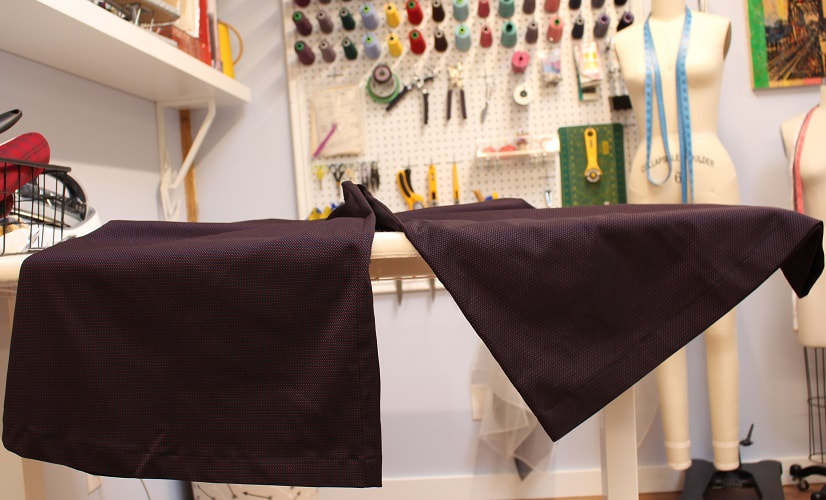 Final DesignHere's our completed design. In true culotte fashion, it appears like a skirt, but it is not! How would you style these wide leg pants? Let us know below! 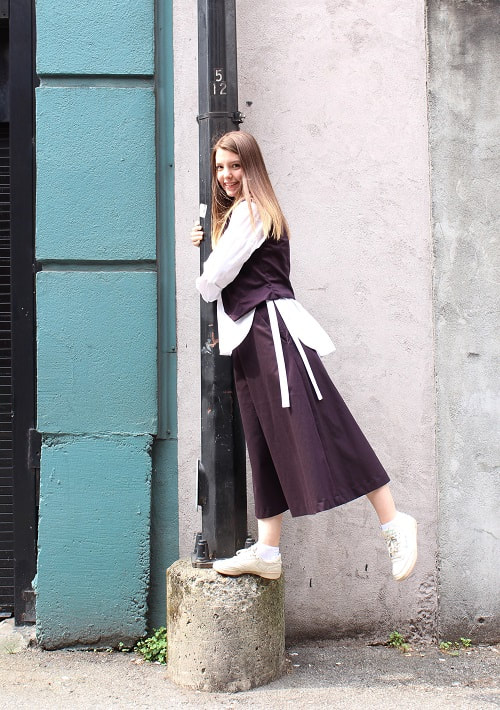 Happy Sewing!
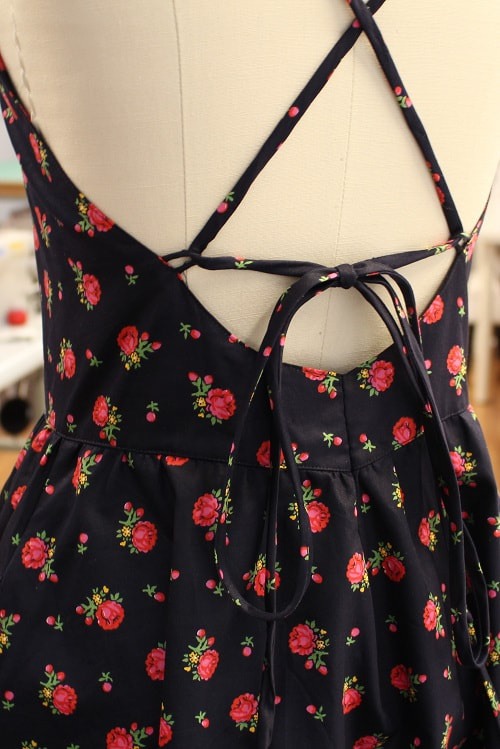
Designed, photographed and written by Sheila Wong Studios When I am not designing clothes, I am a huge supporter of buying second hand. Often time, second hand can mean mending or altering the garment to fit you correctly. Manipulating an already made garment is an art form on its own. This blog post will show you how we made this 1950's inspired vintage dress fit perfectly through a variety of hand and machine sewn manipulation techniques. Below are the major adjustments required on this dress.
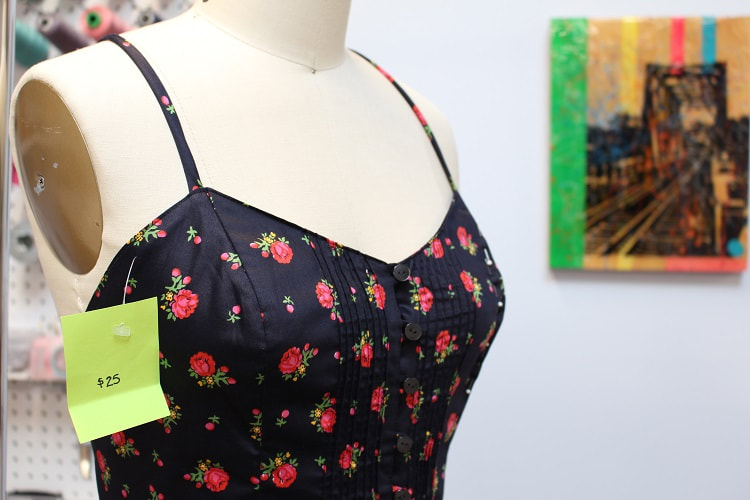 Center Back DartAdjusting an already made garment flawlessly takes skill! A major adjustment to this thrifted dress was taking in the center back. It was huge! One of the easiest ways to take in a garment without taking away from the lovely silhouette, is to create a dart. 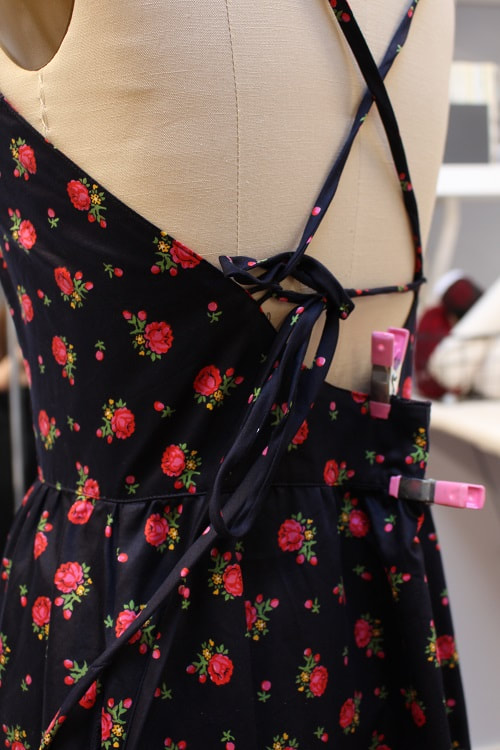 To take in excess bulk along the back of a garment, create a dart starting at the waist.
 Reducing Excess BulkHands up for small boobies! A common adjustment for small cups is to remove excess along the bust seams. In this case, we need to remove 1/2" at the height of the princess line and taper to zero at the top and bottom of the seam. 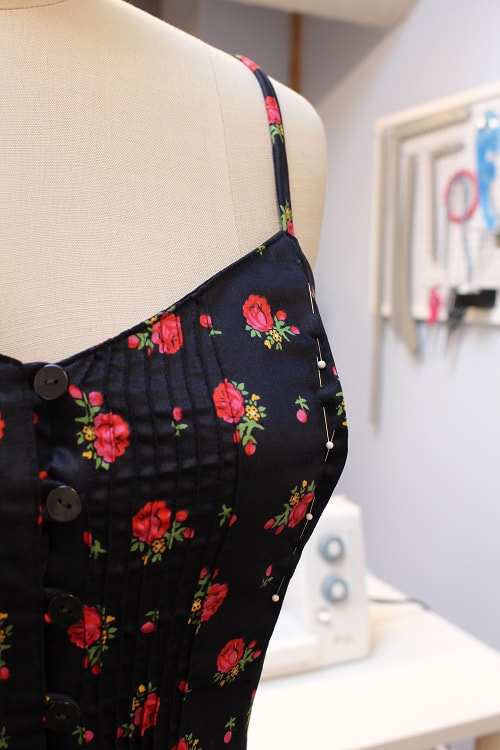 To gain access to the seam allowances of the exterior bodice princess seam, we had to open up a 4" opening along the lining bodice princess seam. From there, we could mark a new seam to stitch. We removed excess SA then flipped the bodice back out to press. To close up the 'incision' area, we draw-stitched the lining back together. 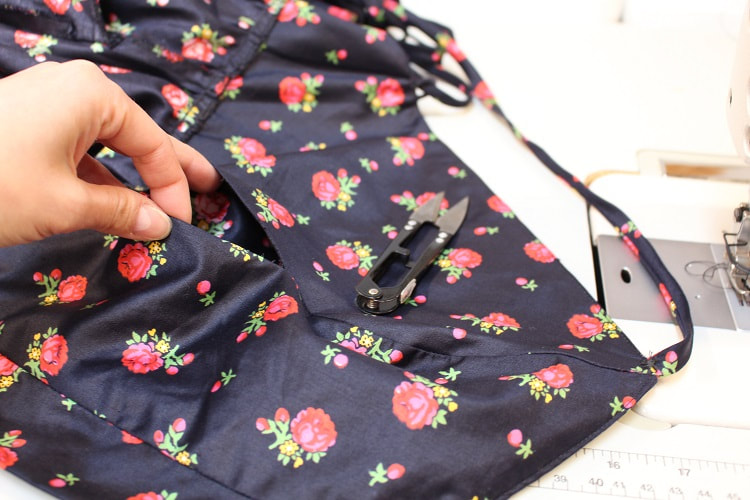
Sewing Tip: To transfer the exact stitch line from one seam to the opposite, chalk along the new stitch line and place that on top of the opposite seam that has to be also taken in, then apply heavy pressure by slapping the layers together. Voila! The new stitch line is transferred and now balanced in the garment. 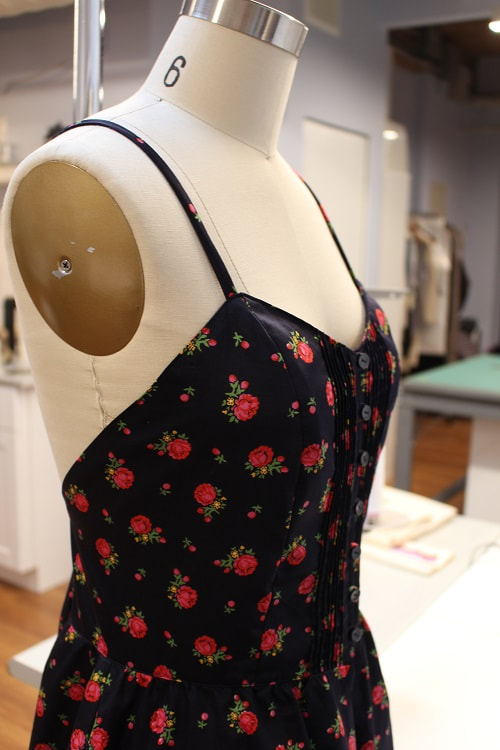 Front Snap ClosuresFinal adjustment to this vintage dress was adding snaps to the front opening from the waist down to the hip line. For some reason, this area was fully open access!! Can anyone explain why?! We can think of a few but they are super naughty!  This dress was picked up at True Value Vintage Clothing on Main Street. Happy Sewing!
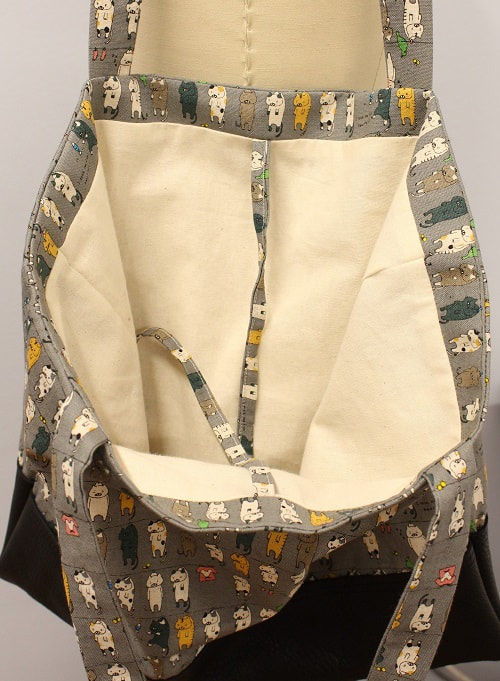
Mended, photographed and written by Sheila Wong Studios Hey Kitty Cats! We cut into our cat fabric from Tokyo! It took over a year to decide what to make out of it. This post will give you an insider view on our latest bag design. From the outside, it looks pretty simple. BUT if you know us well, simple is not our forte. 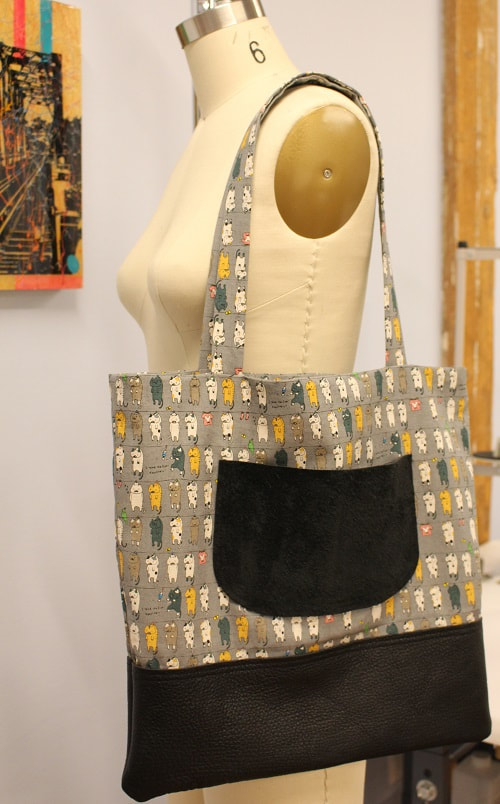 Project Specs
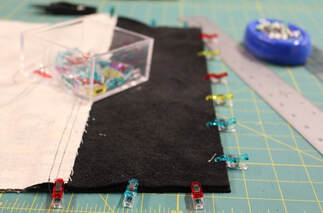
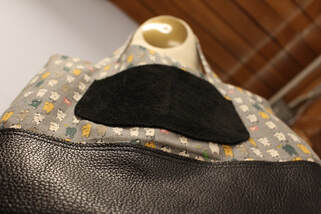
Design ElementsThis fabric traveled all the way from Tokyo, Japan. So we have to do it justice with extra special design elements. It was heading back to Tokyo soon! Our design elements included leather bottom for protection, exterior leather patch pocket, fully lined interior and tie straps for opening closure. 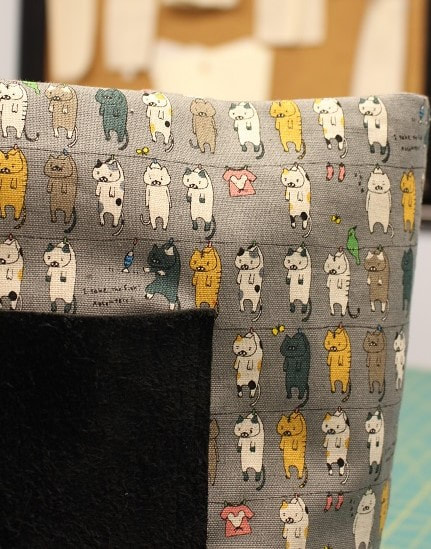 Leather DetailsThis ain’t your basic tote bag! Incorporating leather with this whimsical cotton canvas was something we wanted to do to elevate the design. We used leather for the exterior patch pocket and to protect the bottom half of the bag from germs. 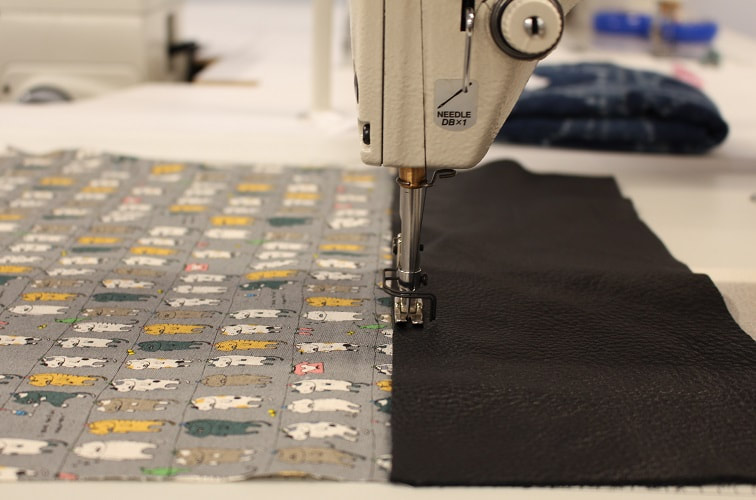 SEWING TIP: When working with leather or even thick layers of fabric swap out pins for clips. It keeps your layers secure, flat and your fingers safe from pricking.
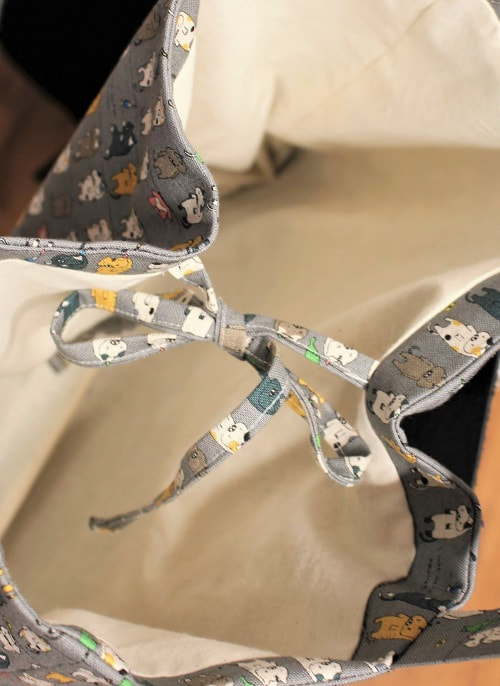
Interior Tie ClosureWe made tiny ties to gently secure the top of the bag. This is the first time we ever did this on a tote bag. What do you think? We think its kinda cute!
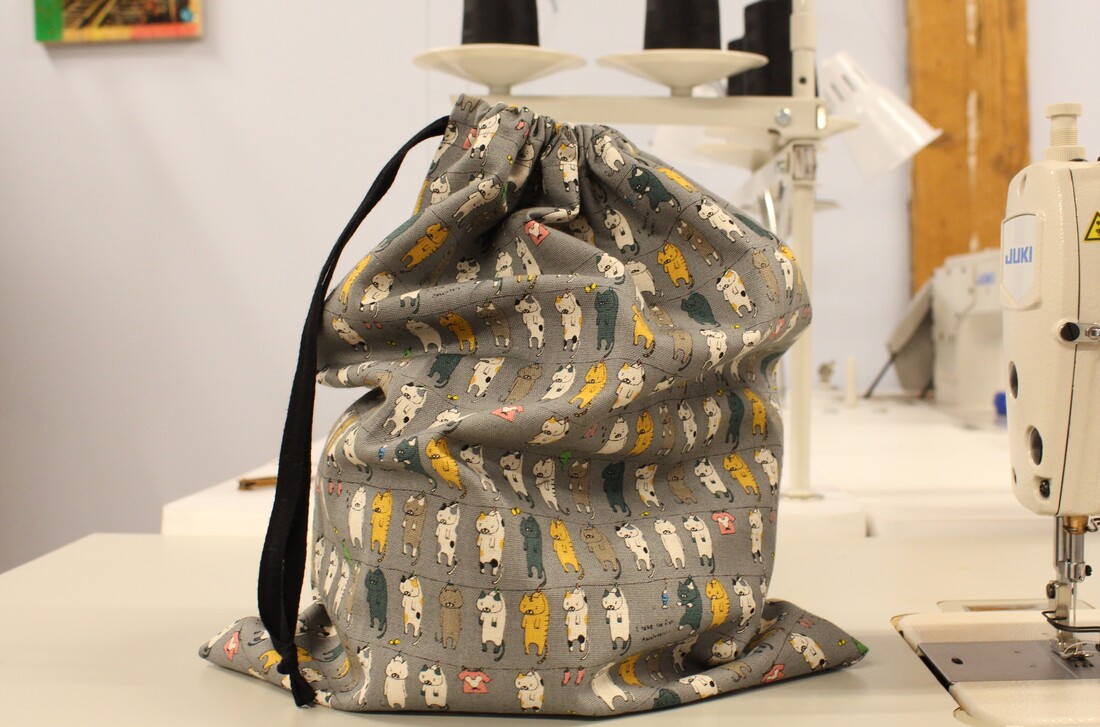
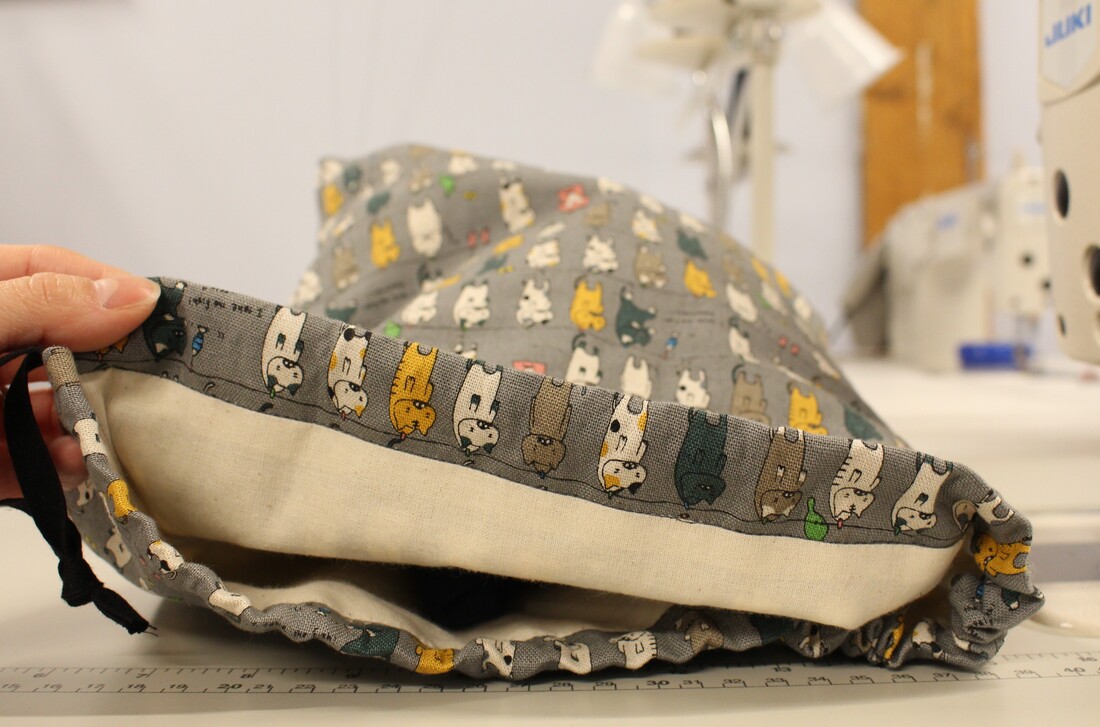
Final DesignFini! Here is our final design for this puuurrfect tote bag. We love the leather details and the little pocket in the back is so so handy! 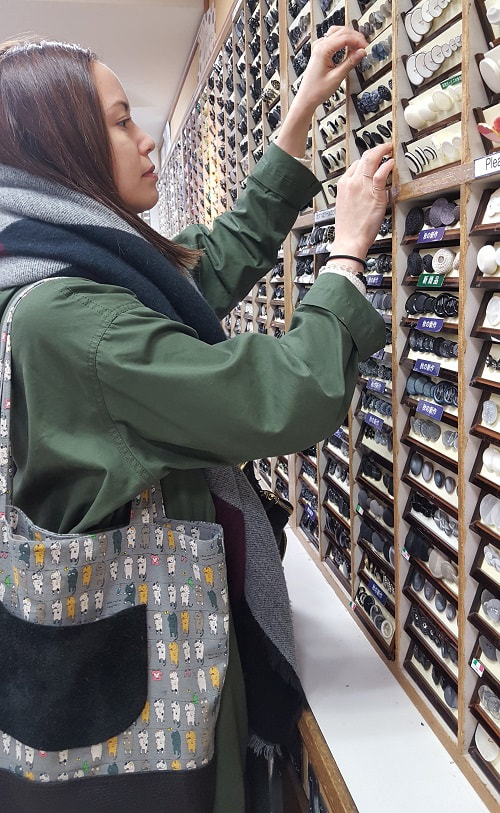 Bonus Design: Drawstring BagWe had some left-over kitty cat fabric, so we made a fully lined drawstring bag. An essential while travelling to chuck your odds and ends in.
Happy Sewing!
Designed, photographed and written by Sheila Wong Studios. Zipping up our latest design! Military inspired high waisted culottes for ya. For this design, we experimented with button holes, volume and our love for pockets. 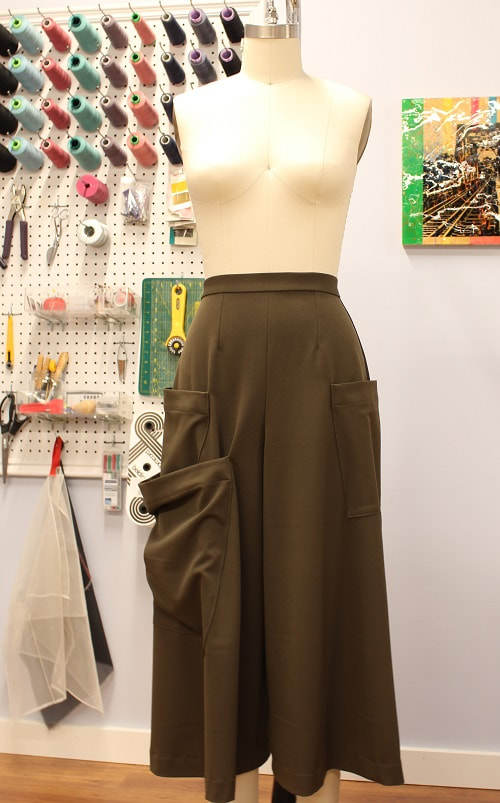 Project Specs
FabricThis gorgeous fabric was picked up in Calgary at Fabricland. Sheila makes it a point to do her fabric shopping rounds every time she visits her hometown. Yee Ha! This past trip she had to check in an extra piece of luggage just for fabric. Design ElementsThese are definitely not your basic pair of wide leg pants. Here is some insight into our experimental process with the patch pockets and some sewing tips on buttons and button holes. 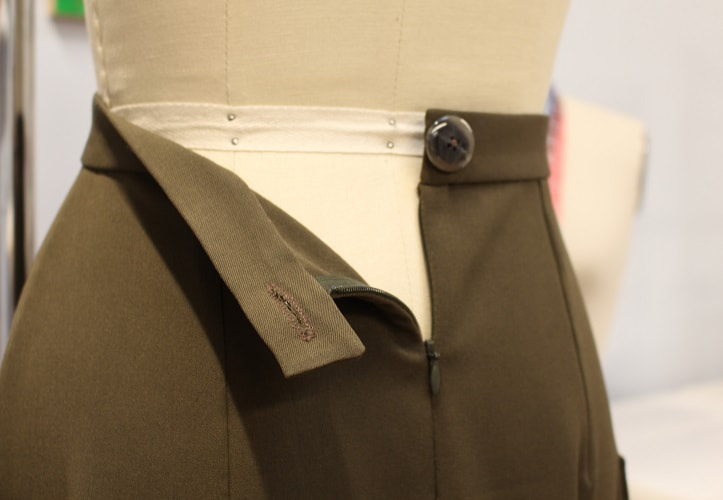 Oversized Patch PocketsNot all pockets are supposed to be functional. Although, we did test it out and YES, you can fit a laptop in the larger pocket. Both side seams rock a smaller (usable) patch pocket. We played around with the placement of the larger pocket (just on one side). Notice how the larger pocket is pulling the main pant leg? Due to its size, the side seams at the opening needed to be placed further away from the Center Back/Center Front of the body to avoid this. Nonetheless, we still love the drape of the over-sized pocket! 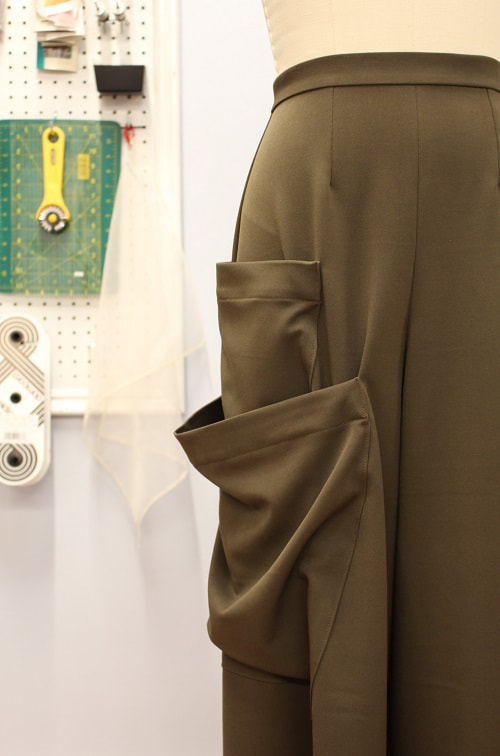 Waistband Button ExtensionWe dove into our big ol' button jar for this gem. You cannot see it, but it is an old button from Jacob! Anyone remember that clothing store? 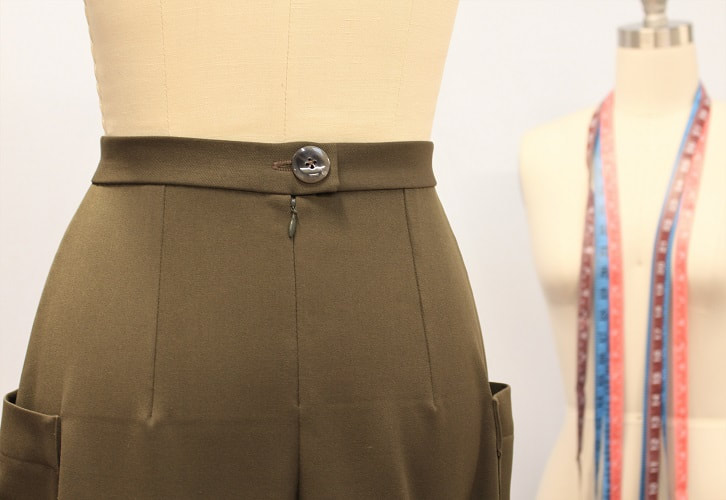 Buttonhole Sewing Tips1. Always test out a machine sewn buttonhole on scrap fabric (2 layers). 2. The buttonhole should be big enough for the button to slide through with a hair bit of resistance as it may stretch out over time. 3. Trim down any excess bulk in your seam allowance, especially if placing a buttonhole along a waistband. The more inconsistent the thickness of fabric under the foot, the more sensitive your sewing machine will be to not sew correctly. 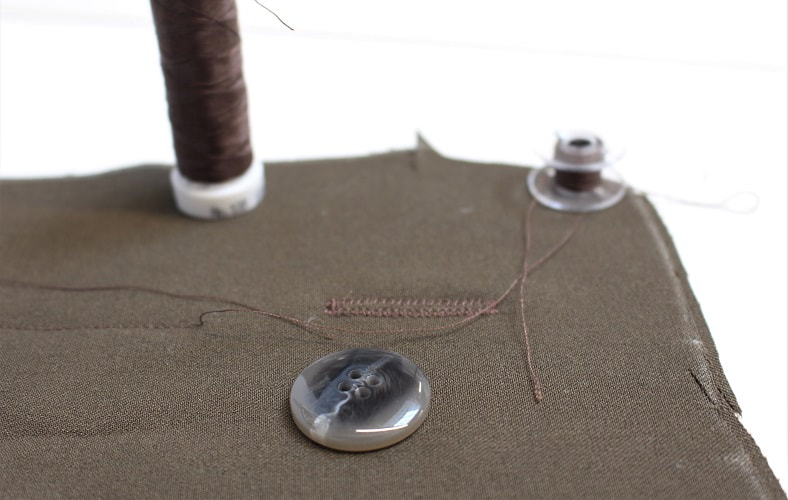 Waist DartsGiven the high waisted waistband of these culottes we created shaping to hug our curves with straight darts in the front and back, radiating from the waist. 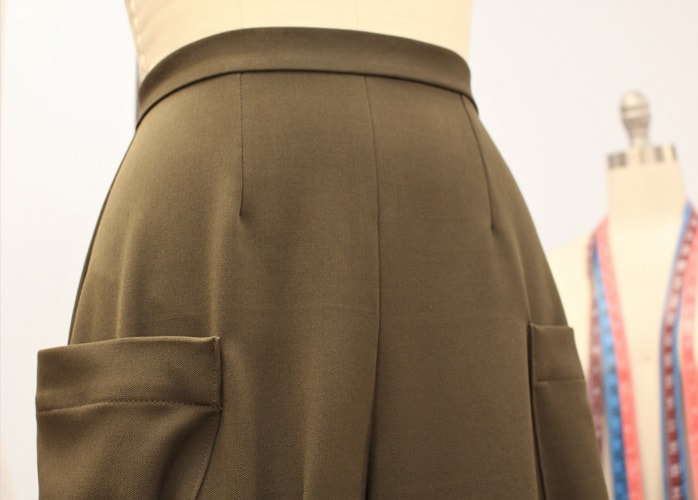 Final DesignVoila! This was a quick sew, under a week, in between clients (sometimes not in between hehe). Almost no hand sewing was used for these design elements. 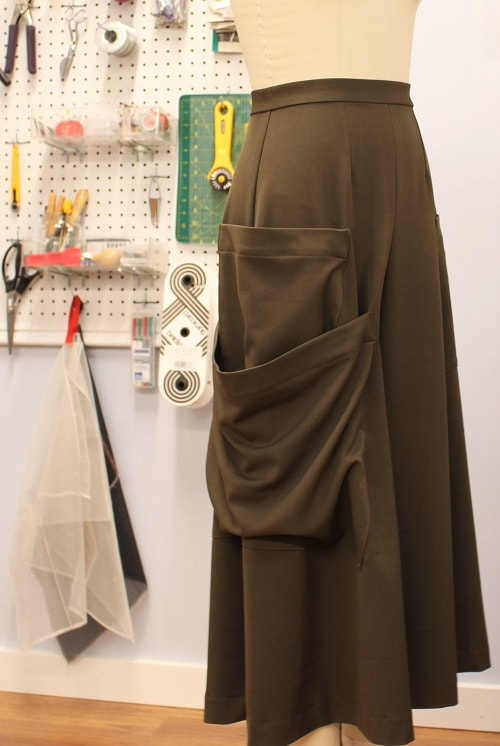 Happy Sewing!
Designed, photographed and written by Sheila Wong Studios Six months ago, we busted out this beautiful vintage Oscar de la Renta pattern by Vogue. We just just tied the knot on the last bit of top stitching and couldn't wait to share! This pattern is from 1973. 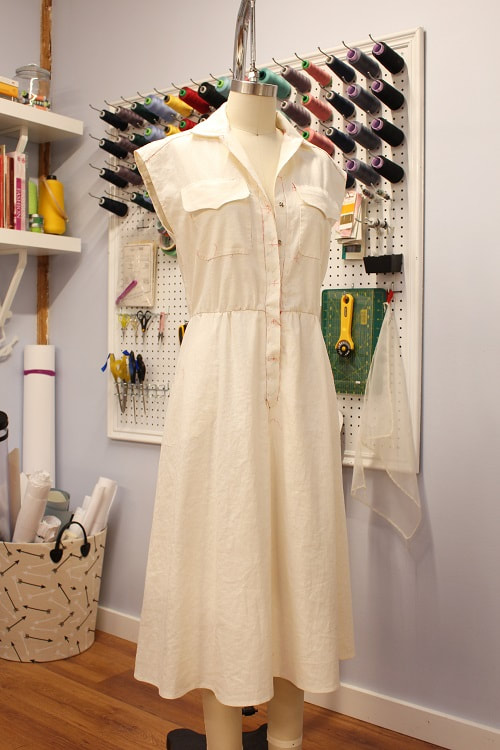 Project Specs
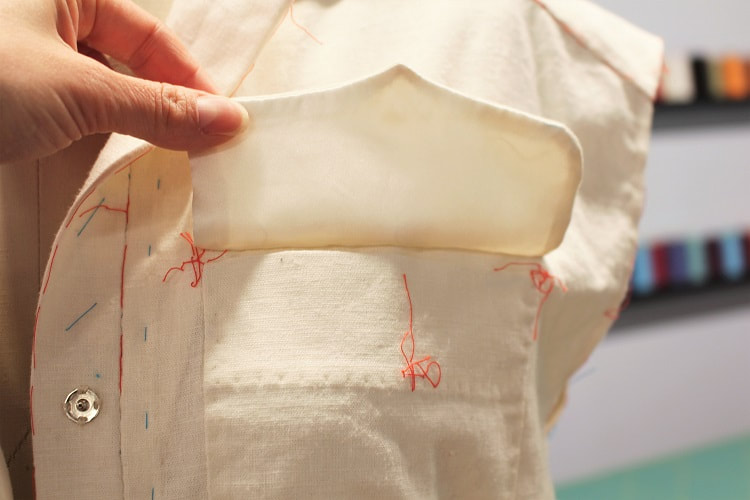
Design ElementsThread MarkingThis is the stuff nobody gets to see! Temporary yet oh so necessary stitches. The orange threads are thread marking stitches. They are inserted in prior to cutting out fabric and frame each pattern piece. They are also used to display any notches. These threads get removed after each seam receives their permanent stitches or at the very end of full garment construction. The blue threads are basting threads that hold multiple layers of fabric together prior to putting in permanent stitches. So helpful as they allow you to not use any pins. 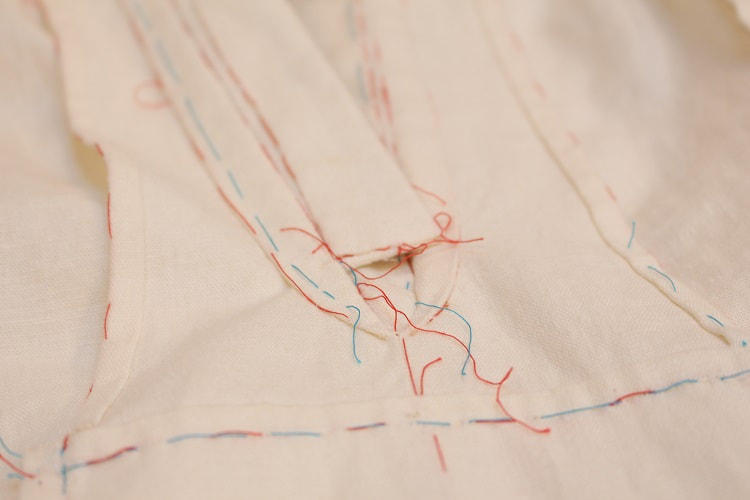 Silk Charmeuse LiningWe’re flipping up these flap pockets to show you the silk charmeuse lining. Some of the finest construction details are hidden away. This dress has patch pockets with flaps on the bodice and slash pockets on the skirt. Both lined with silk charmeuse.
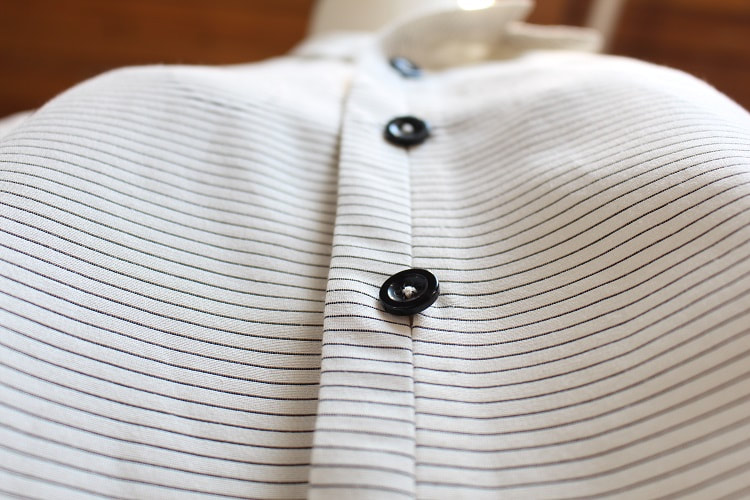
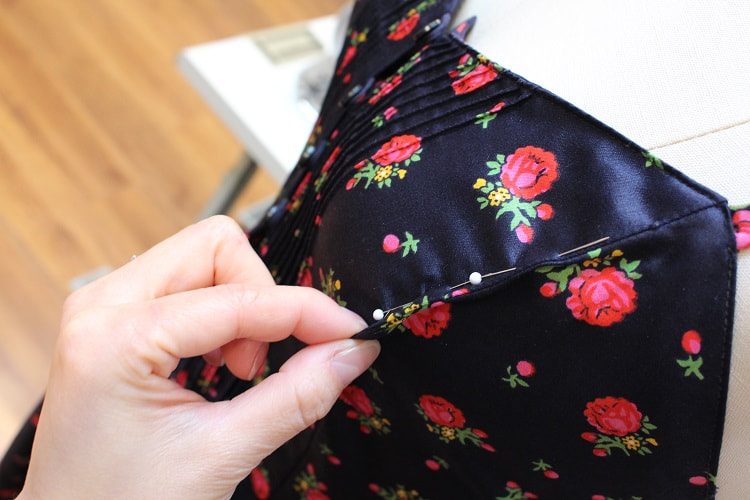
Front Snap ClosuresSnaps VS buttons?! What do you prefer in your sewing projects? The pattern asked for buttons but we opted for snaps to create a clean exterior placket. 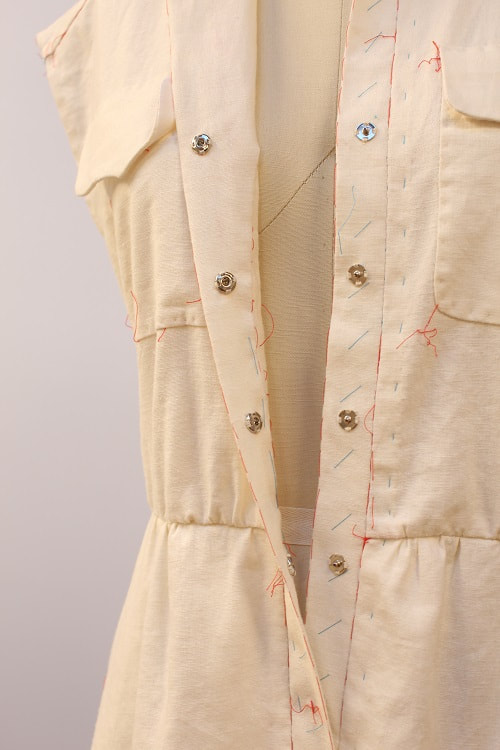 Inverted Box PleatCreating body in a garment can be achieved in several ways. Gathers, pleats, tucks, godets, panels and more. For this vintage design, a mix of mild gathers along the waist and a center front inverted box pleat provided body in the skirt section. An inverted box pleat is like a secret box pleat. Only visible when wearer is in motion or opens it up. 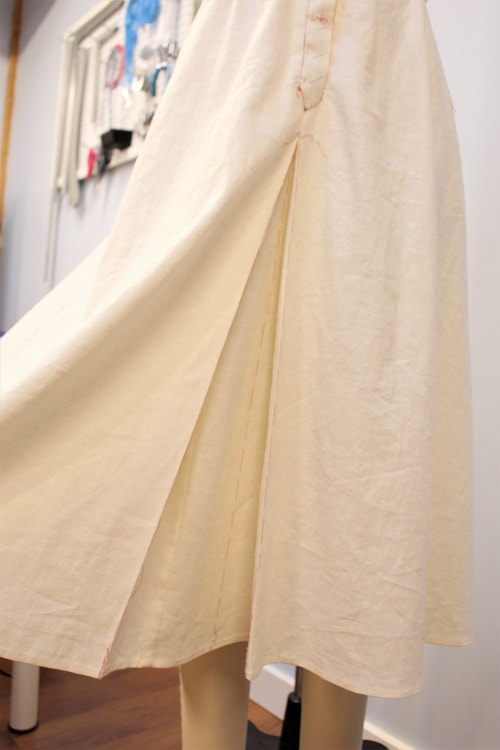 Final DesignDone and done! For the purpose of instructing, we have left all the thread markings and basting stitches in the final garment. Fun Fact: We have several garments in studio like this to aid with instructing our clients. 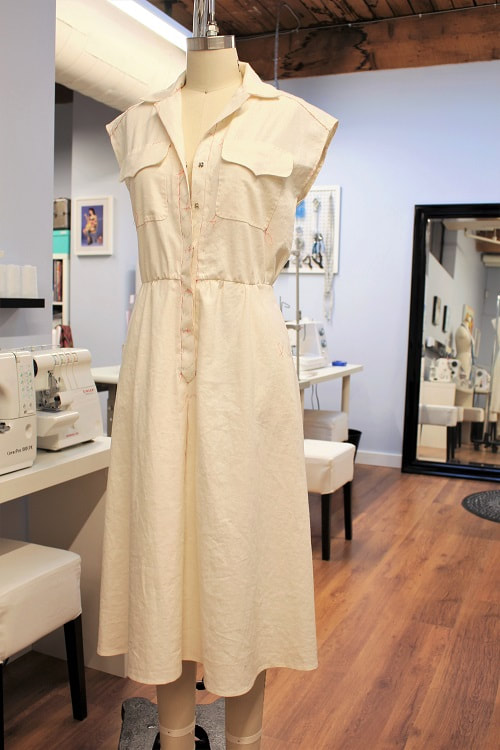 If you would like to learn more about couture hand sewing techniques feel free to contact the studio. It is easy enough to inject small bits of couture techniques in a project or go full out on a fully hand stitched garment. You decide!
Happy Sewing! Designed, photographed and written by Sheila Wong Studios. It's still a little sunny outside, so we squeezed out one last summer dress before it starts to rain! We went back to basics with our latest design. It is a fully hand sewn dress, made of a double sided linen with silk charmeuse lining. 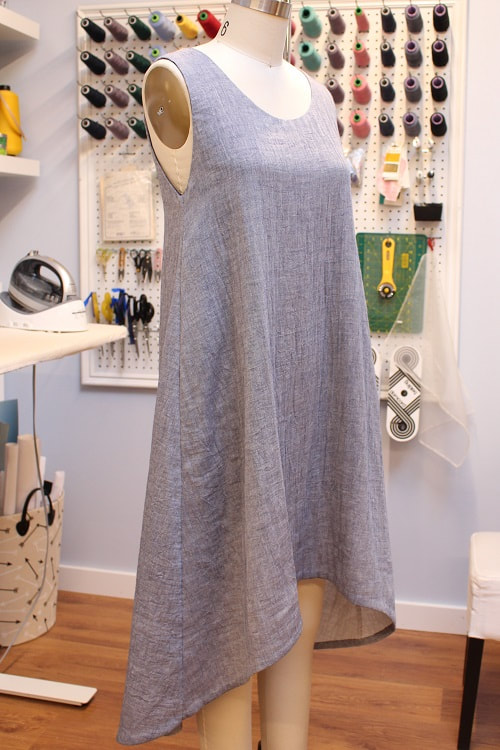 Project Specs
Design ElementsWe dug into our pattern archives to create this dress. Over a year ago, we made it in white linen! The delicious design elements that make up this dress are as follows. 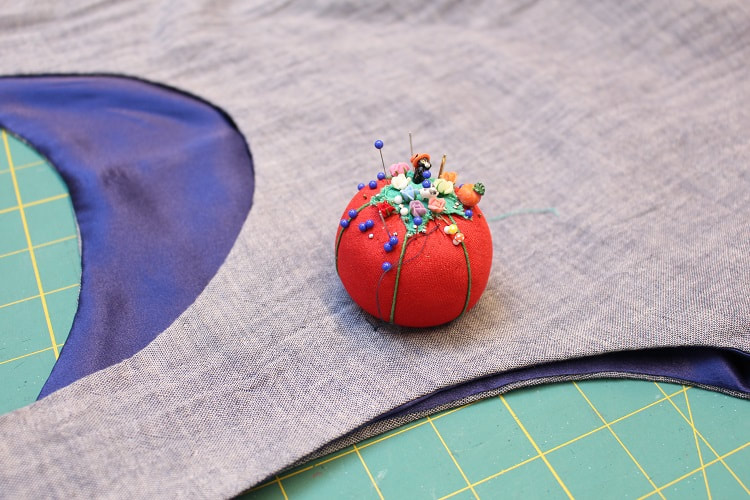 Almond Shaped ArmholeArmholes can be just as sexy as necklines right?! A normal shaped armhole is an oval shape. Here we decided to create an almond shaped armhole instead. A little side boob perhaps?! 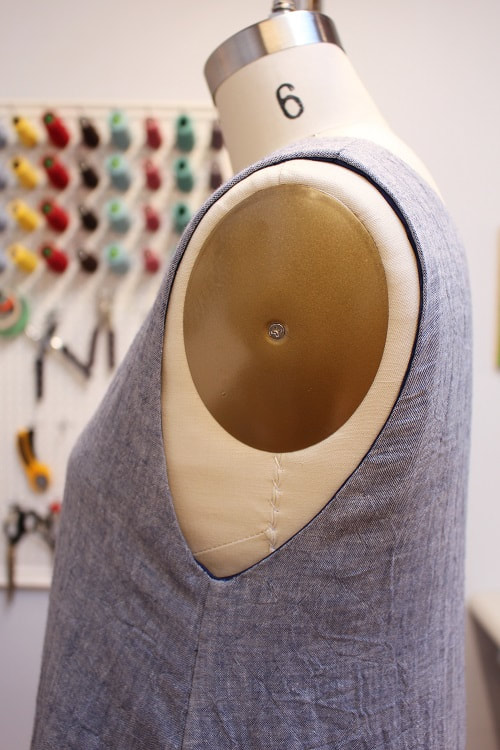 Fun Fact: This one is for the pattern drafting peeps out there. On a 2D level, armholes take on the shape of a wine glass when placing the side seams together. Red, white, perhaps champagne? There are different kinds for each body type. Asymmetrical Hand Sewn Hem FinishHemming this dress was the most time consuming step in the entire process. Flared garments create a large hem opening and it was x2 in this case with linen and silk. We opted for a double fold with a blind slip stitch finish.
SEWING TIP: To avoid the frustration of your sewing thread being caught up in the pins on the freshly pressed hem, hand baste the hem flat with a contrasting color. 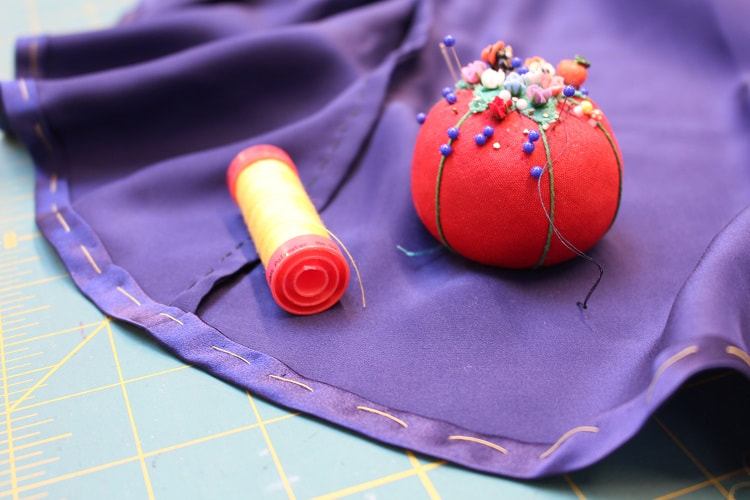 Center Back SeamAdding a center back seam not only adds weight, but is also an interesting detail to give to an otherwise simple dress. We had a huge DUH moment after cutting out the silk lining. The front dress was suppose to be be cut on fold, while the back was cut two to create a CB seam. Well, we where in such a rush that we reversed the cutting on the front and back lining! SO in turn, you will see a center front seam in the lining. C'est la vie! Happy accidents are the best! 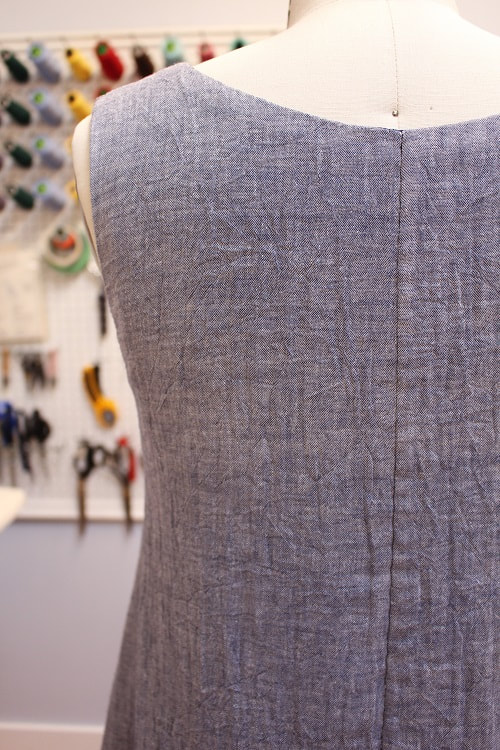 Silk LiningSoft silk lining was a must for this design. We think its fun to show the insides! We even left the basting threads in for your viewing pleasure. 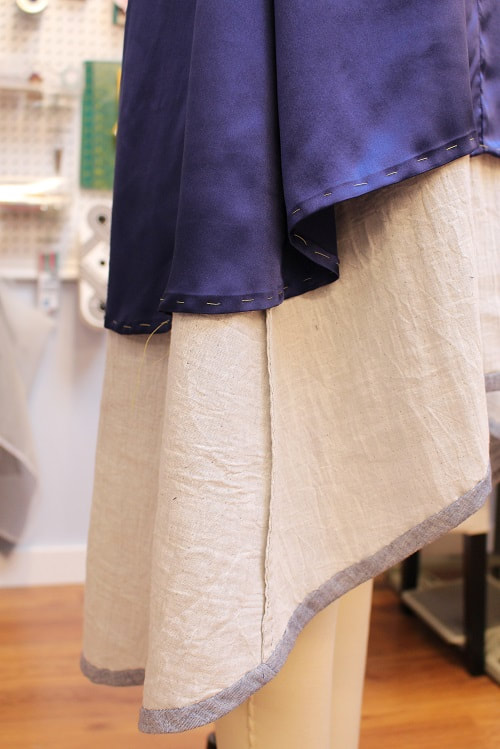 Final DesignVoila! Our design is complete. What other colors would you make this dress in? We're thinking a dark grey for layering in Fall. 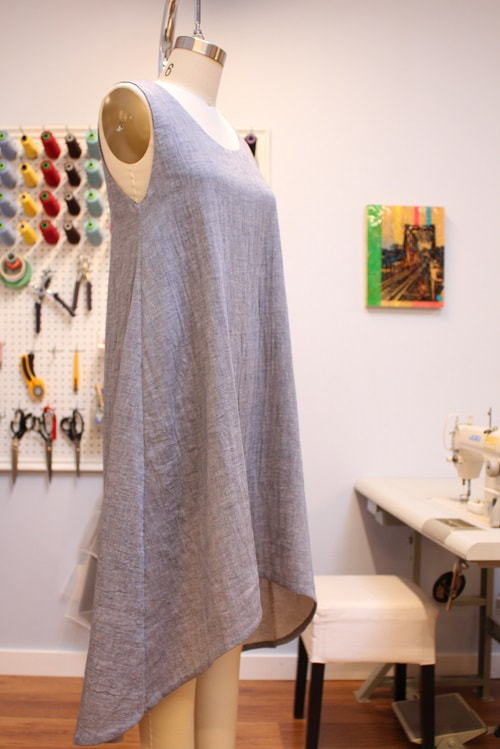 Happy Sewing!
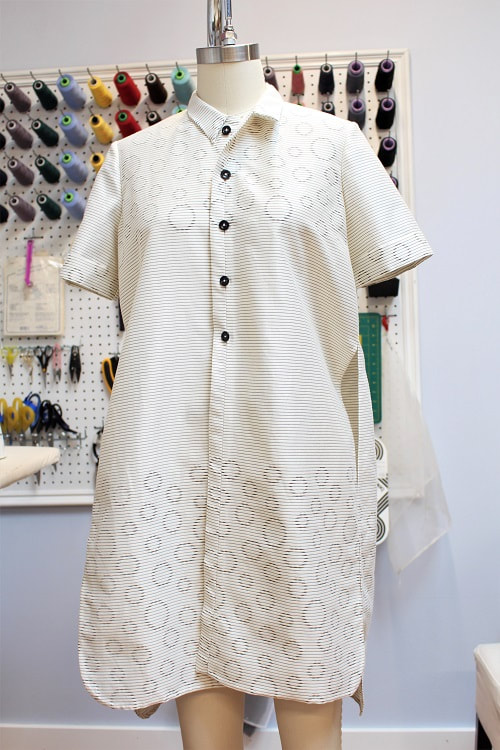
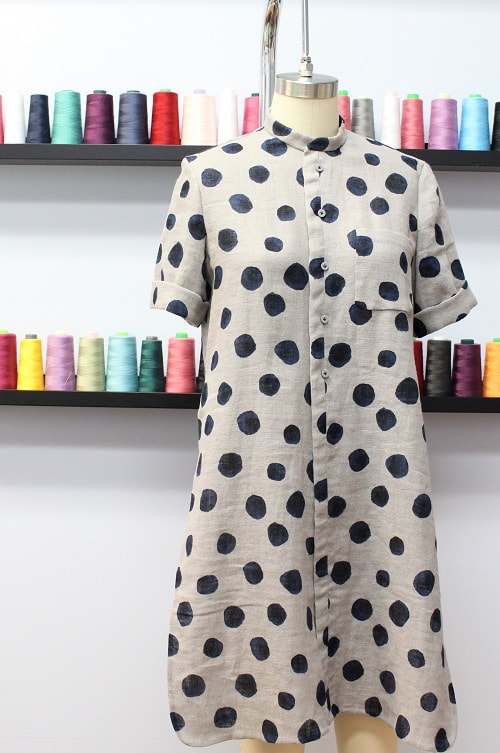
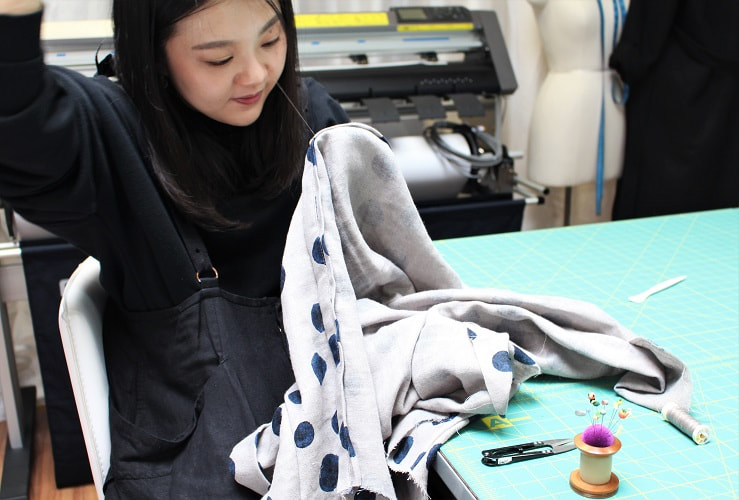
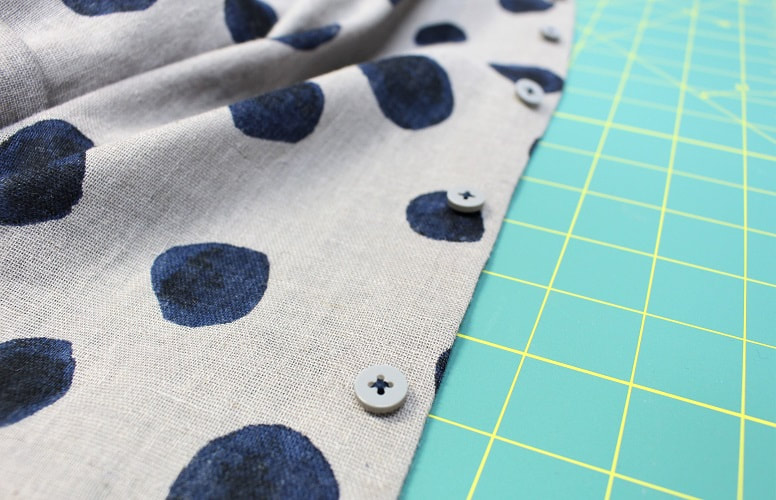
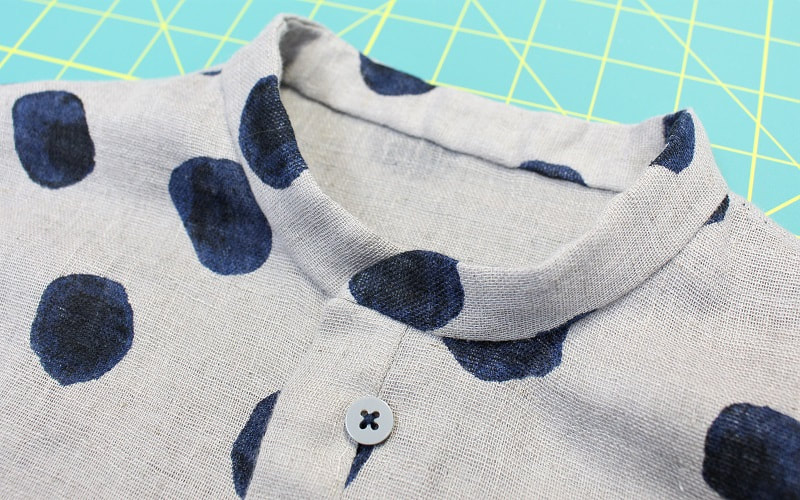
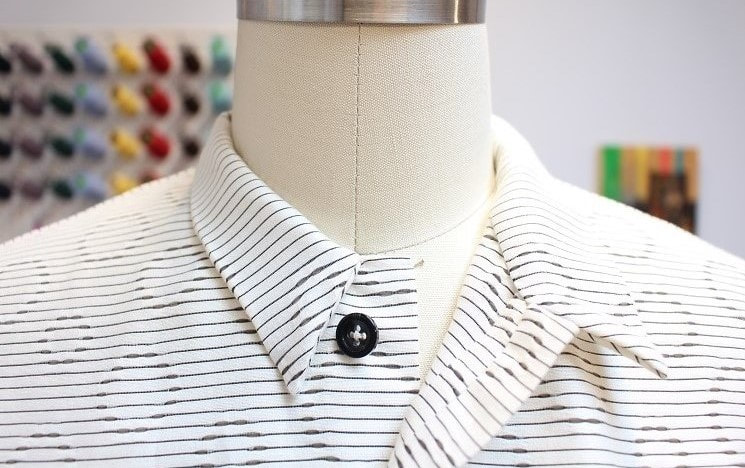
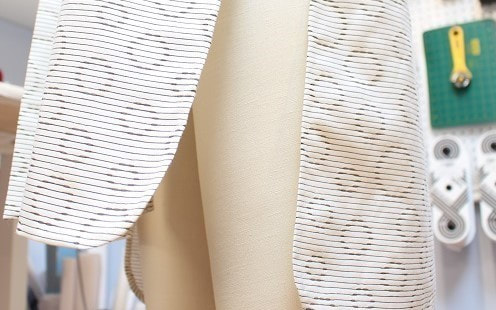
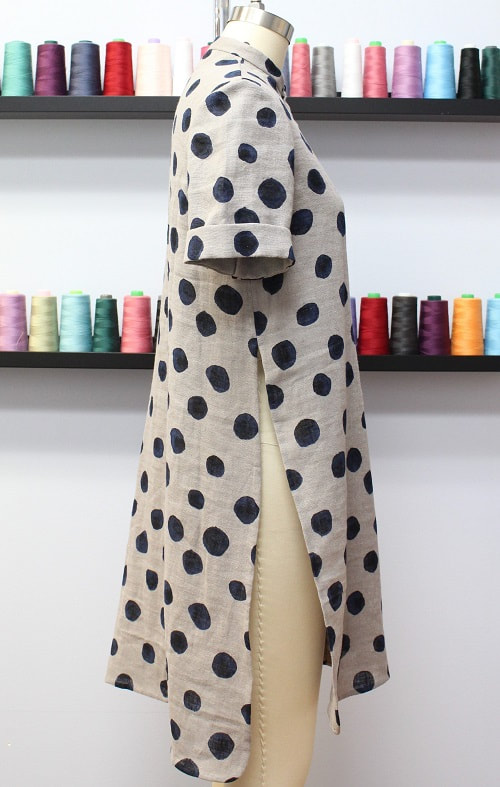
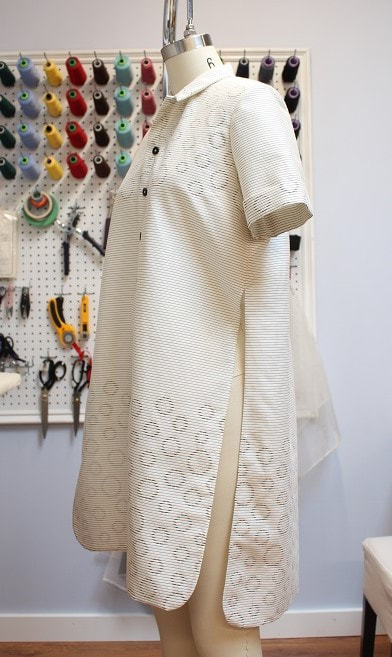
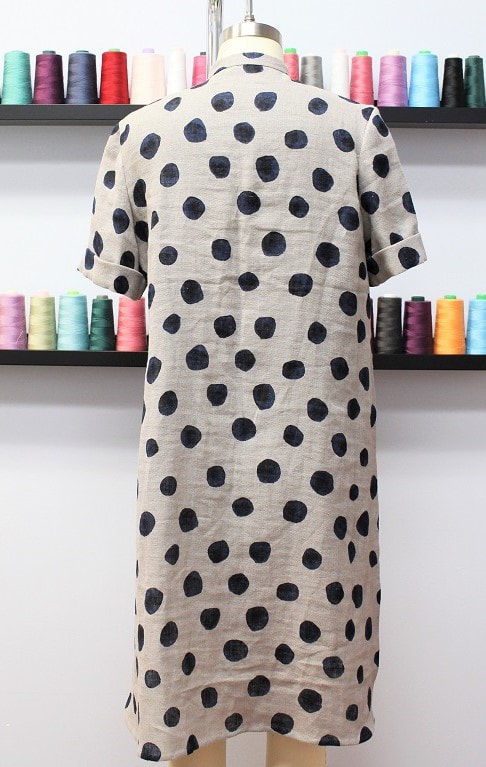
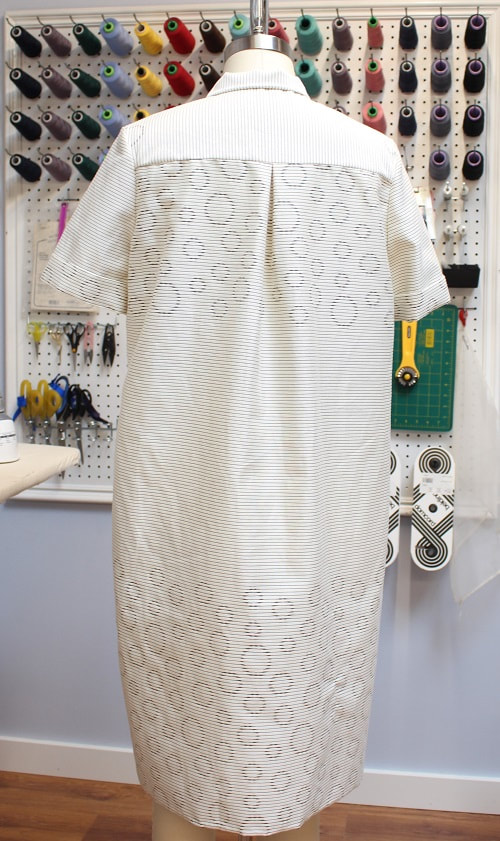
Designed, photographed and written by Sheila Wong Studios Heading into Fall, it only makes sense to explore more tailoring techniques and shirt-making. This series highlights two of our long tailored tunic designs- Tiny Bubbles Tunic and Dot Tunic. Both designs are demi-couture. Only the main seams stitched by machine, all other stitching completed by hand.
This tunic design was drafted using a bodice block and a straight sleeve block. The concept was an interchangeable pattern in which you could customize the collar, the front button placket, the sleeves, the front pocket, back details and even the length.
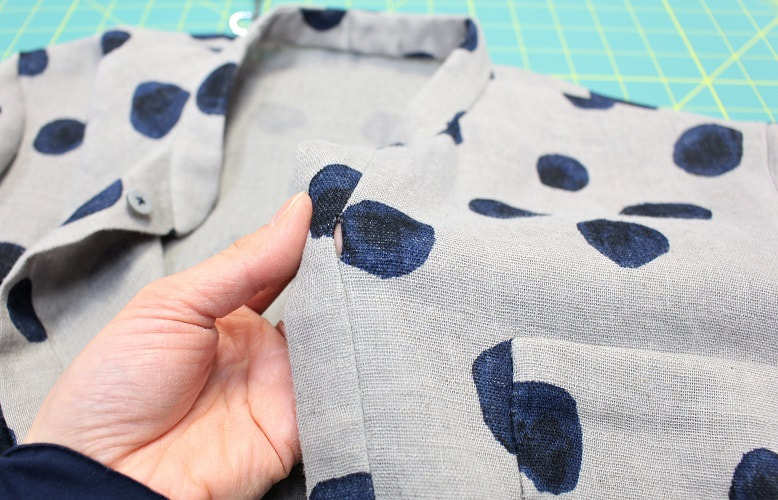
FabricBoth fabrics purchased from Nippoori Textile Town in Tokyo, Japan. Our dot tunic was made from a beautiful double gauze linen purchased from textile shop Tomato. 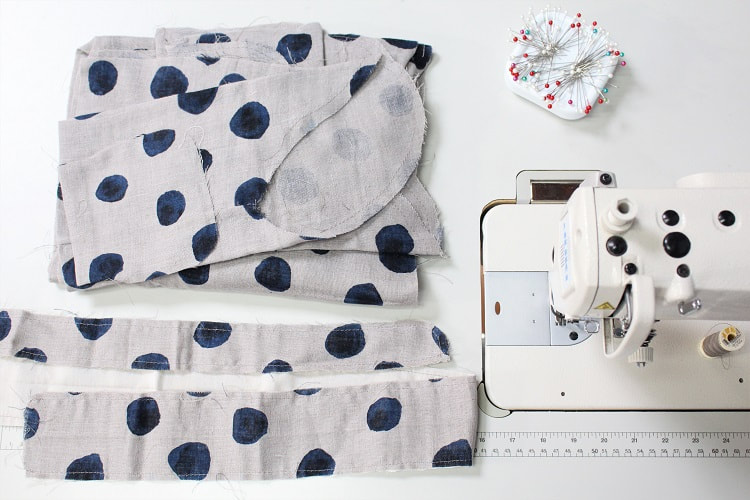 Design Elements Given the interchangeable nature of this design, we will go through the elements featured in these two longer tunic editions. In-seam Button HolesSee ya later traditional button holes. Creating in-seam button holes is the easiest way to get around creating 'real' button holes. Drafting is the most challenging part of this type of button hole. The sewing is easy! Let us know in the comments if you have used this type of button hole in the past.
 Mandarin vs. Convertible CollarDepending on your mood you could pick a mandarin stand collar or a traditional convertible collar. Which one do you like best? We could not decide, so we drafted both!
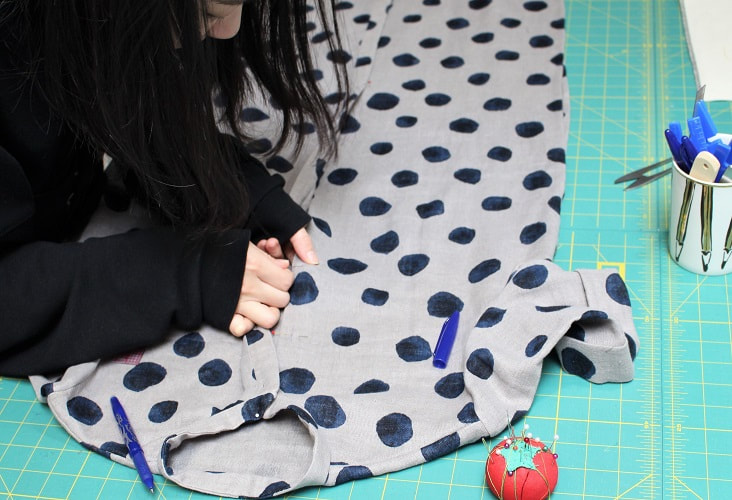
Side Seam Slits with an Asymmetrical HemA curved hem and side slits make this piece a little less traditional. Slits provide ease of movement but still a flared look. In both of these designs, we hand basted small gathering stitches around the curve to pull the hem into place. The edges where folded in twice and slip-stitched closed.
Patch PocketWe know patch pockets are all about the pressing. Here's a useful tip- Use pins to help hold the fabric flat as you are pressing the edges. We think of them as tiny soldiers doing their sewing duty.
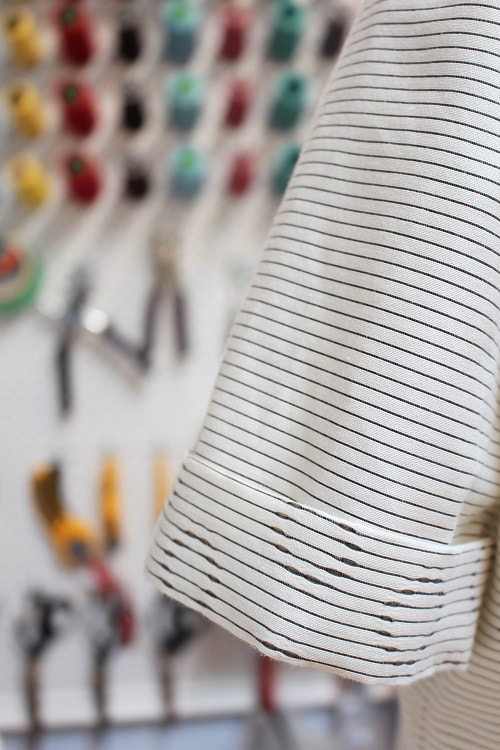
Did you know, most pressing tables have holes in them or extra padding, hence why the pins can stand tall! 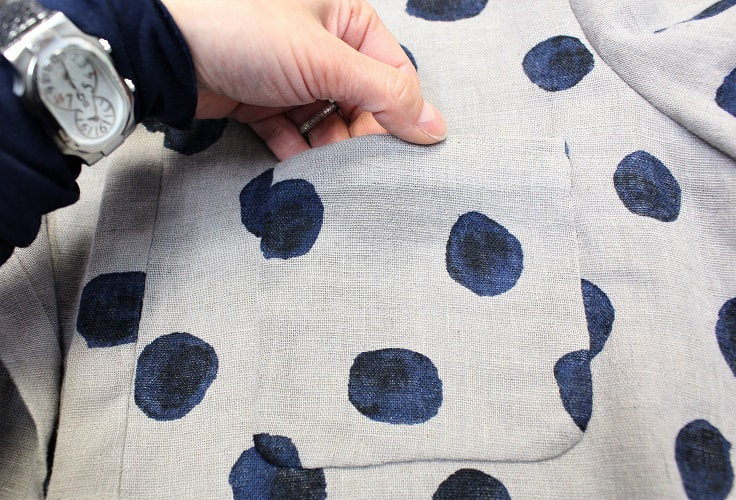 Box PleatTo provide ease along the upper back, quite often a box pleat is placed at the center back of tailored shirts. We favor inverted box pleats, less boxy! The pleat also provides a slight flare to the shirt. 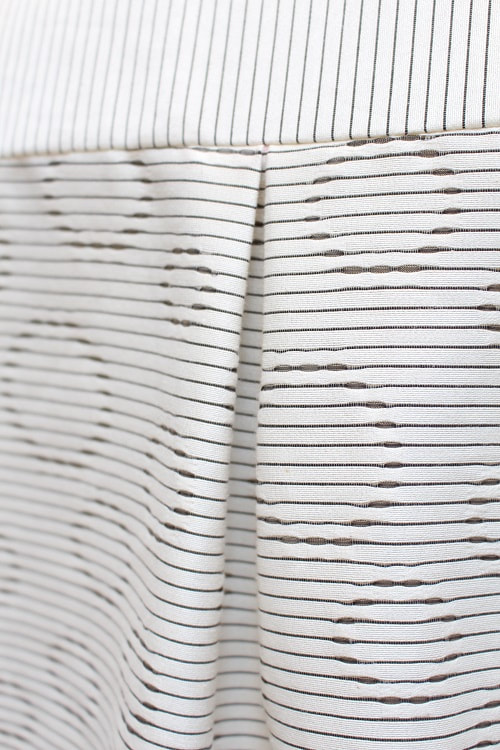 Cuffed SleevesWe like to call this our reverse cuffed sleeve. Most rolled-up or cuffed sleeves display the interior or wrong side of the fabric. In these tunics are reverse rolled up, so the right or outside of the fabric is showing.
 Final DesignLong tunic's finito! From drafting to final stitch, both designs took our team approximately 35 hours to complete. How would you style this shirt? Let us know in the comments.
PS- What do you think of this interchangeable element pattern? Would you be interested in purchasing this pattern? Let us know below.
Happy Sewing! Designed, photographed and written by Sheila Wong Studios Welcome to the latest installment of Sheila-Wong-Sew-a-Long! Har Har, see what we did there? This tutorial is a step by step guide to creating a 3D zip organizer bag in ANY dimension you desire. We will provide the detailed drafting and construction steps below. 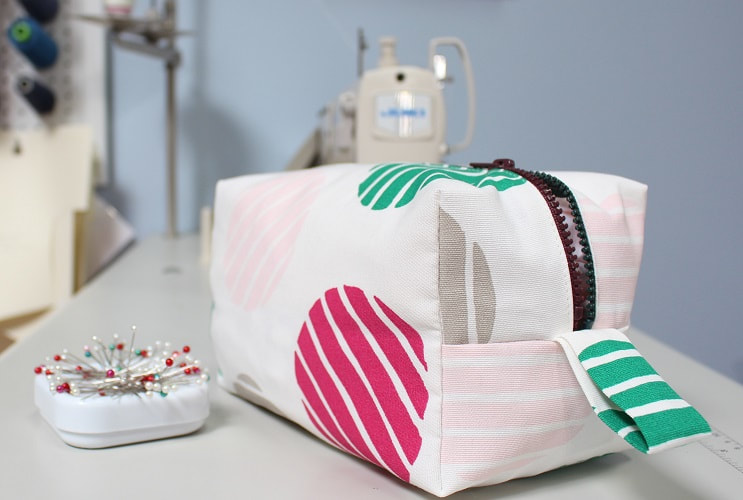 Materials
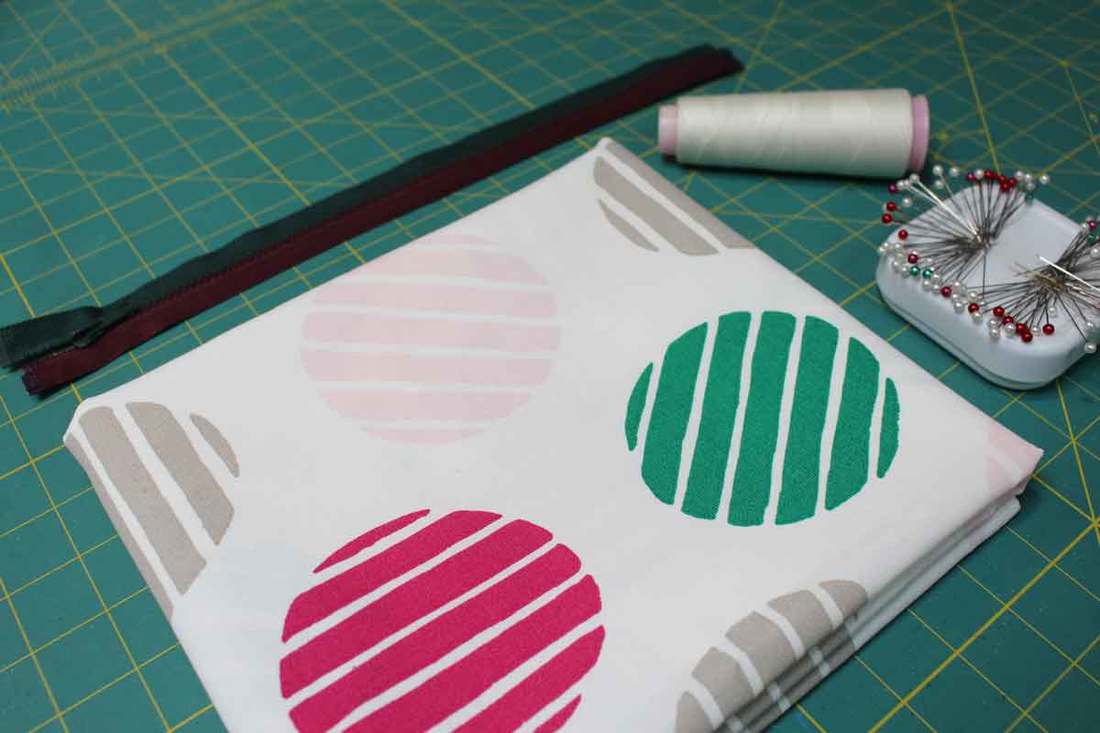 Step 1Measure. Decide on the height, width and length you would like your final bag to be. 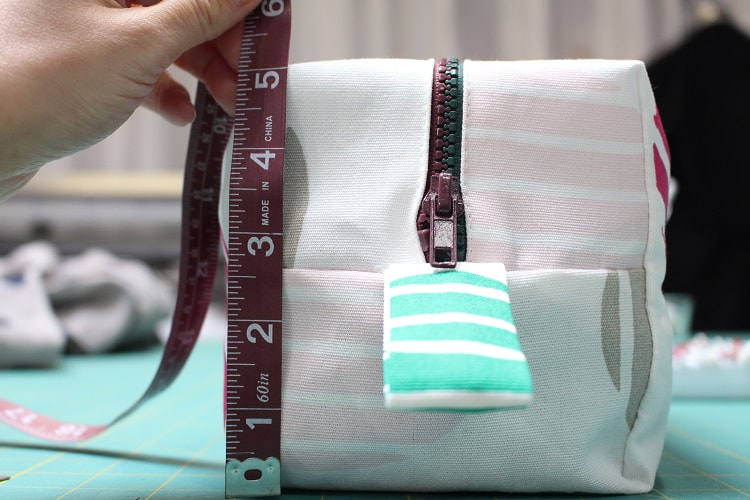 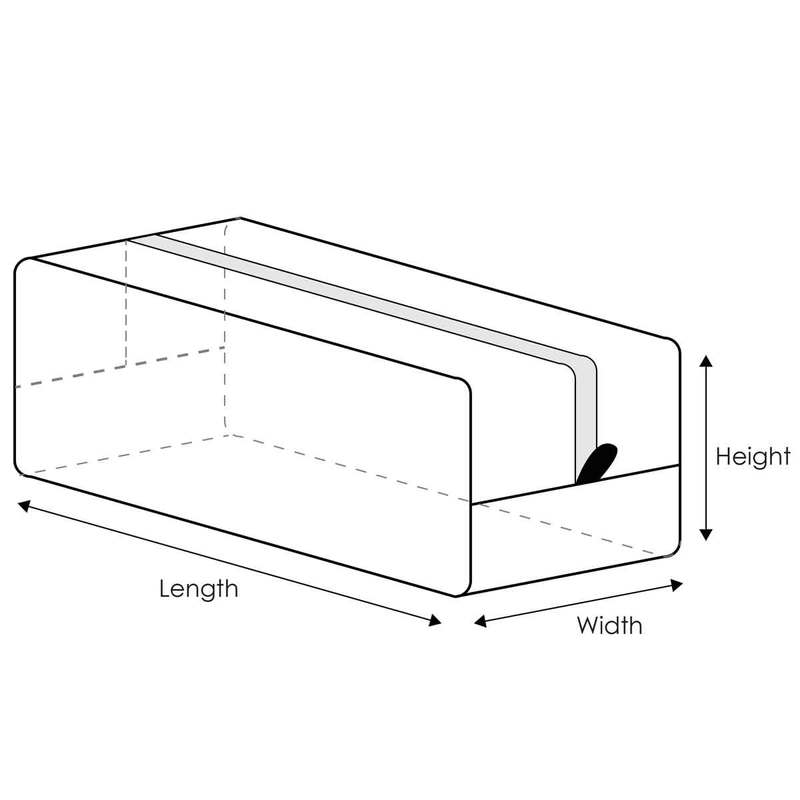 Step 2Create a pattern using the desired dimensions.  Step 3Mark the important landmarks with notches. The interior circle notch is marked in from each letter at a ‘half of width’ measurement. Add a ½” seam allowance around the entire pattern. Label and add the grain-line. 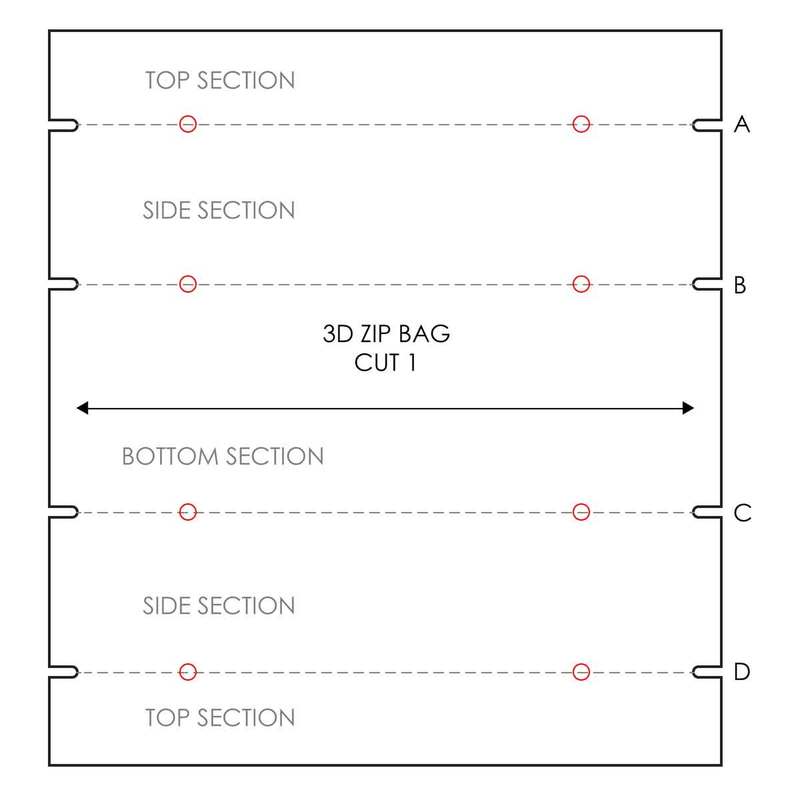 Step 4Place the pattern on grain. Pin, cut and mark all notches. 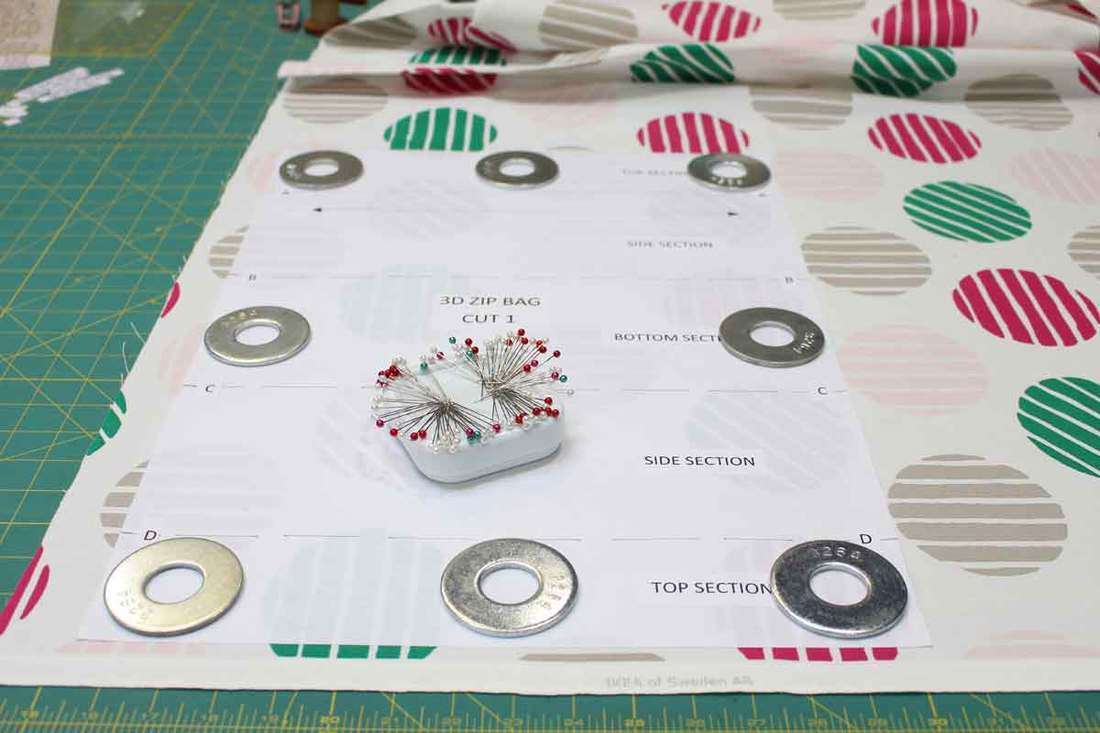 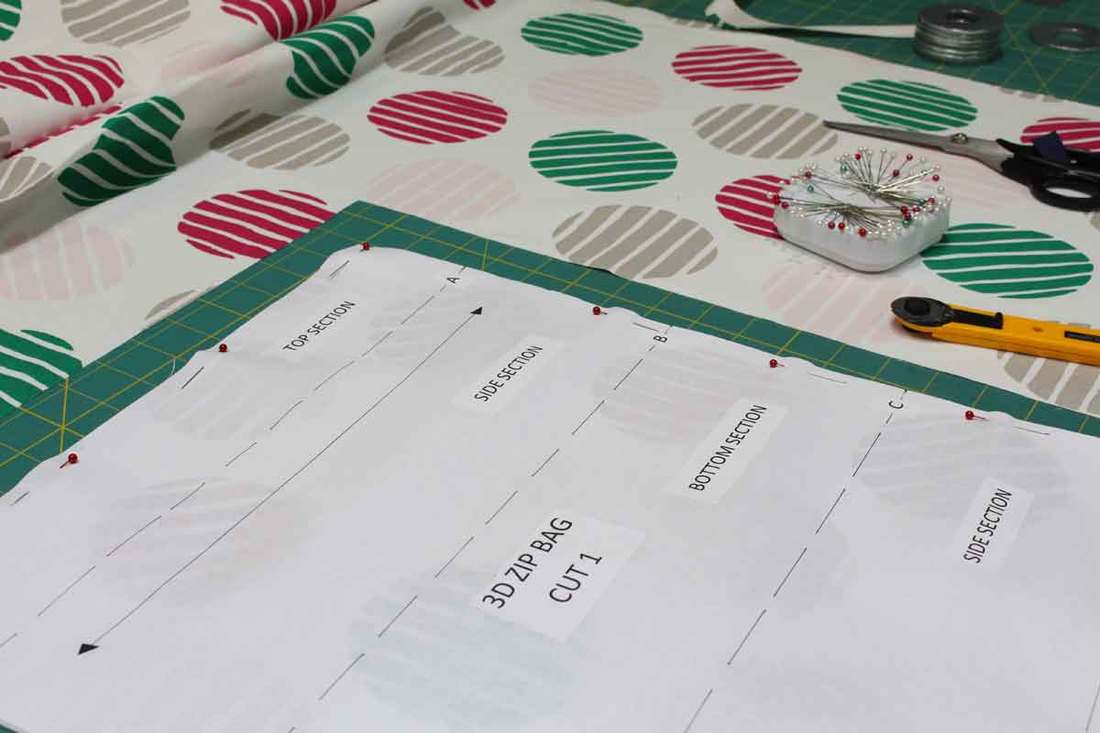 Step 5Over-lock the raw edges of entire piece. Use a zig-zag stitch if you do not have an over-lock machine. 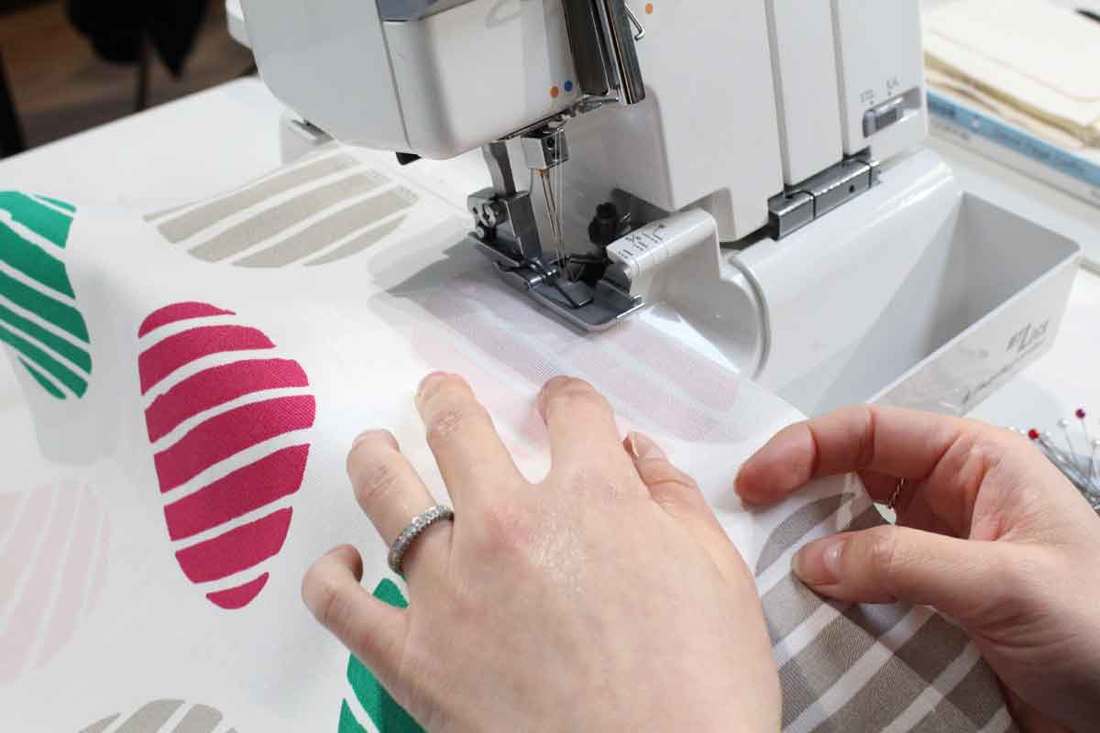 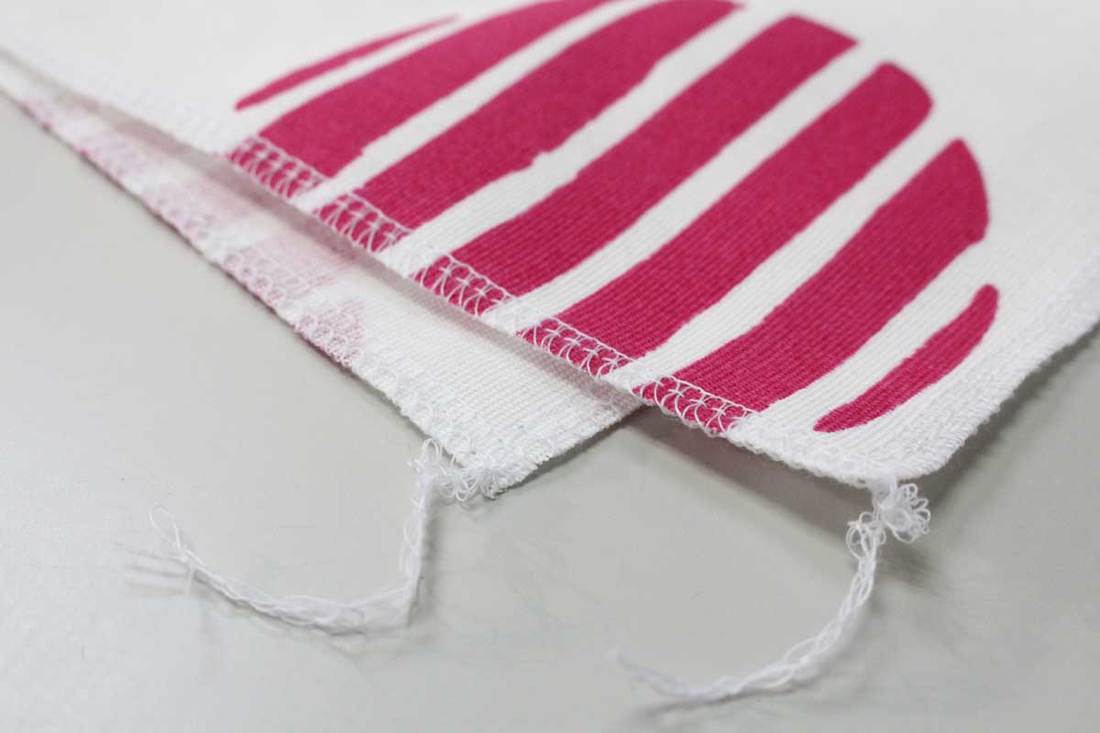 Step 6Change the sewing machine presser foot to a zipper foot. Lay one side of the zipper tape facing down on the right side of the shorter edge of the fabric. Pin and stitch at ¼” seam allowance. Repeat on opposite side of zipper. 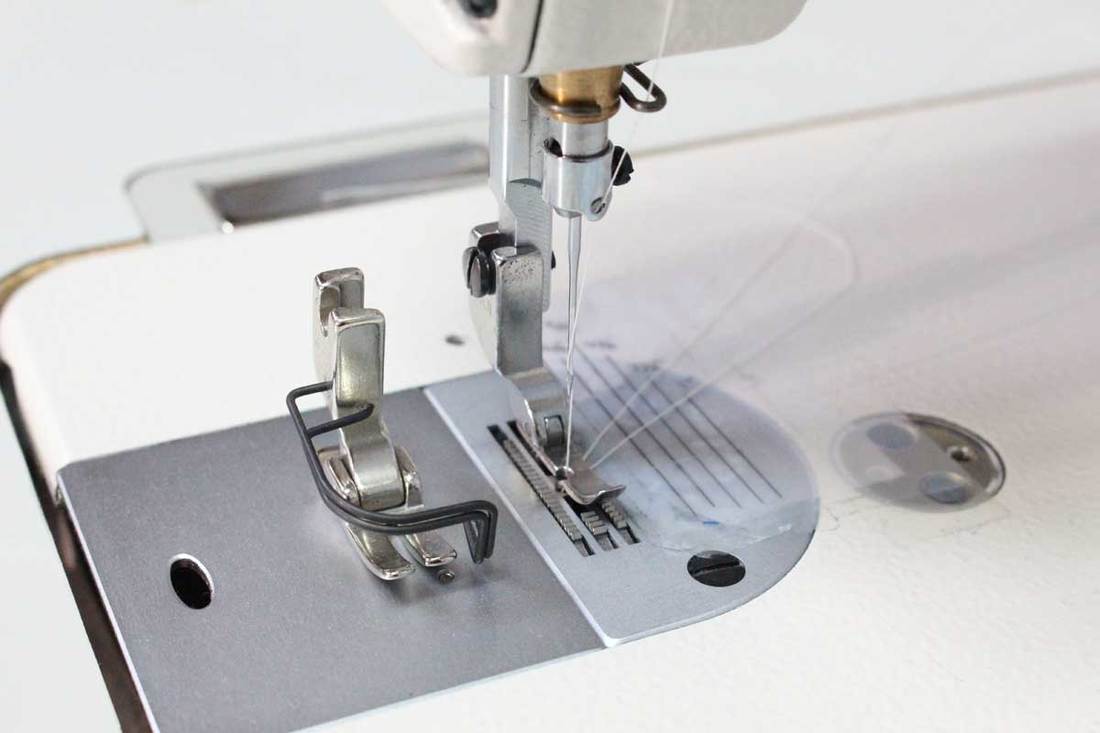 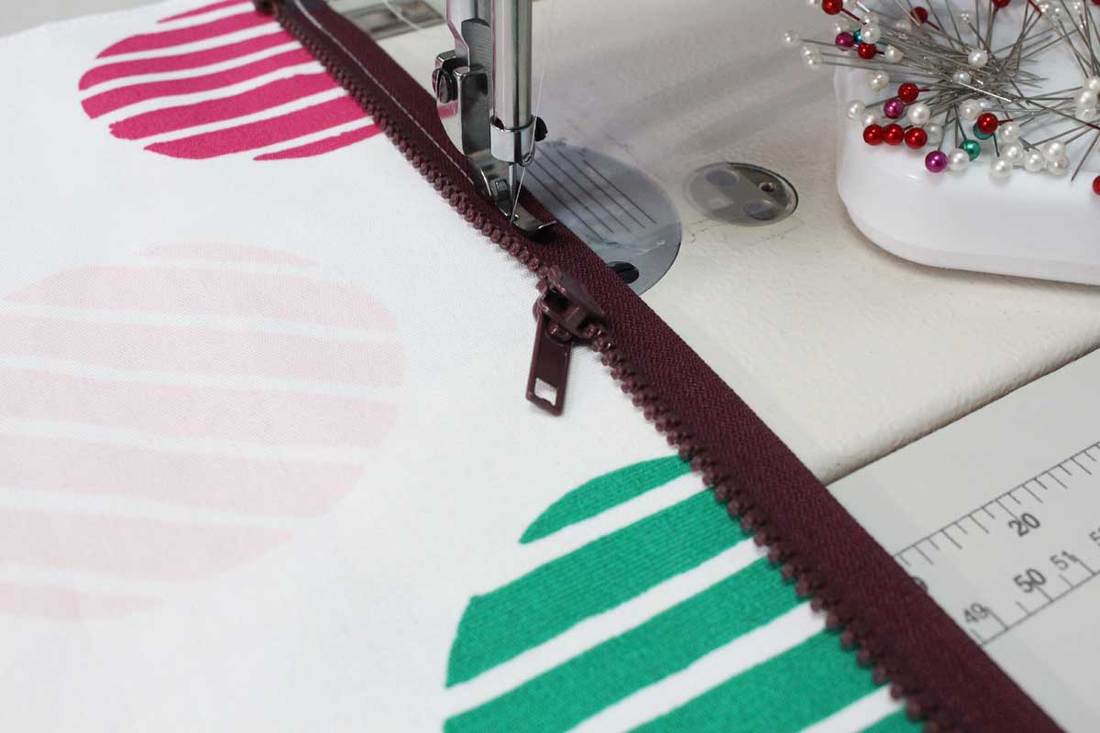 Step 7Press fabric back to create a fold on the right side of the fabric along the zipper coils. Leave sufficient space for the slider to zip freely past fold of fabric. 1/16” to 1/8” space works well. 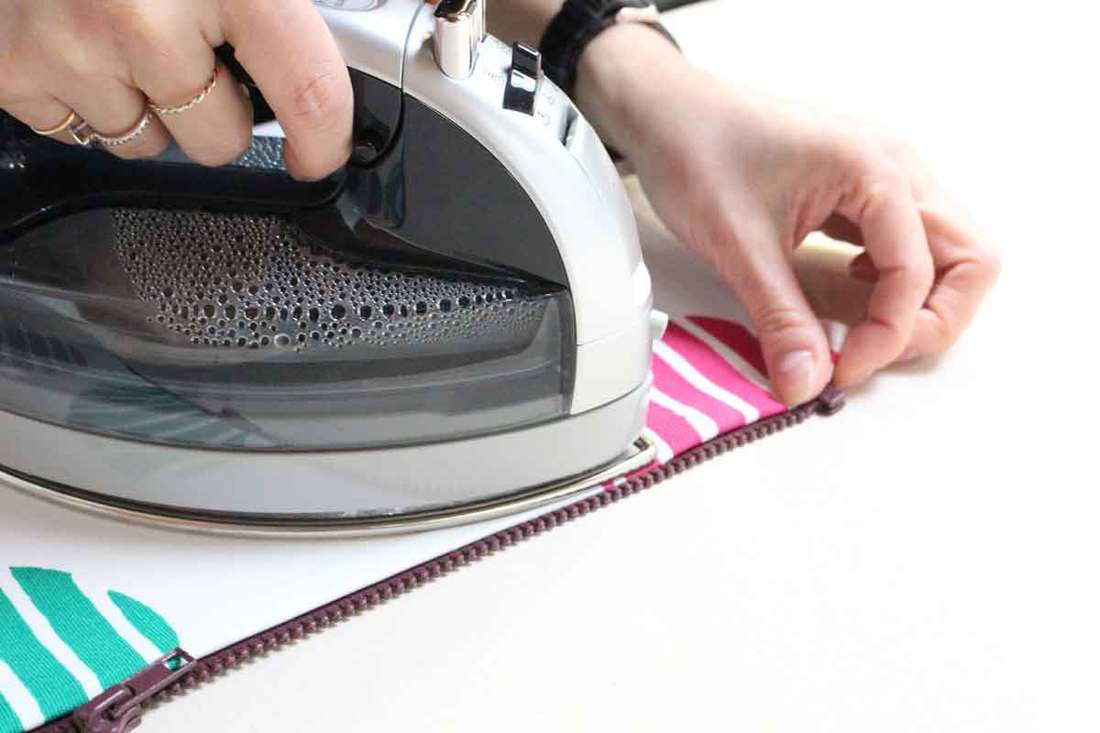 Step 8Edge stitch the pressed seam at 1/16” from folded edge. 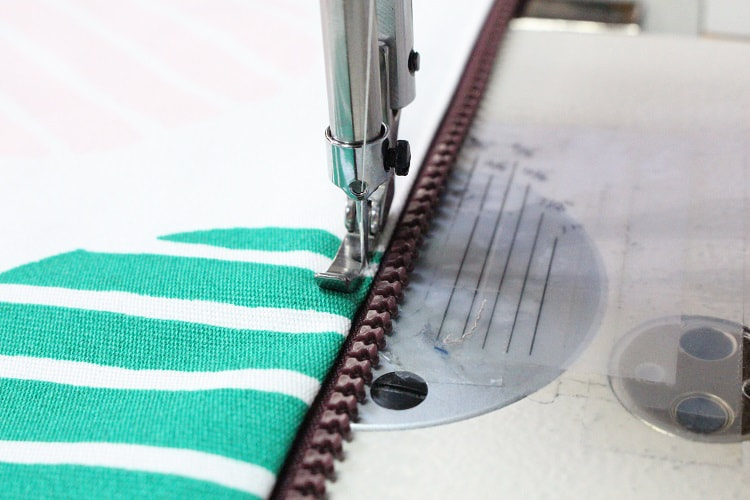 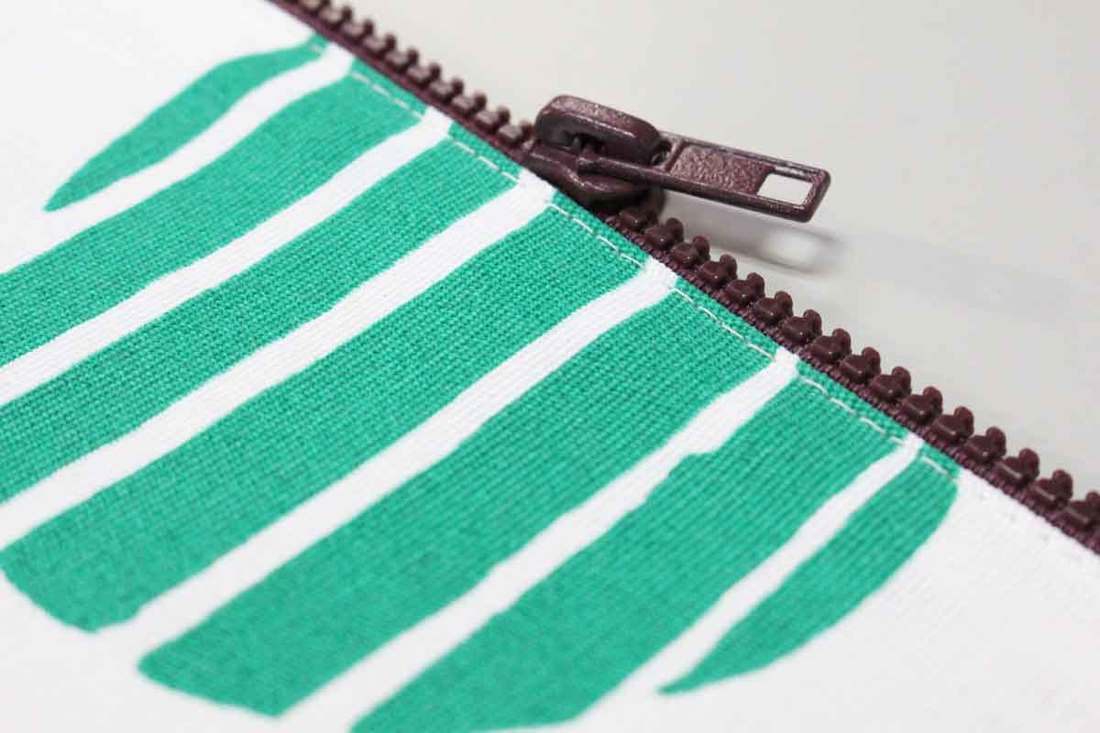 Step 9 (Optional)To create a tab, cut out a piece of fabric that is 3” x 7”. With right sides of the fabric facing each other, stitch on the longer edge at ½” seam allowance. Flip inside out and press. Fold the tab and center it on top of one end of the zipper with raw edges lined up to the raw edges of the side seam of the bag. Stay-stitch in place. 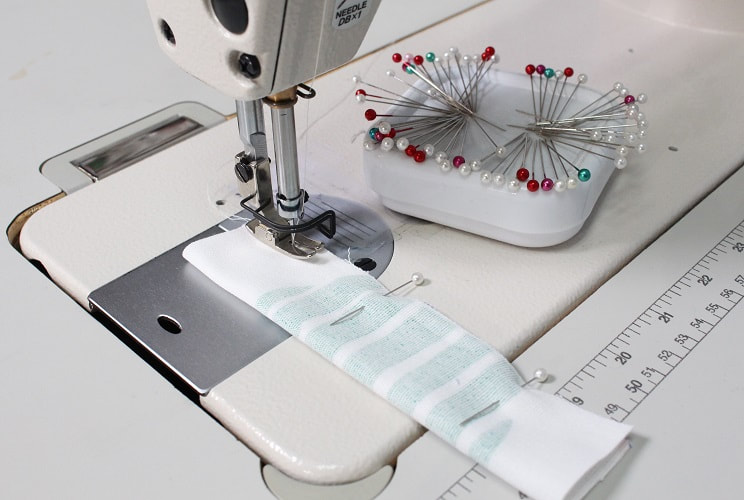 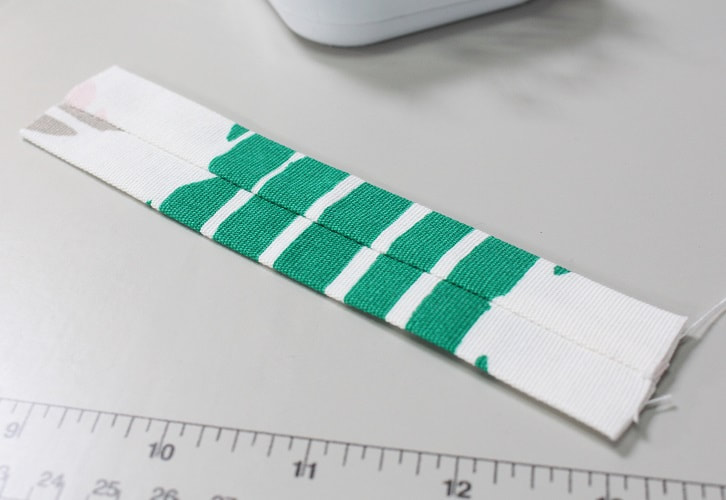 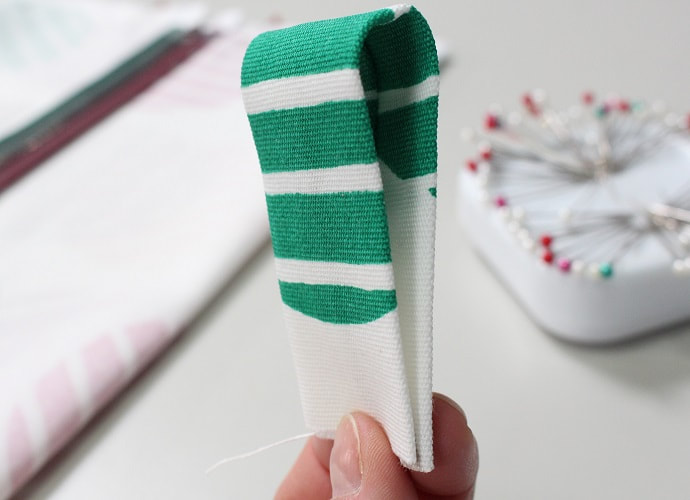 Step 10With right sides of the fabric facing each other, pin and stitch the side seams at ½” seam allowance. Line up notch A to B and C to D. The zipper should be laying in the center with wrong side facing up. Repeat to opposite side seam. Make sure the zipper is unzipped at least halfway before you stitch the final side seam. 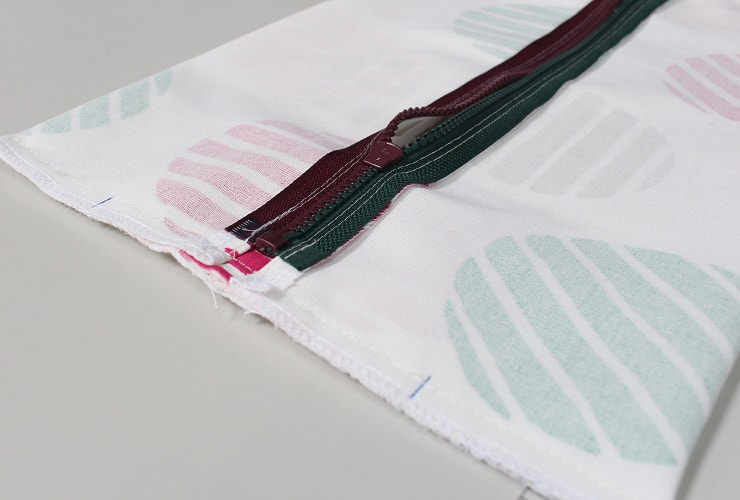 Step 11Stitch vertical side seams at each corner of the bag. Fold your corners at their 45-degree angle. The notches marked in red should lay right at the folds. Stitch from one notch to the other, passing over the side seam. Feel free to draw in a line to help guide you, prior to stitching. Repeat to the remaining 3 corners. 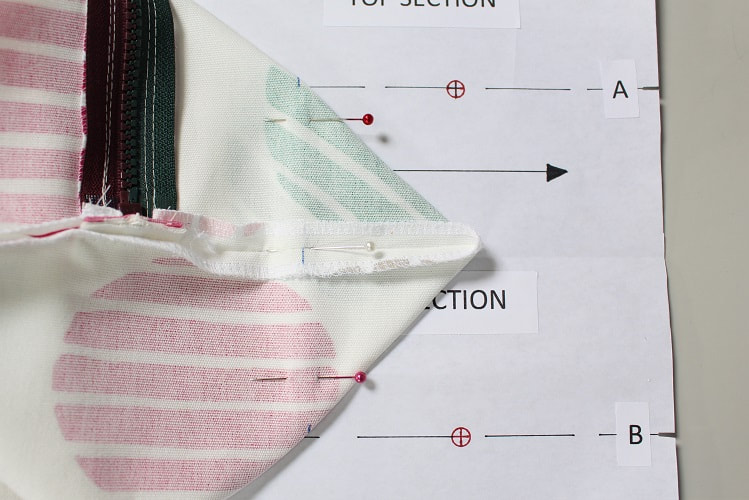 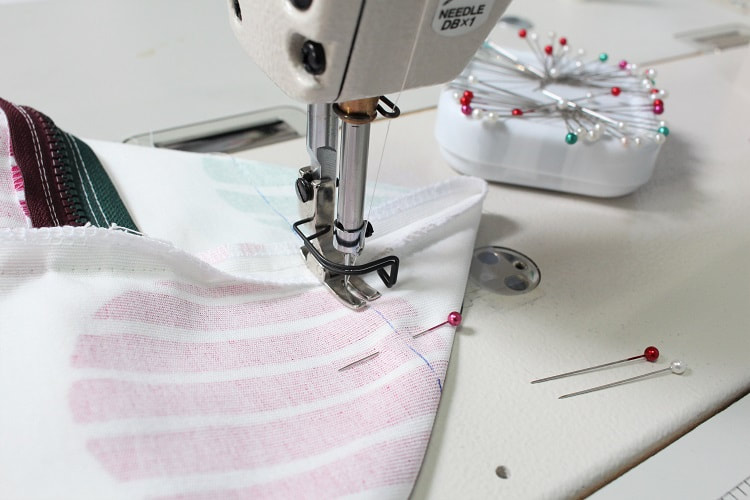 Step 12Over-lock close to above the corner stitch line. 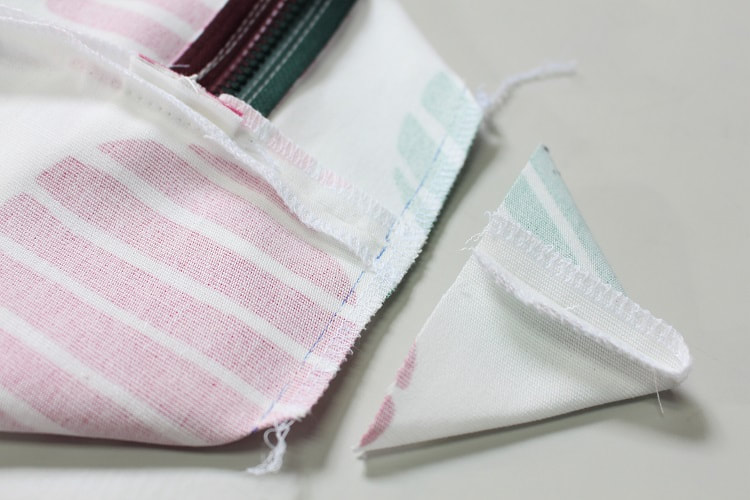 Step 13Flip your project inside out and voila, you are done! 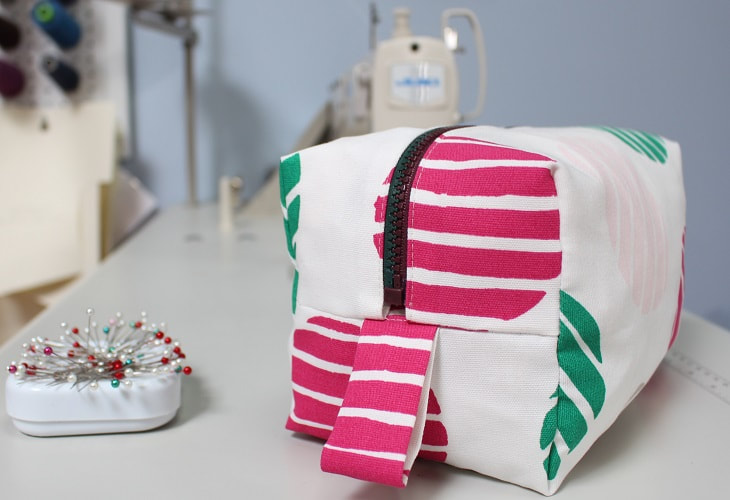 Happy Sewing!
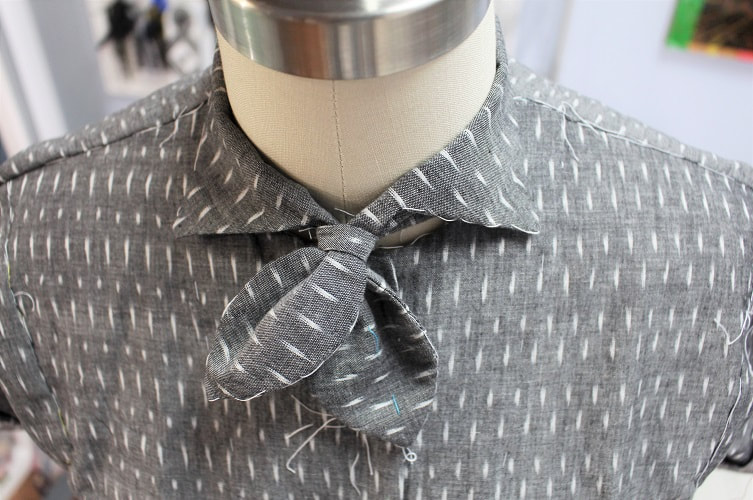
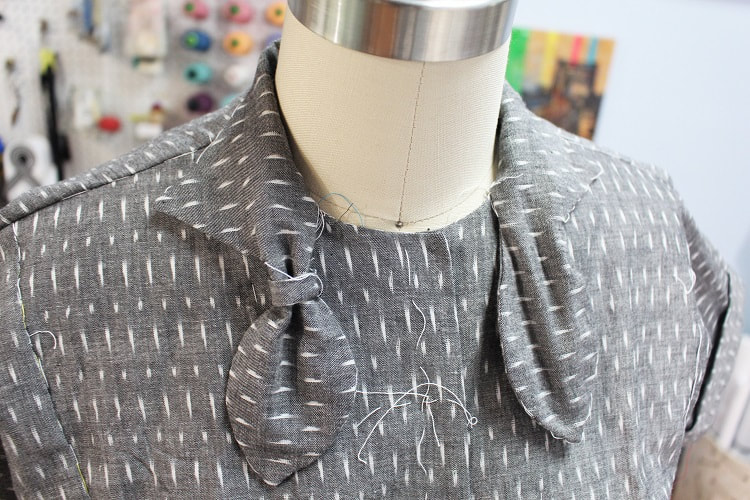
Designed, photographed and written by Sheila Wong Studios. We draft our own patterns in studio, but recently we have fallen in love with vintage and retro sewing patterns. Today we're showing off our latest vintage pattern make- couture bow blouse. This was made using a vintage pattern from the 1950's. By the way, anytime we work with a vintage pattern, we ONLY use hand sewn techniques. 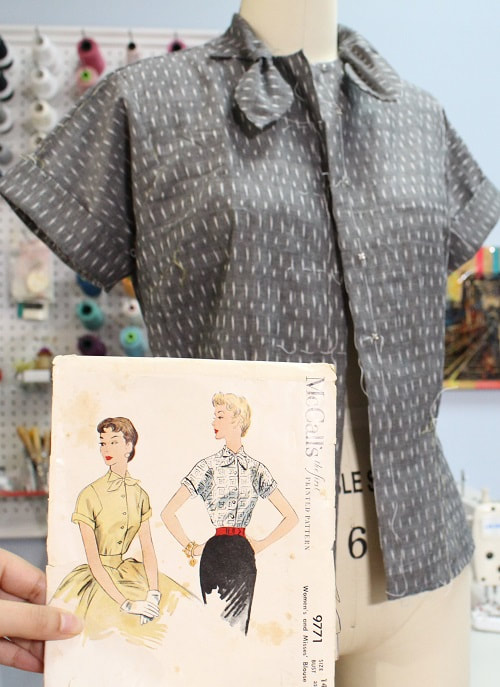 Project Specs
 Design ElementsFull couture sewing techniques applied to this design. No sewing machines involved, all done by hand! Snap ClosuresSnaps are quick and clean to apply. Here are a few tips when hand sewing snaps onto your next garment.
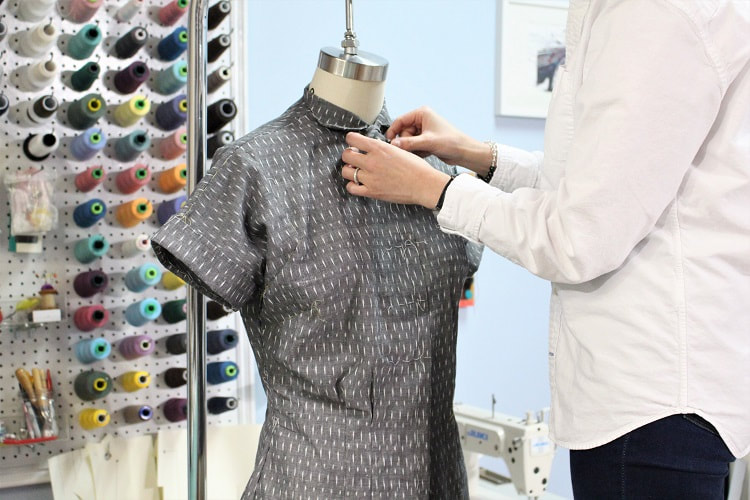
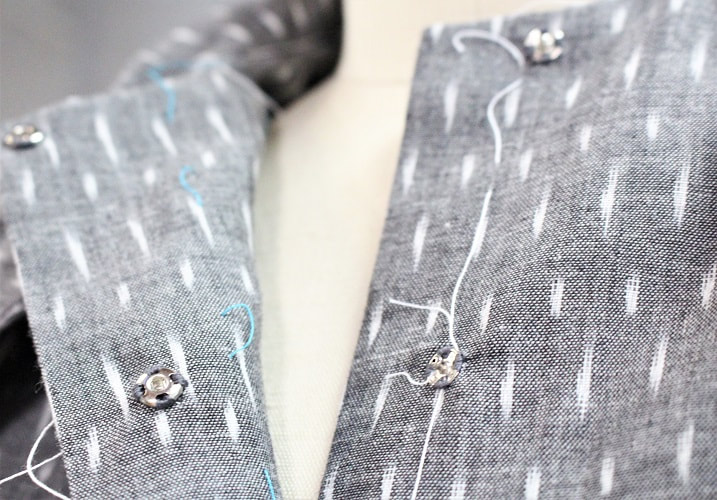 Couture Thread MarkingsApply thread marking around each pattern piece and important landmarks like notches, darts, pleats, tucks, button holes, etc prior to cutting out the fabric. This will create absolute accuracy while stitching up the garment. Use a 1-2" seam allowance, and trim down as you work with each seam accordingly. 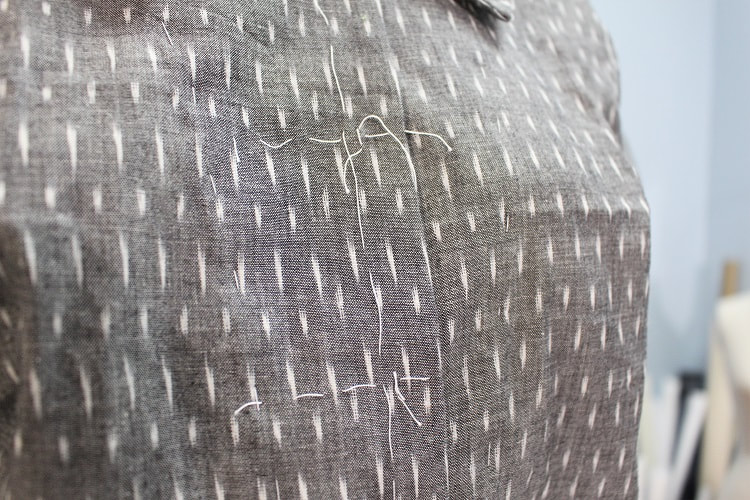 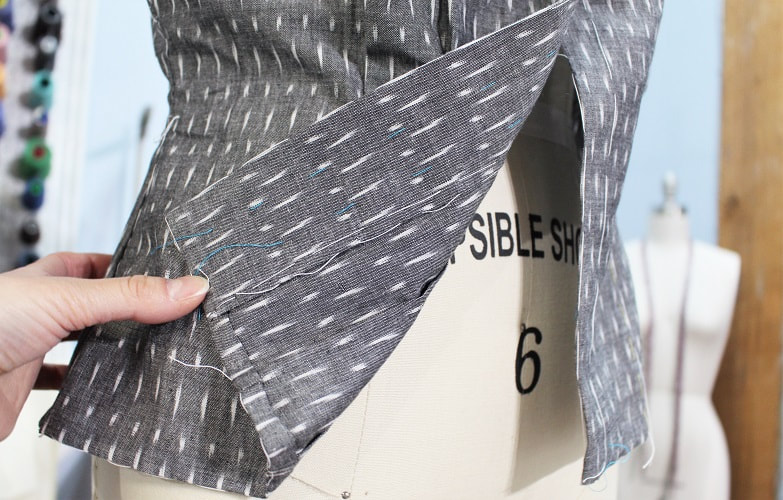 Couture Seam FinishesFalse French seam finishes were used to clean up all the seams in this design. If you do not know what a 'False' or 'Faux' French seam finish is, check out our step by step blog post about it HERE. This type of French seam finish is great to use in couture designs where you always want to work with the right sides of the fabric facing each other.  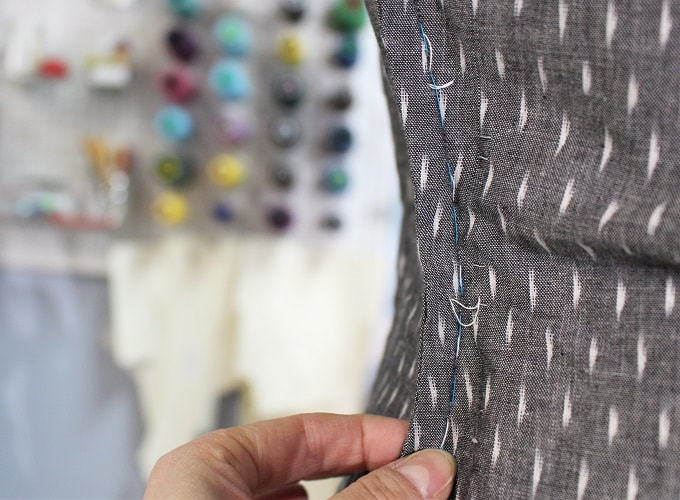 Bow Tie CollarThe dearest detail on this design would be the front bow tie closure. It is such a creative detail to extend out from a collar. You cannot see it but silk organza was catch stitched in between the collar layers to add structure to this area.
Final DesignSeveral vintage tops from the 1950's did not have set in sleeves such as this one. BUT, they would still use creative seams either in the front or back to decrease excess bulk around the armhole area. In this particular design you can see a front inset seam. What would you wear with this top? We are thinking a pair of high-waisted wide leg denim jeans would look so pretty. Let us know your thoughts below. 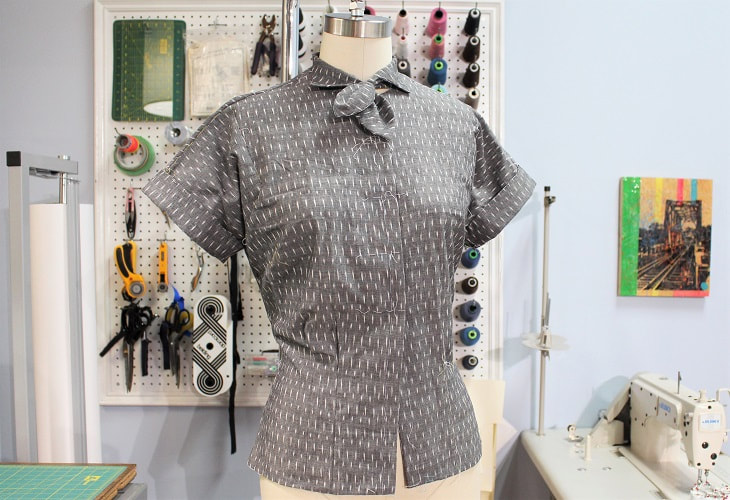 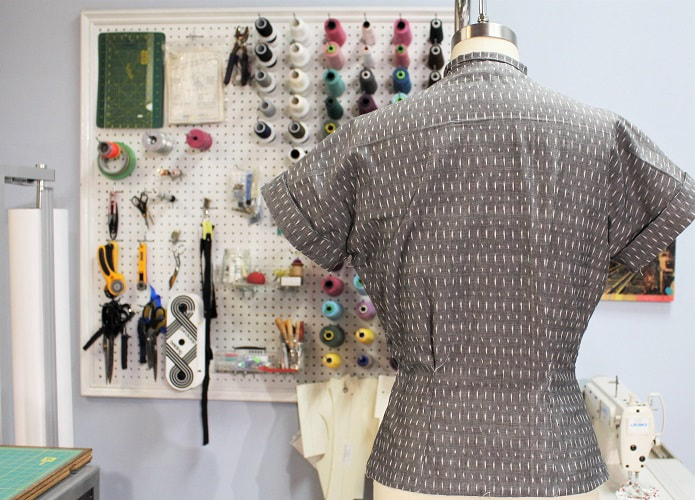 Sign up for private couture hand sewing lessons with us today. Just click on our CONTACT page. We look forward to having you in studio.
Happy Sewing! Designed, photographed and written by Sheila Wong Studios. |
Archives
November 2022
|


 RSS Feed
|
|
Copyright © 2024 Sheila Wong Fashion Design Studio Ltd. All rights reserved.