|
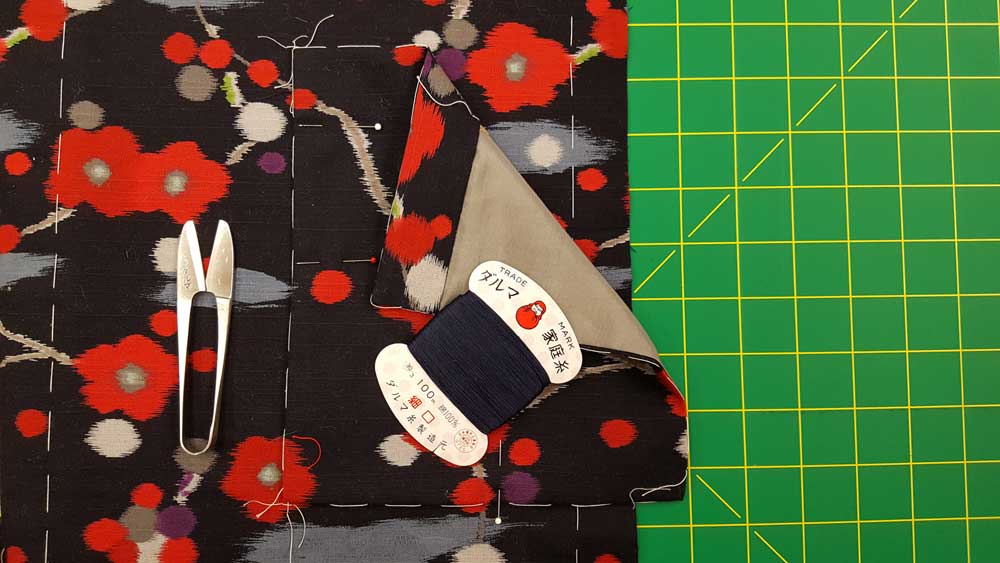
This skirts name is Split Personality Skirt (AKA- Split P Skirt). With designing this skirt, we wanted to create the illusion of 'are those pants or is that a skirt'?? It is a skirt obviously, but from afar the center back and center front opening creates the illusion of the appearance of pants. This design is full couture, so all stitching was completed by hand! 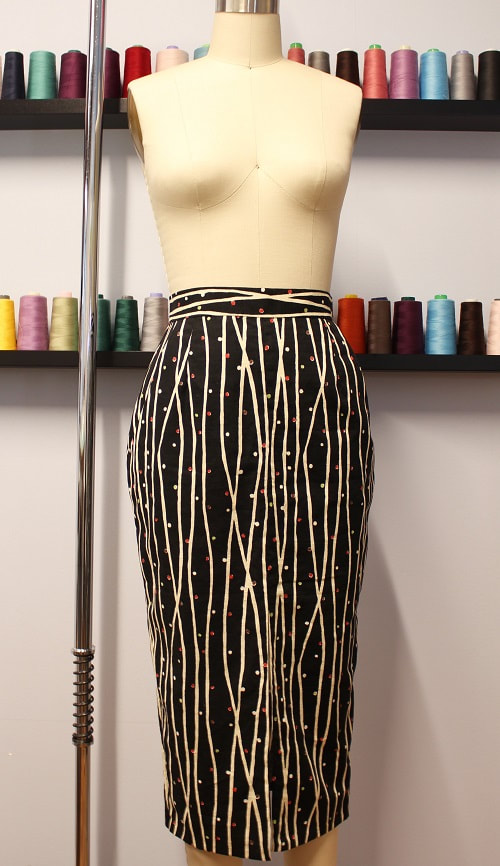 Project Specs
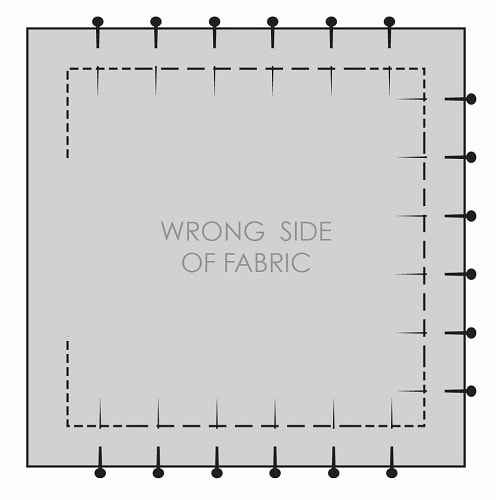
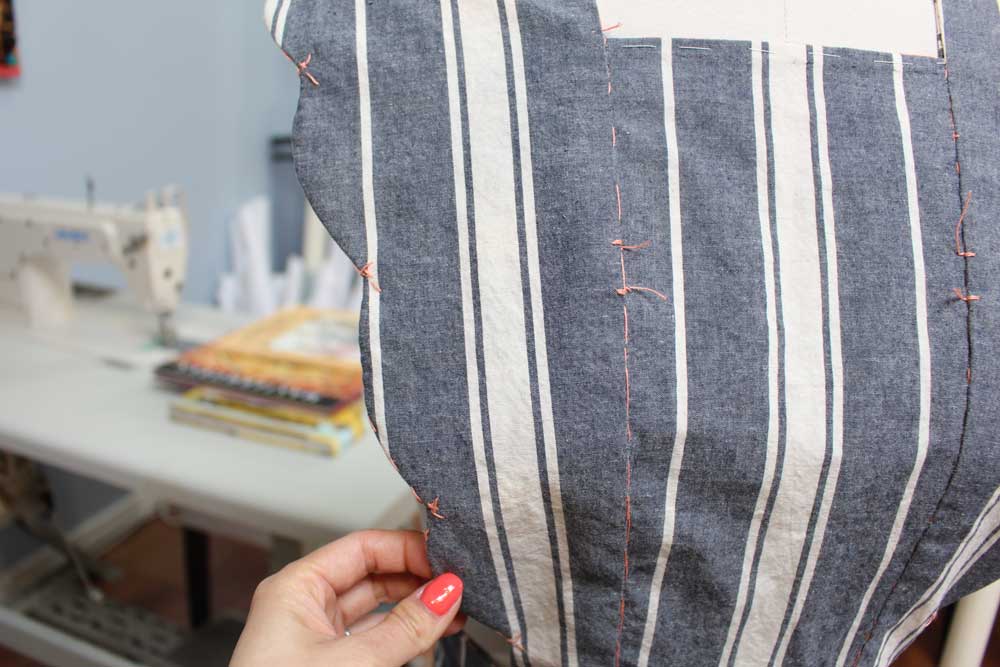
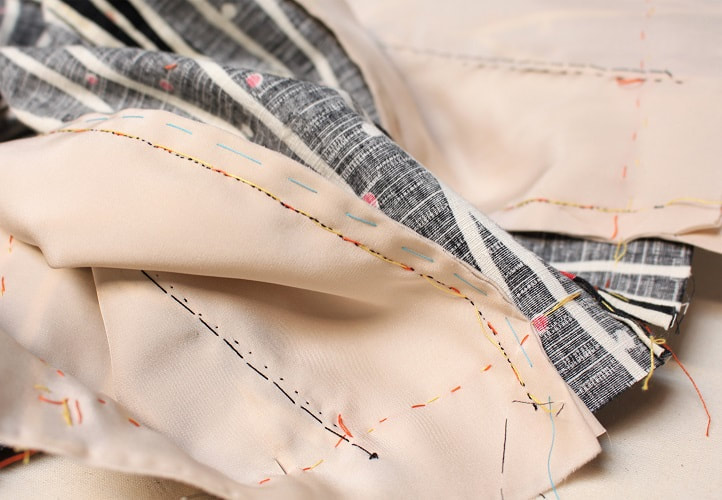
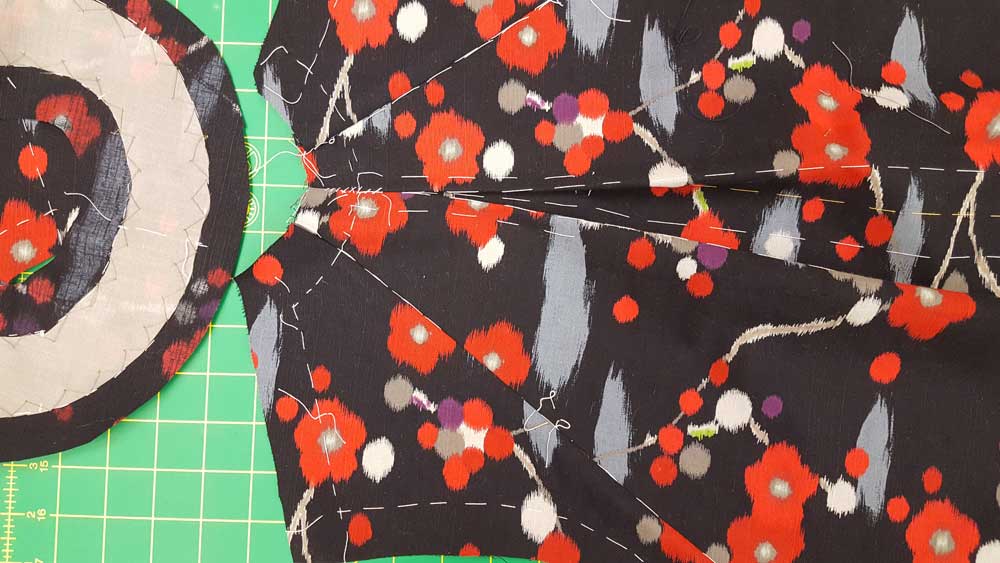
Design ElementsThread MarkingsThis is the stuff nobody gets to see! Temporary yet oh so necessary thread marking and basting thread stitches. Thread marking stitches are inserted in prior to cutting out fabric, as they frame each pattern piece. They are also used to clearly display any notches. These threads get removed after each seam receives their permanent stitches or at the very end of full garment construction. Basting threads hold multiple layers of fabric together prior to putting in permanent stitches.
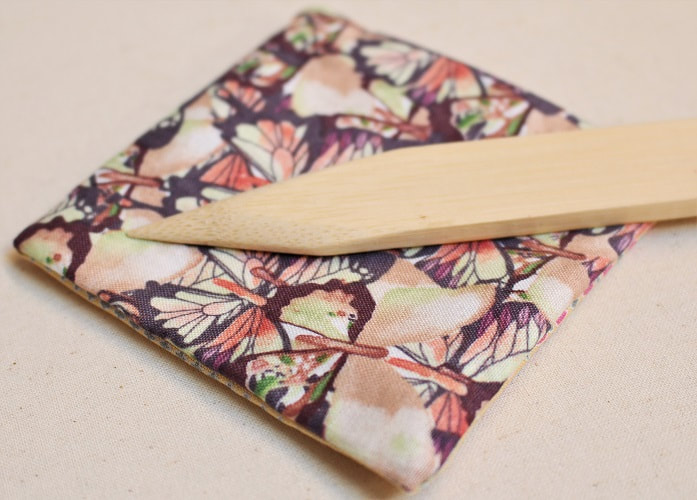
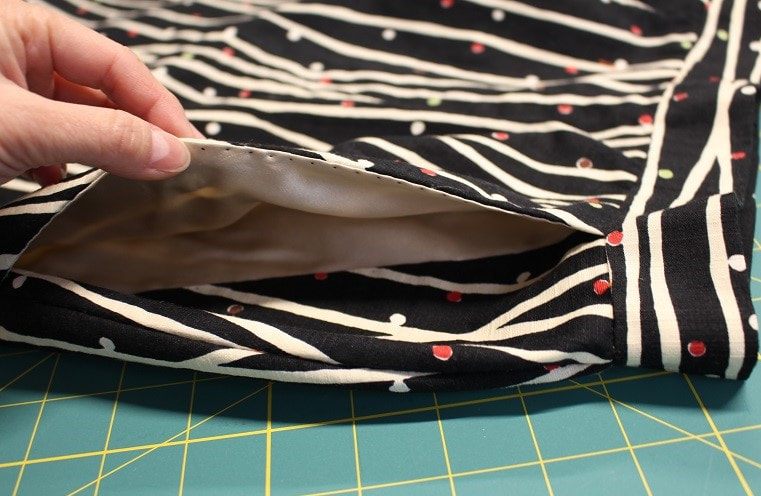
 Slash PocketIf you blink, you will miss the slash pocket element in this skirt design. We carefully lined up the fabric print to ensure the pocket opening was one with the rest of the skirt. Pocket is lined with a buttery silk charmeuse fabric.
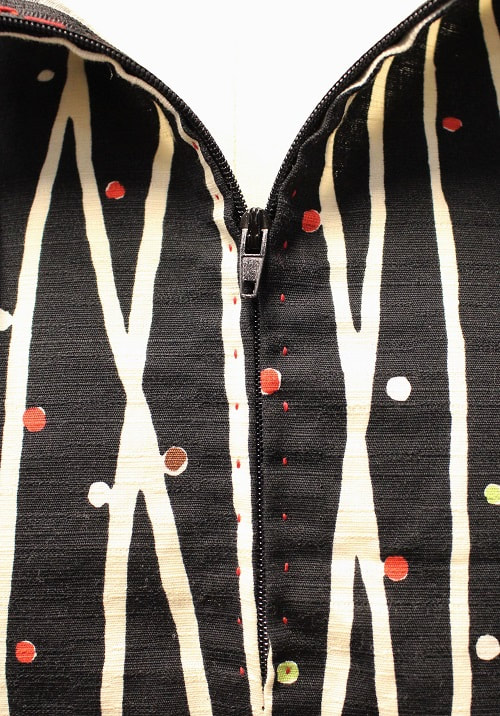
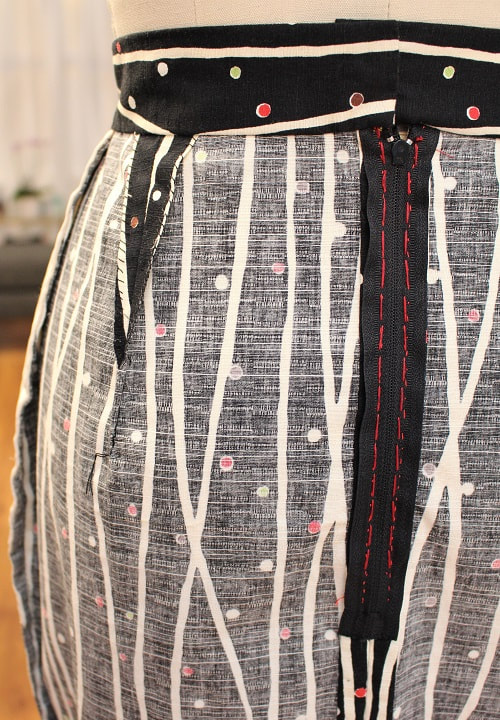
CB ZipperWe hand stitched the center back zipper with a decorative stab stitch finish in contrasting red. Have you tried decorative stitches to highlight a seam? We ended up carrying this decorative stitch further in the garment along the CF and CB seams.
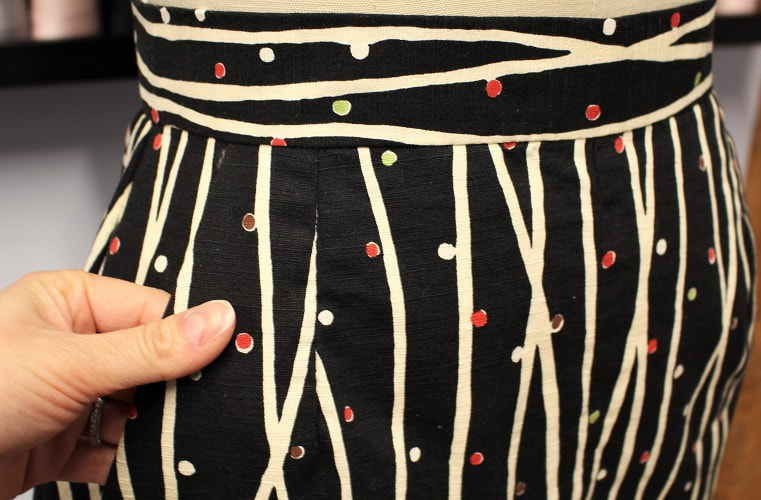
CB and CF SlitsAlong the center back (CB) and center front (CF) we designed high slits for movement and also to create an illusion of pants from afar. 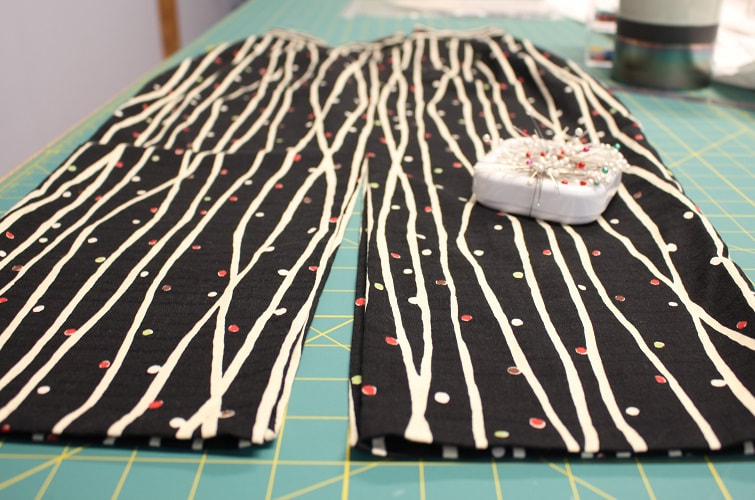 Fabric Covered Snap ClosureElevate the quality of any garment with fabric covered snaps. Often seen on pricier apparel, these snaps only take a few minutes to sew. But, can change the look dramatically. Check out our detailed blog post on "How To Sew Fabric Covered Snaps". 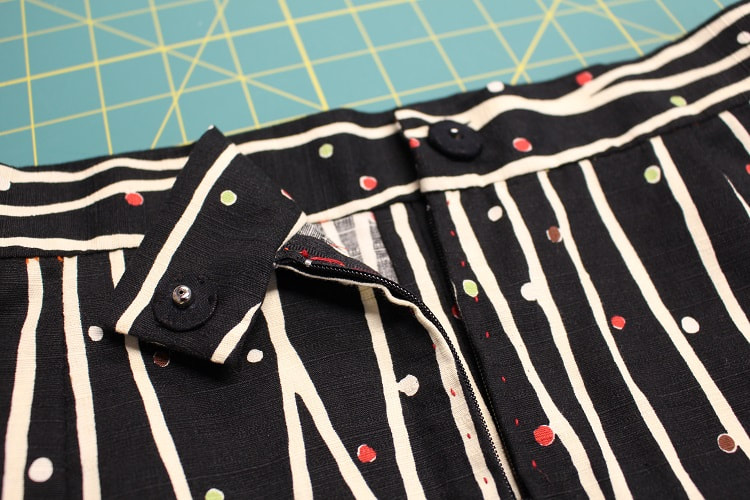 Final DesignChanging our perspective can make life beautiful! Here is the completed Split P Skirt flipped inside out. To all the designers out there, do you ever just wanna show the insides of the design first? 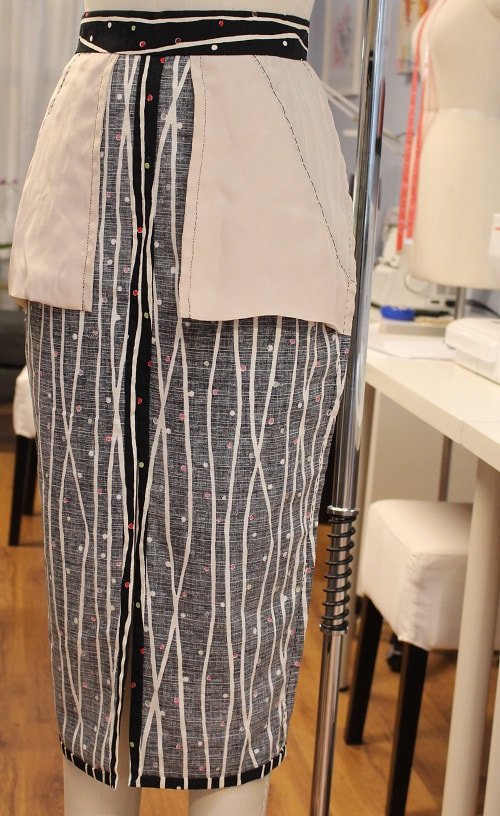 If you want to learn how to inject hand sewing techniques into your next project, come take take lessons with us. CONTACT us today.
Happy Sewing! Designed, photographed and written by Sheila Wong Studios.
0 Comments
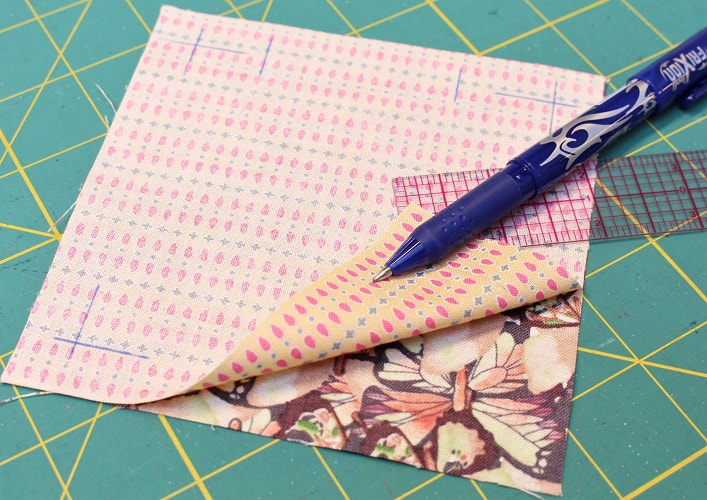
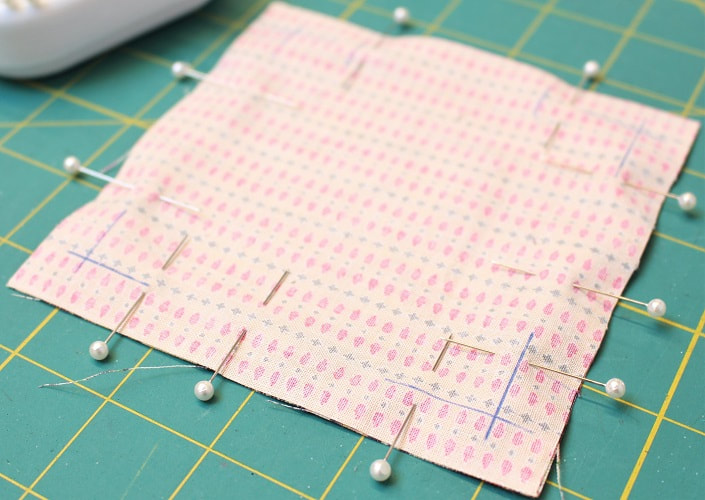
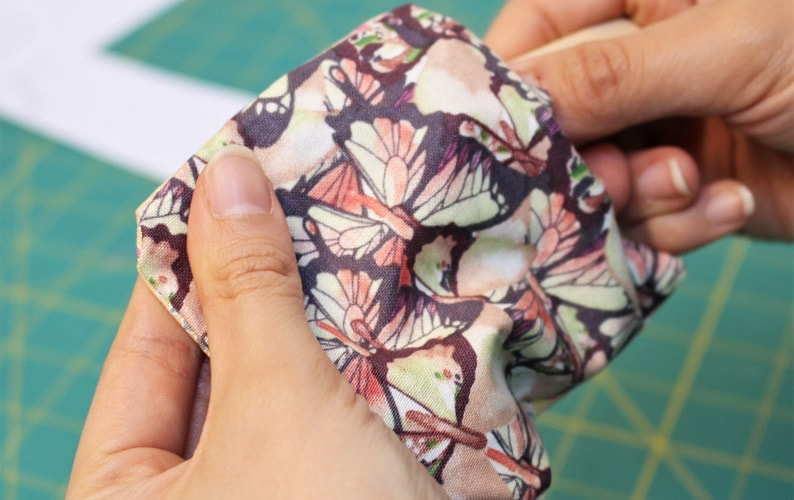
It is time for a quick and easy sew-a-long with Sheila Wong! Every year our scrap fabric pile hits a level that we gotta do something about it. So this year we are making reversible coasters. 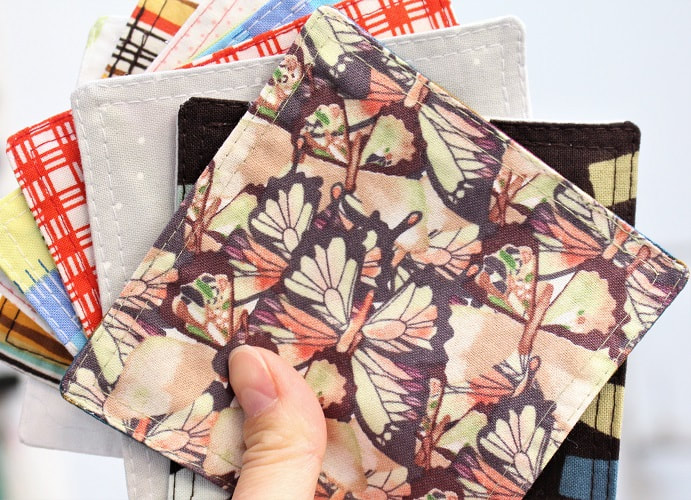 MaterialsTo make one coaster you will need 2 pieces of fabric that are 5" x 5" in dimension. If you would like the coaster to be reversible, choose two different fabric prints. 100% cotton works best. 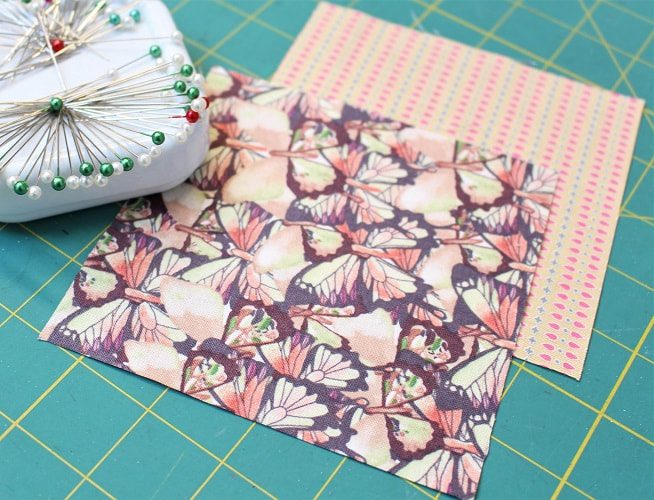 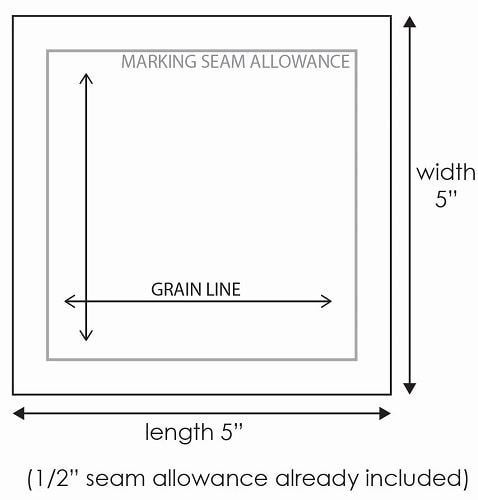 Step 1With right sides of fabric facing, pin and stitch a box all the way around 4 edges. Leave an opening on one side approx 2" in width.
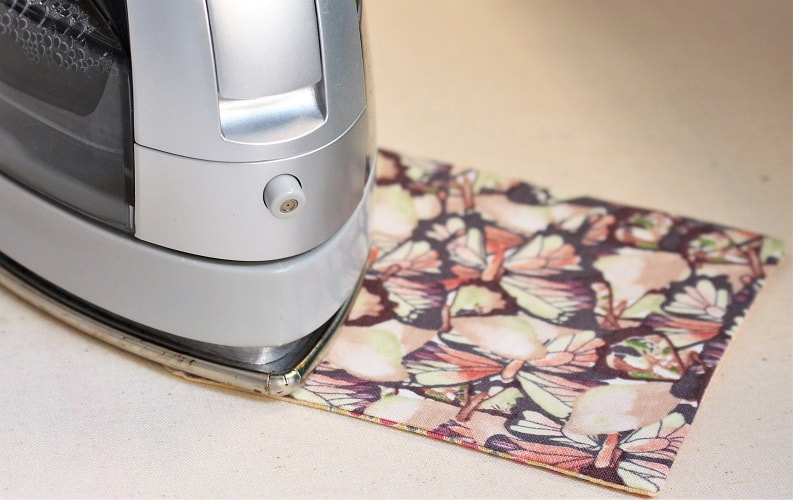
 Back stitch at the beginning and end of your stitch line to secure the opening while flipping it inside out tomorrow. Feel free to mark your corner pivot points and use a smaller stitch length in the corners for strength.  Step 2Remove bulk by trimming excess at corners. Stay approx 1/8" away from stitch-line (pivot point). 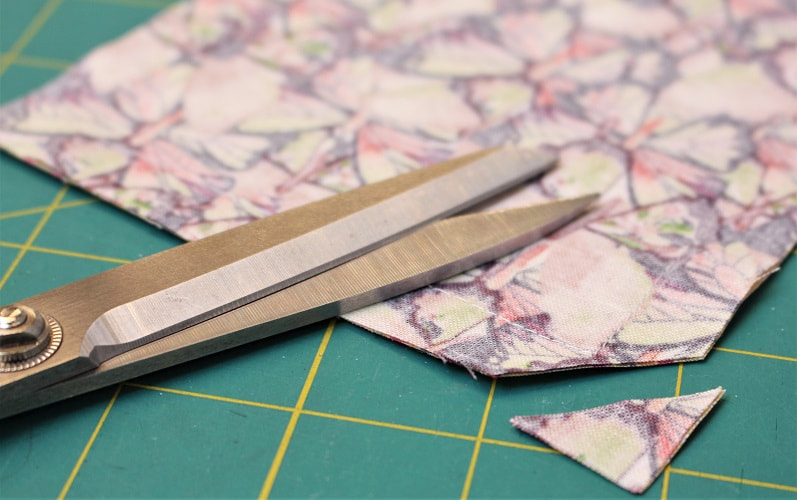 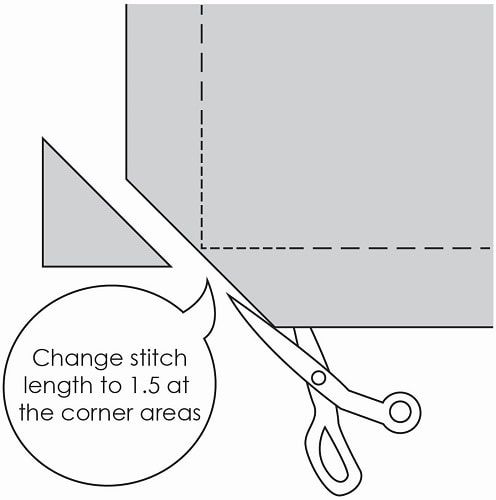 Step 3Flip out and press flat. Use a point turner to help bring out corners.
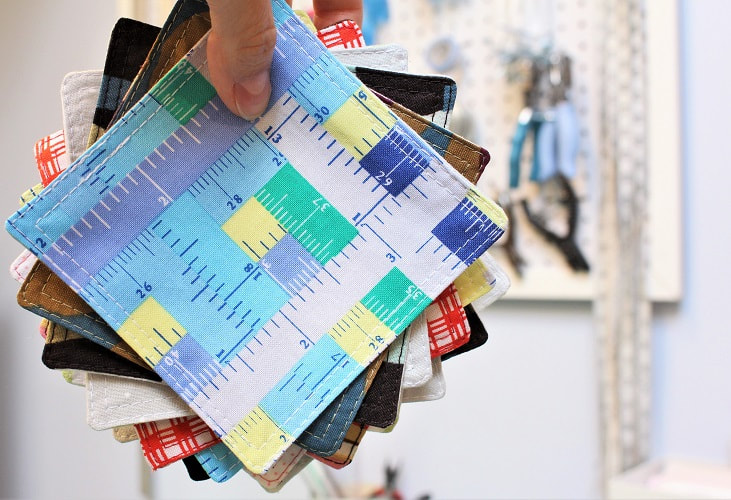
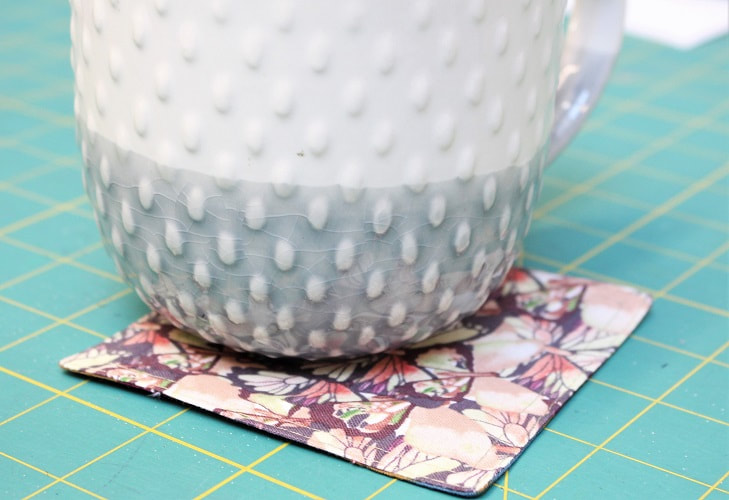
 Step 4Top stitch around square to close. Feel free to do a double top stitch. 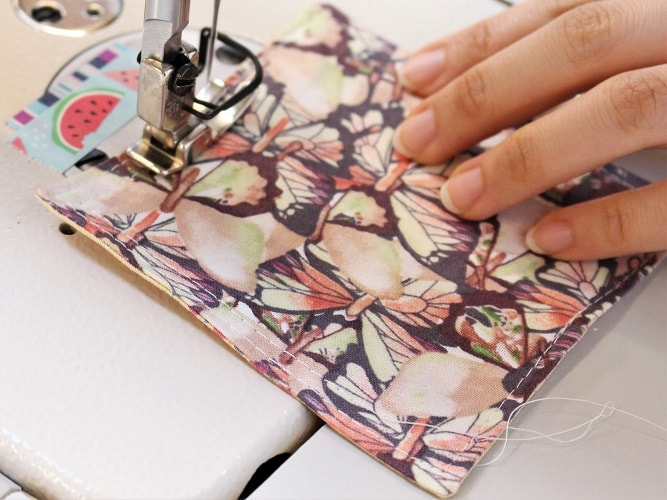 Final DesignHow many are you making? We ended up making 2 dozen with all our scrap bits of fabric. Tag us in a pic on Instagram to show us your final coasters.
Happy Sewing!
Designed, photographed and written by Sheila Wong Studios. I love a good white jacket, it reminds me kinda like a lab coat. We used our mad scientist skills to tame complex in-set corners, in-set sleeves and non traditional lining. In this post, I get behind the seams, showcasing the inspiration and the important design elements. I also share with you the challenges and what I learned. 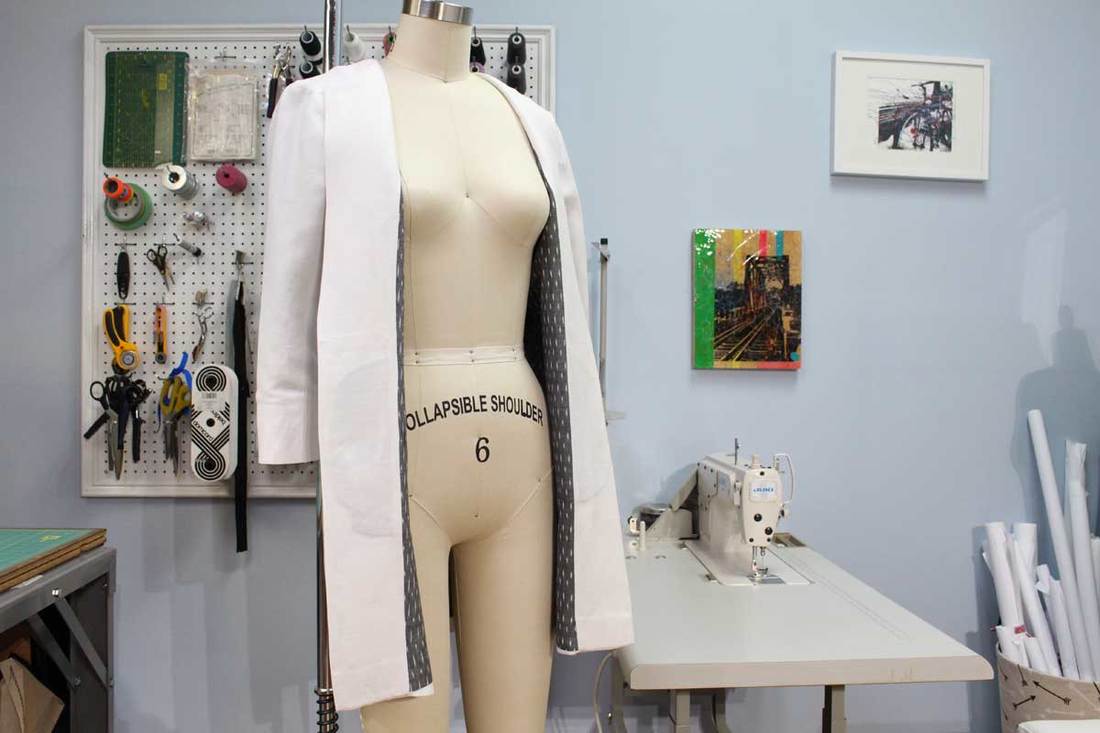 Project Specs
Reverse Pattern CuttingBack in the winter of 2017, I taught a 2 day reverse pattern drafting workshop at Maiwa School of Textiles. Reverse pattern drafting is all about extracting a pattern from an already made garment. In below example, I demonstrated the pattern extraction process from a Zara jacket. This is the base of this blogs inspiration! If you look carefully, you will notice many pattern pieces make up this jacket. I like to call it the 'Tetris Jacket'. 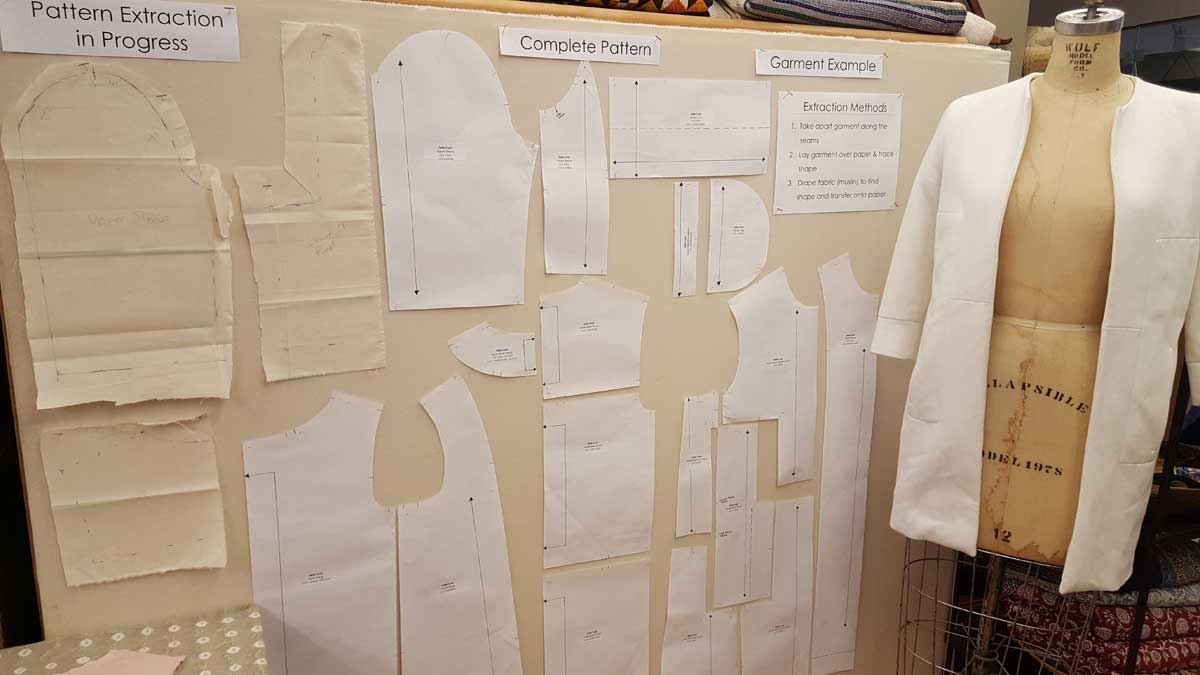 FabricFabric inspiration came directly from below ikat fabric from the Maiwa supply shop in Granville Island. This ikat fabric is hand woven, which in my mind makes it so special to wear. We used the same fabric on a vintage bow blouse design too. Keep an eye out for that blog post in the coming months. 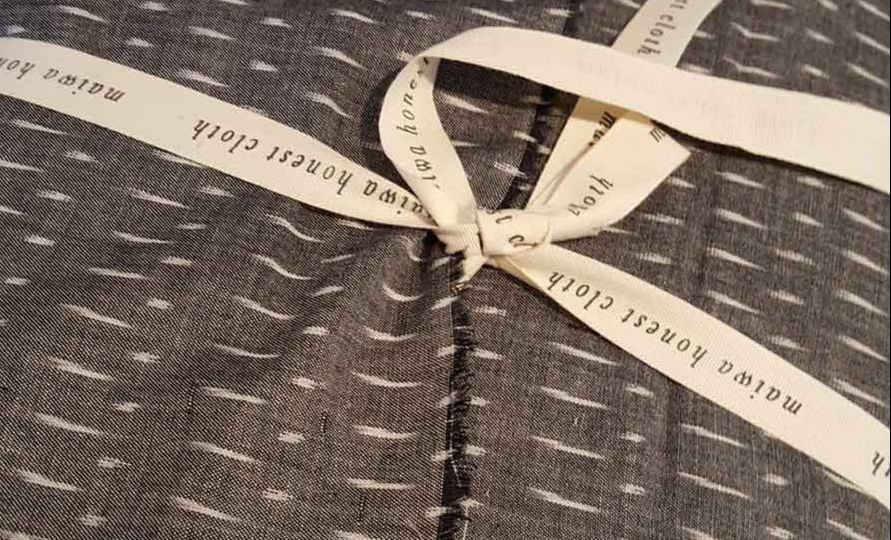 For the past year, we have been making a conscious effort to use up fabric in studio before buying anything new. We had just enough white linen left-over from when we made a white linen summer dress. What worked in our favor was the many small pattern pieces that made up this jacket design. We where able to use up smaller bits of left-over fabric. You can find this linen from Fabricana in Richmond. 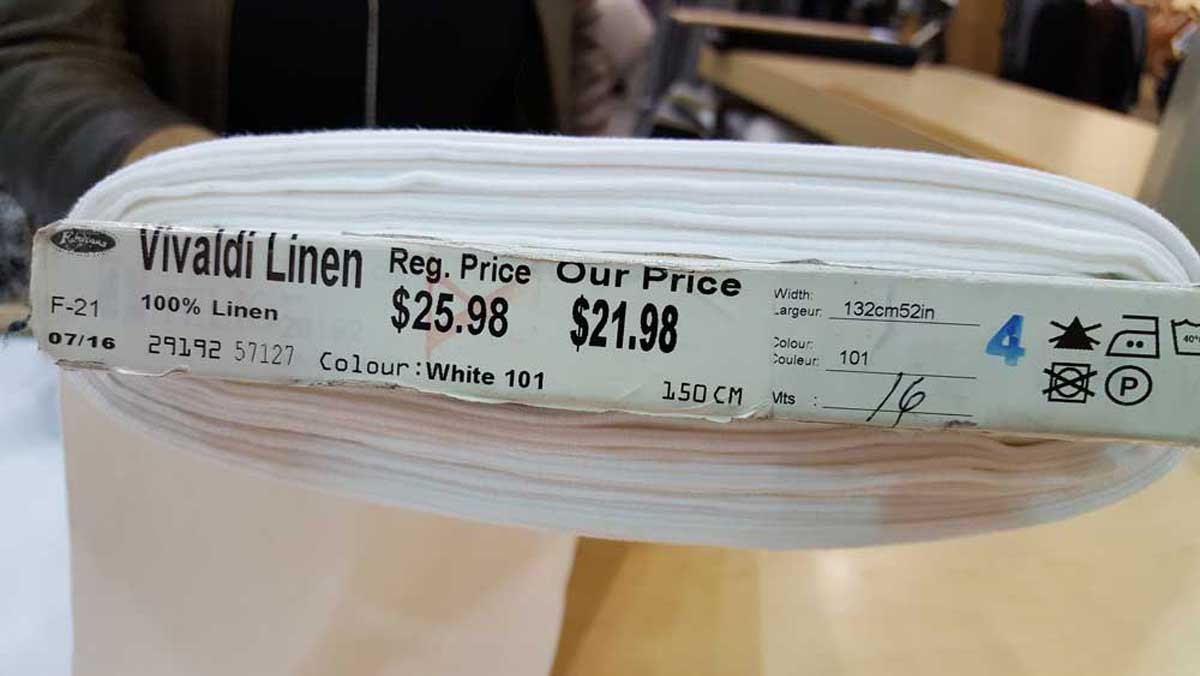 Design ElementsFirst glance at this garment, it looks fairly simple in design. But there are many advanced technical design elements involved. In-set sleeves, lining, in-seam pockets, facings, and in-set corners. Kinda like peeling back an onion! Have a tissue handy as you read on. JK! LiningI feel the lining is the silent hero in this jacket. I do not mind breaking rules. Using non-traditional darker lining in comparison to the outside lighter colored fabric may not have been the best decision, but you never know until you try. I am a firm believer in pushing the boundaries of your comfort zone. If your risks work, its such a rewarding payoff. If they do not, you have just learned a great deal of knowledge! Read on as I ended up learning a lot in this situation. 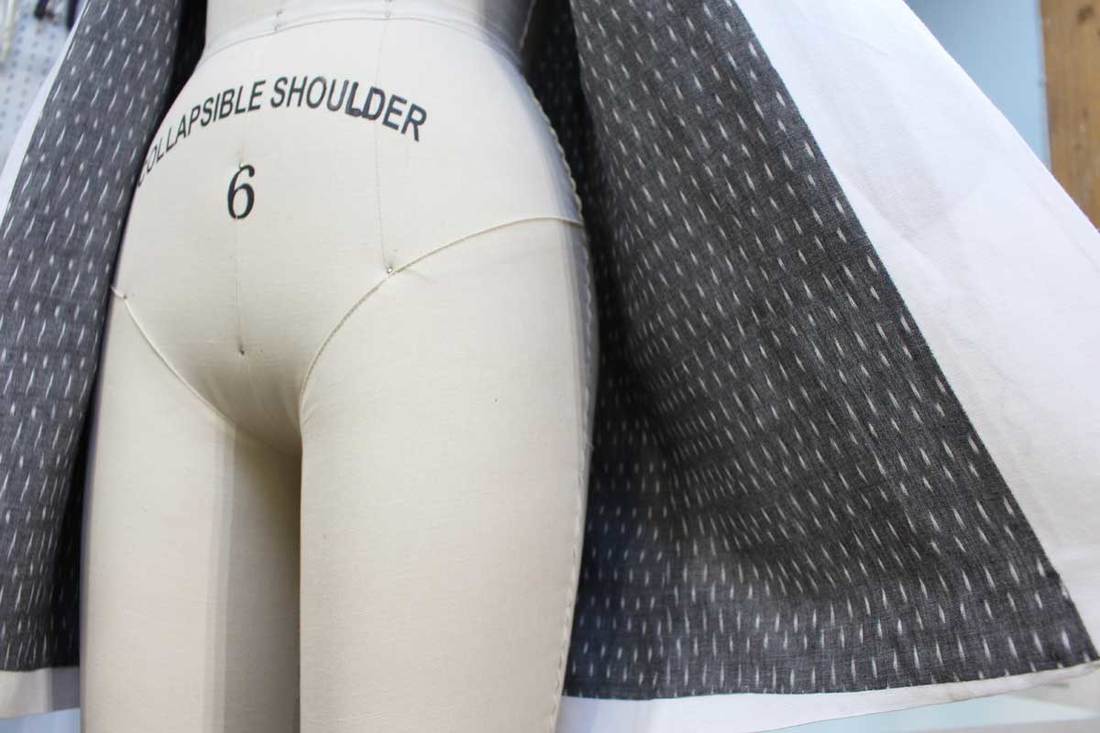 In-seam PocketsThis is technically a in-seam pocket with a facing. It worked well in this situation to hide the darker colored lining fabric from peeking out. The pocket along side the in-set corners, was probably the most challenging elements to stitch. The opening of the pocket is centered within a vertical rectangle seam which has in-set corners. The opening of the pocket was also lined up to an adjoining seam above and below this area of the jacket. Basically many seams of this tetris jacket came together right at the pocket. If you where off by a 1/16" anywhere else in the jacket this is where it all showed its ugliness. 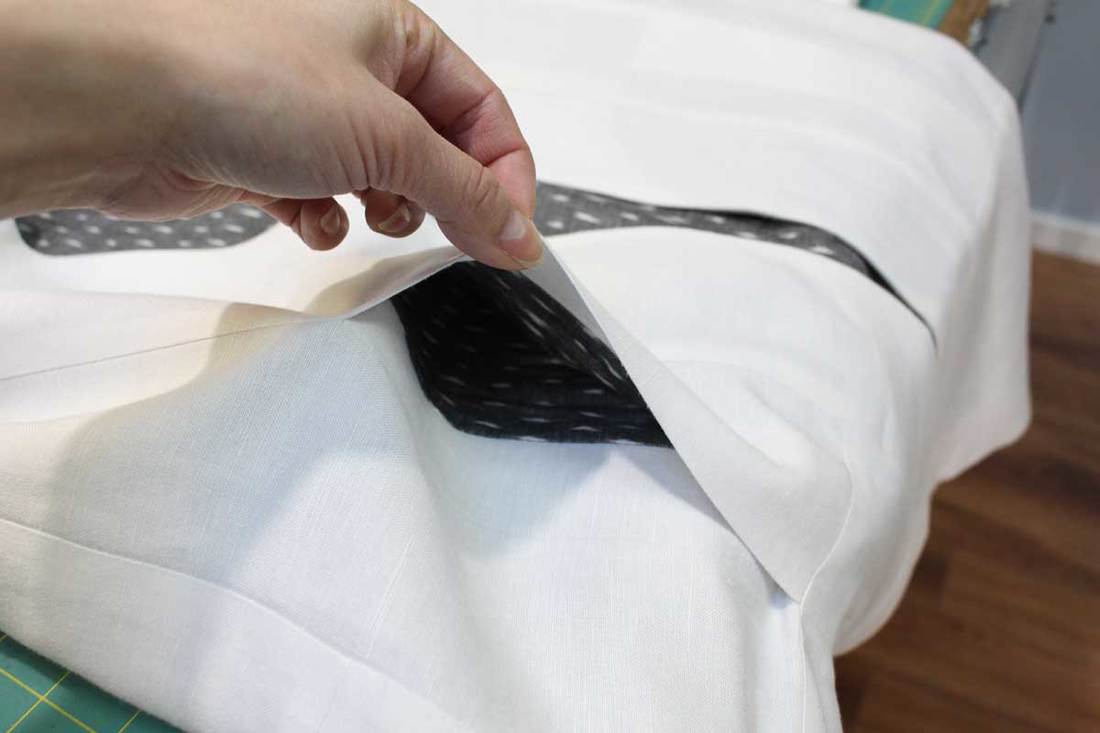 Collarless with FacingsNo collar?! Yes please. Minimalist designs can be found all over right now. I like the idea of being able to layer with a collared shirt underneath. Changes up the look with each new shirt. We applied a 4 inch width front facing from the hem up the center front, then narrowed it down over the shoulder towards the center back. Edge stitching was applied around the neckline, to keep facings 'facing' your body only. 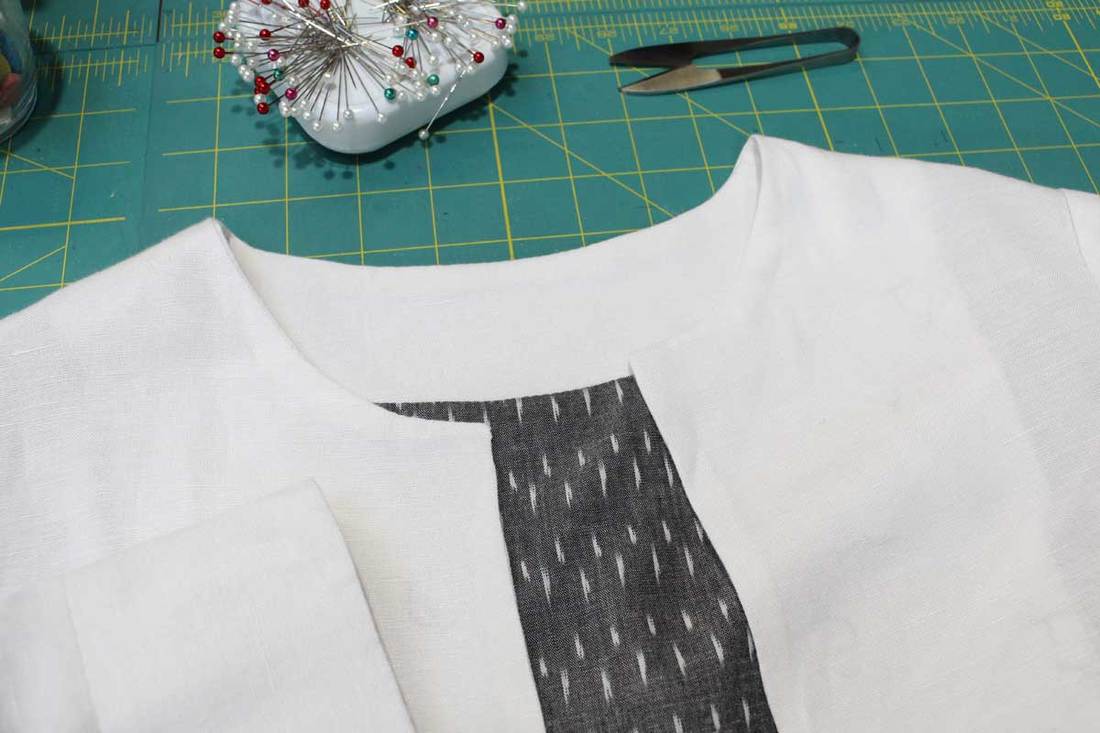 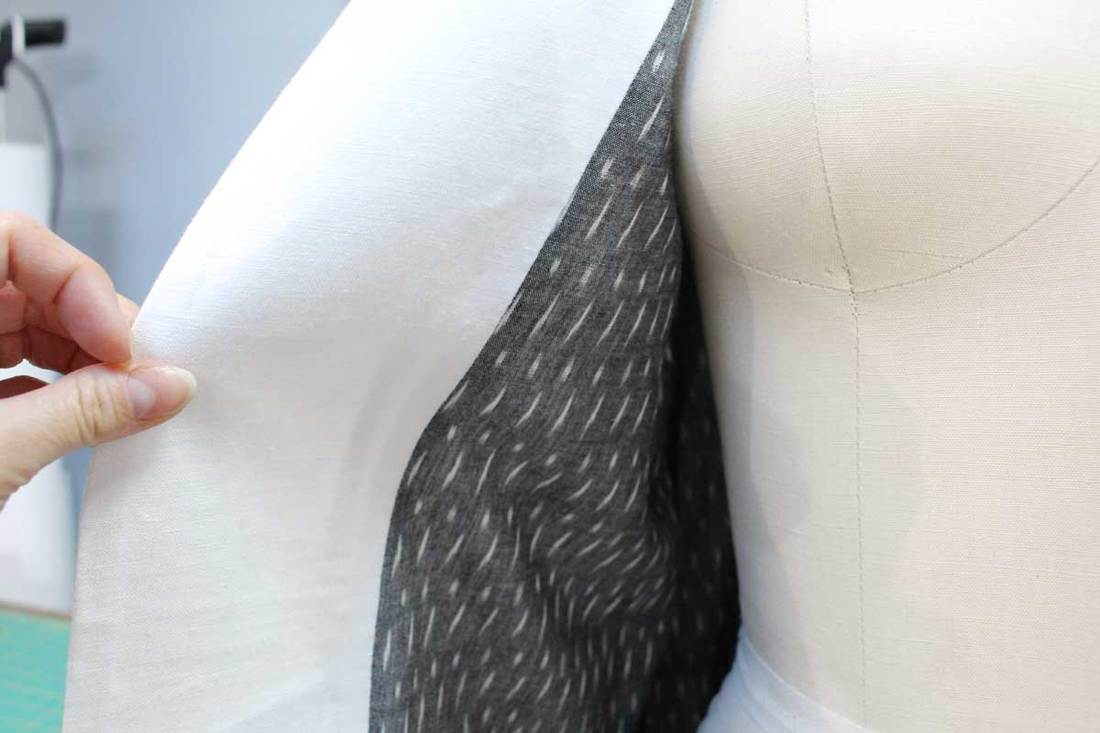 In-set Corner SeamsI already started talking about the complex pocket section earlier. Here is a closer look at the in-set corners surrounding the pocket. To add strength to the exterior part of the in-set corner, we fused a small bit of interfacing. When you clip the seam allowance towards the corner, the small bit of interfacing will strengthen the fabric from ripping away over time. So never throw away scraps of interfacing, they can be used in these areas. 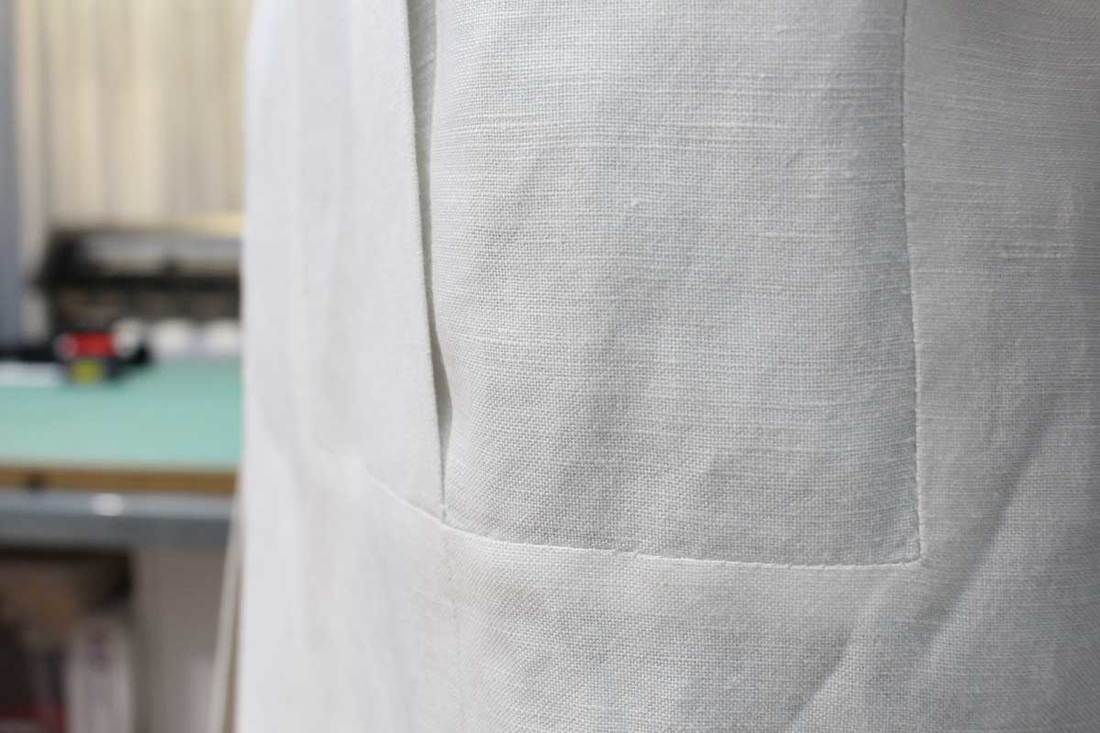 What I learned!The biggest thing I learned from this design is an obvious one! If your lining is darker than your exterior fabric, most likely the lining fabric will show through. In our case, the white linen was kinda sheer. The lining doesn't show through dramatically, but after many wears the raw edge of the darker lining fabric starts to show through. If we where to create this design again with the same white linen, an interlining would be required to ensure a solid separation between the exterior and lining fabric. The interlining could be basted to the exterior fabric. Another option, would be to finish the raw edge of the lining prior to closing up the lining to the exterior jacket. What would you do? Please share your ideas below in the comments. Final Design 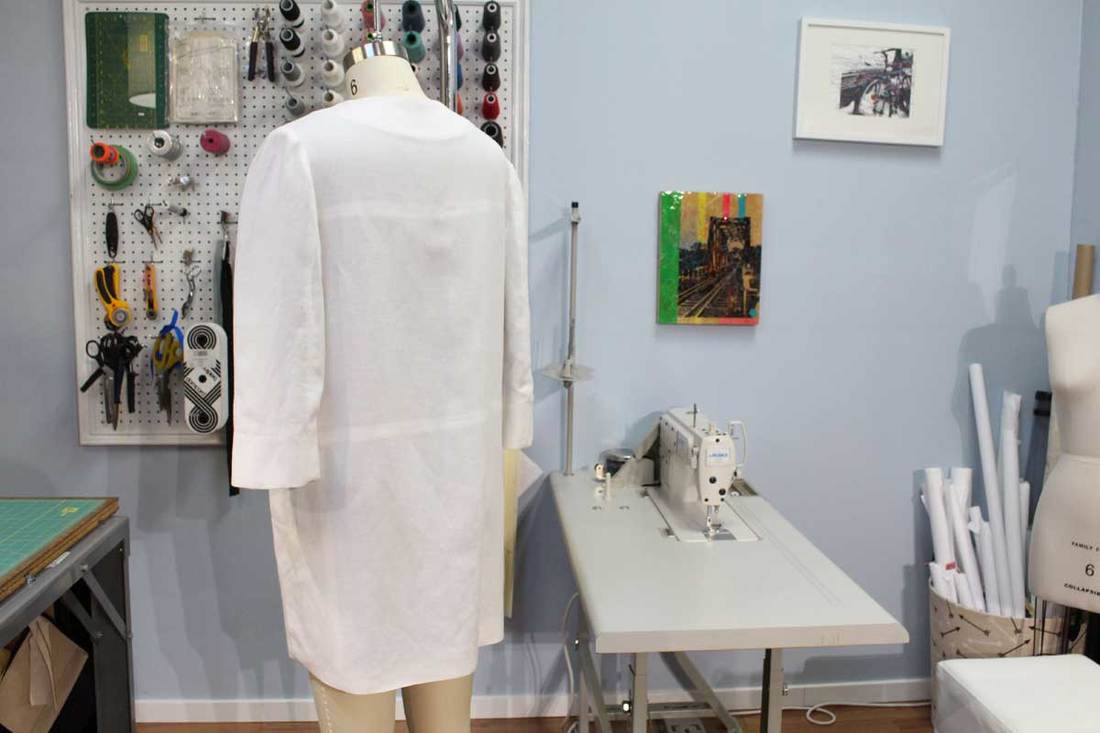 Happy Sewing!
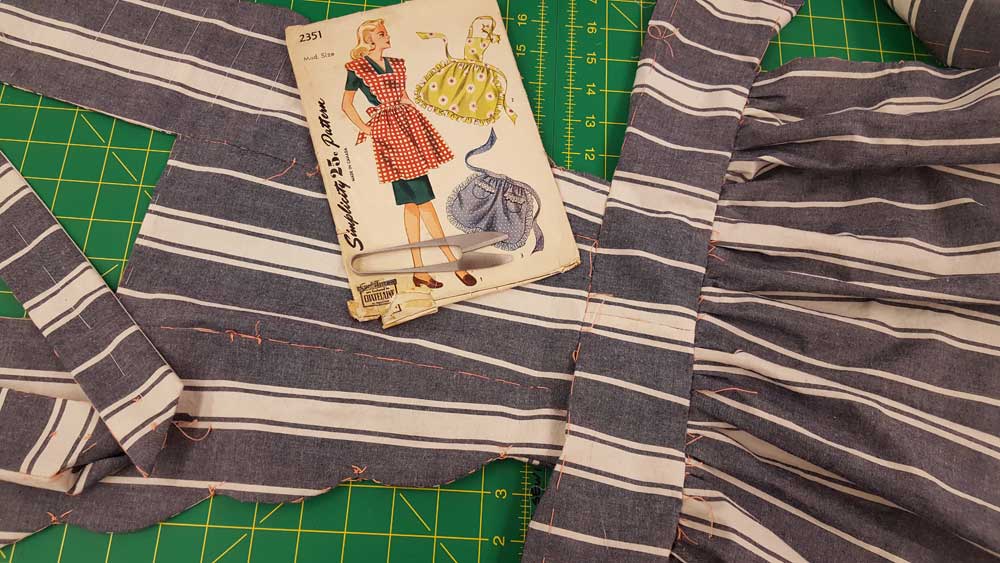
Designed, photographed and written by Sheila Wong Studios. I am going to let you in on a little secret. Our studio has been working on creating patterns for you to sew with! Our focus will be designs that have modern silhouettes and sewing techniques that are the epitome of slow fashion. I believe the garments you create should be loved beyond one season. In fact, if they can be passed onto the next generation, why not?! In this post, I will share with you one of the patterns we are perfecting. It is a button-up shirt with stand collar, cuffed sleeve, asymmetrical hem and patch pocket. There are a few variations to this pattern. The cropped version is our first to sample. Please let us know in the comments what you think.  Project Specs
FabricThis black linen fabric has been sitting around the studio for over 6 months, just waiting to be made into a top. It was perfect for this design because it has an airy feel to the fabric. Caitlyn and I took great effort in lining up the plaid lines. For the most part, we where able to achieve alignment and balance around the garment. Read below to find out how we worked around the more challenging pattern pieces such as the collar, button-hole placket and sleeves. You will also learn that I procrastinate when having to line up challenging prints... 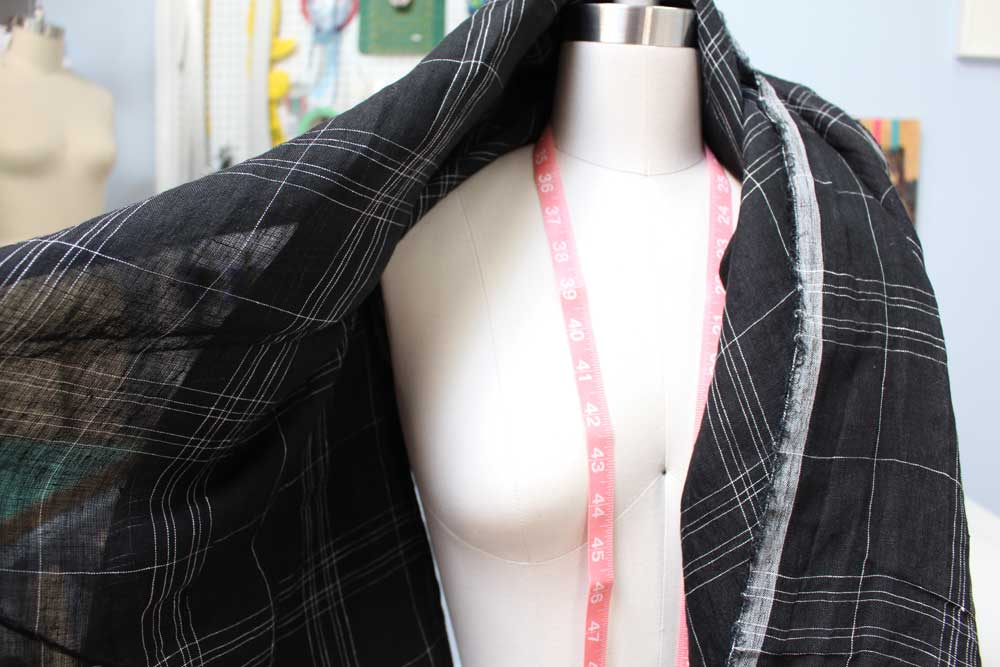 Design ElementsPrint alignment aside, this small crop top packs a punch in the design details. Here is your insider view. Patch PocketInspired by all things slow fashion and couture; the patch pocket is THE original couture pocket. All of the seam allowances are pressed into place and it is set from the exterior of the garment providing the designer full control over placement and construction. To ensure the plaid of the pocket lined up with the bodice, we pinned each line in the plaid intersecting with the bodice line. We took it one step further by hand-wheeling over the pin, instead of taking the pin out while stitching. 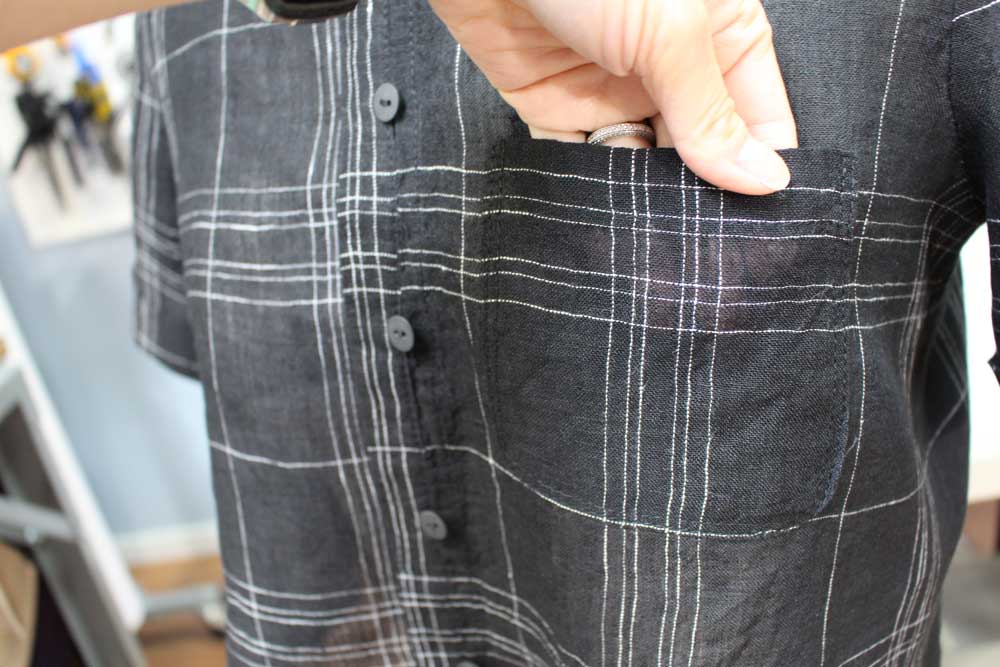 In-seam Button HolesIn-seam button holes are a great alternative to the traditional machine sewn button hole. In my opinion, it looks cleaner and provides and interesting element. The fact that I despise machine sewn button holes might have something to do with it too. 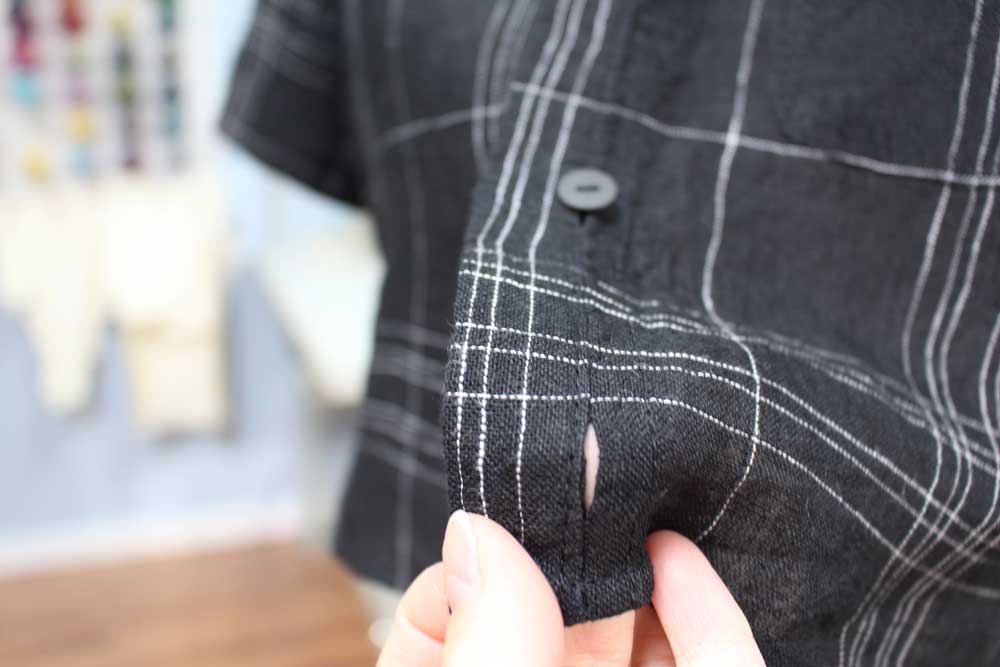 CuffThis one is fairly self explanatory, but it was nice to add a little something extra to a plain short sleeve. It creates more balance in the overall silhouette of the shirt. Especially in this cropped version. We're currently sampling up a longer tunic style version and hope the cuffed sleeve element will work well. 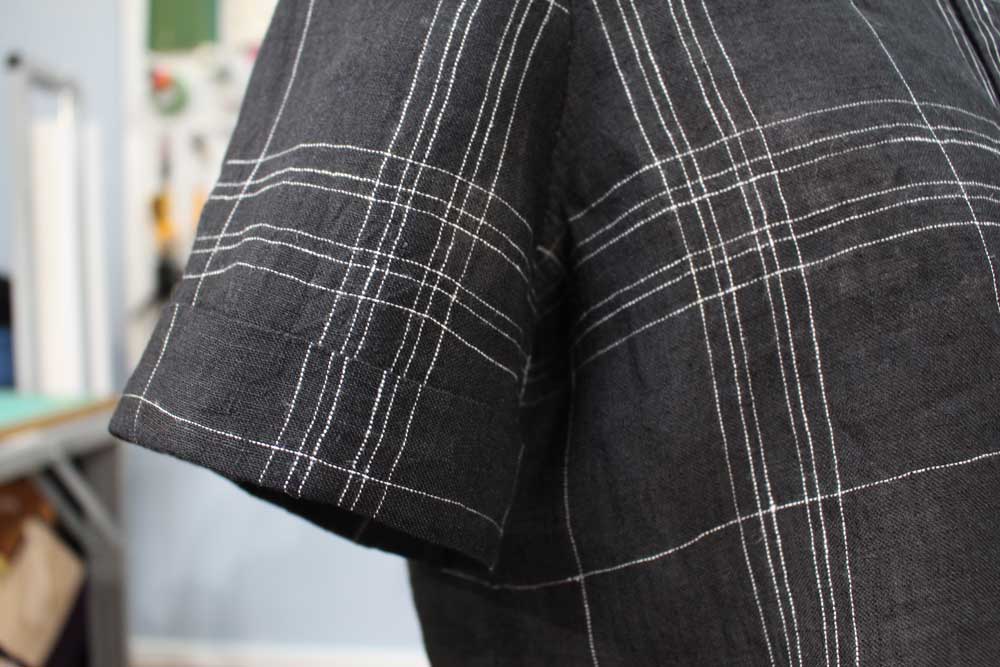 Stand CollarA stand collar can be a tricky element to wear. It can look very institutional depending on height and curve of the center front. Our toile (fit sample) of this design was made in a white cotton, and it looked almost priest like. Going forward, I think we will test out a less curved center front. This will give a more wearable look and more versatile with all colors. 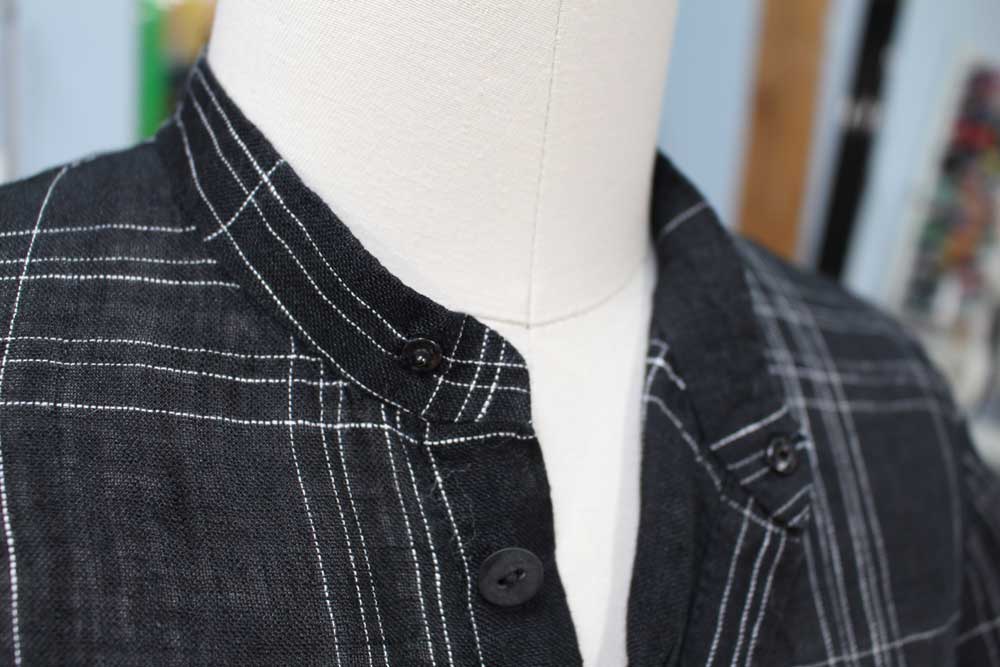 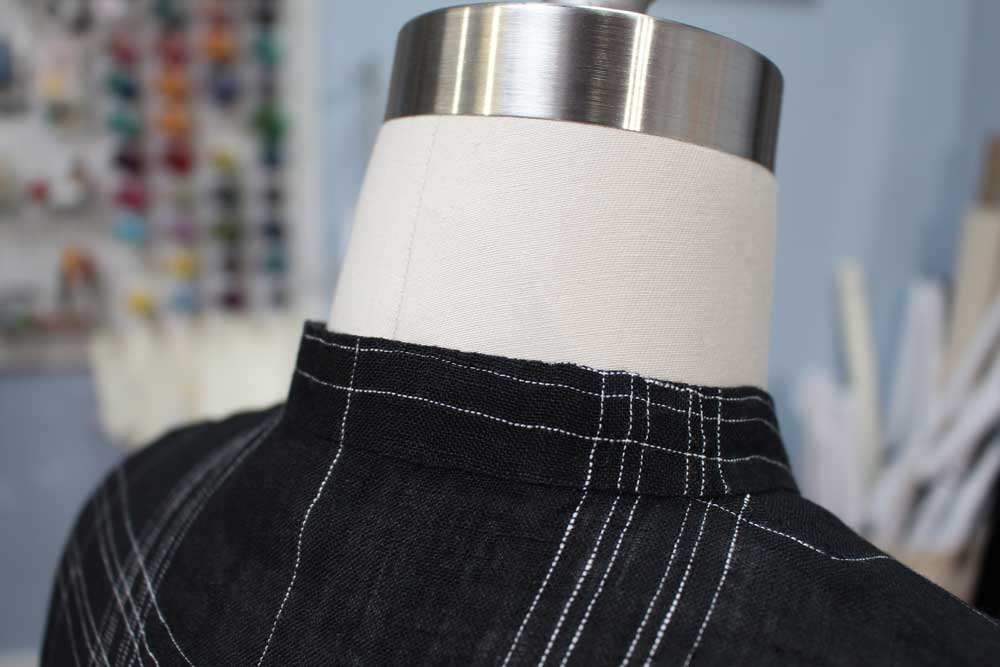 Seam FinishesWe applied french seams to the shoulder seams, false french seams to the armholes and clean seam finish to the side seams. If you are familiar with these type of seam finishes, you will understand that a majority of the time spent constructing this garment was spent at the pressing table. 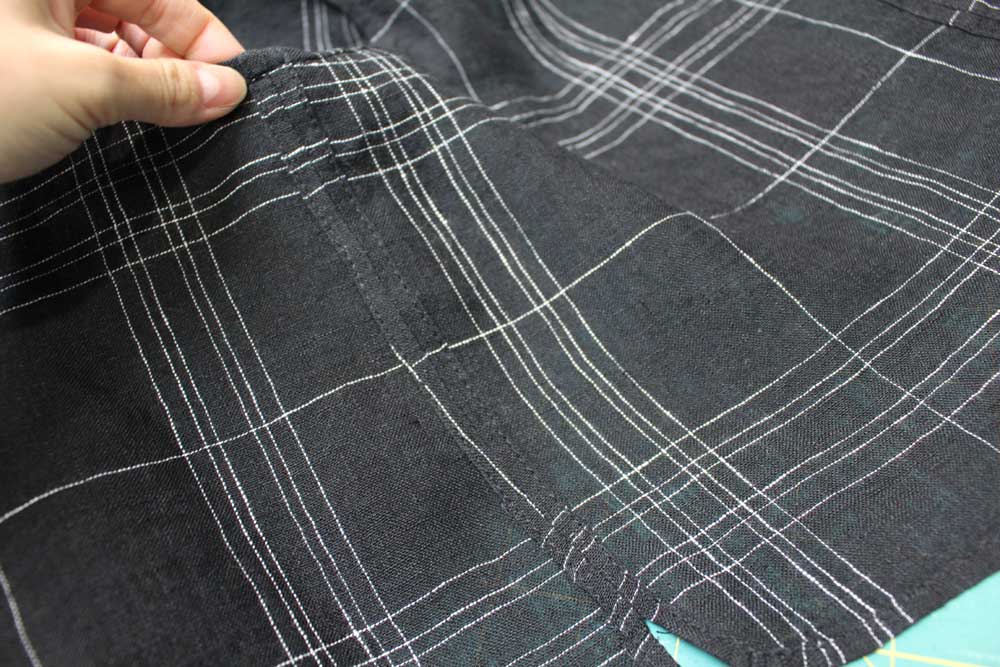 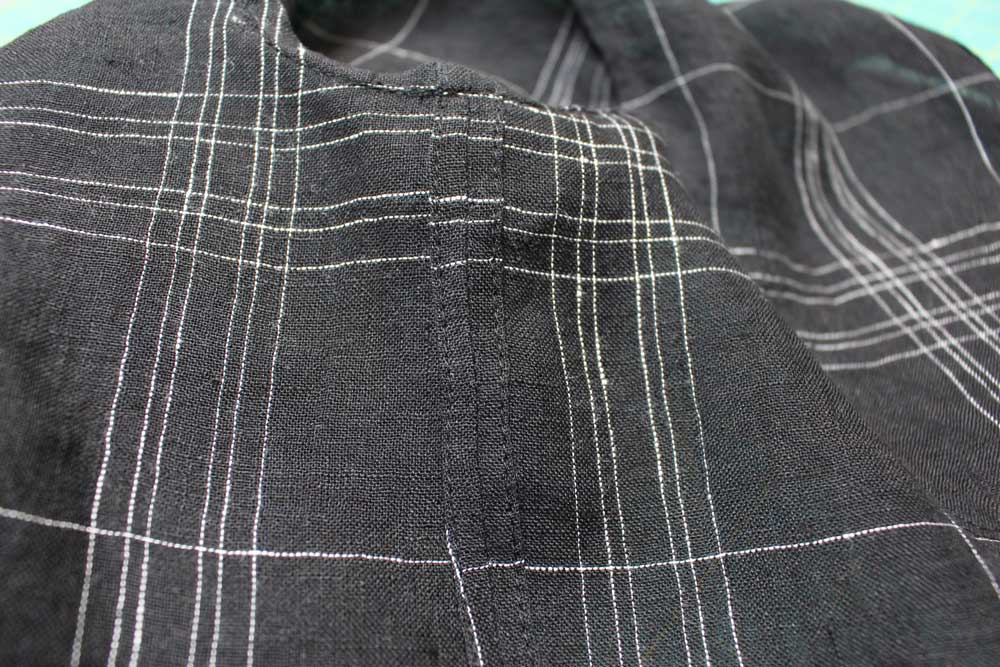 Above photos show the clean seam finish along the side seams. To create a clean seam finish, stitch your seam as per usual seam allowance, press the seam fully open, then press the raw edges under towards the original stitch line. Edge stitch or slip stitch to finish of the clean seam. This type of seam finish is use along straight seam and with fabric that is stiffer in nature. Below is an inside shot of a false french seam finish to the armhole. This is very much a time consuming type of finish. But I promise you, this seam will outlive you. Here is a blog tutorial on how to sew a False French Seam. 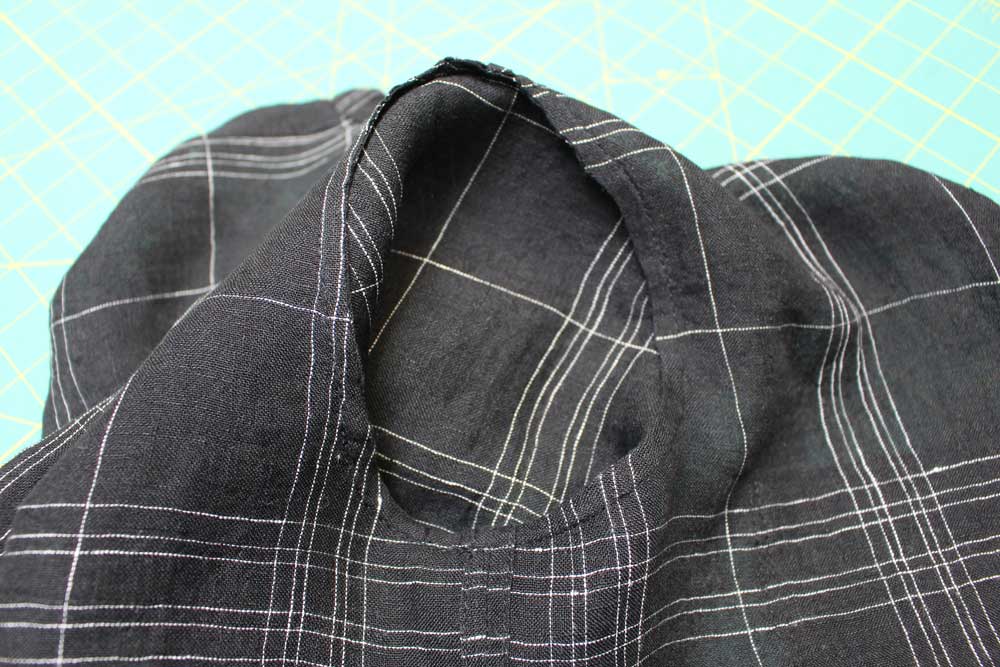 Curved HemWe opened up the side seam on this shirt to sit just above the natural waist. This is in tune with the high-waist trend we are seeing in pants and skirts. It shows off your smallest part of the torso, while still providing a free flowing top that is not skin tight. So basically you can eat your face off and still feel comfortable.   What I LearnedOne of the most challenging things about this design was alignment of the plaid print around the garment. Aligning the plaid from front left and right bodice around to back bodice pieces was easy enough. Trying to get the sleeves, collar and the front button placket to be perfectly aligned was almost impossible. For the collar, we decided to just line up the center back line and let the front left and right of the collar just be balanced in the plaid, to provide a balanced look in that pattern piece alone. If you want sleeves to look appropriate with the bodice, just ensure both sleeves are exactly the same in plaid offering. It will make a balanced over-all look to the garment. The most time consuming alignment was the front button-hole placket. My brain got all discombobulated, so I literally left cutting out this particular pattern piece to last, and procrastinated while doing it. When lining up prints, I like to not have any seam allowance present on the pattern piece. This lets you visualize one pattern piece to the next without any distraction. If the particular edge you are aligning is straight, you can just fold back the seam allowance. Final DesignThank you for taking the time to read about our latest design. If you are interested in being the first to know about our patterns, or just want to see what we are stitching next, be sure to follow us on Instagram.  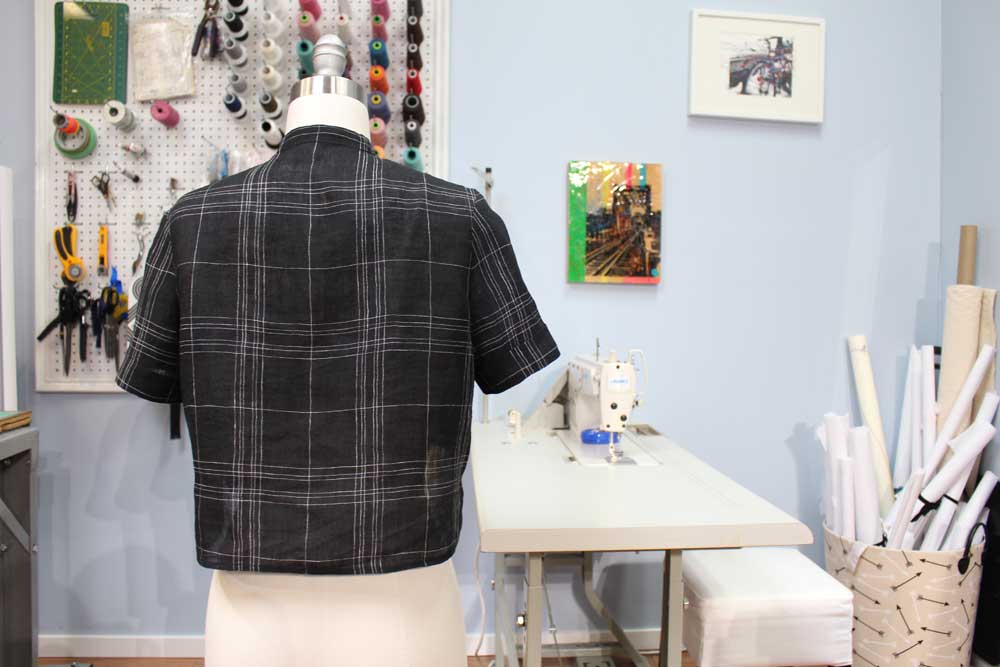 Happy Sewing!
Designed, photographed and written by Sheila Wong Studios.
 Hello! This is Deanna, your instructor for the beginners in the studio. Some of you might know this, but I am also a co-founder of the newly launched fashion brand, Moonstruck! It’s a local business run by two passionate designers and we manage everything ourselves - from drawings, patterns, and even our social media. There is a lot to tackle, but the control you have over your product is so rewarding. When I was asked to write a guest blog post for the studio, at first I couldn't decide on a garment to talk about. But I've decided to give you all an insider peek into my favorite piece from our most recent collection, the Eventide Long-sleeve Tee! Design Elements
The classes I teach at the studio are usually with woven fabrics, but knits are a whole different weight class with its own set of challenges, and I definitely was put through the ringer when fitting the shoulder area of this top. Before this, I didn't have a ton of experience with knit fabric so I relied heavily on my notes from fashion school, as well as doing research in clothing stores to figure out all their secret tips and tricks! Through trial and error (and three samples later) I arrived at our final product.  If there is one thing I have taken away from instructing at the studio this past year, is that you are never out of options when you are designing. Whether it is with a project or with a lesson plan, being backed into a corner is not your endgame. If you think about your problem from a new perspective you are bound to find an answer you can work with. For example: when I couldn't find an appropriate weight rib fabric for the hem and cuffs, we decided to use our self fabric (our main fabric we already had) rather than going on a wild goose chase to find something new. Design and sewing give you freedom to explore new techniques and to think outside the box! Through frustration and desperation, I persevered. It is a piece I am proud of, and will happily put into the record books as a garment I will not soon forget. Less than a year ago we released our products to the public, so Moonstruck is still a baby of a business. Despite the short time, I felt like the entirety of my learning has all been put to the test, and I cannot tell you how many times I've gone to bed still mulling over the day's obstacles. There will always be rough patches on one’s journey and I am no exception. I’ll be sure to learn more and pass on the knowledge from my brain to yours. If you would like to stay in the know on any new Moonstruck news, follow our Instagram or Facebook! Can’t wait to show you what I get up to next! 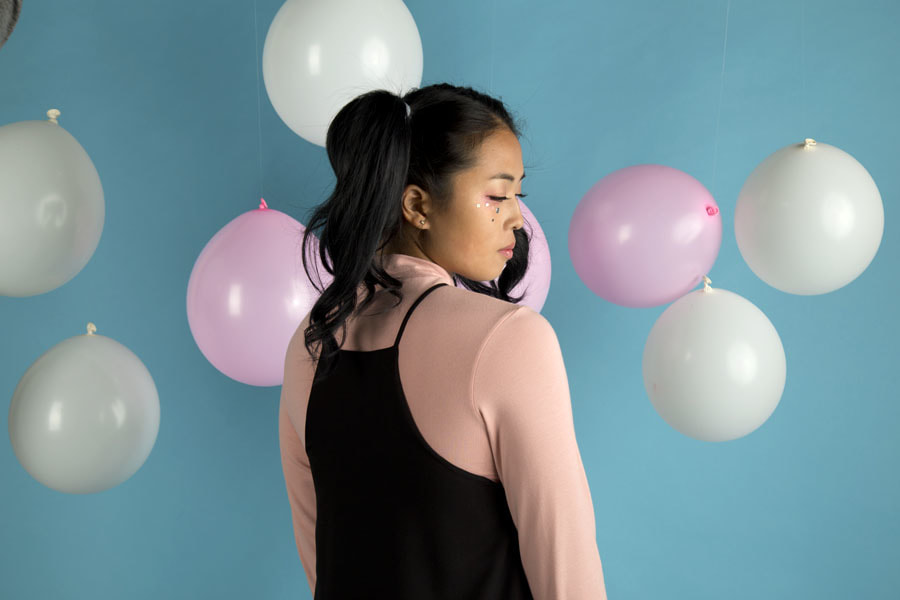 Written and designed by Deanna Kadota
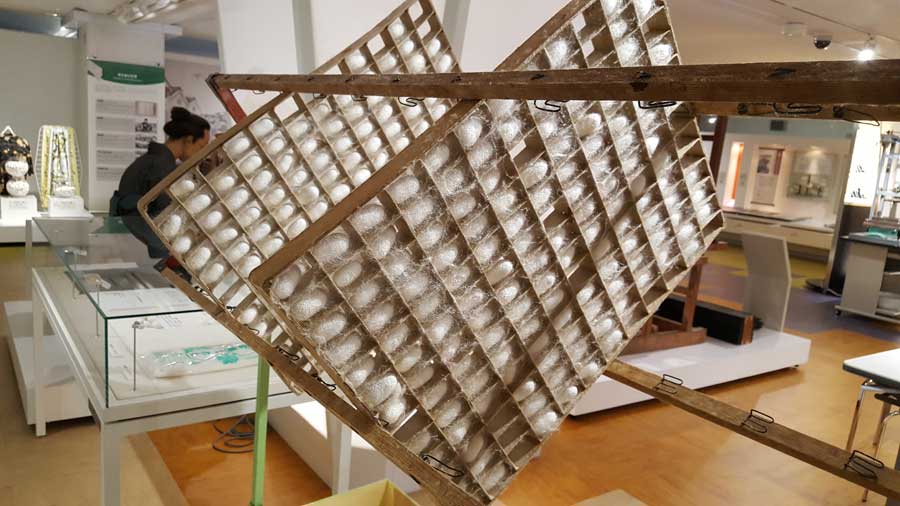
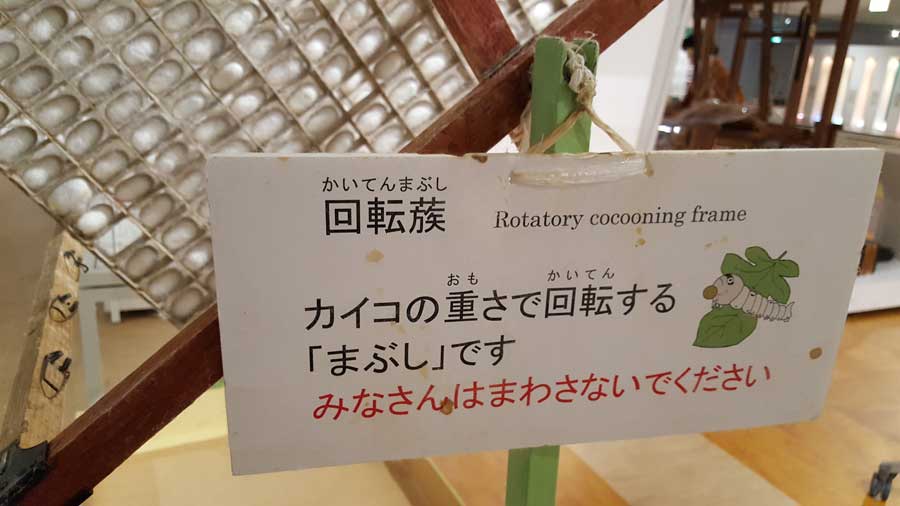
Photos of Deanna by Desmond Cheng Photos of Moonstruck designs by Sheldon Leung Edited by Sheila Wong Studios Welcome to the final blog post in a 3 part series featuring all things textiles in Japan. Well, not all things textiles in Japan, just what I saw in Japan this year. Part 1 (Fabric Shopping Guide: Kyoto), and 2 (Fabric Shopping Guide: Tokyo) where all about buying textiles. Part 3 dives deeper into the history of fabric, in particular- silk! The Silk Museum is located in Yokohama, Japan. From Tokyo, you can take the Fukutoshin line from Shinjuku-sanchome station to Nihon-odori station in Yokohama. This is a 54 min train ride, than about a 3 minite walk to the museum. Cost of entry is 500 yen for adults. That about $6 CAD to learn all about silk. You cannot go wrong!  The Silk Museum is comprised of 3 main sections. The Wonder Farm and The Study Library are located on the main floor, and The History of Silk is located on the second floor. The museum is set-up with a lovely flow to allow you to guide yourself through the sections of the museum. You begin in The Wonder Farm, which provides you with an introduction to the life stages of a silk warm. 
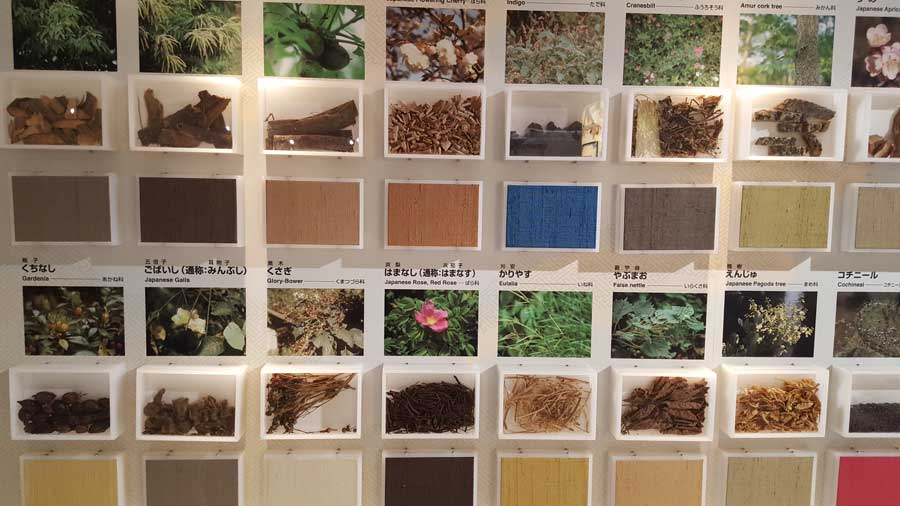
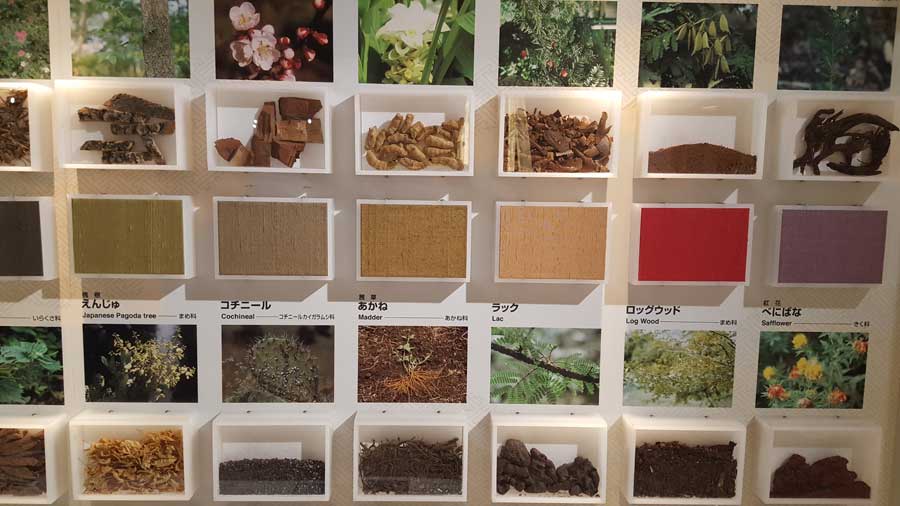
Traditional rotary cocooning frame pictured above. The following two photos show the process of reeling silk from cocoons. If you look closely, you can see the many filaments coming out of the bath of cocoons being pulled up and spun into silk thread. 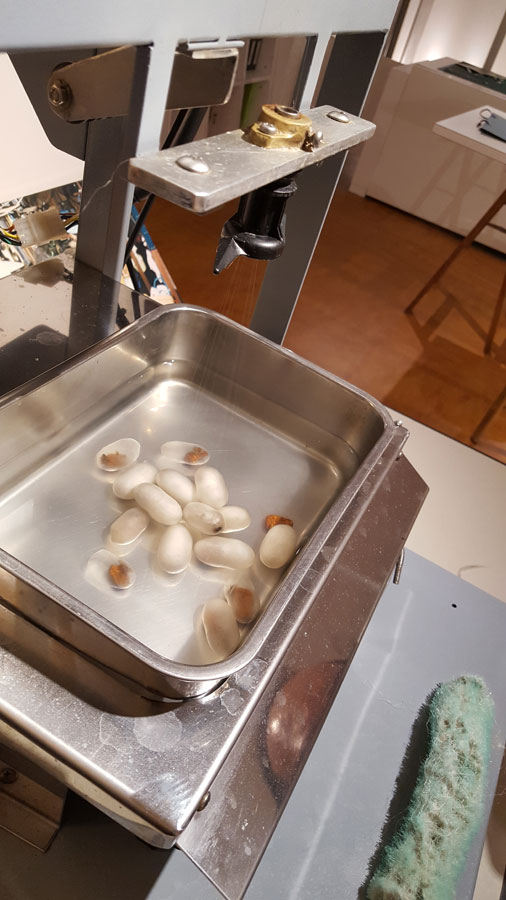 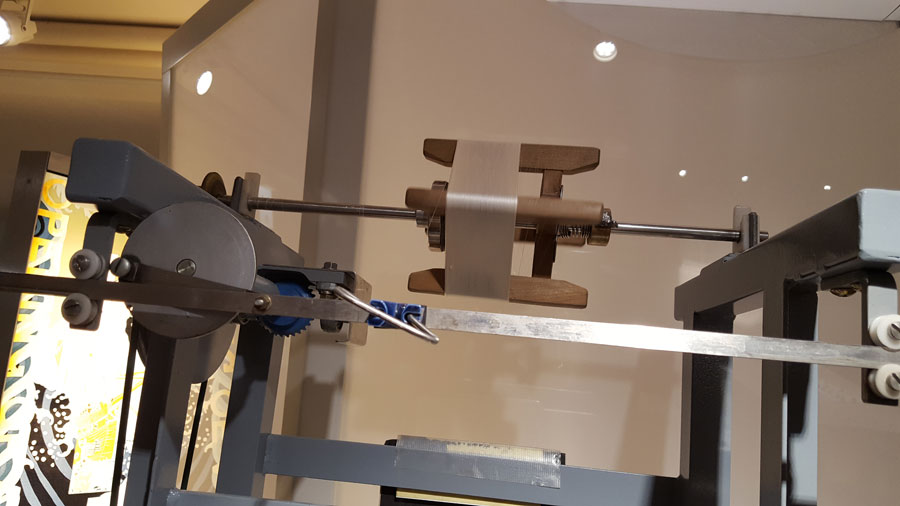 The second area of the museum is The Study Library. The main focus in this section is displaying how silk is used in our everyday lives. 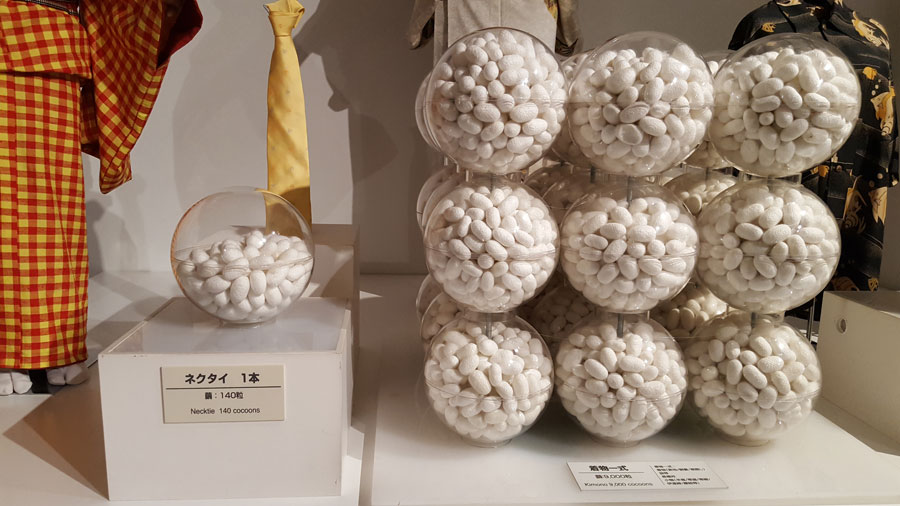 According to one of the areas in the exhibit, "the length of the filament making up a single cocoon is an average of about 1,300 meters". A single necktie requires 140 cocoons! Something to thing about the next time you make or purchase a silk necktie. In addition to learning how silk is used in our everyday lives, this section also showed what silk fabric looked like when using natural dye methods. Visually, this was really stunning to look at!
The final area of the museum is The History of Silk located on the entire second floor. I really appreciate the way the museum is curated. As you walk up the steps to the second floor, you have already learned about the life cycle of a cocoon, and how silk is used in our everyday lives. You are now presented with the Kimono in many forms from different periods of historical Japan. There are displays of kimono's from the Asuka, Nara, Muromachi, Momoyama, Edo, Meiji and Taisho periods.
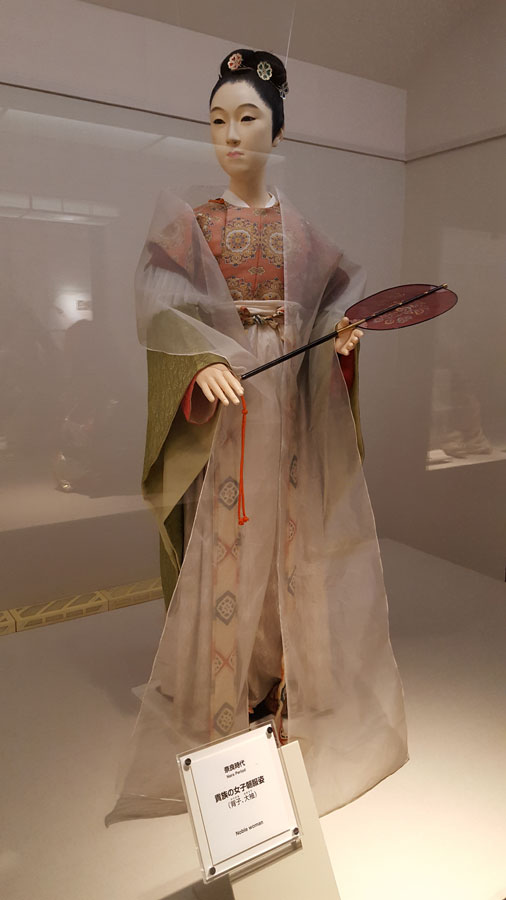
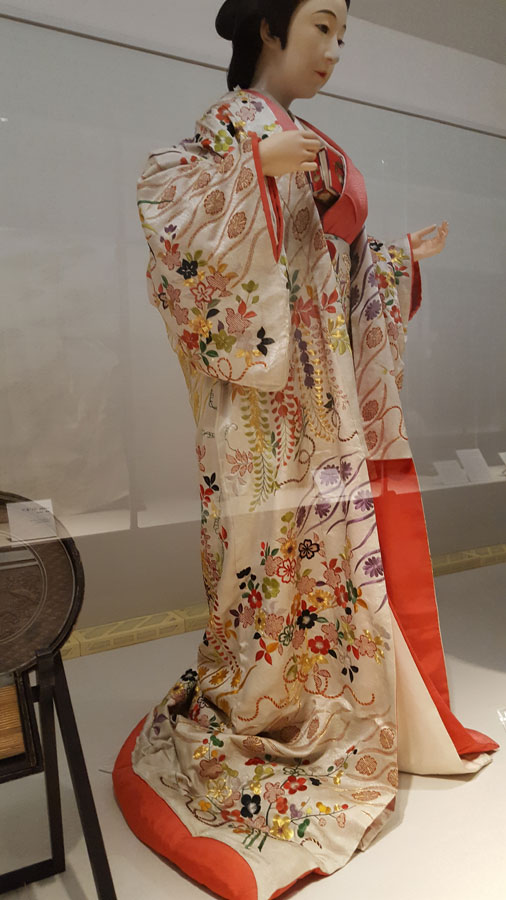
Above left displays a noble woman from the Nara period. Above right displays a typical outfit worn by an upper class warrior women during the Edo period. Below was a really striking display of kabuki theater costumes. Traditionally, actors wore elaborate costume and make up. This is so on point! Please excuse the glass glare. It is more stunning in person, so be sure to check it out for yourself.  In addition to The Silk Museum, be sure to walk across the street over to the Yokohama Bay pier. Take a stroll around the bay and take in the stunning views. If you are lucky you can catch the sight of massive cruise ships docking at the main terminal. Continue your stroll along the pier towards the Yokohama Red Brick Warehouse for picture worthy spots. This area has been the backdrop to many Japanese movies and tv shows. If you have ever watched Good Morning Call, this is where Nao gets stood up by her temperamental boyfriend Uehara in the pouring rain. 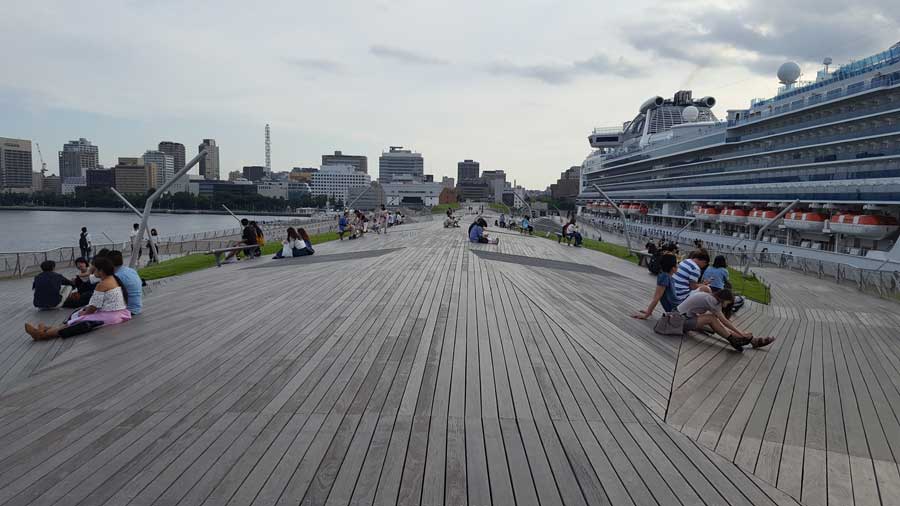 I visited The Silk Museum close to the end of my trip. It was really nice to get my learn on after buying hoards of fabric in Kyoto and Tokyo. It reminded me of intensive extraction required in one of my favorite textiles to design with. It also reminded me to treat all textiles with great love and attention.  Stay tuned for a fabric haul video, as I picked up over 15 different fabrics over the course of the entire trip. Follow us on Instagram to know when that drops.
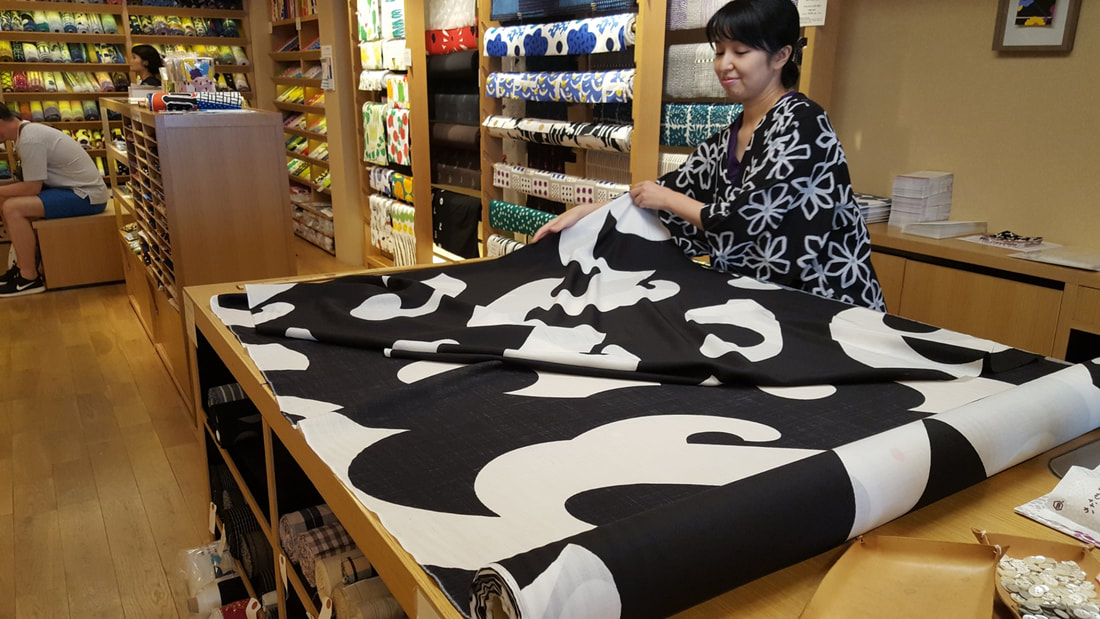
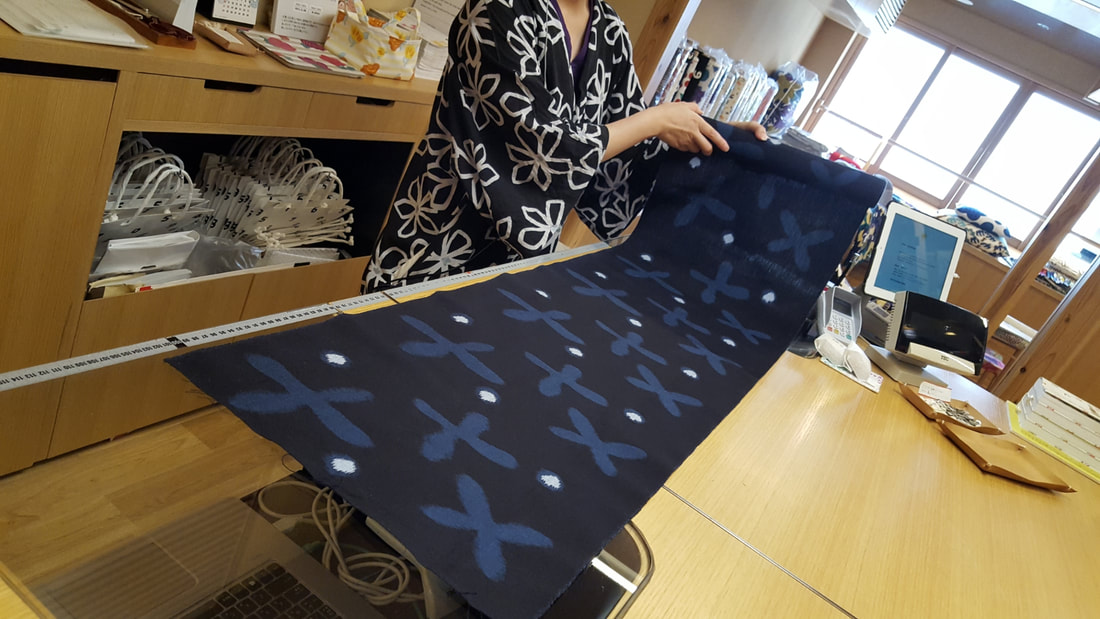
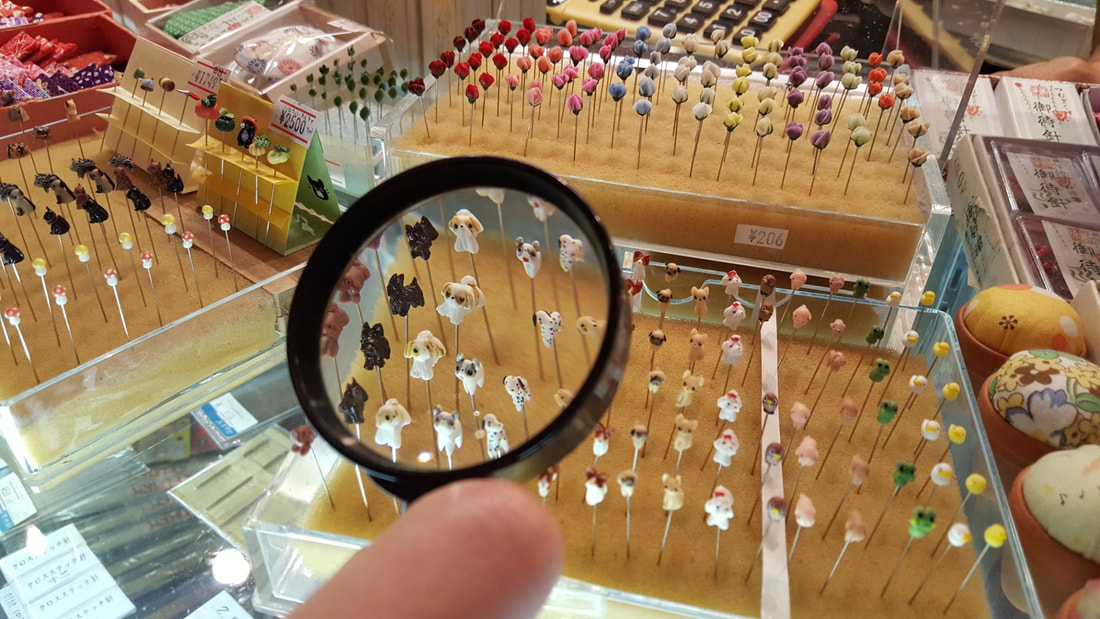
Happy Sewing! Designed, photographed and written by Sheila Wong Studios Welcome to part two of a three part blog series featuring my travel experiences this year in Kyoto, Tokyo, and Yokohama, Japan. To read about Kyoto, click HERE. This blog post will focus on two major sections: Nippori Fabric Town and Okadaya Store in Shinjuku. 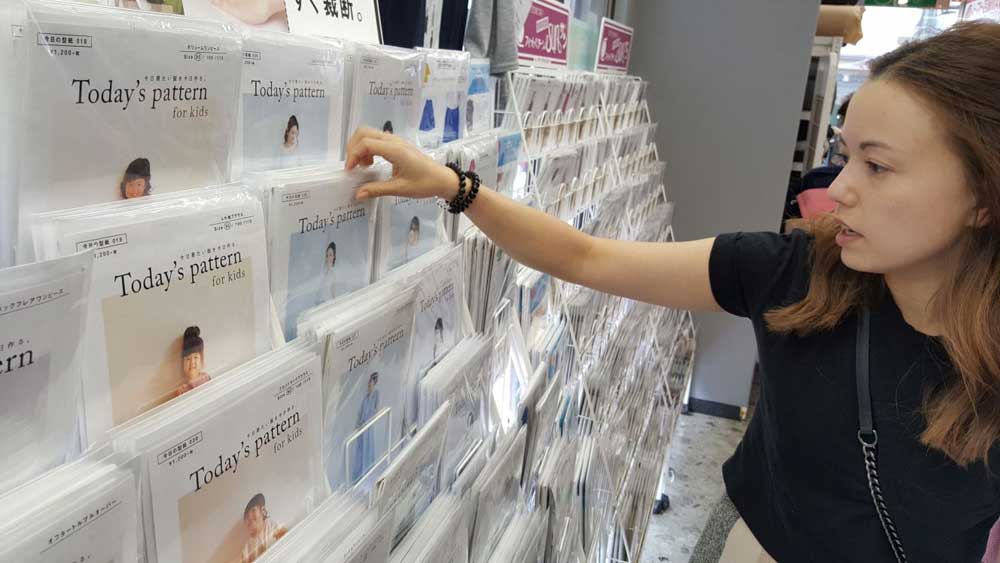 Nippori (Sen-I Gei) Fabric TownThis area is the must visit district for sewing enthusiasts, for both visitors and locals. There are over 90 shops offering a variety of textiles and trim, spanning almost one km in length. I didn't even get through a quarter of the shops. I recommend committing at least one to two days to visit this area. One of the main shops is Tomato, and most bloggers talk about this place in high regard. Yeah, its good, but do not be shy in visiting all the other shops in the area. In this section, I will reveal over 20 shops I visited and what I picked up. Stay tuned on our YouTube channel for a fabric haul video. I will go into depth into each fabric purchased and what we plan on designing with each. 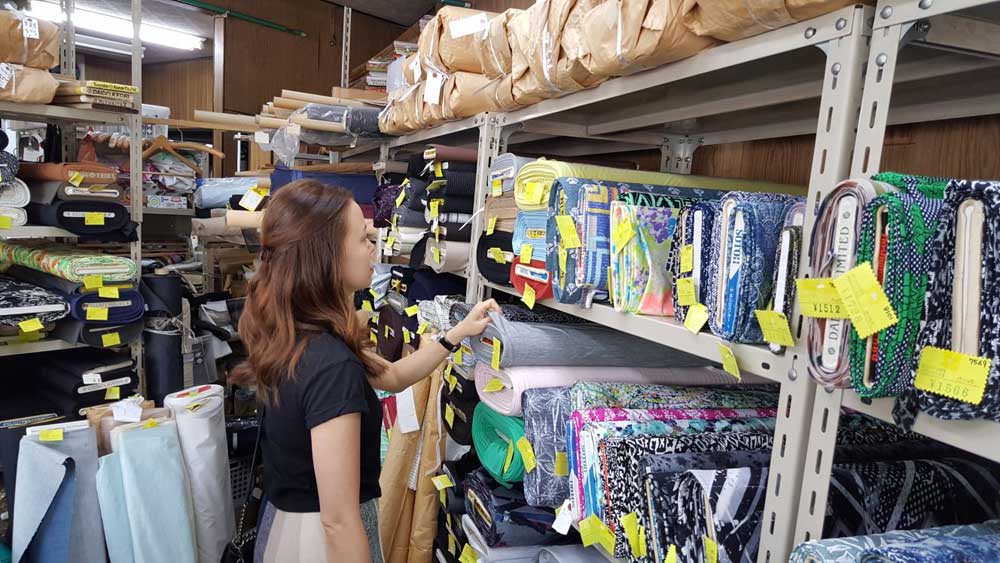 Here is a complete list of the shops I visited in Nippori Fabric Town during this trip. I had to leave a few off the list because there was no shop sign!
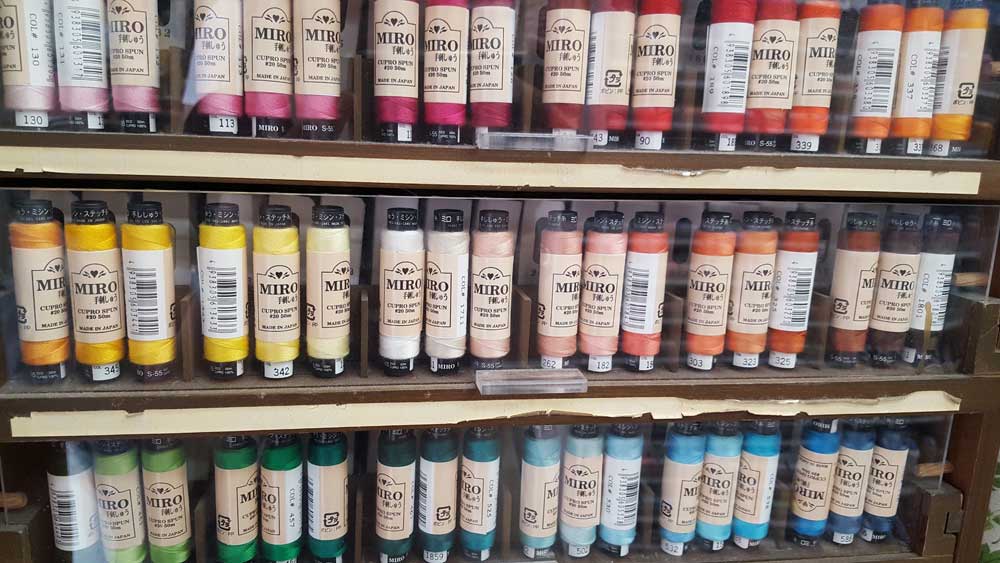
EDWIN DenimYou might remember EDWIN Denim from the early 90's when Brad Pitt was their spokesperson. Founded in 1969, EDWIN continues to design high quality denim and jeans. In Nippori, you can find bolt ends of denim for sale. 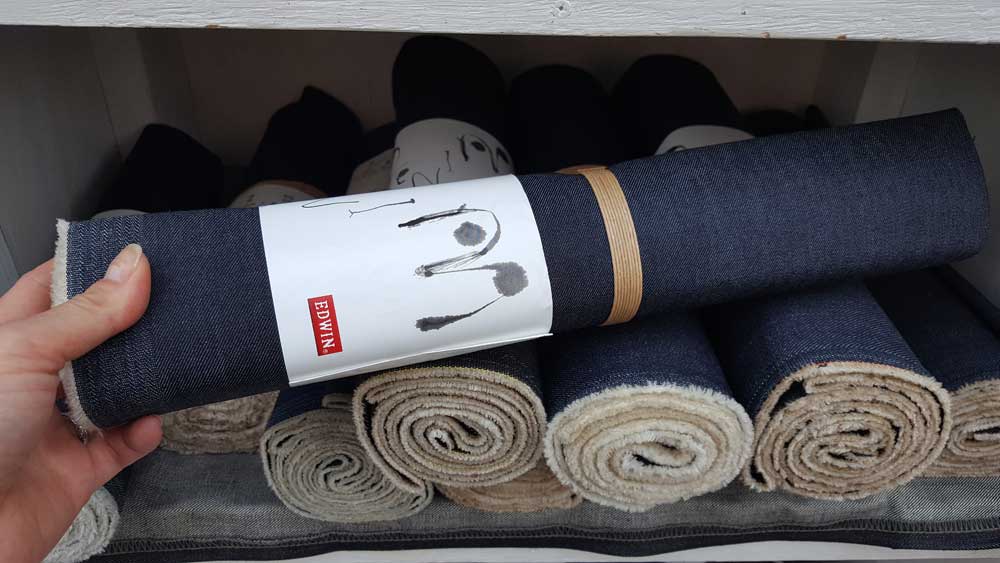 The shop front is not the most inviting, but go in anyway. The fabric is right out front, so you cannot miss it. I purchased 2 bundles of denim, which totalled 3 meters. My plan is to make a pair of overalls. The total cost was approximately $20 CAD. My husband also purchased 4 pairs of jeans that he has on heavy rotation right now. 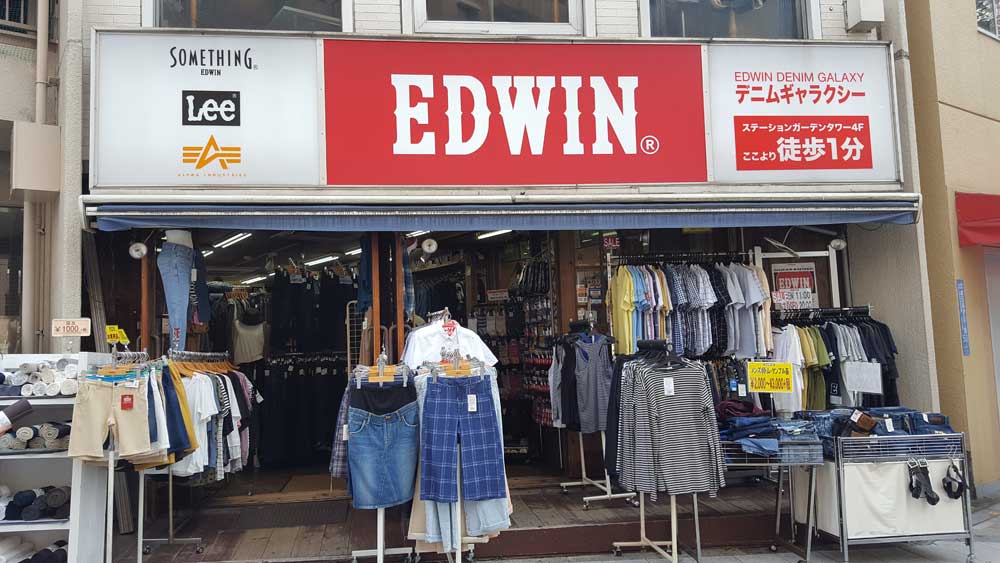 YamayoI remember Yamayo so clearly from the year before. Hands down, they have the best selection of fabric marking tools, selling chalk, wax, pens, and so much more. They also have a massive selection of thread and fun printed cotton fabric. In the picture below, I am explaining how the Japanese have an obsession with kawaii (cute) characters on everything. 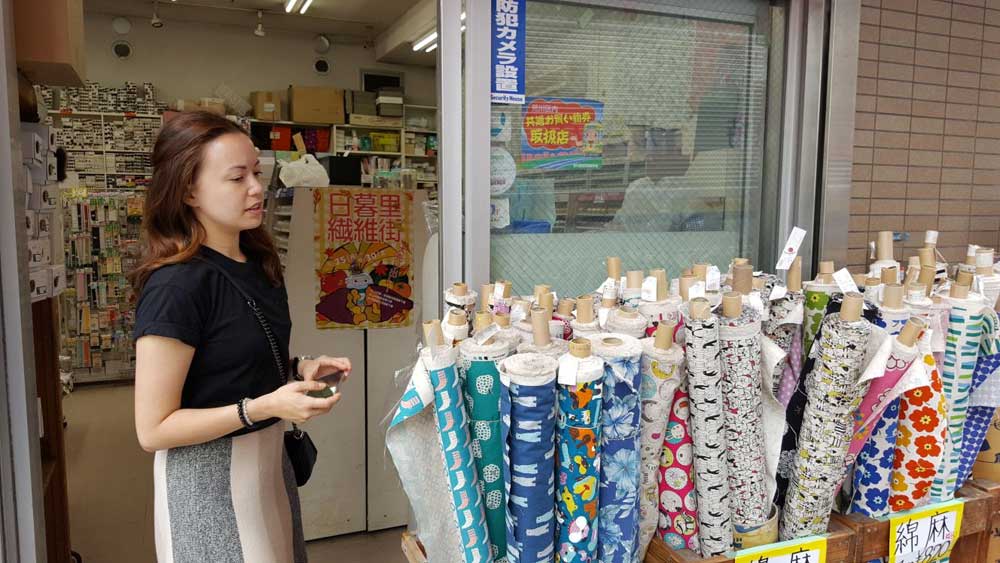 This year, I purchased wax for marking fabric and a dual head tracing wheel for marking in seam allowance when your pattern drafting. 
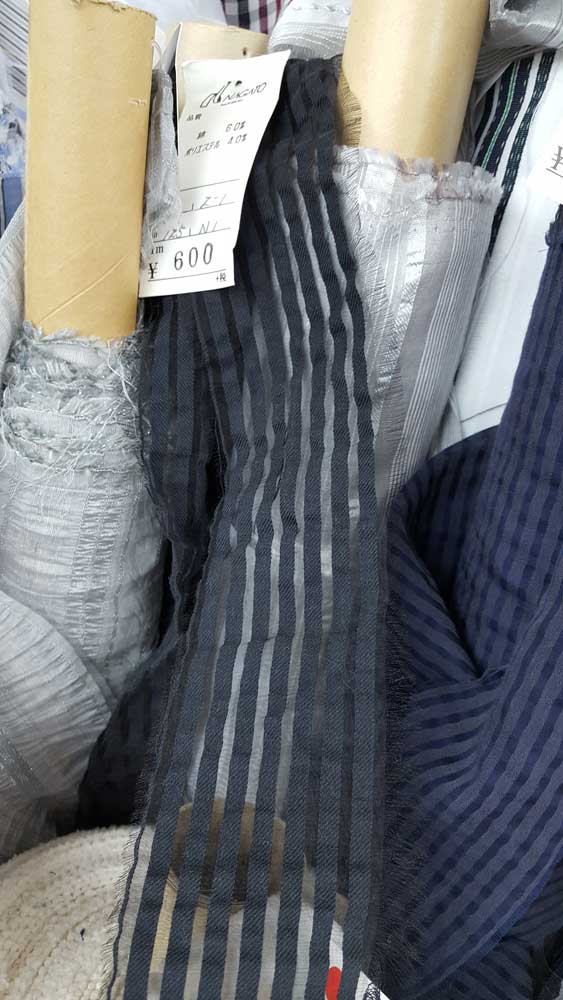
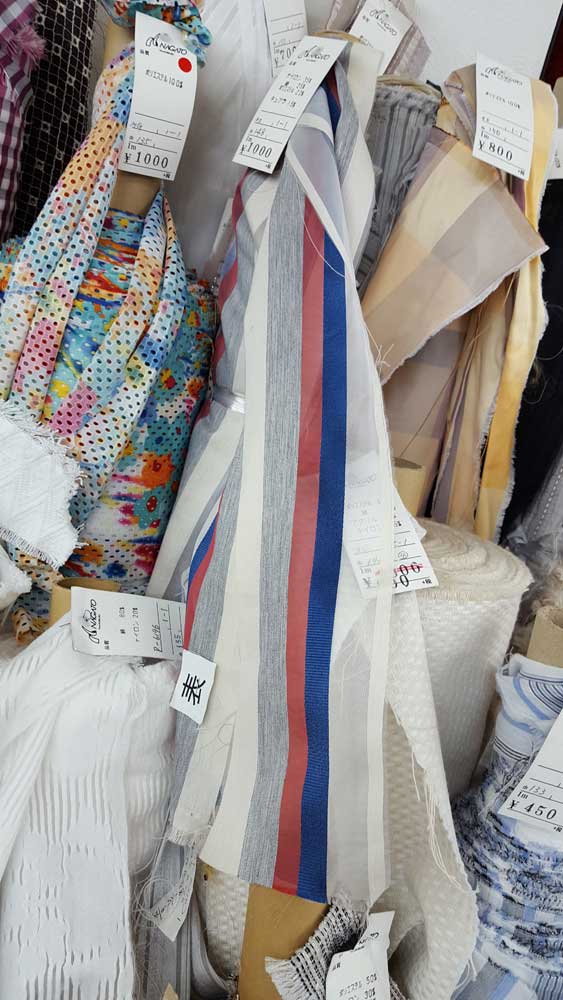
Most of the fabrics in Yamayo were under $10 per metre. It was really well priced considering how cute and unique each print is. I regret not buying the adorable moody dogs pictured below. 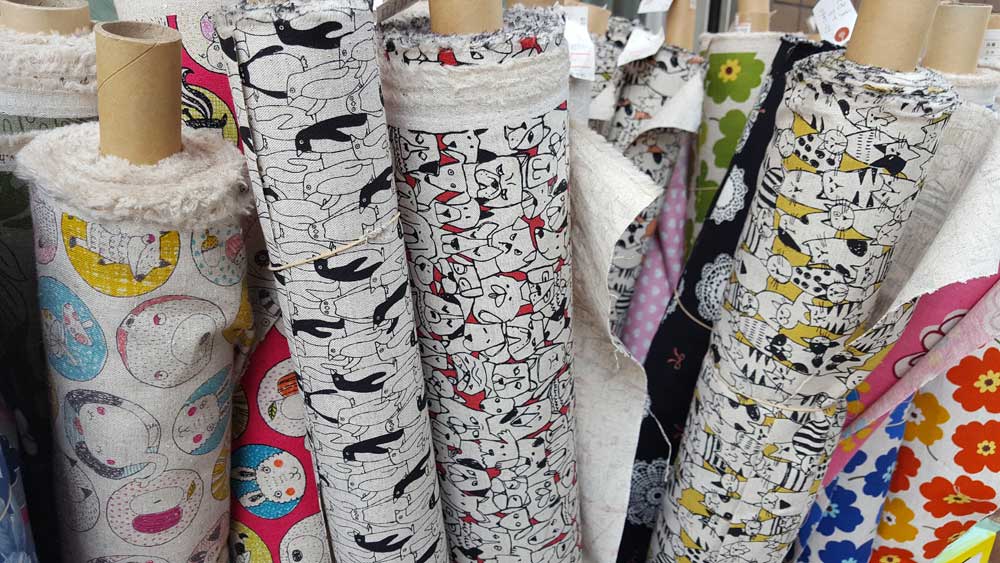 Nagato (Main Shop)Most of my fabric purchased in 2016 was from Nagato. This year, Nagato was where I was most excited to visit in Nippori. I recommend most visitors to put this shop at the top of their shopping list. Why?! Because they have the most variety in garment textiles, the price point is on point, and the shop keep are so helpful. During this shopping trip, I decided I would buy at least two different fabrics that were completely opposite from what I would normally would design with. Pictured below is one choice: a silk crepe fabric sold by the panel with a nature inspiration. For this fabric, I plan on creating a high-waisted, hand pleated skirt that is midi length. By pleating the skirt, it will make the animals less noticeable and in my books, more wearable.  Two of my favourite fabrics are pictured below. On the left is a sheer black stripe silk/cotton blend. It feels very much like a silk organza but the cotton adds softness to the overall feel. It cost 600 yen, which is approximately $7 CAD per metre. A total of two meters was cut. It will be incorporated as an overlay into a new studio design. On the right is a stunning large stripe fabric featuring a few different fibres in ones. The colour combo made me buy it. We're thinking maybe an over-sized coat or a fit and flare dress. We must show off the stunning colours, head to toe! It cost 1000 yen, which is approximately $11 CAD per metre.
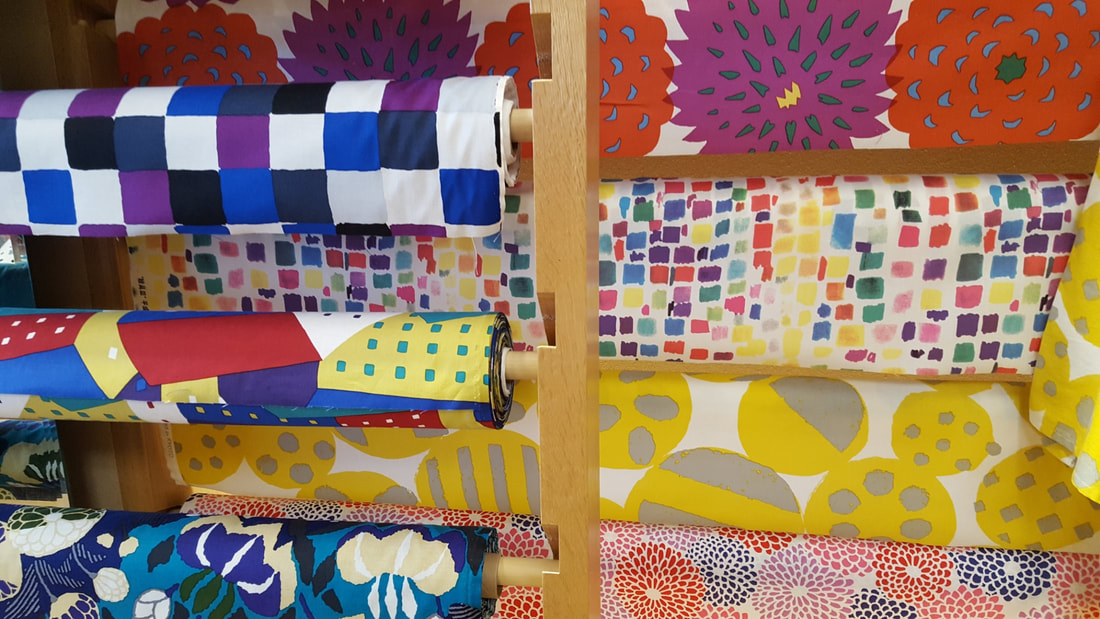
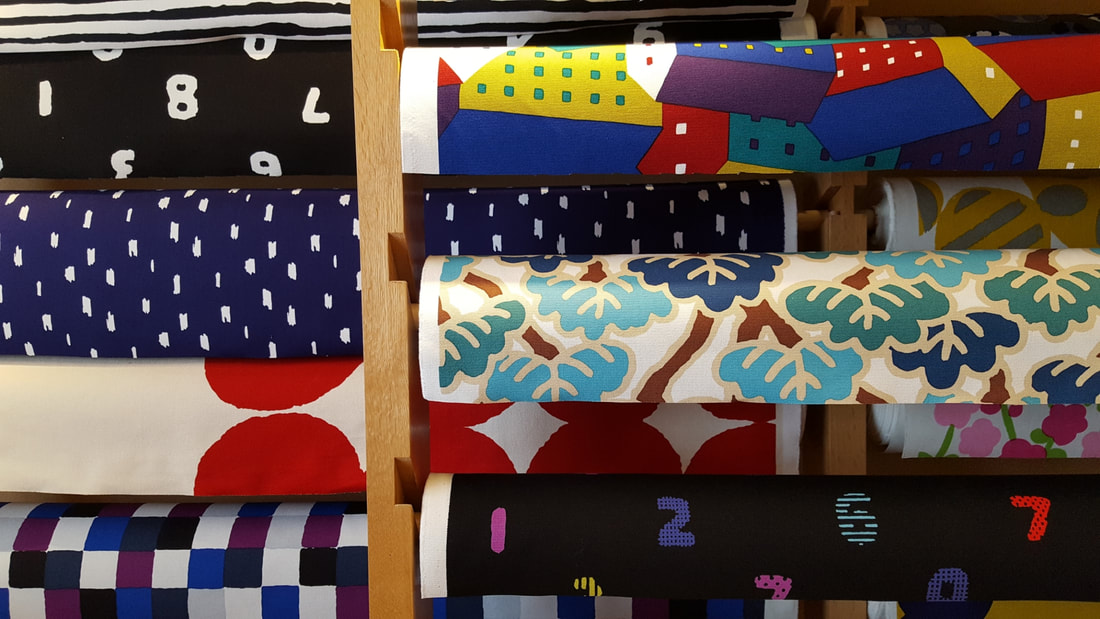
A total of 6 different fabrics were picked up from Nagato. They all ranged from $4 up to $15 per metre. As a rule of thumb, always purchase between 2 to 3 metres of fabric. This is a safe guesstimate that will cover most of your future designs. 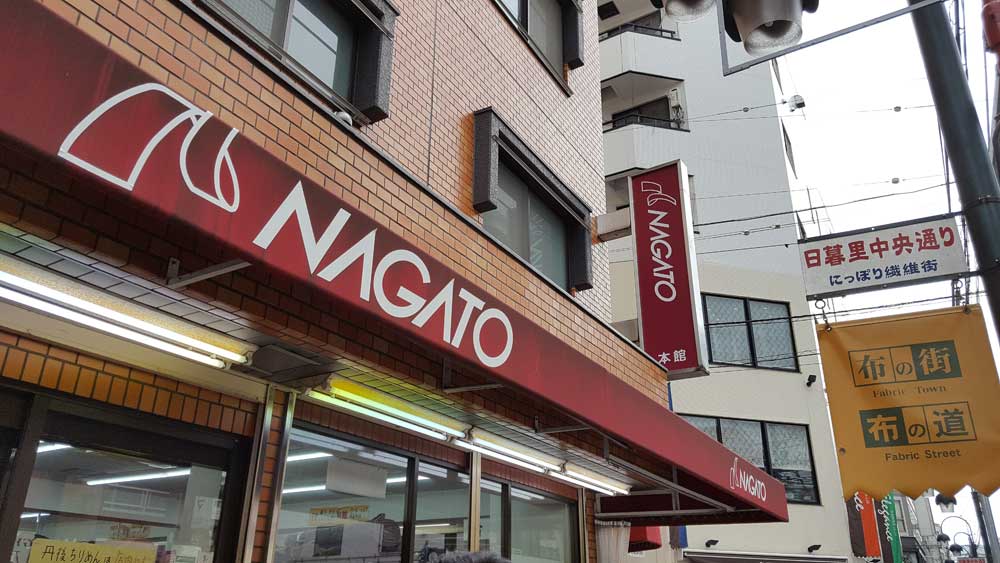 And Leather ShopIf you have ever visited Japan, you know there are many artisans creating high quality leather goods. So it only made sense that there were a high number of leather supply shops in Nippori. And Leather Shop stood out for many reasons. The shop was super clean and organized and the exotic skins available are jaw dropping. Vancouver has a really great leather shop (Lonsdale Leather), but damn! I mean, And Leather Shop has a Siamese crocodile skin for sale for 38,000 yen. 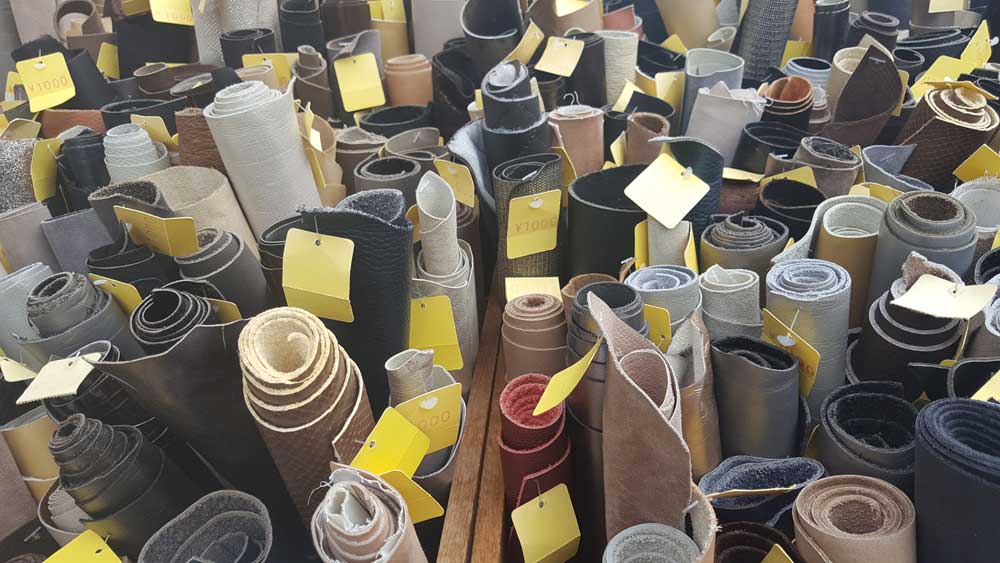 Siamese crocodile and stingray pelts pictured below. 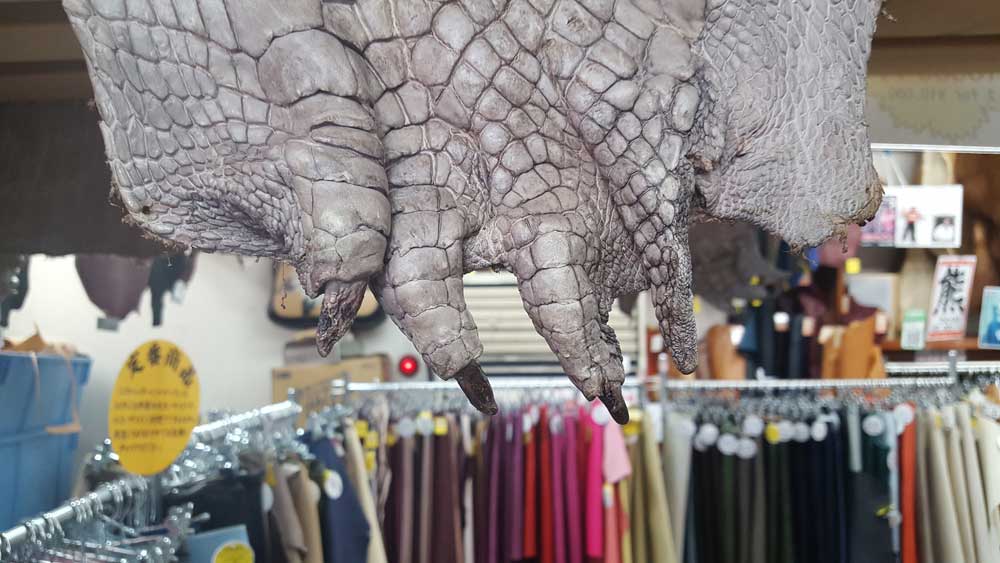 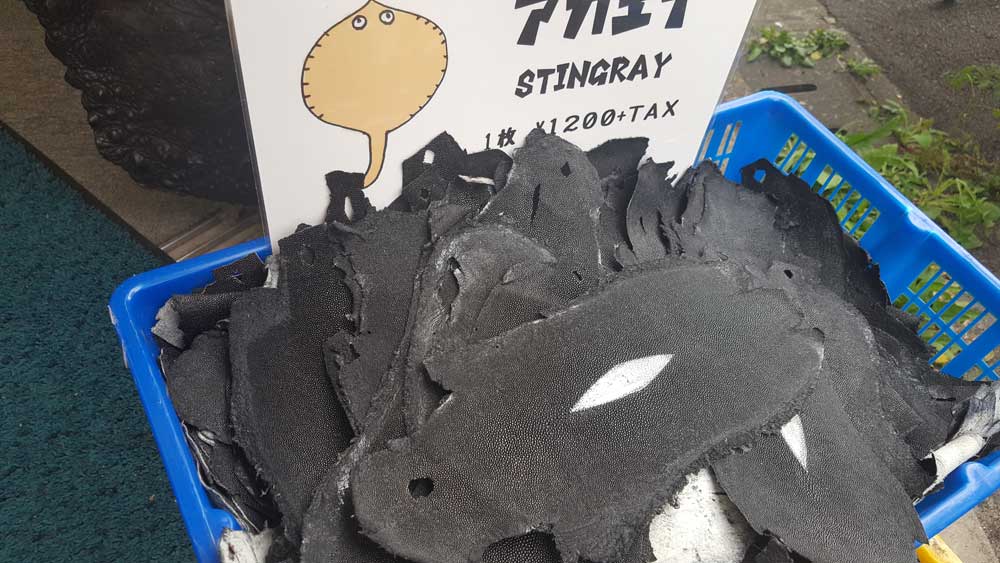 Tomato (Main Shop and Select-Kan)Five buildings make up the textile giant Tomato in Nippori. Below you can see that Tomato Notions and Tomato Interior are right across the street from each other. I visited Tomato Main Shop and Tomato Select Kan. 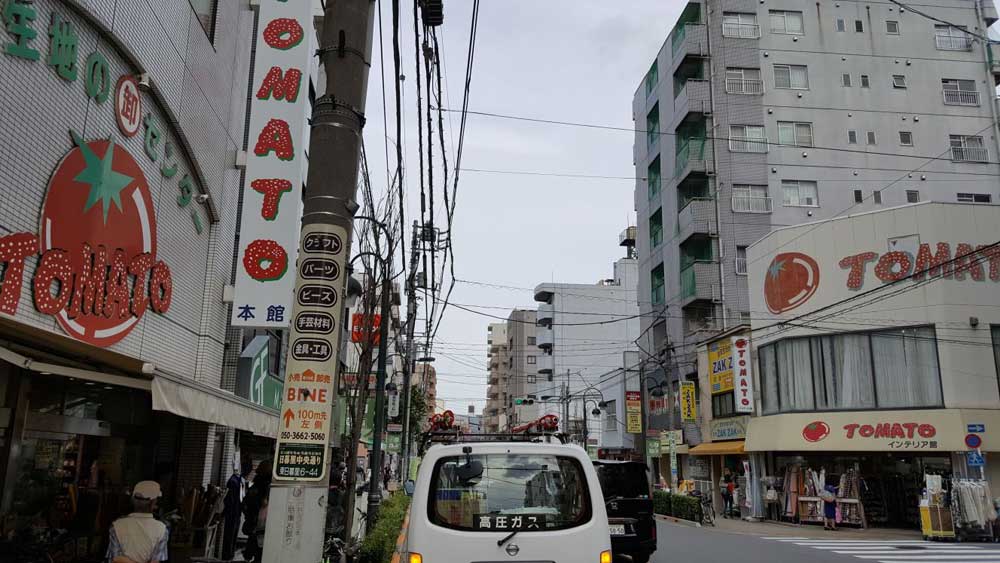 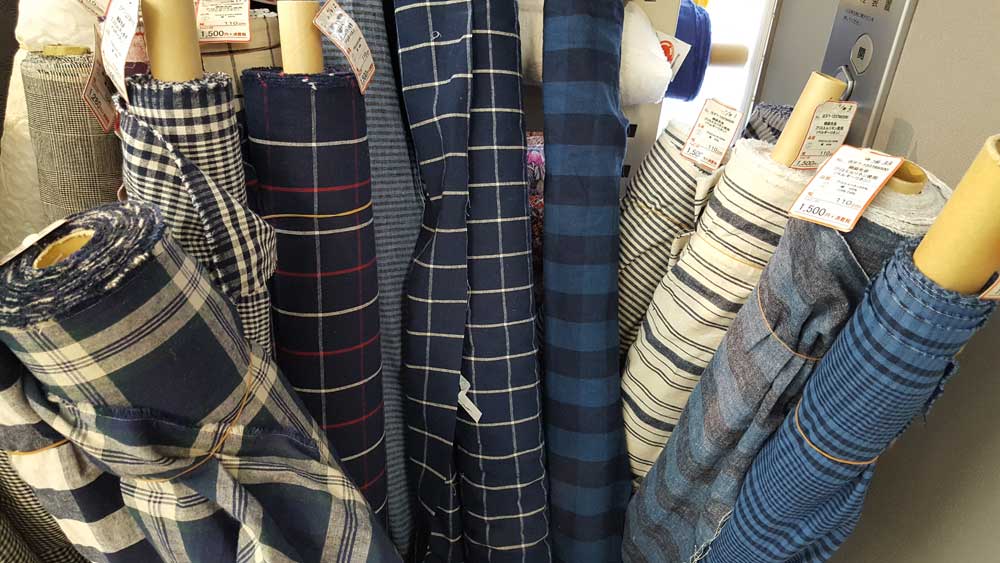 The majority of the fabric I picked up from Tomato was linen, cotton and cotton silk blends. Japan is the destination for linen fabric. The variety in weaves, thicknesses, double gauze, and prints just goes on for racks and racks. Based on my previous designs, you would have thought I picked up all the blue printed fabric above, but I did not! Below is a stunning cotton/silk blend with an abstract nature inspired print. I have no idea what design this will be made into. If you have any ideas, please comment below. In the end, I walked out with seven different fabrics. 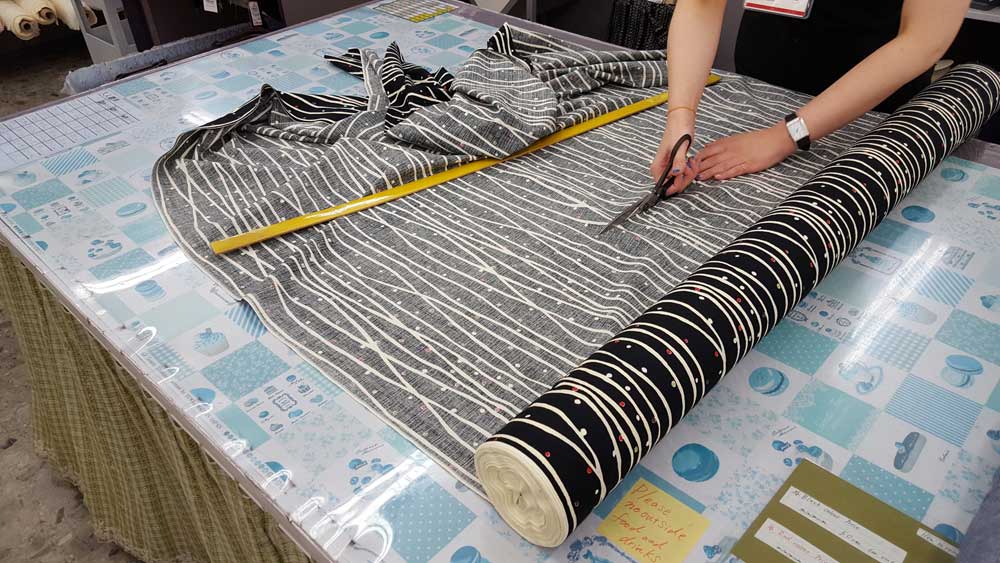 On the second floor of the Tomato Select Kan, you will find a section of machine and hand made trim along side a variety of linens, cottons and novelty textiles.
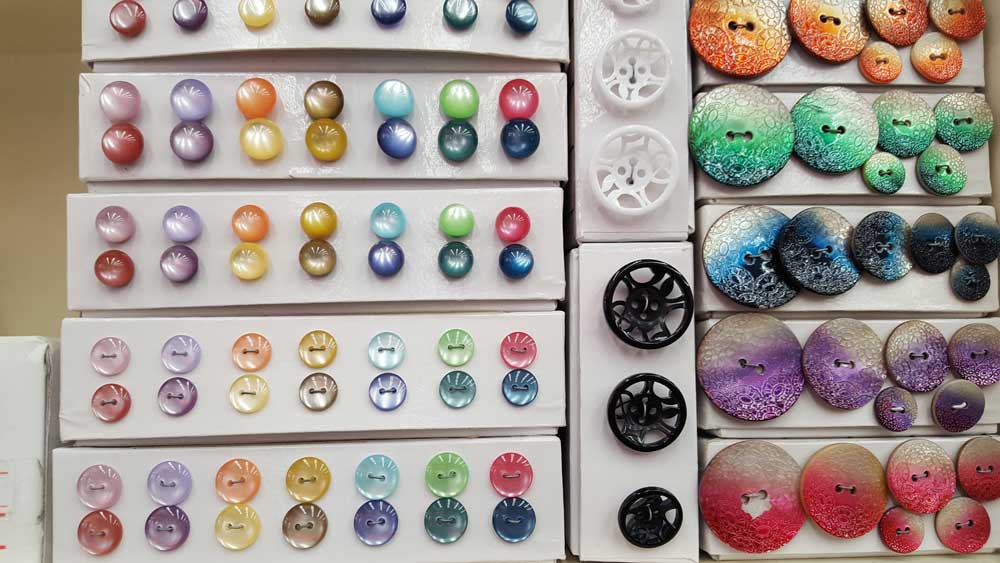
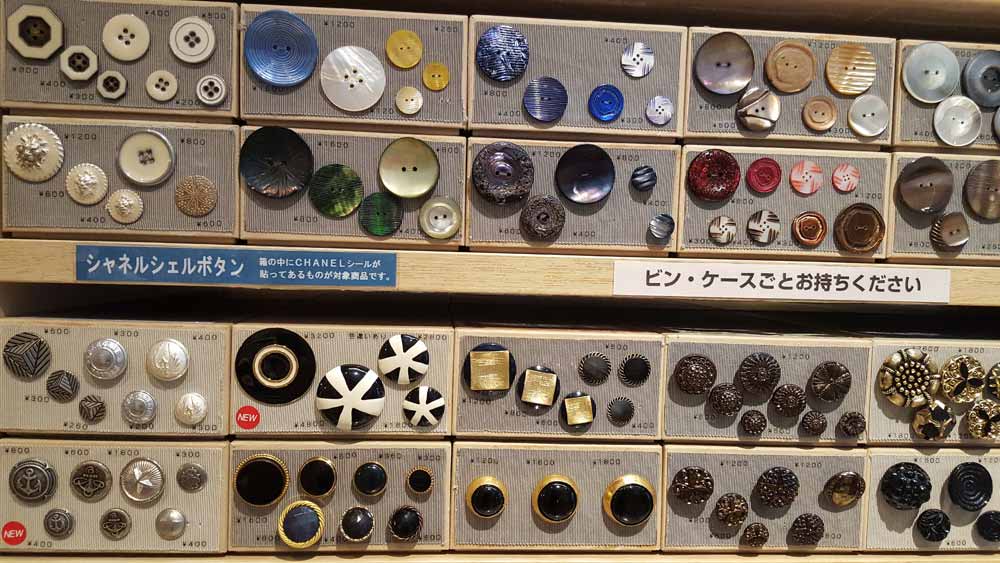
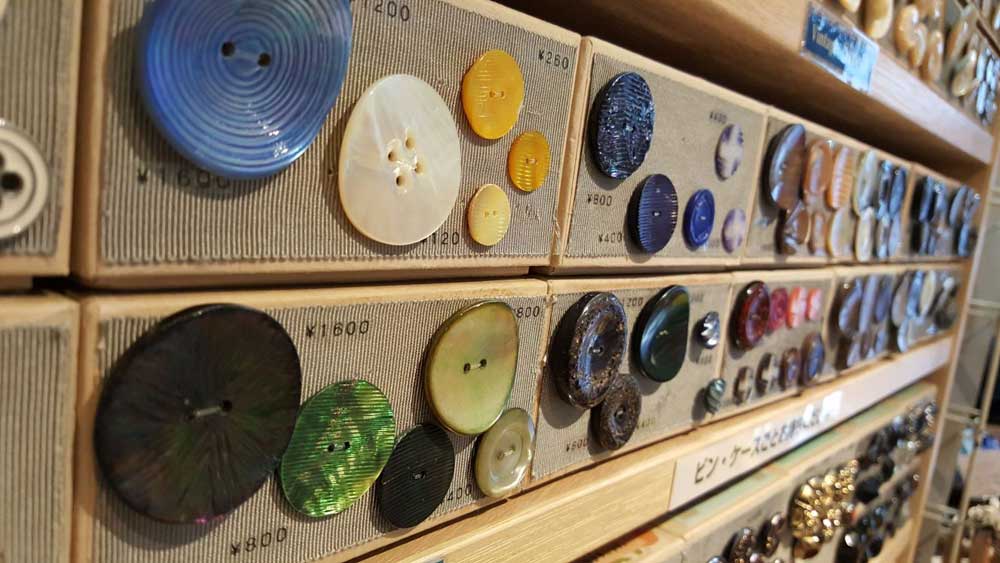
I could not stop touching the fabric pictured below. Doesn't it remind you of sprinkle cupcakes or confetti? It cost approximately $28 CAD per metre. I did not buy any of this fabric, but have a feeling I will regret that decision very soon. Note to readers: if you see something in Tokyo you love, just buy it! Most likely you will not find it back home. UGH. 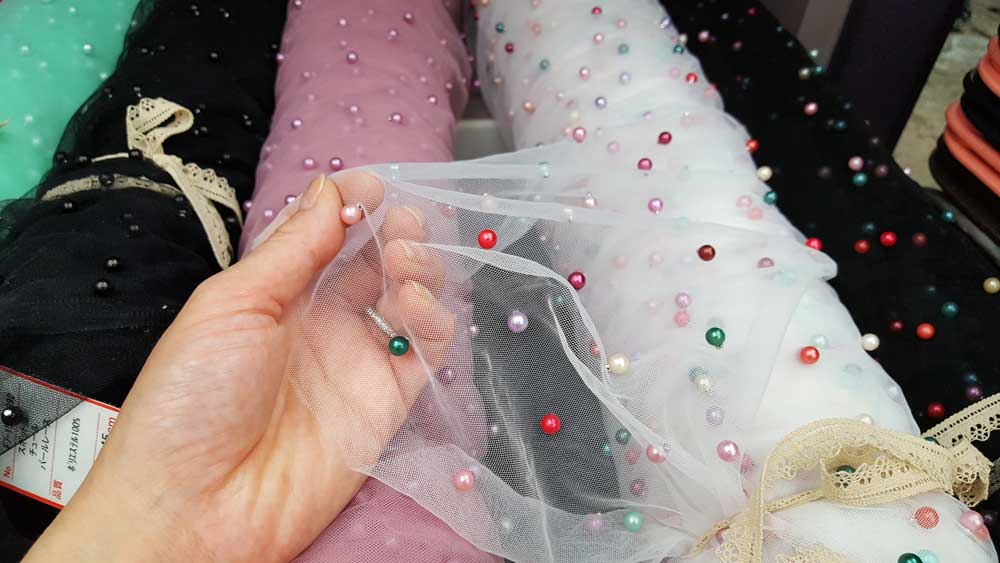 Zak ZakA bit of research before my trip revealed that Zak Zak was the place to visit for cheap fabric. A ton of fabric in the shop was only 100 yen, which is approximately $1.50 CAD per metre. Most of the fabric was comprised of synthetic fibres, so I walked away. However, if you are a button person, you will want to hit up this shop. Buttons are dirt cheap here. All buttons pictured below are under $1 CAD. 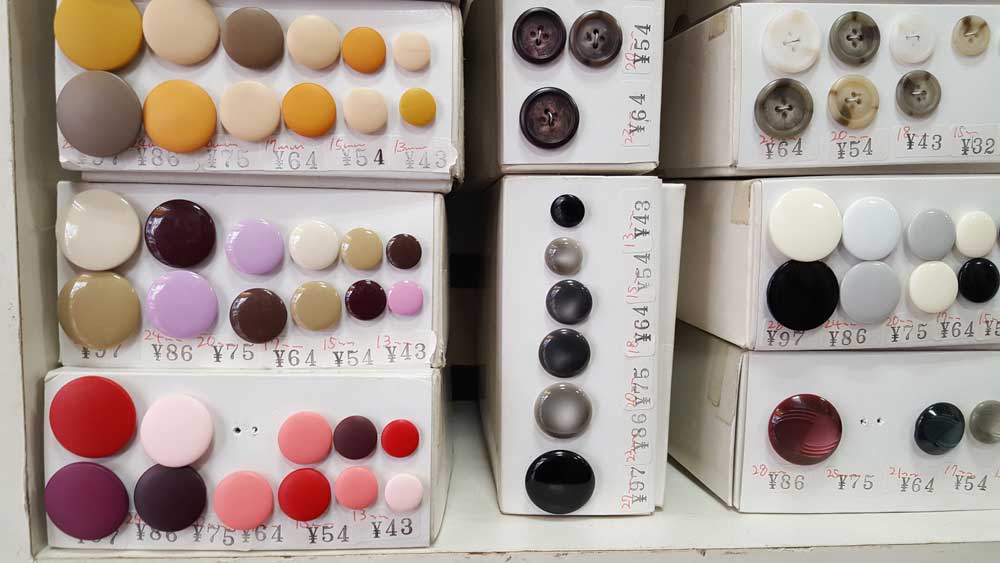 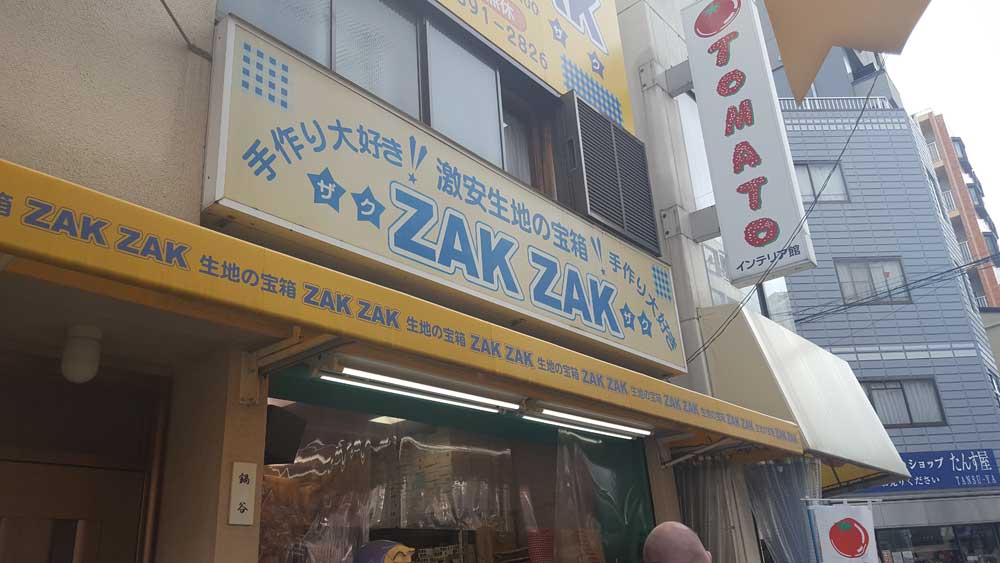 L musee Button ShopFrom cheapo buttons to not so cheapo buttons. Do not walk into L muse near the end of your fabric shopping trip. Most of the buttons in this shop are imported and vintage. Which means you will be dropping a lot of dough in this shop. 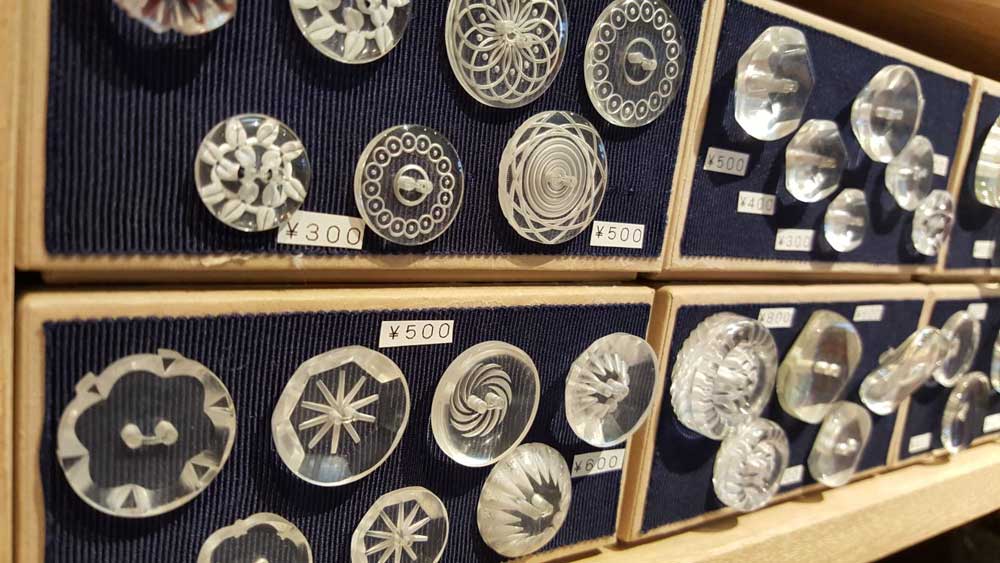 I am not really a huge button person, due to the fact that I prefer hand sewn button holes. But I love the way buttons can come in so many unique shapes, sizes, colors and forms. So here is some eye candy for all your button lovers out there.
The most expensive button I found was around $78 CAD. It was a vintage button from a French designer in the early 1960's. I couldn't get a picture of them as the shop keep wouldn't let me. My husband and I totally snuck all these photos. Shhhhh!
I did not purchase any buttons from L musee, but I did purchase some decorative jewels from their sister shop Nippori Maru. I'm thinking of using them on a cuff or collar. 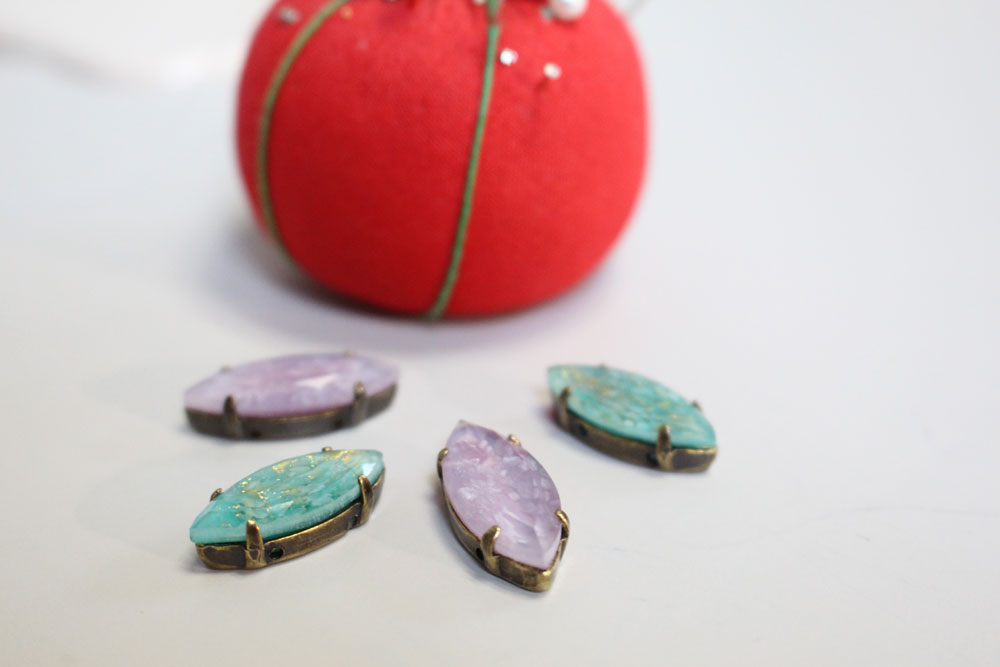 Okadaya, ShinjukuMost visitors stay in Shinjuku and do not even realize how close a major textile shop is to their hotel. Okadaya in Shinjuku is comprised of two buildings. One is six floors filled with textiles and some notions. Most of the fabrics I found in Okadaya were perfect for costumes. If you are into cosplay, you must visit this shop. 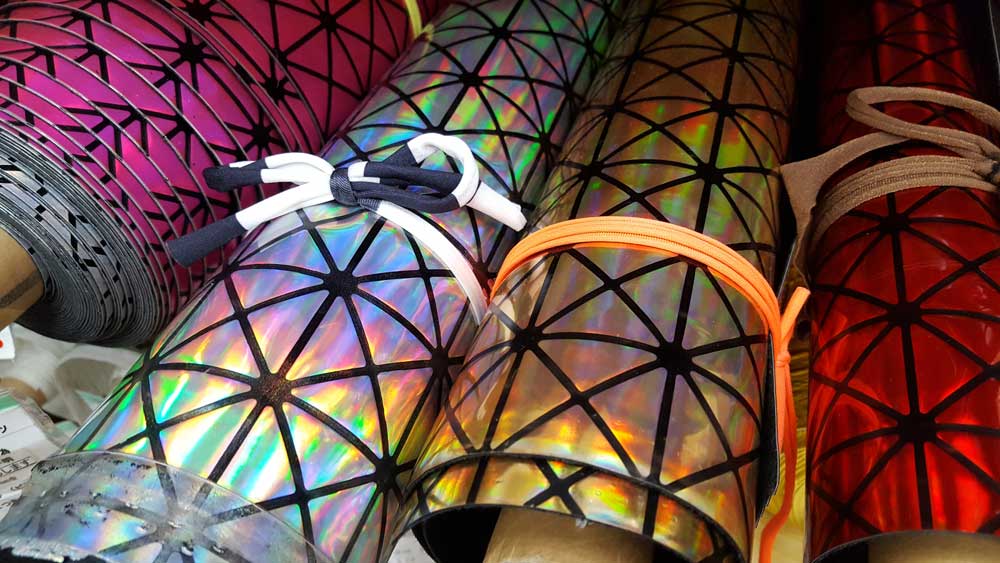 I did not buy any fabric from Okadaya due to the high price point. I figured the prices would be higher because they are located in the heart of Shinjuku. Really, you are paying for convenience.
The second building has six floors filled with hobby, haberdashery, and design supplies and tools. I wish I entered this building earlier in my trip, because the drafting and draping supplies are so nice. I found draping tape, colourful pattern weights, and a variety of marking tools and drafting rulers that would be very helpful. 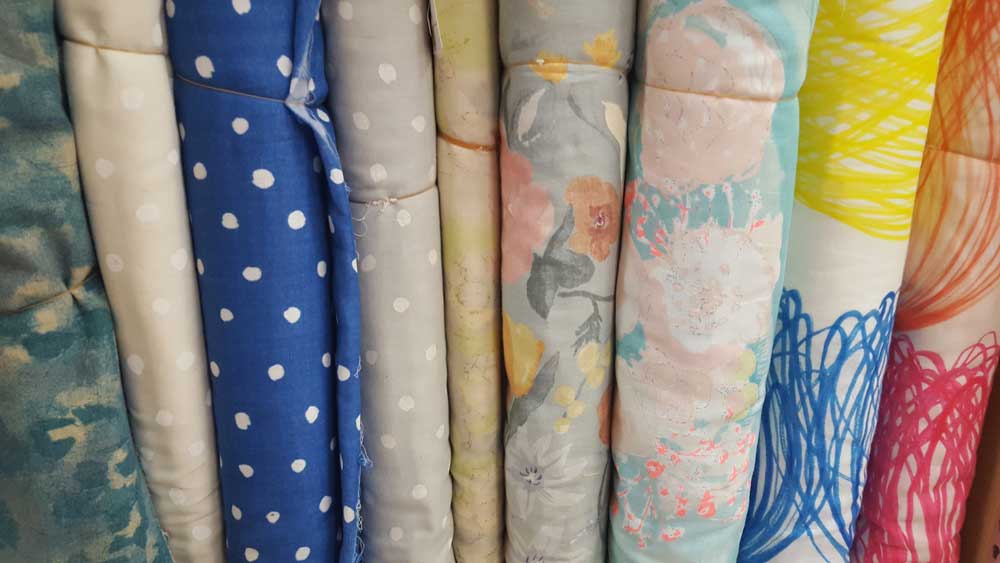 The pattern/fabric weight below is high on my 'did not buy' regret list. Don't worry pattern weight, I shall see you in 2018. 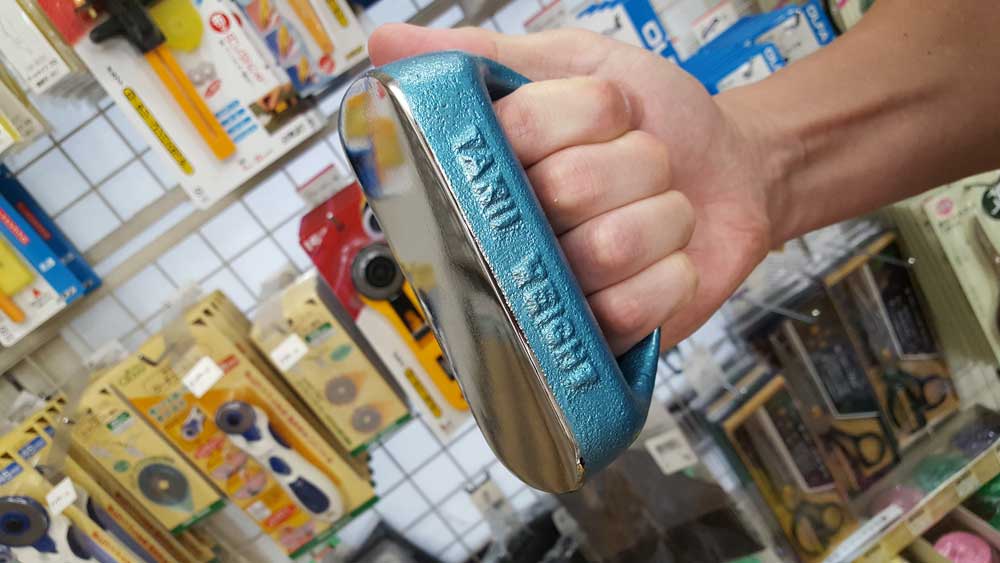 Hope you enjoyed this Tokyo review. I still feel like I barely scratched the surface in Tokyo in terms of fabric and trim shops. Stay tuned for a fabric haul video, as I picked up over 15 different fabrics over the course of the entire trip, as well as the last part of this fabric shopping series which covers Yokohama.
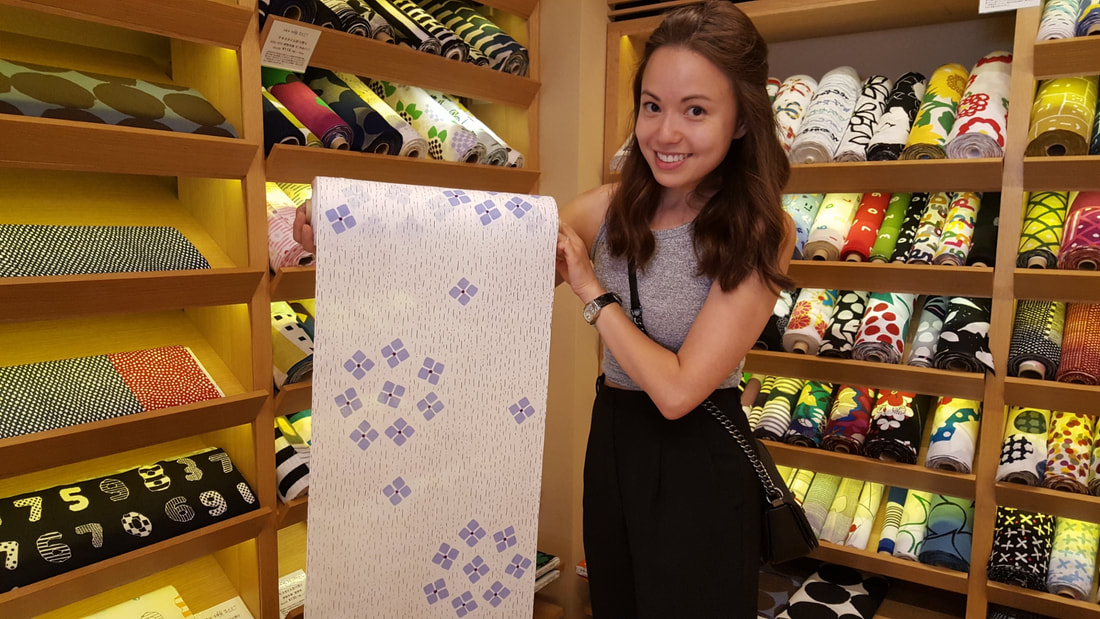
Follow us on Instagram to be the first to read more blog posts including my adventures in Kyoto and Yokohama. Written and photographed by Sheila Wong Edited by Samantha Quon Happy Sewing! Sheila Wong Sewing Team This is part one of a three part blog series featuring my travel experiences this year in Kyoto, Tokyo and Yokohama. I will share with you fabric shops, sewing shops and other fashion related places that are a must see while in travelling in Japan. You will want to book a flight to Japan after reading this!  Kimono Forest. Read on to learn more! Fabric and Trim ShopsFor me, there are three stand out shops you have to visit while in Kyoto. Sou SouSou Sou is a lifestyle label that offers women's wear, menswear, children's wear, accessories, housewares, shoes, and textiles. This is not your traditional fabric shop. They offer a specific type of cotton called Ise-Momen in a few different weights. According to Sou Sou, "Ise-Momen cotton, a traditional craft manufactured in Mie Prefecture, has more than 250 years of history since the Edo period (17th century). The thread is lightly twisted, hardened with natural starch, and woven slowly with the traditional loom." 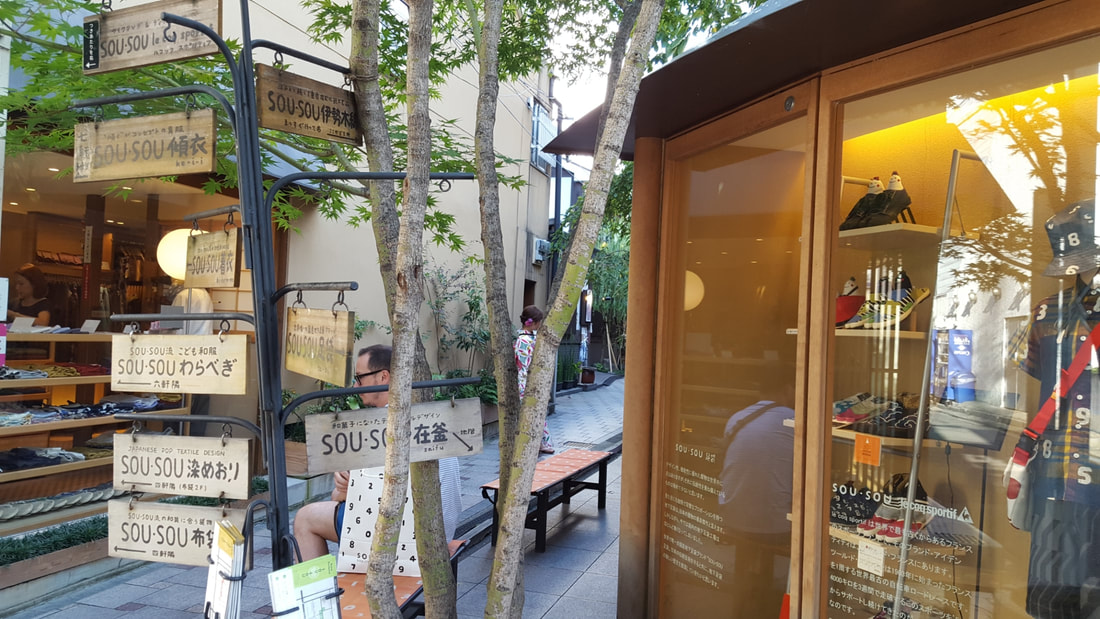 Sou Sou is well known for unique and bold prints, which they design in-house. I purchased 2 meters of each of the fabrics pictured below. I'm not so much a bold print person, so you will notice I picked out the least vibrant prints in the entire shop.
Fabric is purchased in 10 cm (.010 meter) increments. It might seem costly, but given the unique weaving, design and hand feel, you can't go wrong.
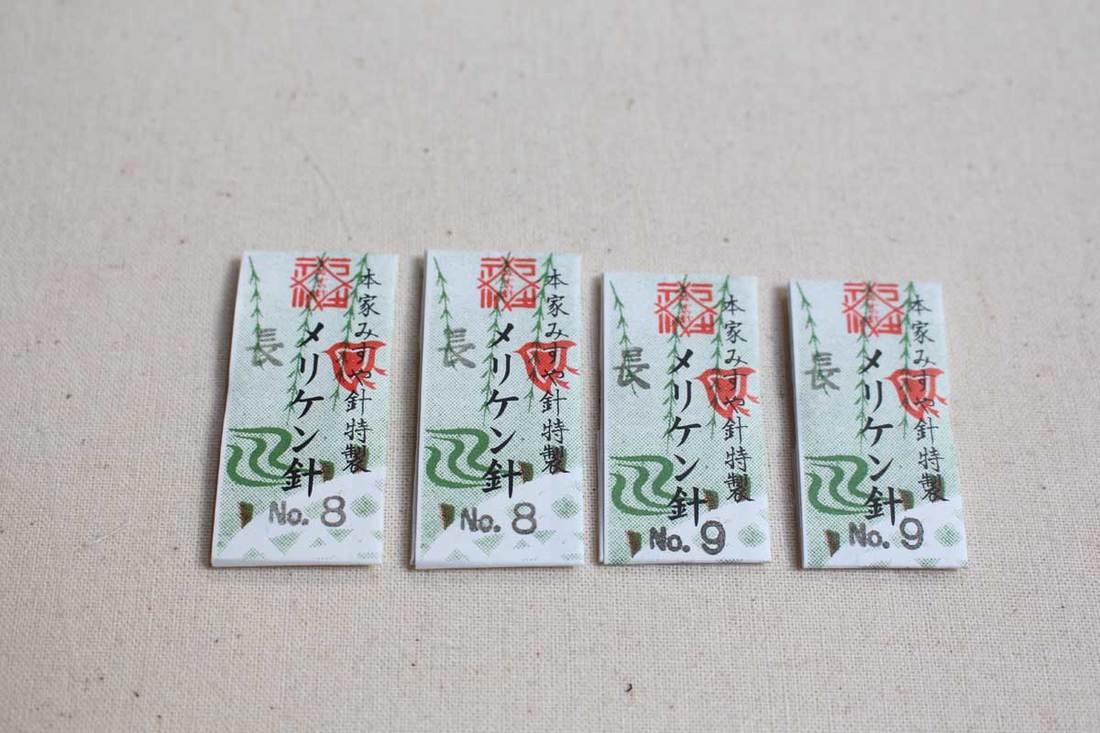
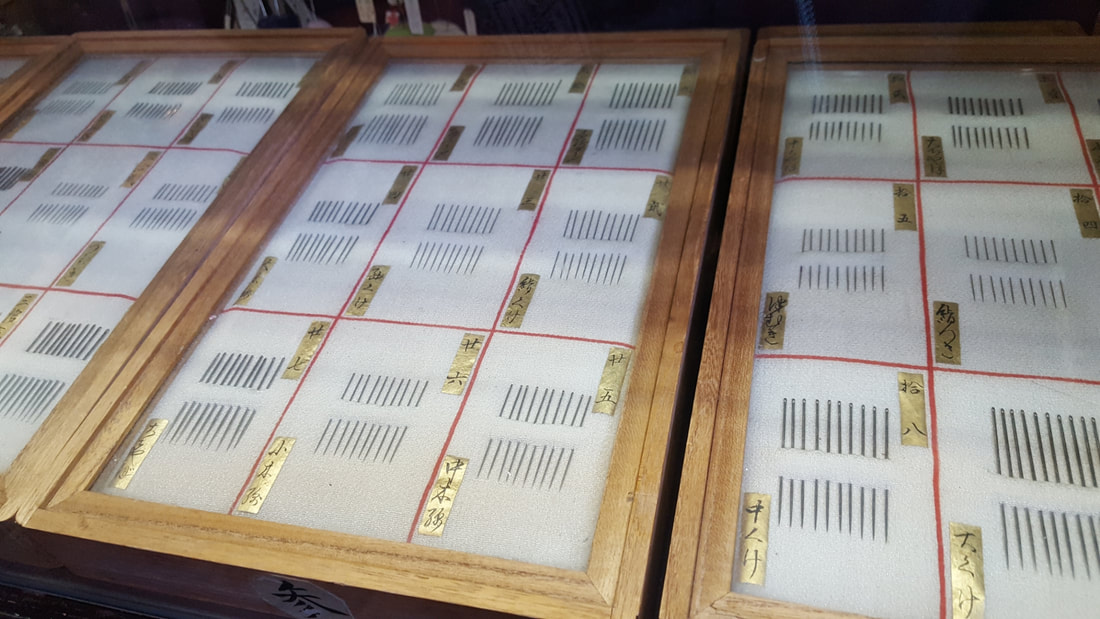
 You can purchase fabric made for kimonos. Notice the unique narrow width? Misuyabari Needle ShopVisiting Misuyabari Needle Shop was on the top of my TO DO list. Many of our studio designs are hand sewn, so visiting a needle shop dedicated to making a tool I cherish was kind of surreal. They offer a variety of hand sewing needles that are hand made and machine made. Unfortunately, their hand made needles were out of stock as the creator is currently ill. Wishing them a speedy recovery! I tested out many soft hand sewing needles made for dress making. I ended up purchasing 10 packs of size 8 soft needles and 4 packs of size 9 soft needles. Each pack comes with 25 needles. I also picked up a variety pack of soft needles, just in case. Since I wasn't sure If I'll return to Kyoto next year, I took advantage of being in the city and ended up visiting this shop 2 times during my stay.
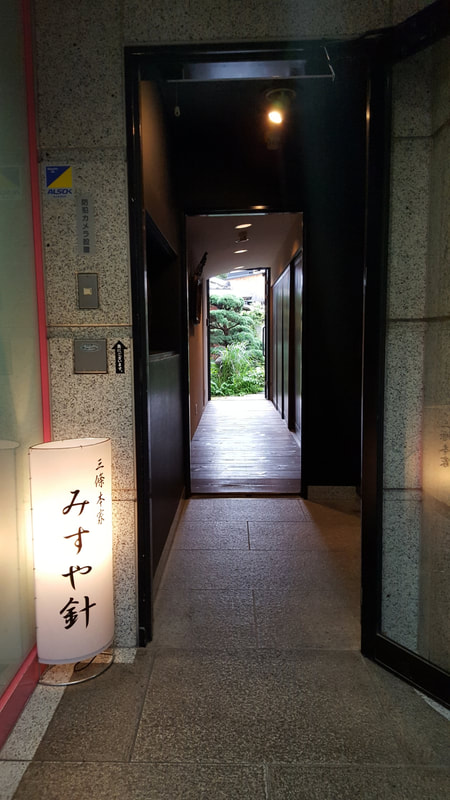
 There are many blogs explaining how to find this hidden away shop. For me, the easiest way to find this shop was to find the T intersection of Sanjo Dori (三条通) and Kawaramachi Dori (河原町通). The picture below shows the entrance into Cupola Sanjo (三条名店街), where the T intersection is located. Enter into the covered shopping area, and after a few shops/restaurants on your right you will see the first side entrance leading into a green space. Look for a psychic business at the foot of the entrance.  There is a hallway down the side entrance that looks like this.
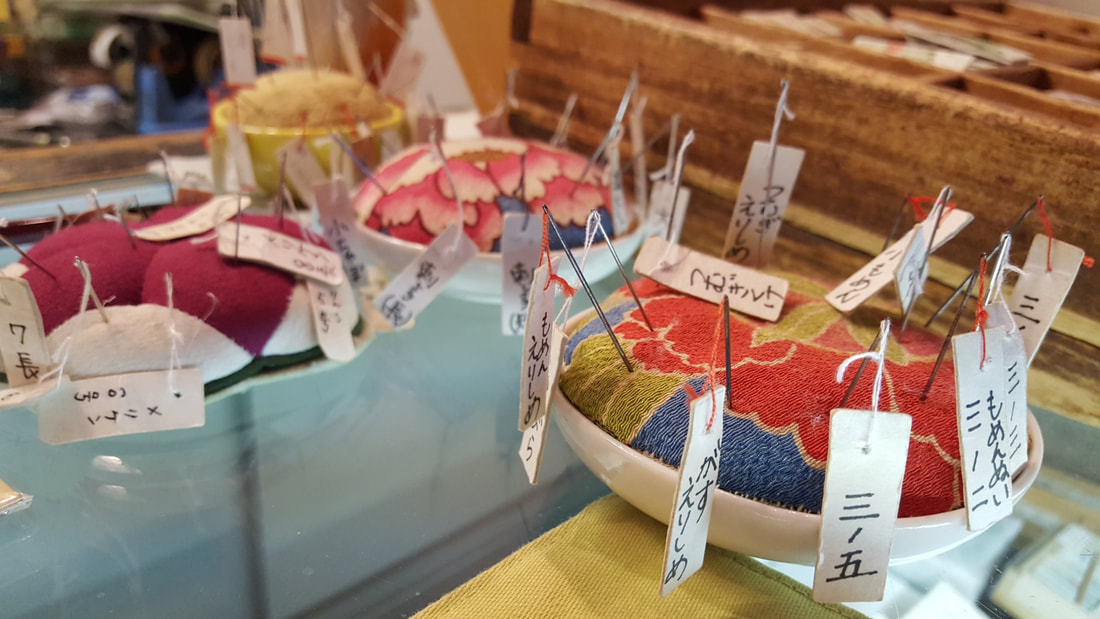
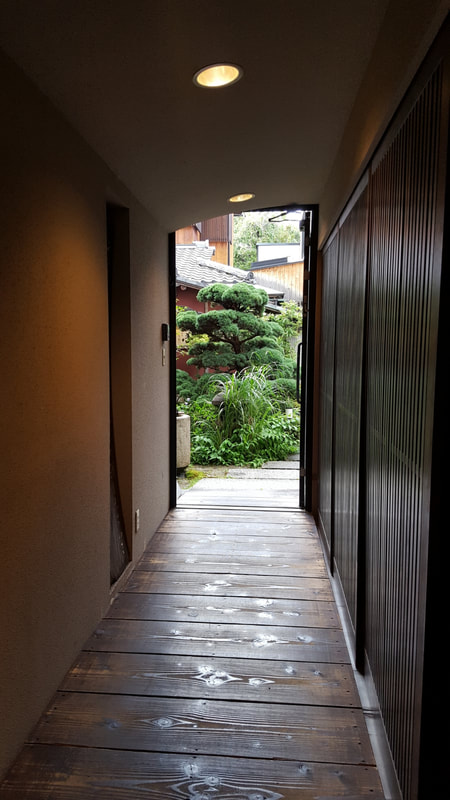
Pass the hallway, and you will be transformed into old world Kyoto. In front of you is a traditional inner garden called a tsuboniwa (壷庭), with a tiny shop hidden at the back. 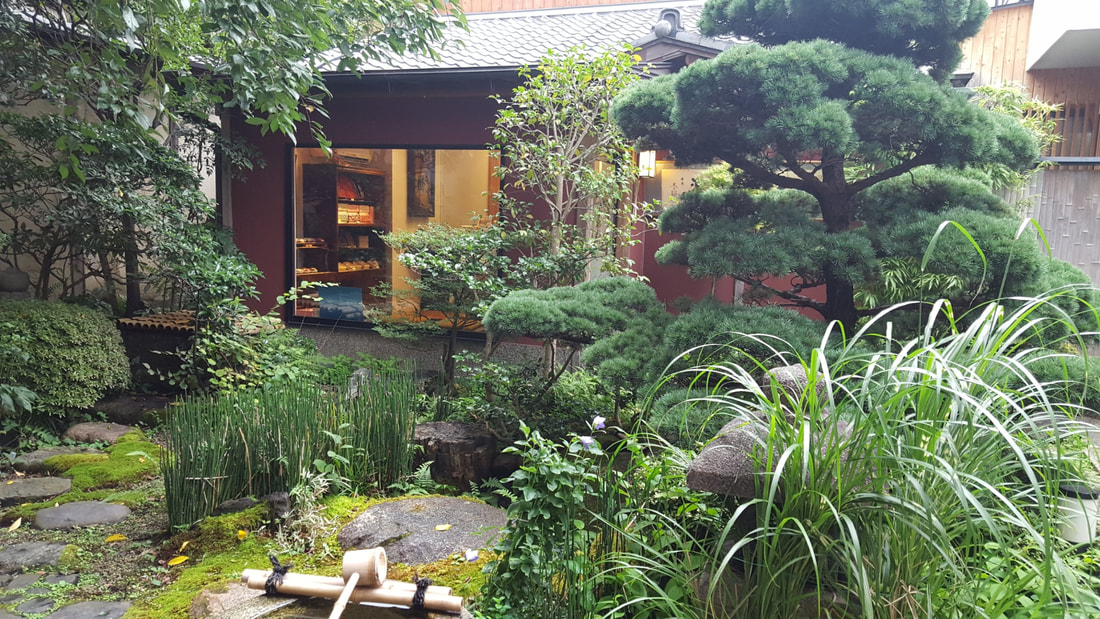 You cannot resist ohhing and awwing at the shop's very kawaii decorative hand made pins. They come in a variety of categories, from animals, to sewing objects, to nature objects, and food. In September, they just released a special edition Halloween series (photographed below). I picked up roses, dogs, cats, birds, sewing related ones and obviously the Halloween edition. Let us know in the comments which ones you are gushing over. I just cannot decide which one I love most. 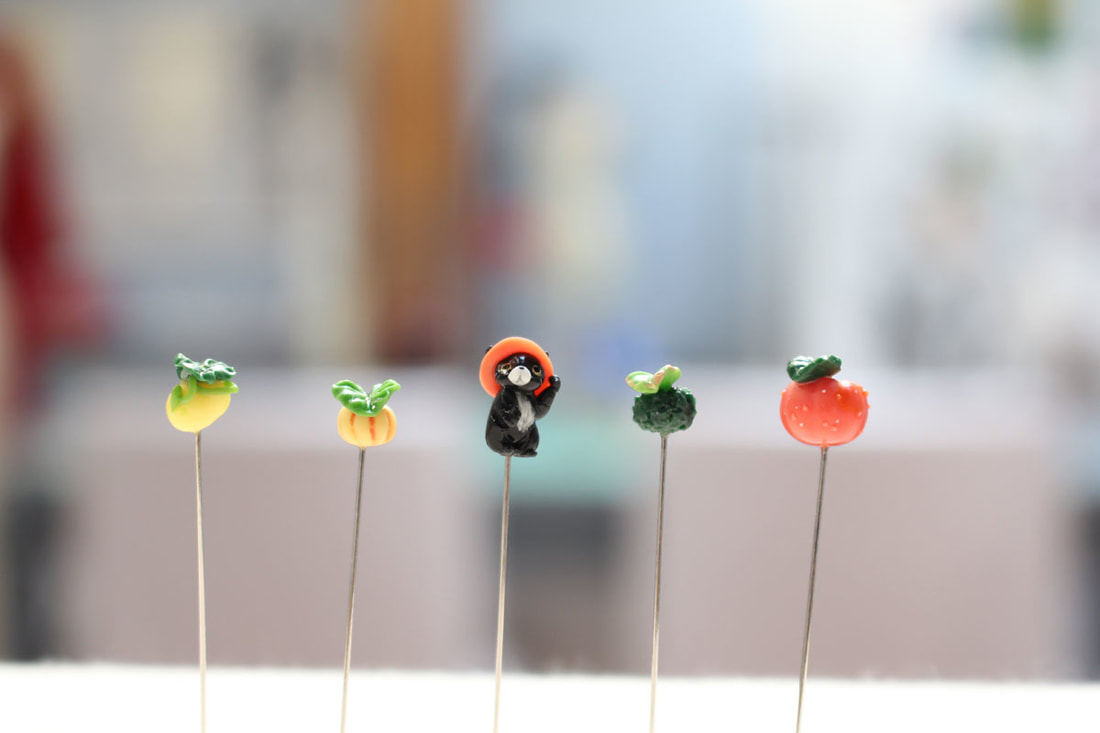
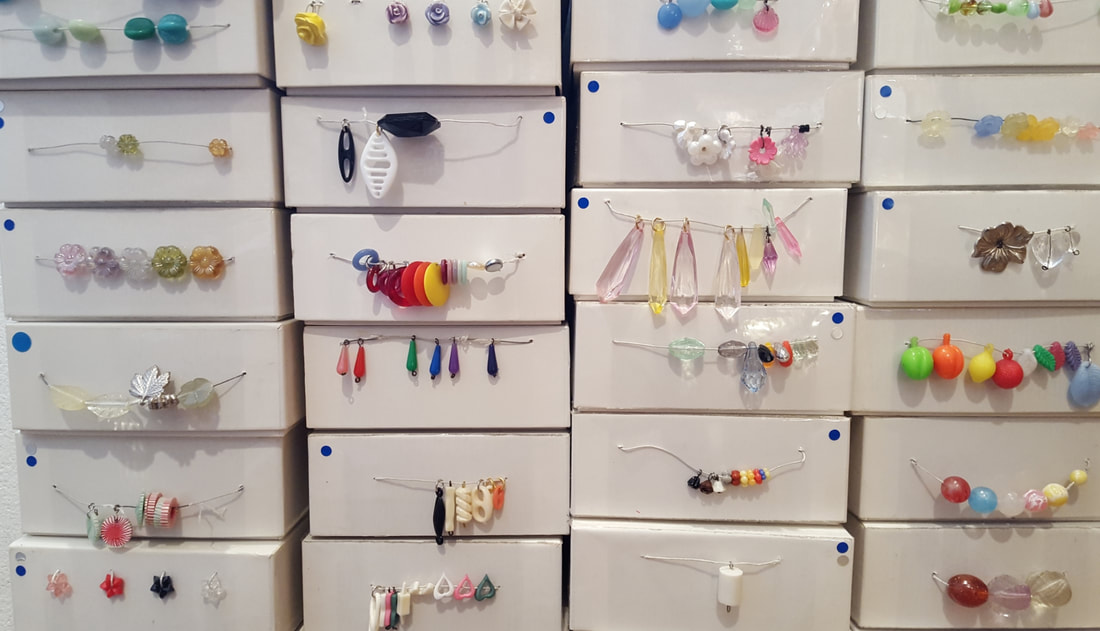
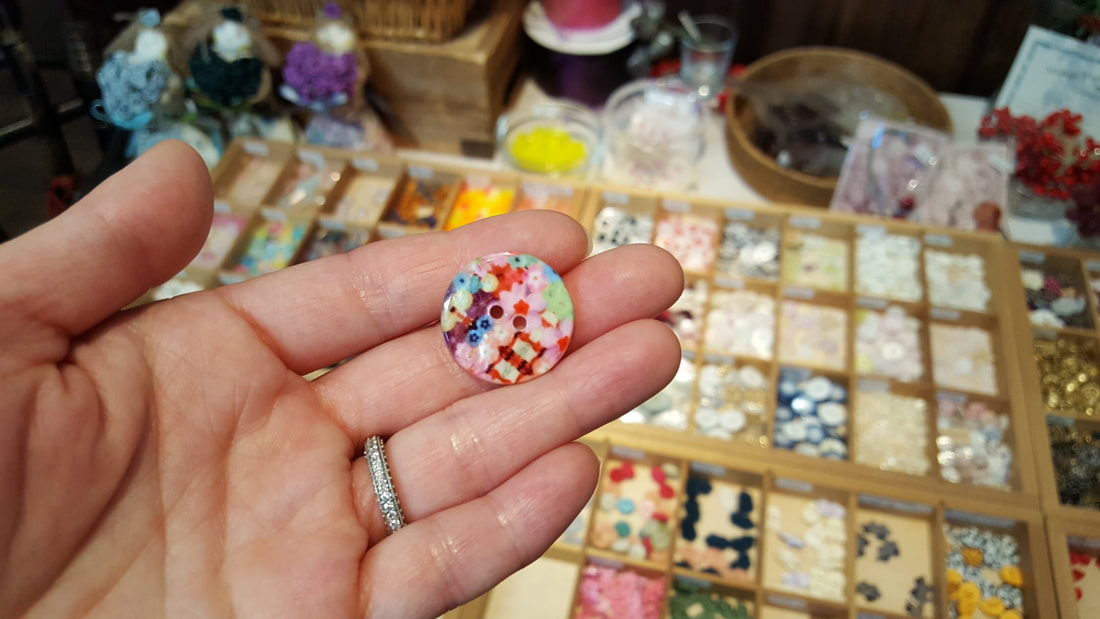
Idola Bead and Button ShopLocated on the third floor of a retro style building called Sacra Building, you will find Idola bead and button shop. There are two shops, one dedicated to buttons and the other for beads and associated trims.
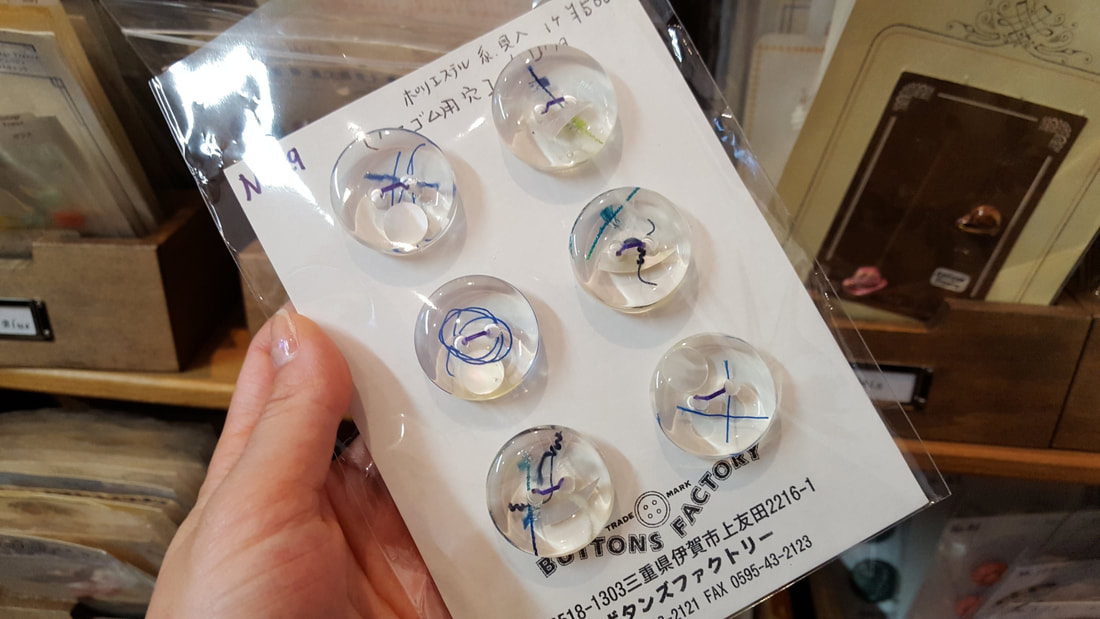
Buttons are relatively small, so you can pack a ton of stock in a small 200 square foot room. Open every drawer possible! Hidden treasures from new to vintage buttons await you. 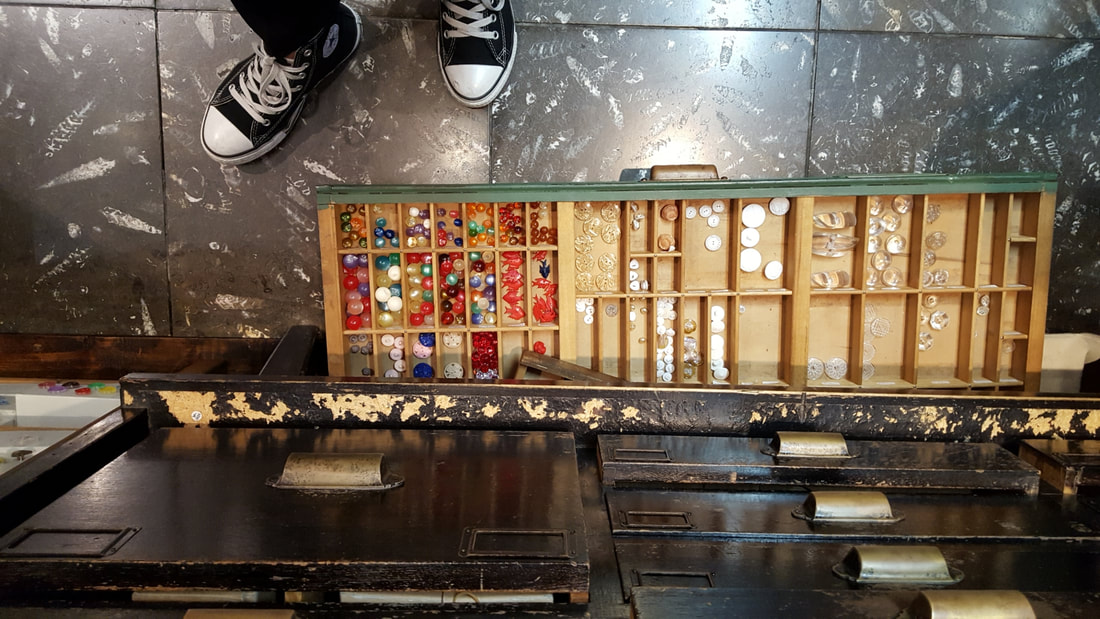 Below are some of their vintage buttons, so beautifully packaged. I fell in love with below clear vintage buttons with thread floating inside.
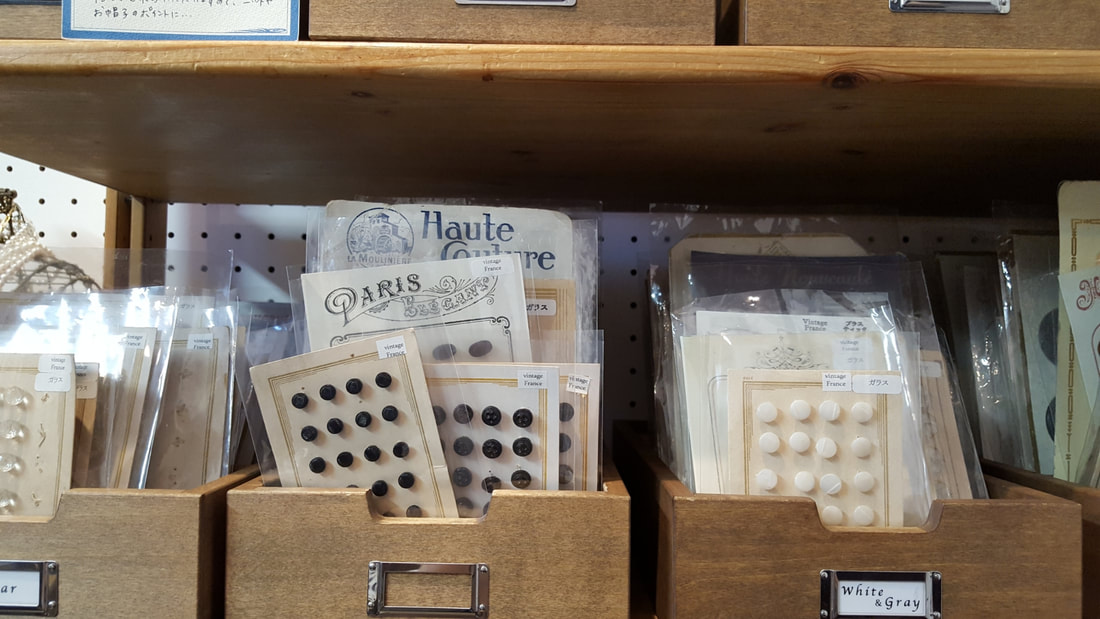
Honorable MentionsSanjo Mercerie is a shop dedicated to beads. It is only a couple of blocks away from Idola, so check this out on the way there. A bit more expensive, but the quality speaks for itself. 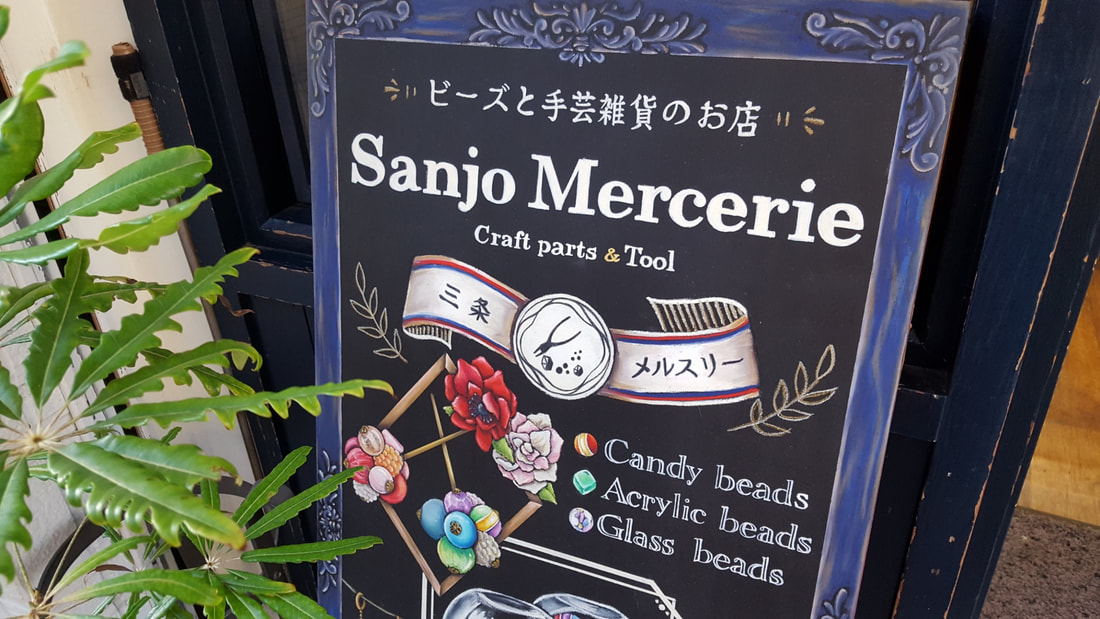 Established in 1952, Nomura Tailor Shop has two locations. I visited the Nomura Terra Teramachi store, located close to the famous Nishiki Food Market. If you are into printed cottons, you will love this store. There are also a selection of notions.
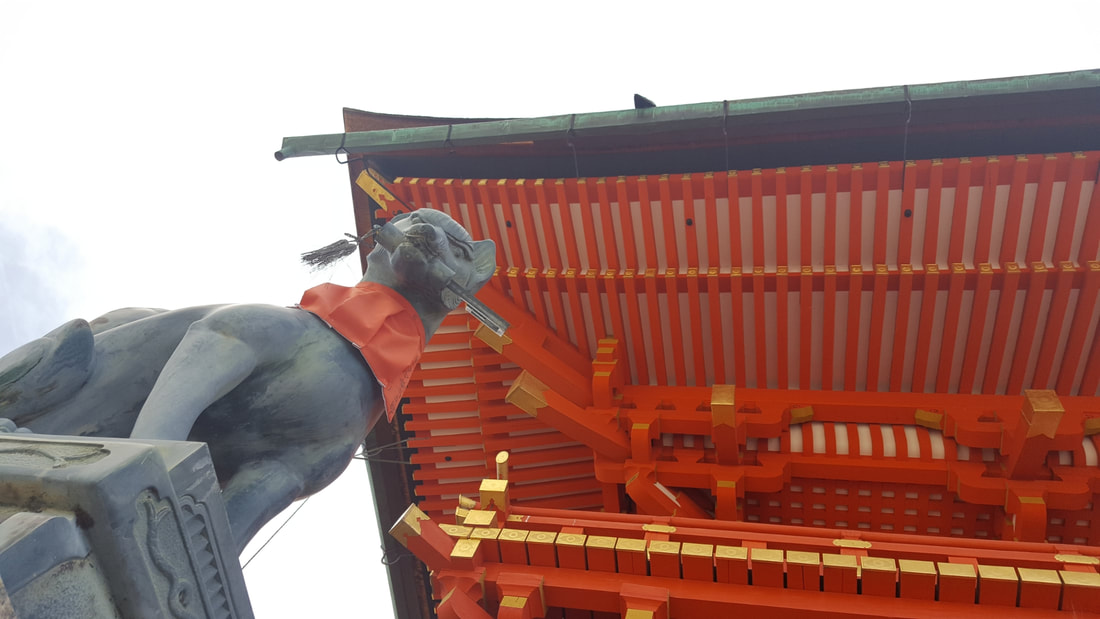
Other Kyoto Must VisitsI did so much more than fabric shopping on this trip. I promise. Kimono ForestLocated in Arashiyama, the Kimono Forest is a collection of large clear tubes filled with a variety of kimono fabrics. It is located right beside the Randen Tram Station on Kyoto's Keifuku Arashiyama line. There are approximately 600 pillars installed, and they light up at dark. The artist of this project is Yasumichi Morita. 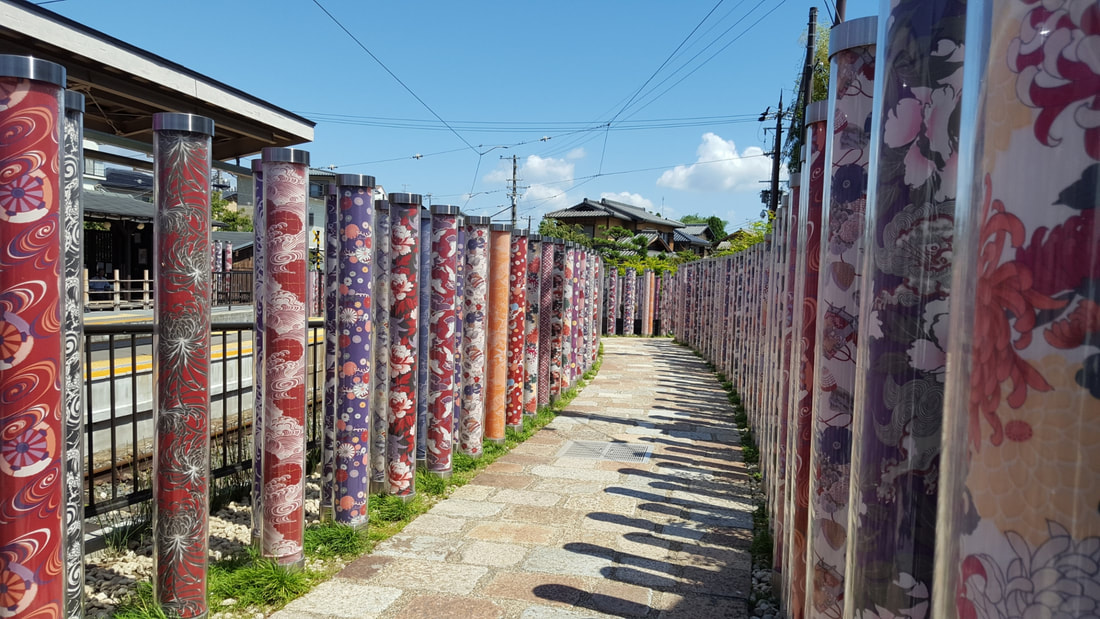 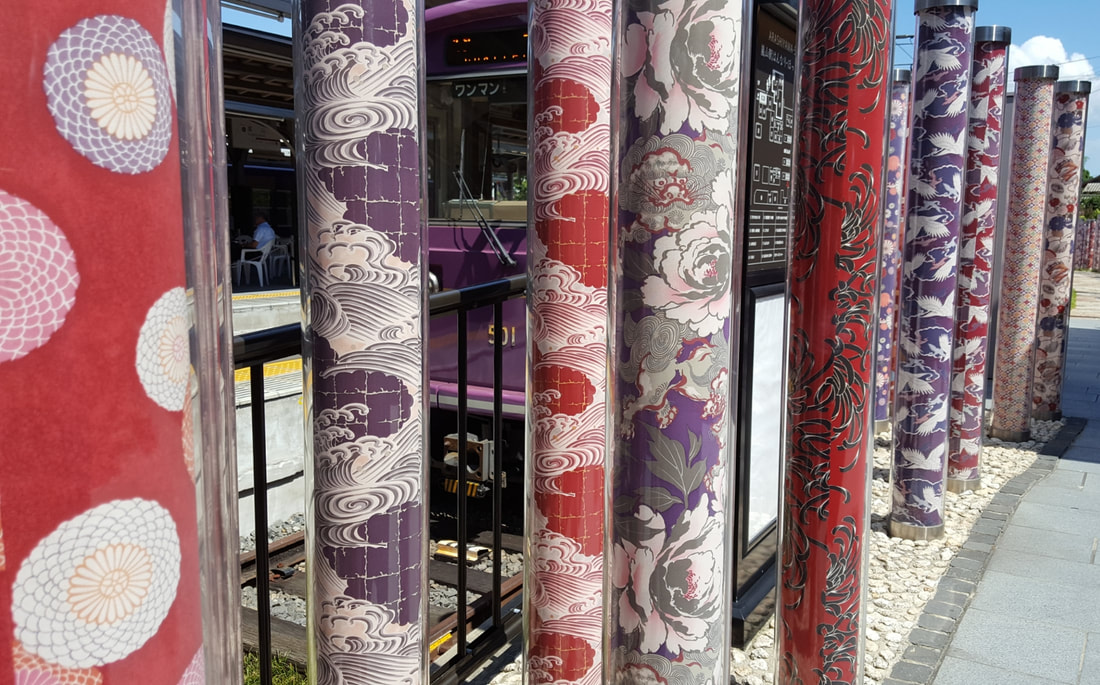 Fushimi Inari ShrineLocated in Southern Kyoto, this is a Shinto shrine established in 711, during the Nara period. This shrine is well known for its thousands of vermilion torii gates. Every torii gate has been donated by a Japanese business, to ensure prosperity in their ventures. 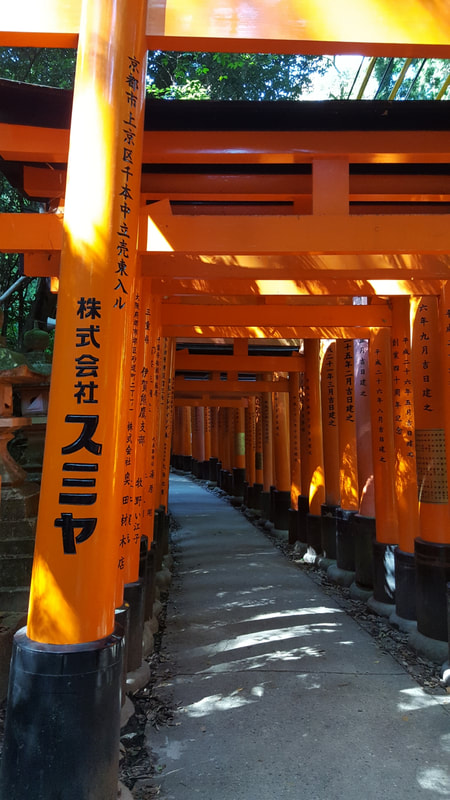 This place gets packed with tourists! Get there early and bring water. Bottled water gets more expensive as you hike up higher and higher.
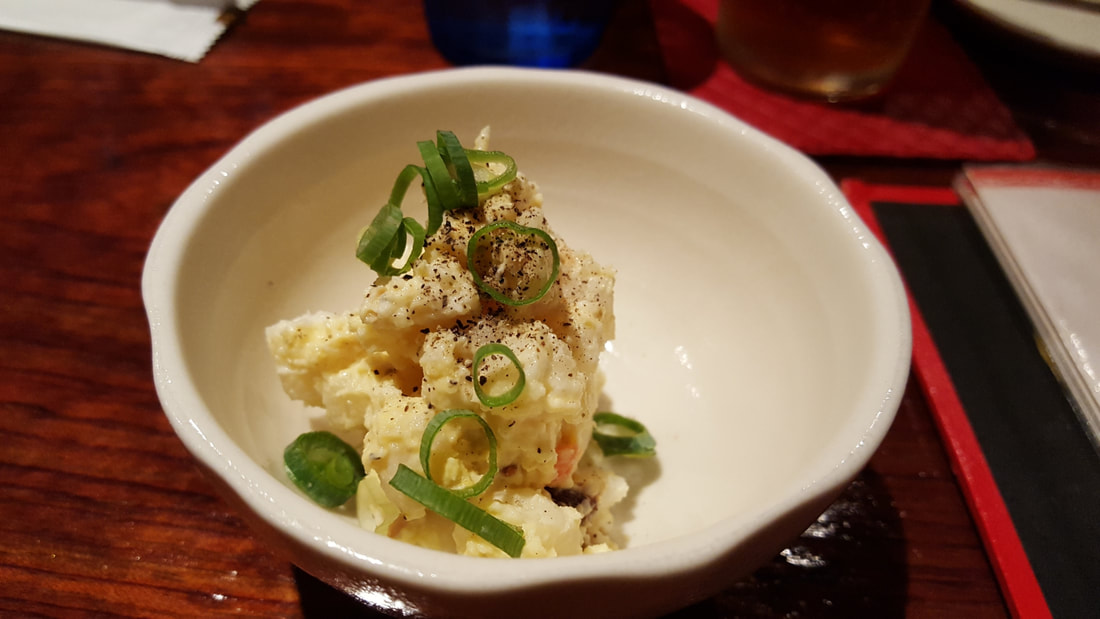
Anzukko Gyoza BarI love gyoza, so eating at Anzukko was a no brainer! Anzukko offers a variety of fried and boiled gyoza. You must order the original iron pan Anzukko gyoza. We also ordered the Camembert cheese gyoza, fried kitsune, potato salad, Japanese fried rice, and sake (of course)!  Be sure to order their potato salad. Actually, anywhere in Japan, order the potato salad. The Japanese know how to make a good potato salad. At Anzukko, there is bacon in their potato salad!
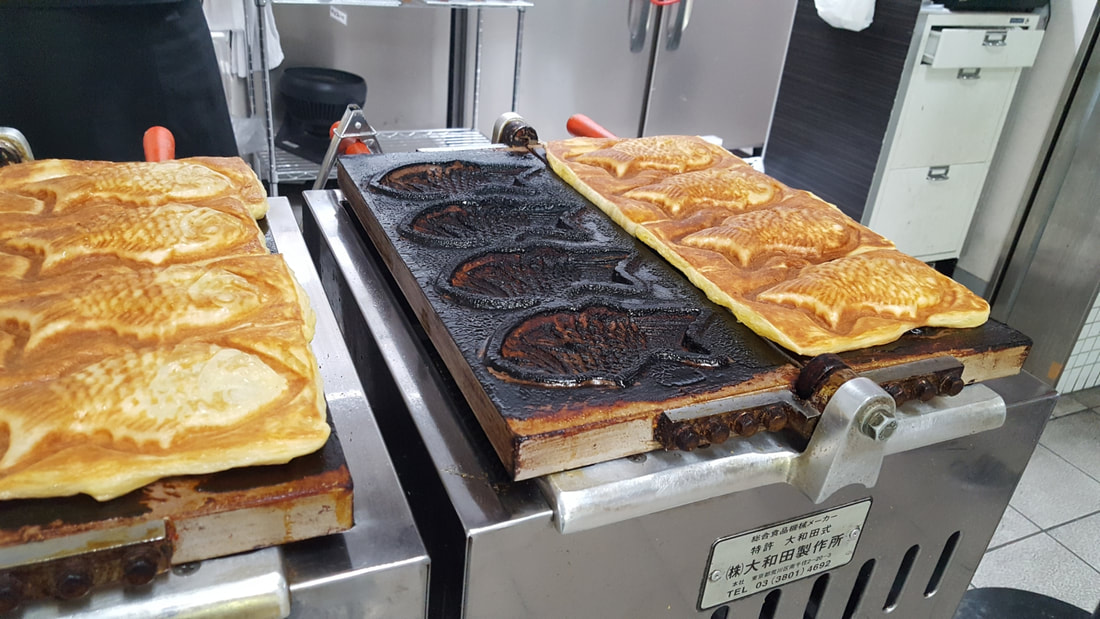
Taiyaki in Kyoto StationTaiyaka is a fish shaped cake, normally filled with azuki (red bean paste). The most magical taiyaki is located inside Sanjo Station in Kyoto. If you smell the sweet scent of butter, just follow your nose. This small vendor is located between the main pay gates and exit #7.
Hope you have enjoyed this Kyoto review. Stay tuned for a fabric haul video, as I picked up over 15 different fabrics over the course of the entire trip, as well as parts two and three of this mini-series.
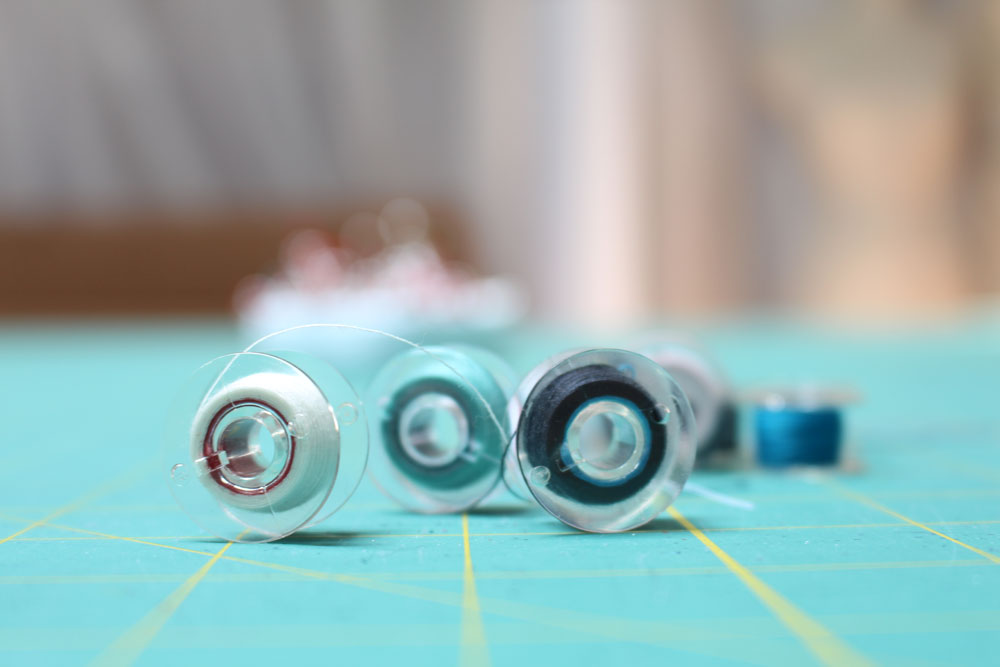
Follow us on Instagram or Facebook to be the first to read more blog posts including my adventures in Tokyo and Yokohama. Written and photographed by Sheila Wong Edited by Samantha Quon Happy Sewing! Sheila Wong Sewing Team Designing can be challenging, but an arsenal of helpful tricks can make the process more efficient. In this post, we are going to share a few sewing and pattern drafting hacks we use regularly in studio. Feel free to share yours in the comments! What is a life hack? Google defines it as "a strategy or technique adopted in order to manage one's time and daily activities in a more efficient way". So, let's get efficient! Hack 1: Fabric PrepTraditionally, fabric is oriented with its selvage edges on top of each other to yield one fold in the fabric. Oftentimes, patterns require many pieces to be placed on the fold of fabric, or, ON FOLD. If we orient our fabric as shown below you can make use of your fabric and get more ON FOLD real estate. To guarantee both layers of fabric are on grain, you must make sure each selvage is parallel to its corresponding fold. To check this, measure from selvage to fold at 3-4 points minimum along the length (see image below). Each measurement should be the same. 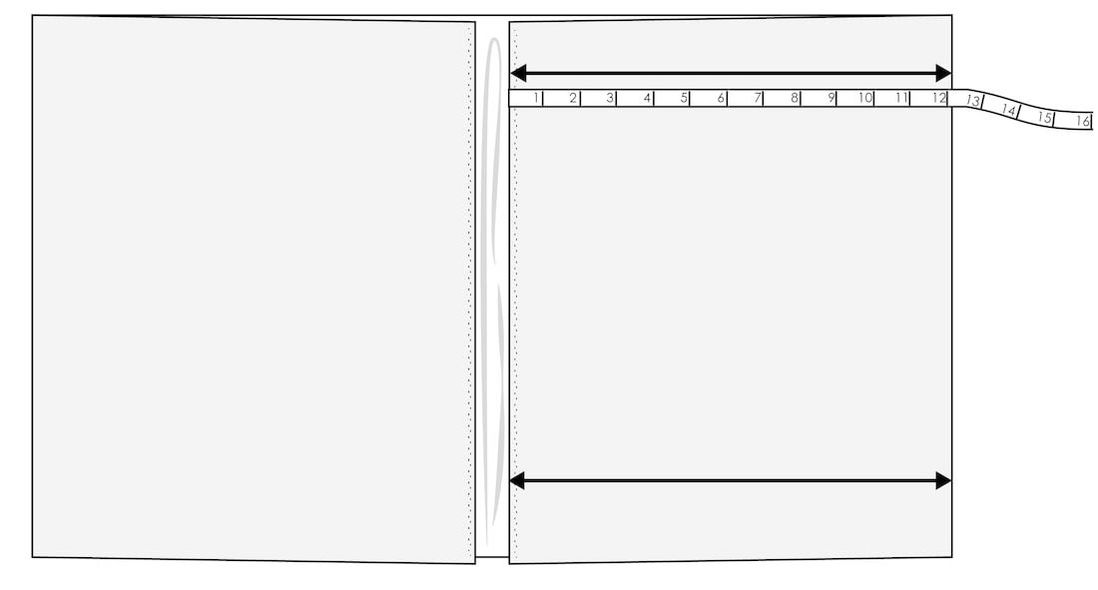 The width of your chosen fabric and pattern pieces will determine if this layout is possible. Hack 2: SewingWhy is there never an empty bobbin when you need one?! De-threading a bobbin to fill with another colour just seems so counter productive. Do this instead! Fill your bobbin with the new colour on top of the old one. Just ensure the thread tail of the original colour is tucked away before filling your bobbin with the next colour.
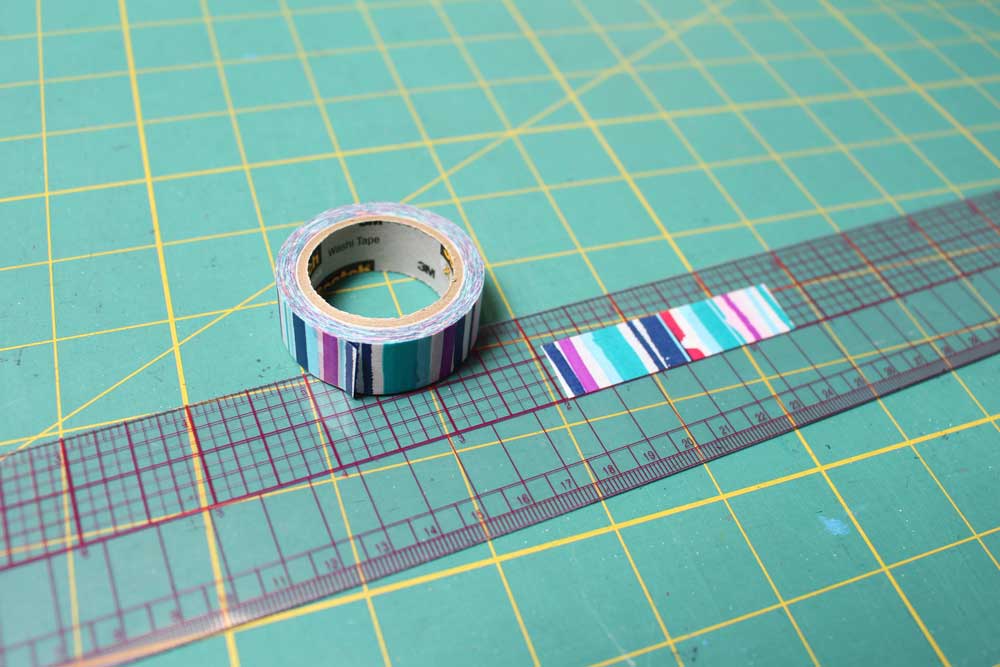
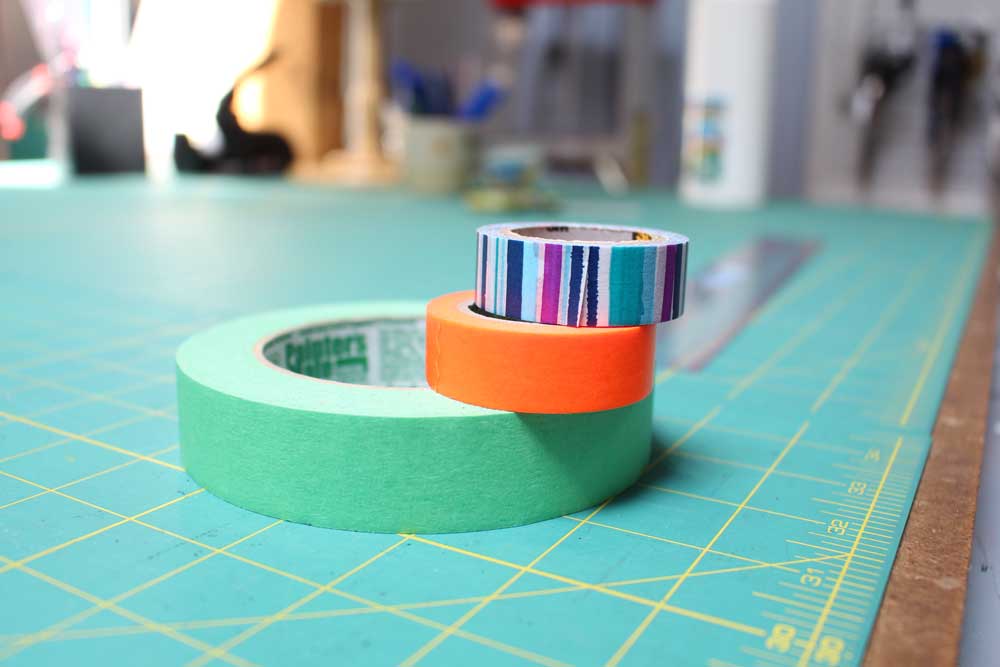
If you must take out the thread on a bobbin, designate a thread jar so you can use them in the future for hand sewing. 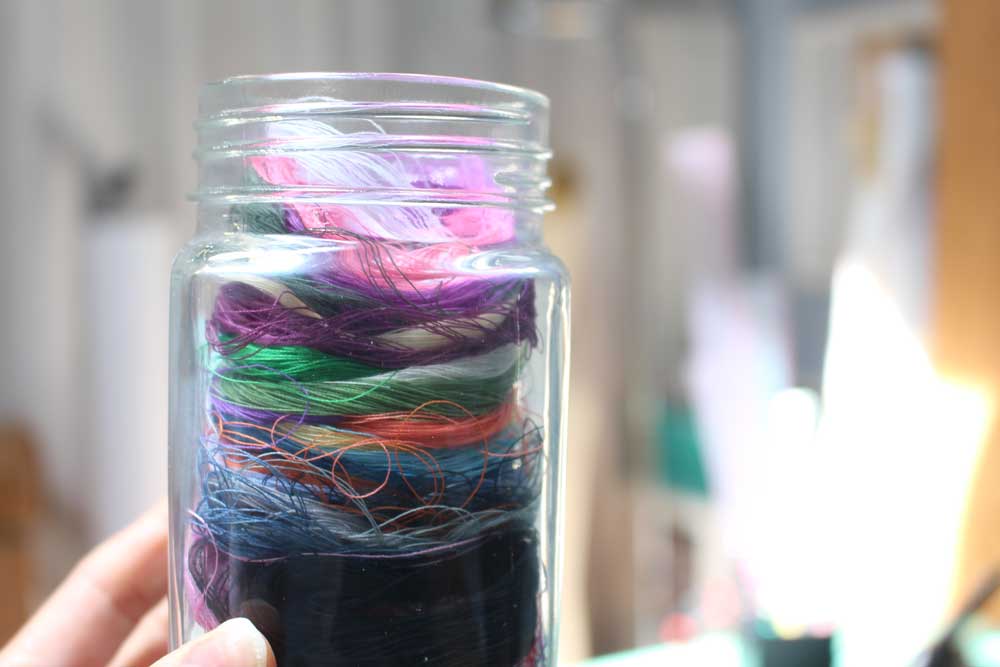 Hack 3: SewingLining up seams while sewing can be hit or miss...is what we used to say. When pinning your seam, ensure your pin enters and exits along the seam you wish to align. While sewing DO NOT take out that pin! Hand wheel your needle over the pin. This will guarantee perfectly aligned seams in your garments by reducing the movement of fabric layers. 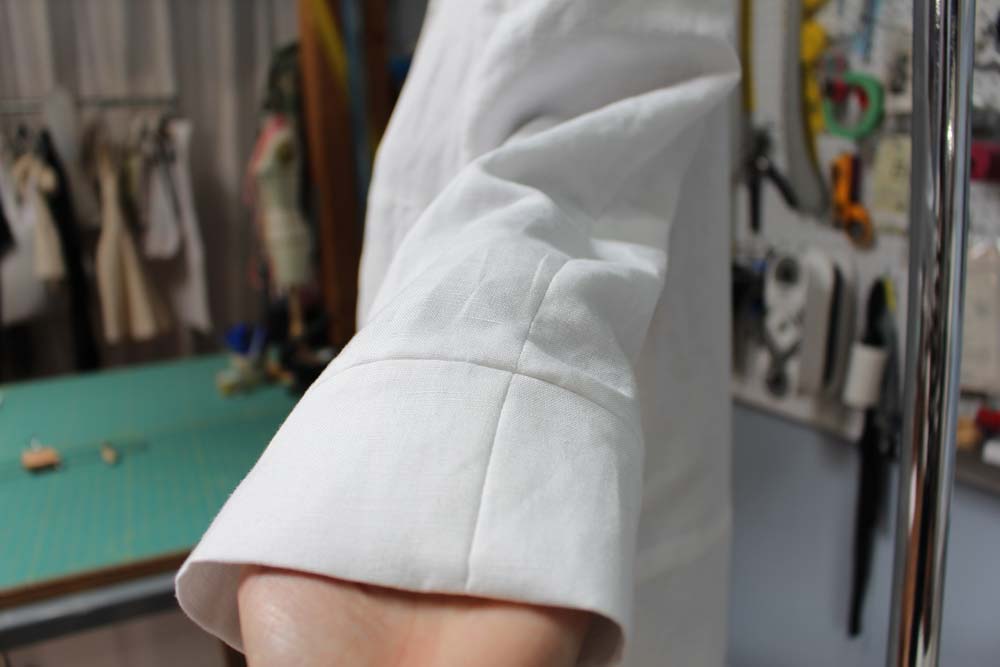 Safety warning: do not sew over pins while your foot pedal is controlling the speed. The needle is going too fast and will not have enough time to go around the pin, increasing the chances that your needle will probably break. Only use the hand wheel to sew manually over the seam pin. Hack 4: Pattern DraftingMost of us have cutting mats on our cutting tables. You can use them to your advantage when pattern drafting to draw in your grain-lines. When drafting a design with numerous panels or seams, the grain-line needs to be drawn in before separating pattern pieces. Simply line up your CF or CB along one of the mat lines, then place your ruler within the required pattern that needs a grain-line and draw.   Hack 5: Pattern DraftingWhen adding seam allowance manually to a paper pattern, place a piece of masking or washi tape along your desired seam allowance on the grid ruler. Now you have a clear line to follow.
You can also use washi tape as a seam allowance guide on your sewing machine.  We hope you enjoyed these little life hacks. Let us know in the comments which ones you cannot live without. Follow us on Instagram for more design tips!
Written and photographed by Sheila Wong Technical drawing by Deanna Kadota Edited by Samantha Quon Happy Sewing! Sheila Wong Sewing Team Maiwa is one of the studio's favorite clients. Between the months of January to June, one can find me (Sheila) instructing a variety of group workshops at Maiwa School of Textiles on Granville Island. Deanna and Caitlyn joined me to help guide students through these intensive workshops. Students came from all over North America which made for a diverse and creative group. Workshop Specs
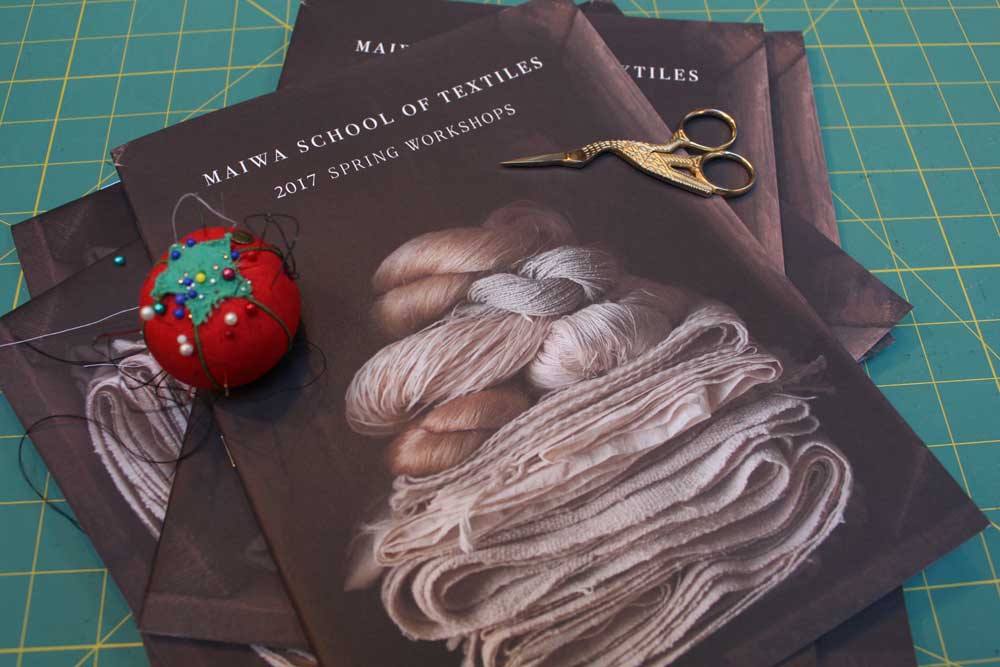 Our studio first started teaching group workshops at Maiwa School of Textiles in 2015. It was a very unique opportunity as it was the first year that textile construction and pattern drafting were introduced to Maiwa's workshop offerings. Working in partnership with them, we helped shape the program from the initial stages. We are extremely grateful to be part of this program and look forward to 2018! For the rest of this post, we'll take a peek into our most popular workshops and show you what you can expect as a workshop student. Peek into our WorkshopsWorkshops that took place in 2017 include:
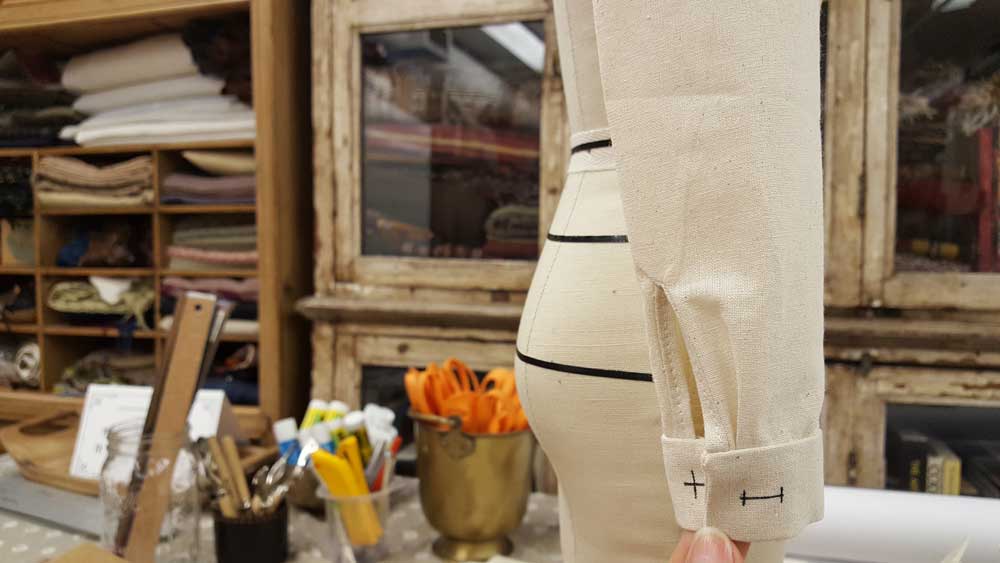
Couture Hand Sewing (5 Days)In this workshop, students constructed a garment using only hand-sewing techniques. No machines allowed here!
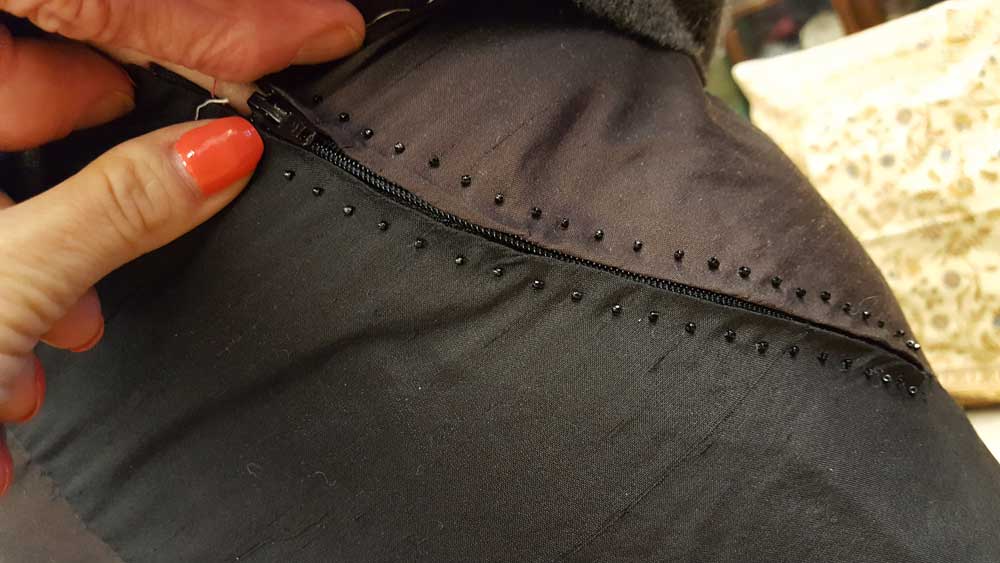 Student Joan tries on her couture-installed zipper with decorative beaded stab-stitching. Vintage Hand Sewing (5 Days)This workshop might be titled "vintage" but I hate saying that because in studio we regularly use these so called "vintage" sewing techniques on our modern designs. I would rather call this workshop "Creating Quality Garments with Hand Sewing Techniques". Students learned different hand-sewing techniques that are applicable to both vintage and modern patterns. Similar to Couture hand Sewing workshop, only hand sewing was applied.
 Me admiring the scalloped edges and beautifully lined up seams. Thinking about how I don't want to remove the thread marking because it really is pretty. Caitlyn did most of the sewing on this one, mad respect to her. 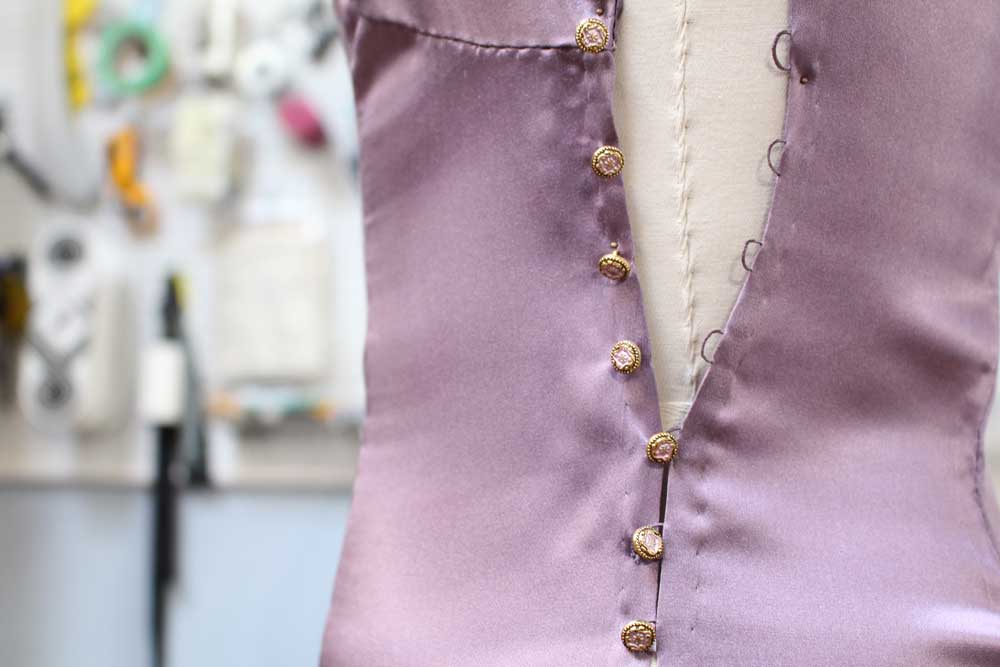 Close up shot of 15 hand sewn thread bars with delicate buttons. This fully hand sewn garment was a studio make used as a demo garment in this workshop. Taken from a 1950's vintage pattern.
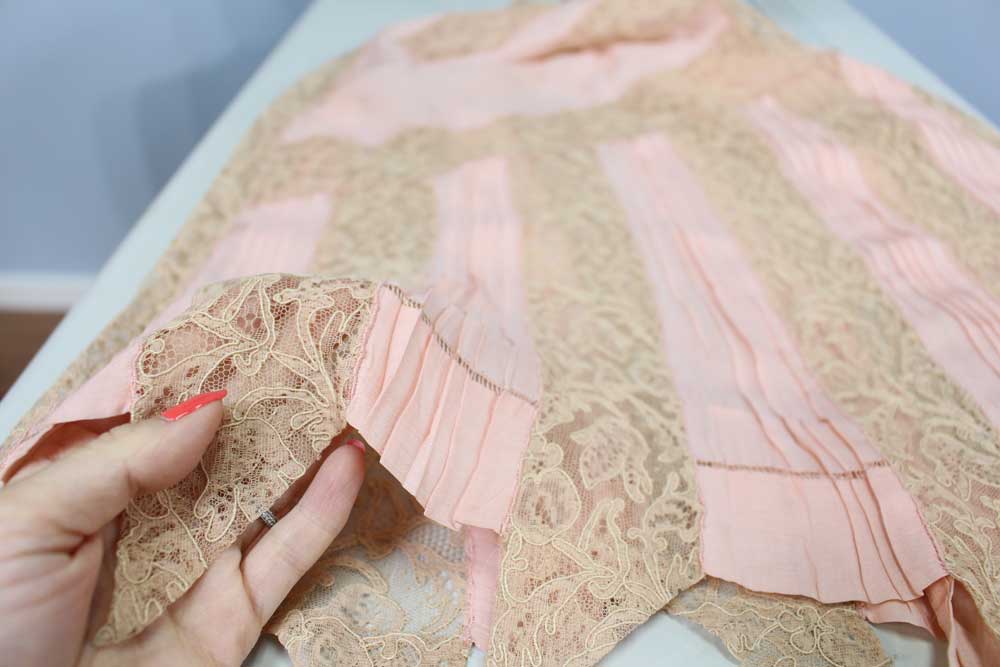
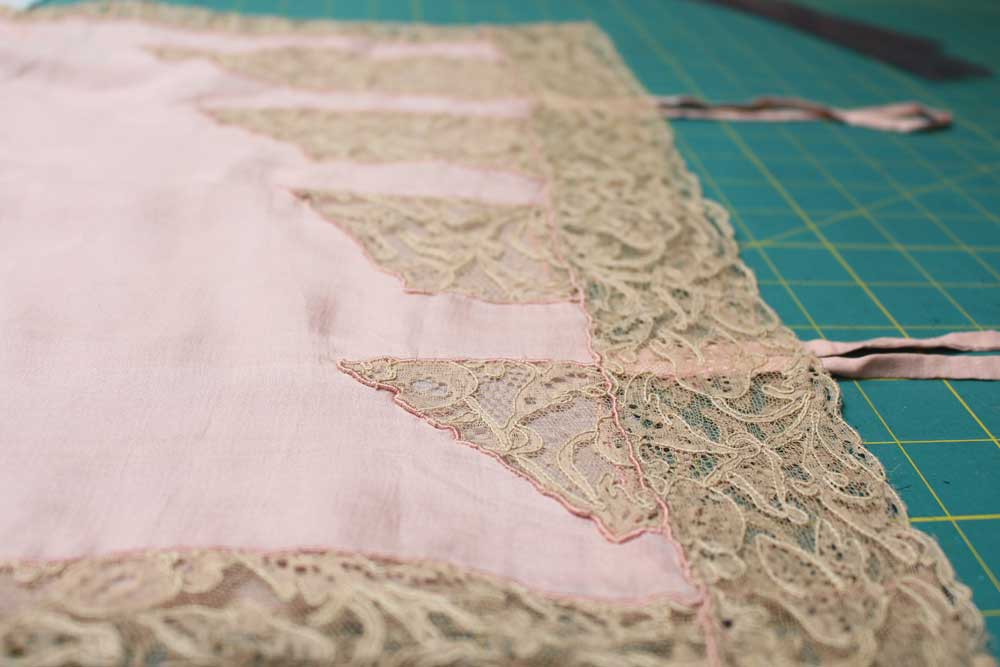
On lend to us by a local vintage collector were 6 fully hand sewn garments to showcase along side our own hand made pieces. These garments were from a variety of time periods, ranging from the late 1890's to the early 1950's. What a treat! The pictures above show a dress from the 1920's. The garment was constructed from a combination of lace and silk fabrics. The dress had a secret design on the inside to allow the wearer to dance without worrying about their hem flipping up. How thoughtful.
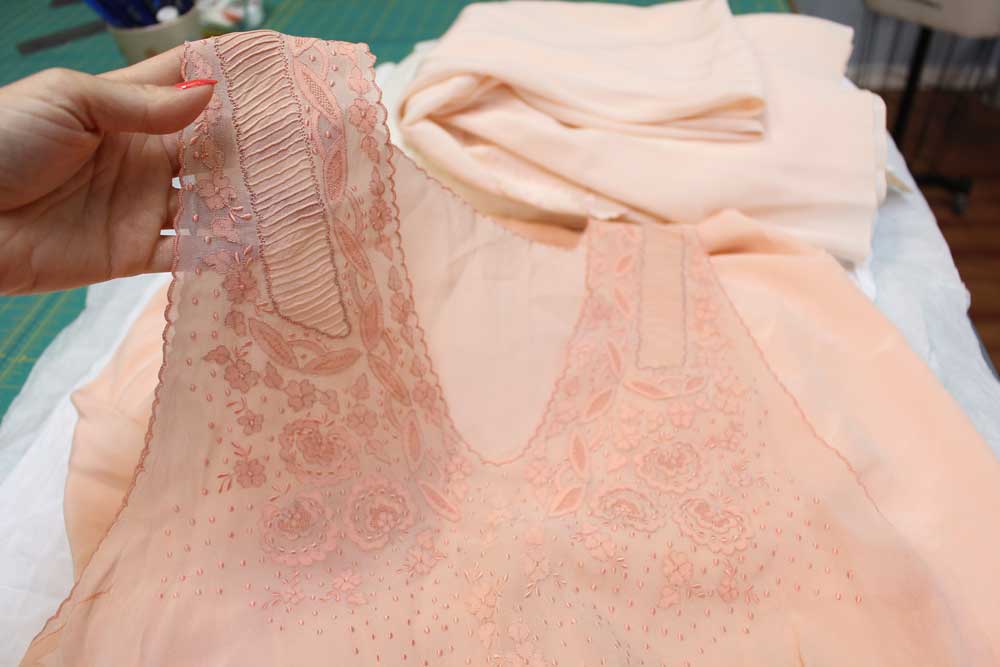
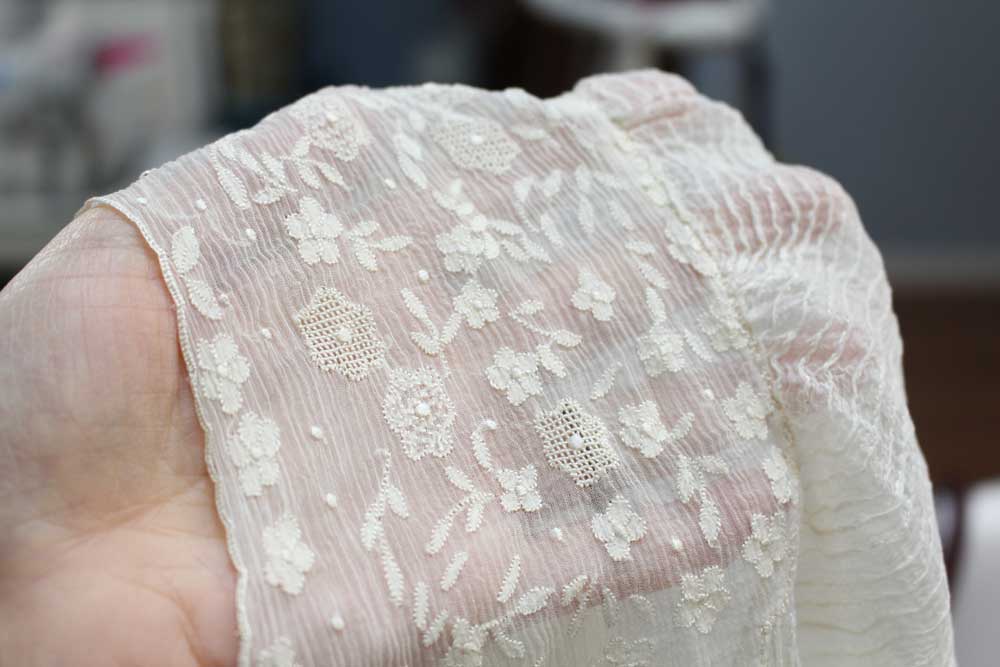
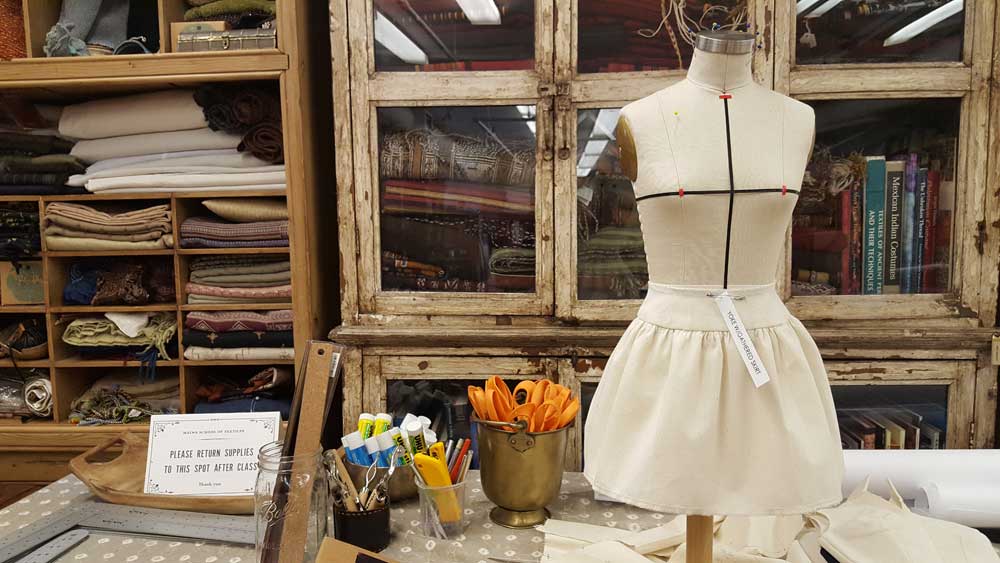
Extremely fine embroidery work along the necklines and shoulders of these two dresses from Italy. By the way, these are actually lingerie. If you want to see more shots of these beauties be sure to follow us on Instagram. Pattern Drafting: Create your own Blocks (5 Days)In 5 days, students learned how to take full body measurements, pattern draft bodice, skirt and sleeve blocks, sew a toile, have a fitting and then adjust their patterns where needed.  As some of my students say, "this [workshop] is not for the faint hearted". It is fairly intense but you walk away with blocks that fit you, along with a better understanding of your body. 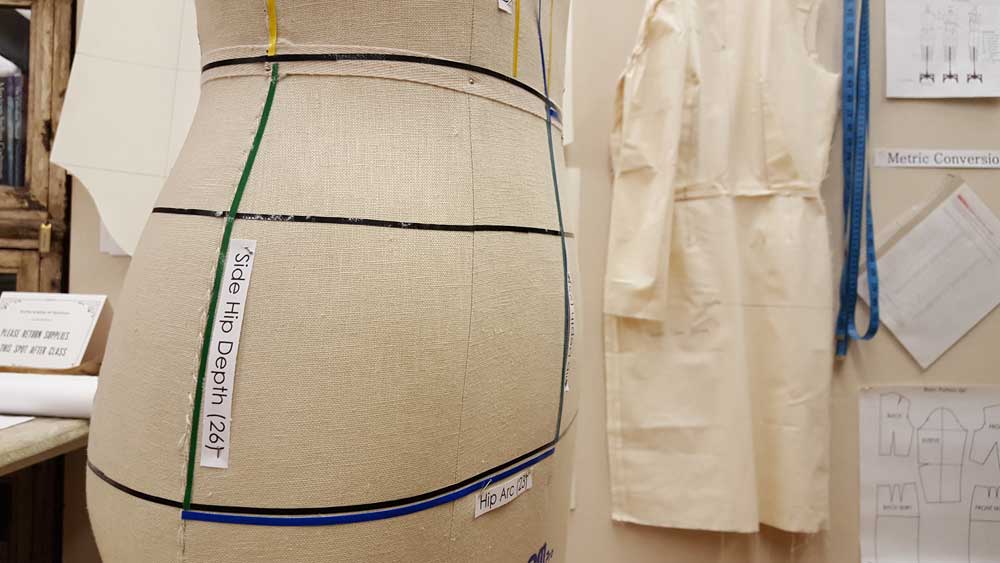 Pattern Drafting: Working from the Block (5 Days)After creating their own pattern blocks, students learned how to manipulate them to carry out their design vision. 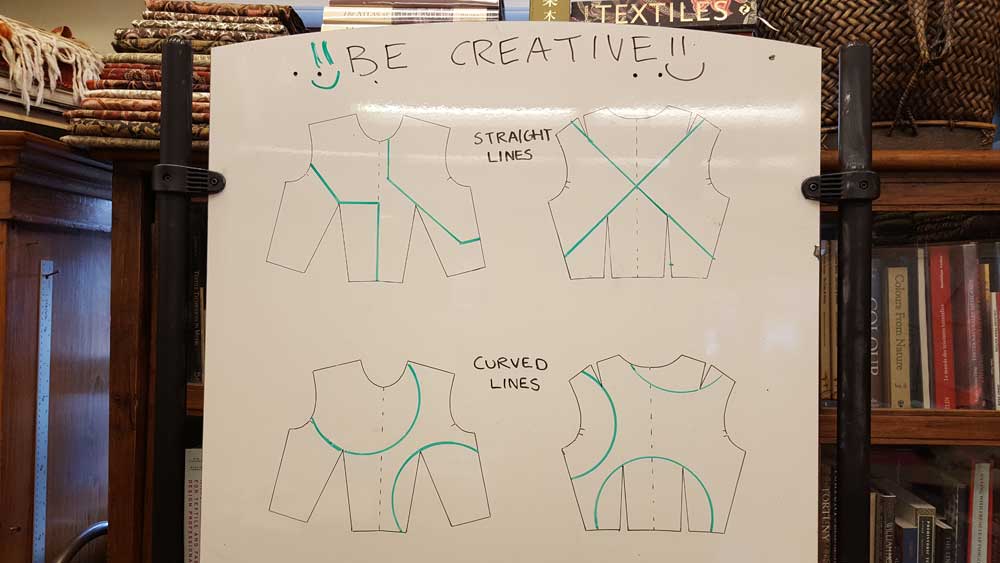 Once the students understood how to manipulate darts, they got to be creative with their seams. Pictured above is what the students picked for me to demonstrate.
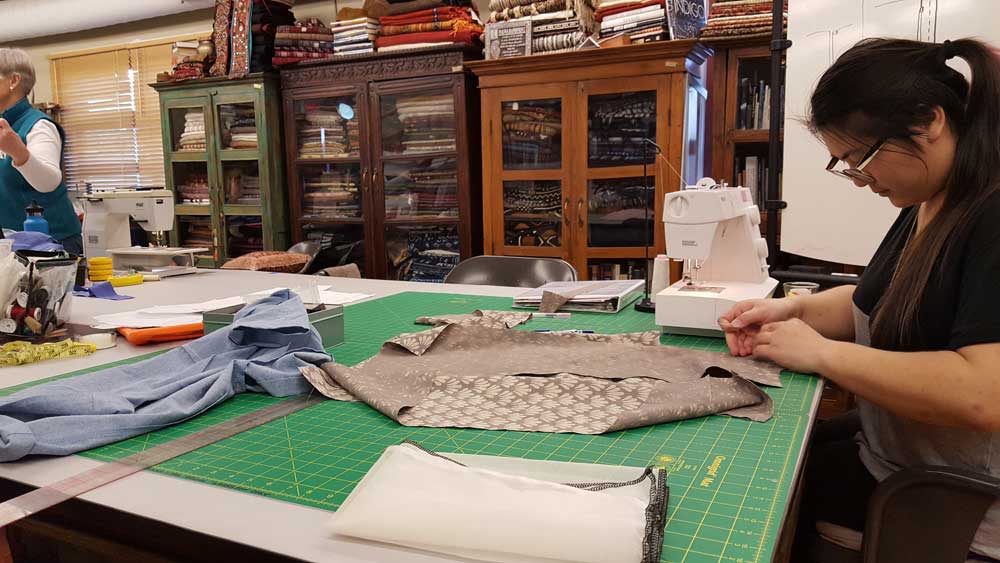
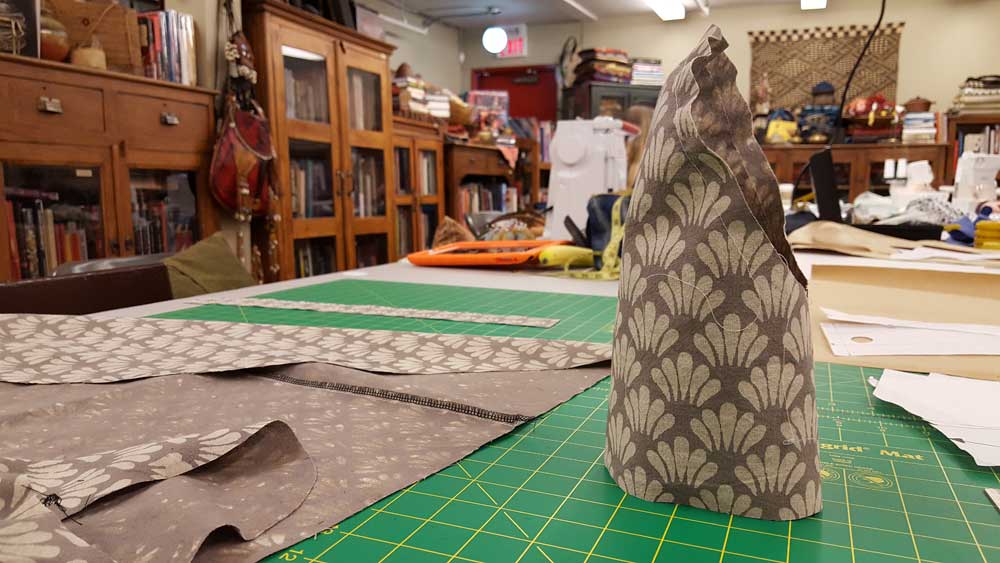
Reverse Pattern Drafting (2 and 4 Day Offerings)In this workshop, students work in reverse learning how to create paper patterns from a loved article of clothing. The extraction methods allow students to understand shape, balance and industry standard made patterns.  Shown above is our demonstration board and the garment that was reverse pattern drafted. On the board you'll see extraction draping techniques in progress and finalized pattern pieces ready to be cut in the fabric of our choice. Stay tuned to our social media to see our version made with white linen and a hand-woven grey ikat lining. 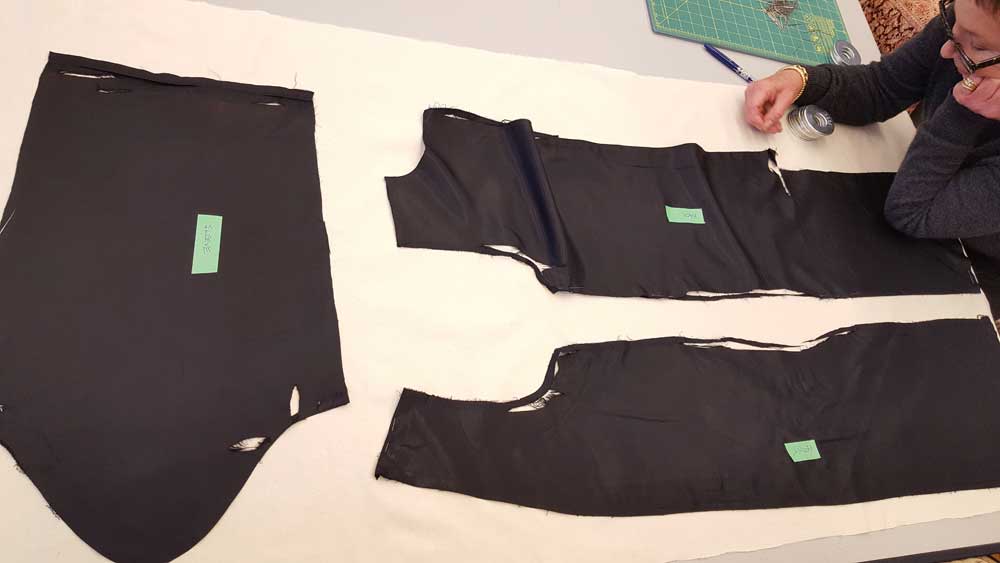 A student in the process of extracting and analyzing the lining of a well loved jacket. 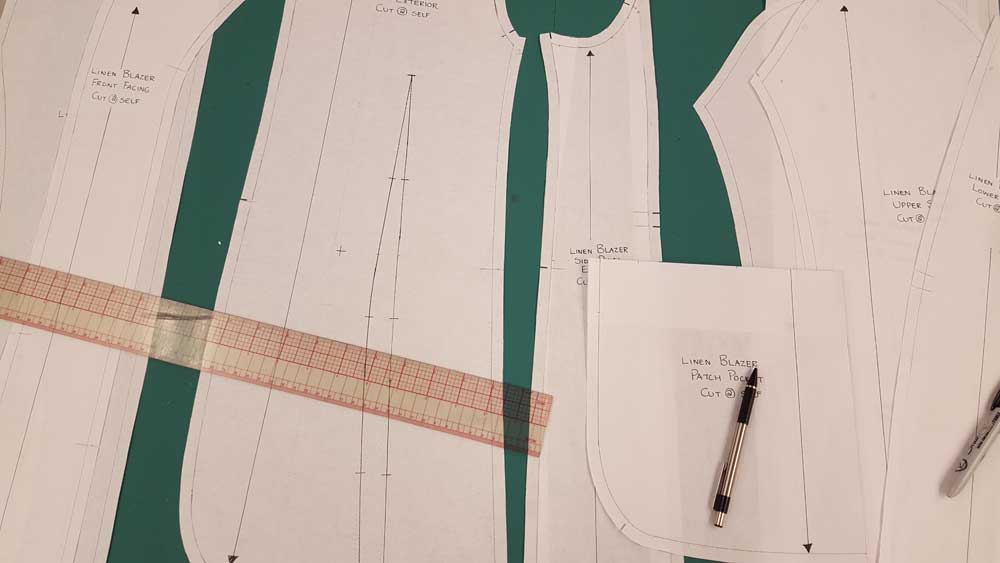 Over the course of the workshop, students learned how to label, add seam allowance, add grain-lines, trueing and notching. Pictured above are the final stages of reverse drafting a fully-lined blazer that served as the demo garment for the workshop. This took place on the last day of the workshop. 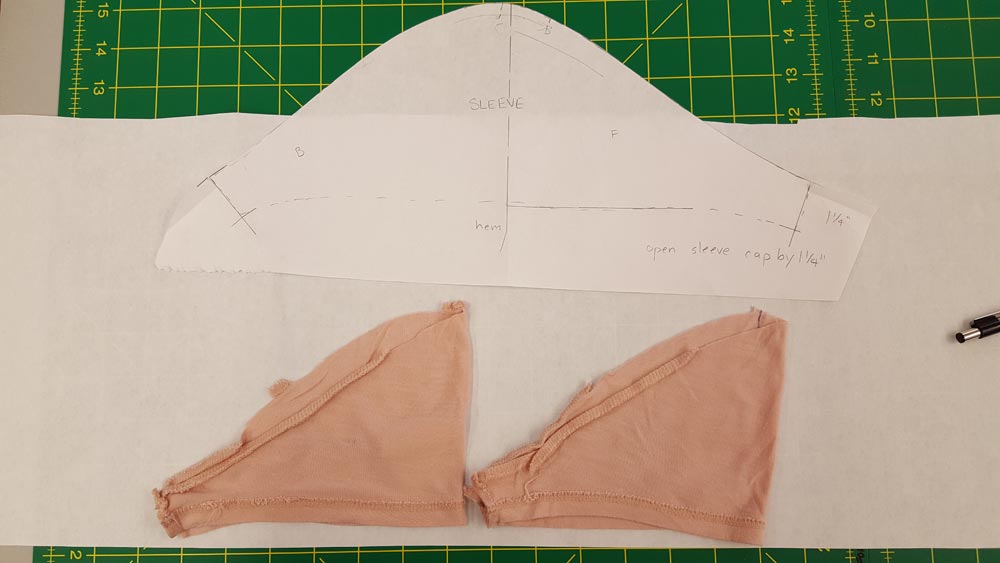 Had to share this with all of you. Look really close! After taking apart a basic knit top by a popular clothing brand, we found they installed two left sleeves! Appalled, but not really surprised. Fast fashion is literally made so fast they didn't even notice this mistake. Garment Construction (4 Days)Aimed at textile artists and designers, students learned how to construct a skirt and a top. 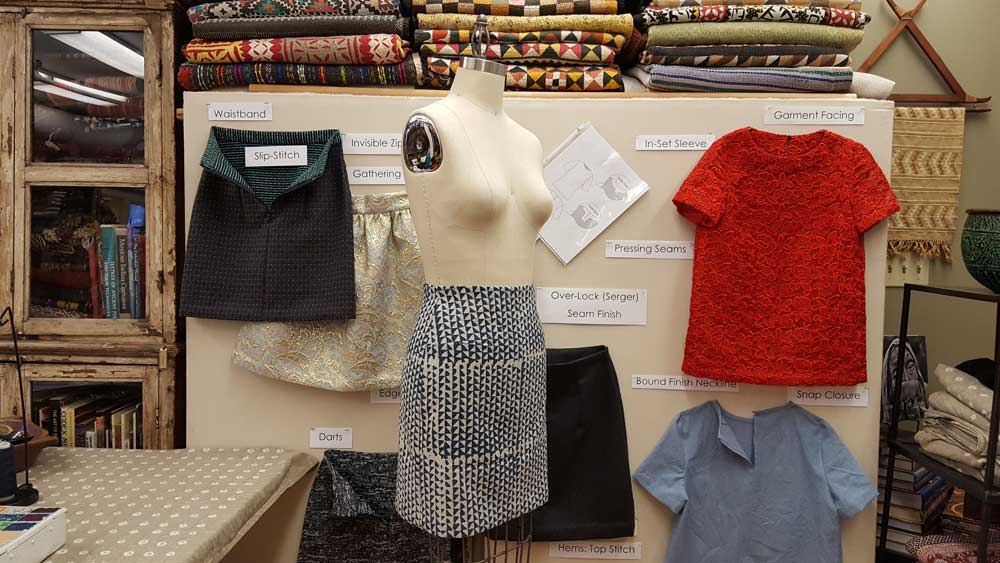 Our demonstration board displaying the variety of garment construction design elements the students would learn.
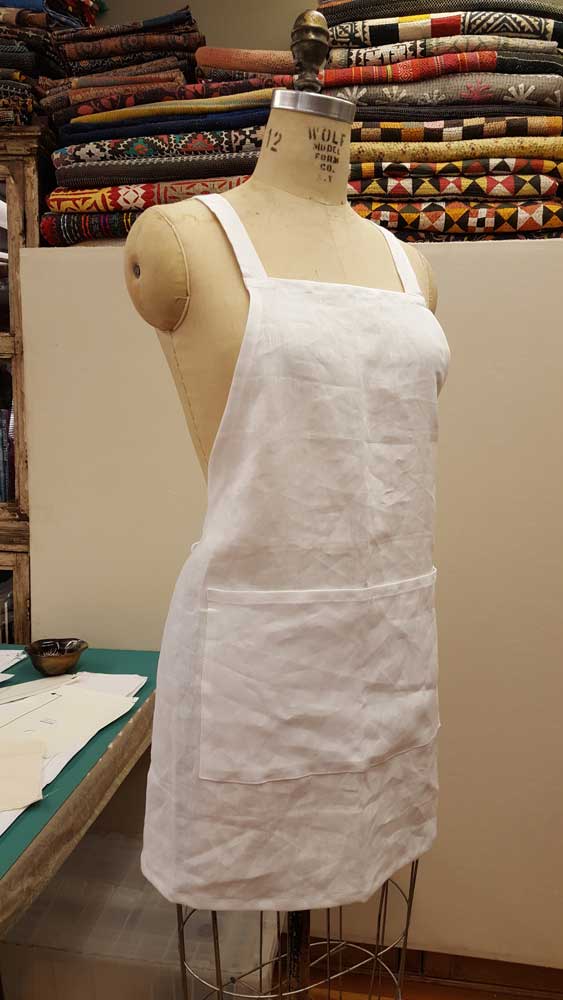
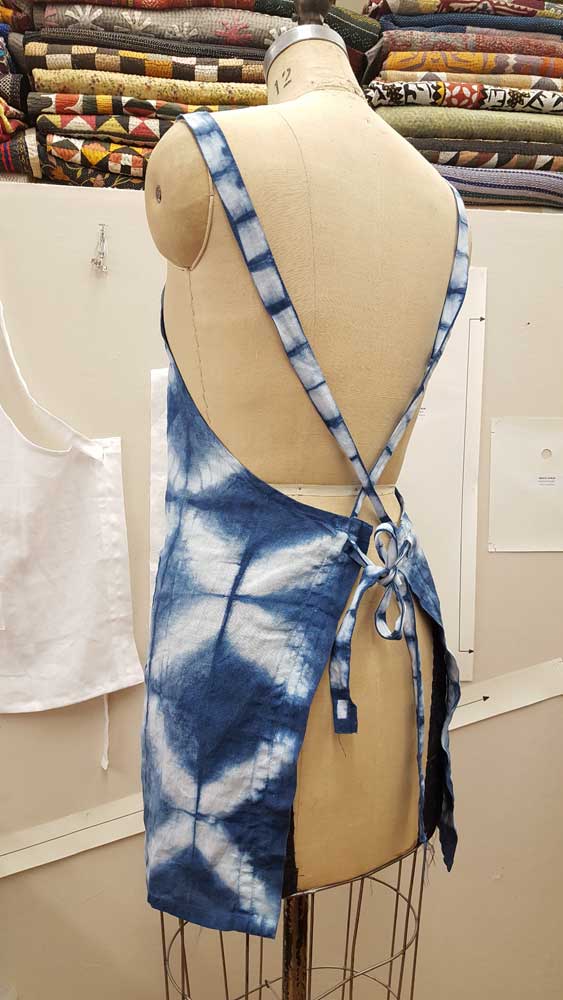
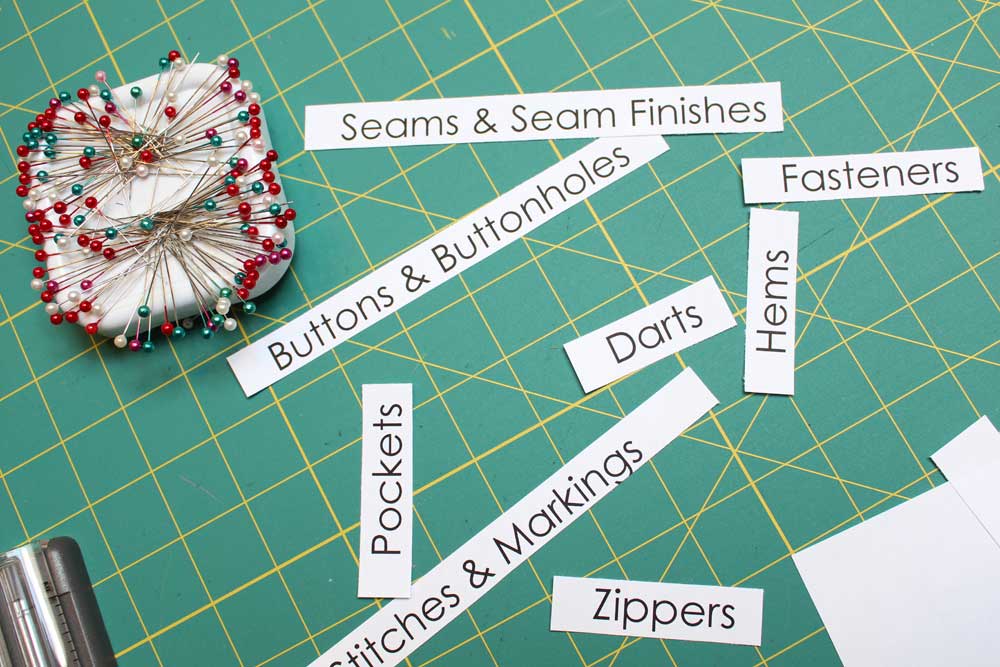 If you have ever been in our studio or in one of our workshops, I like being organized. Here are some labels of essential sewing techniques covered in this workshop. My least favourite topic is buttons and button holes! Indigo Apron (2 Days)Taught in conjunction with Sophena Kwon, students constructed and dyed their own linen aprons.
On day one, I guided the students through cutting and stitching the intricate apron. On day two, students were guided by Sophena through shibori and shape resist indigo dyeing.
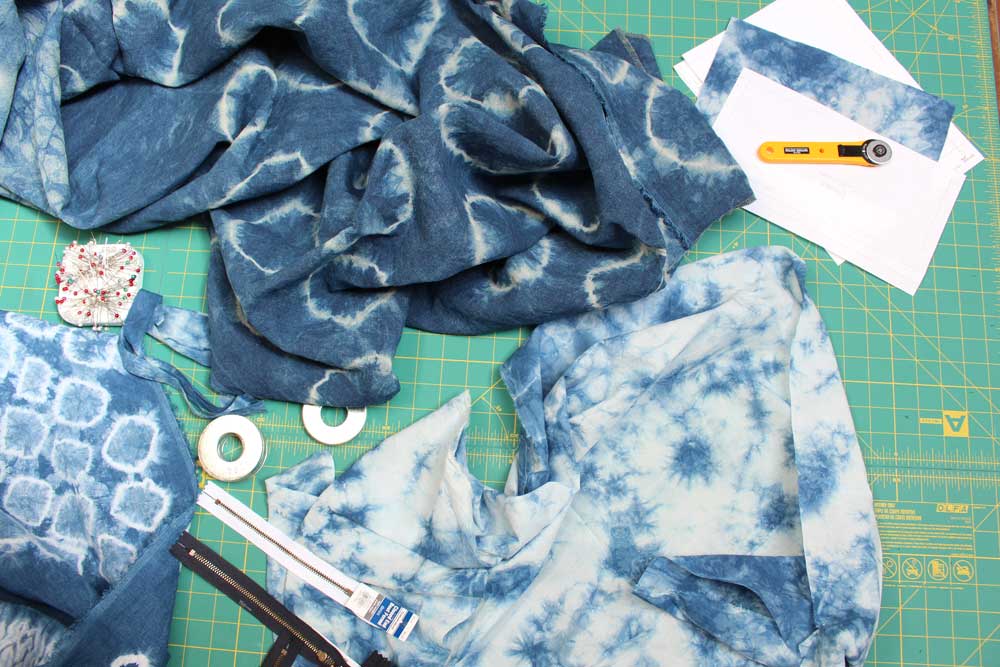
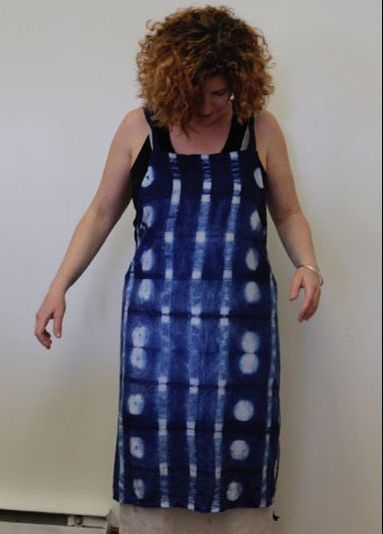 A student admiring her hard work at the end of the workshop. Dyeing to Sew Nights (4 evenings)This workshop was similar to the Indigo Apron workshop above. It was co-instructed by Sophena and myself. Instead of sewing the item first, students dyed their fabric first then carefully cut out their fabric to best showcase their indigo prints. 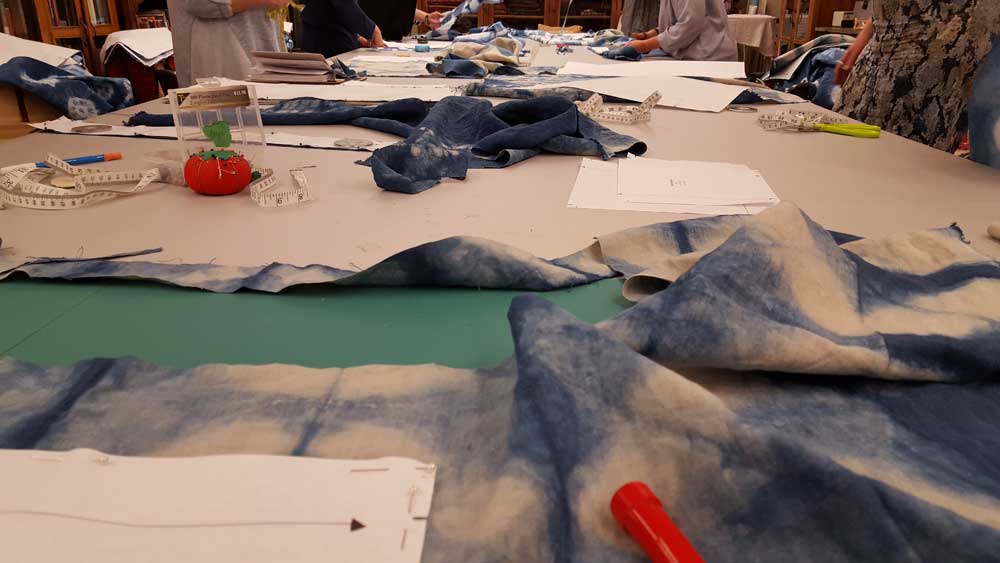
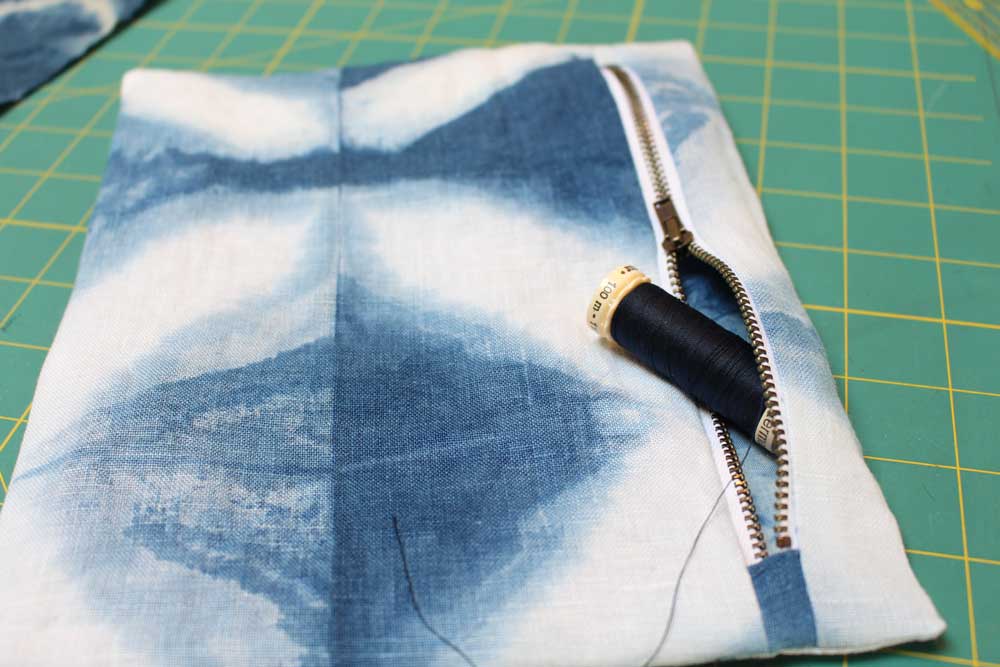
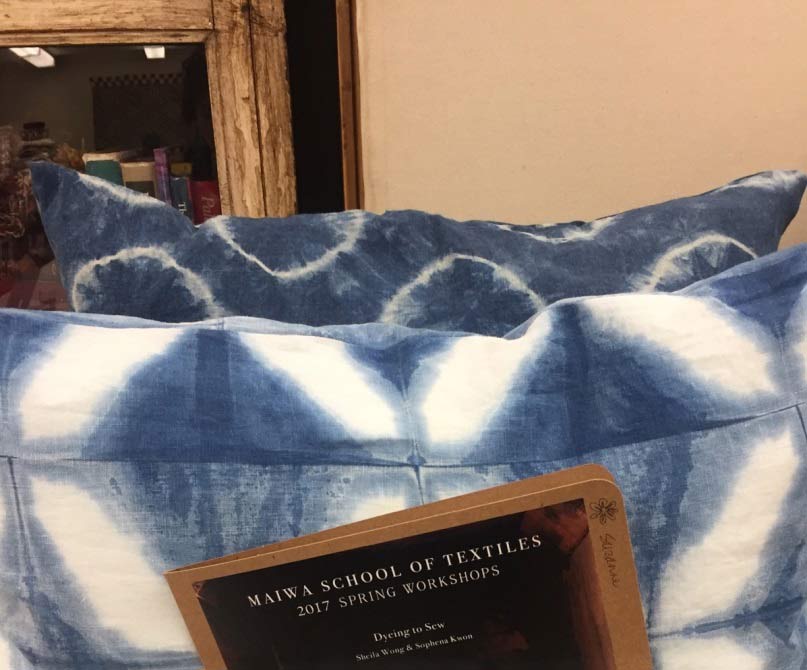 Project 2, set of two over-sized throw pillow covered with in-seam button closures. 2017 was a blast at Maiwa School of Textiles. Looking back, bonds were formed, stunning designs came to life and I grew stronger as an instructor. For 2018, we already have six exciting workshops lined up. Interested in signing up for a workshop? Follow us on Instagram to find out when to sign up.
See ya next year! Sheila Wong Sewing Team Written and photographed by Sheila Wong Edited by Samantha Quon |
Archives
November 2022
|


 RSS Feed
|
|
Copyright © 2024 Sheila Wong Fashion Design Studio Ltd. All rights reserved.