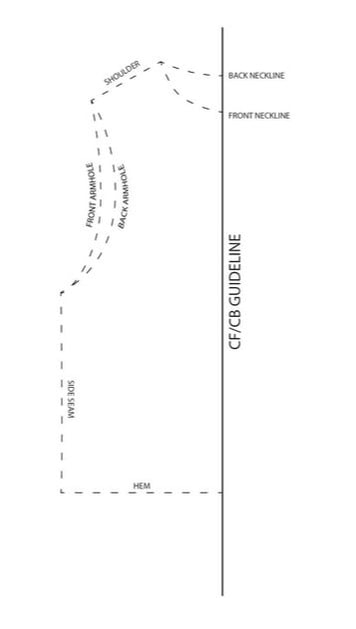
|
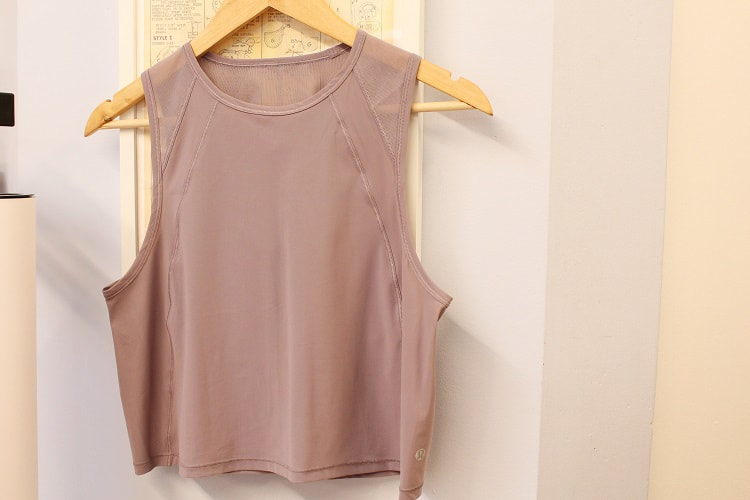
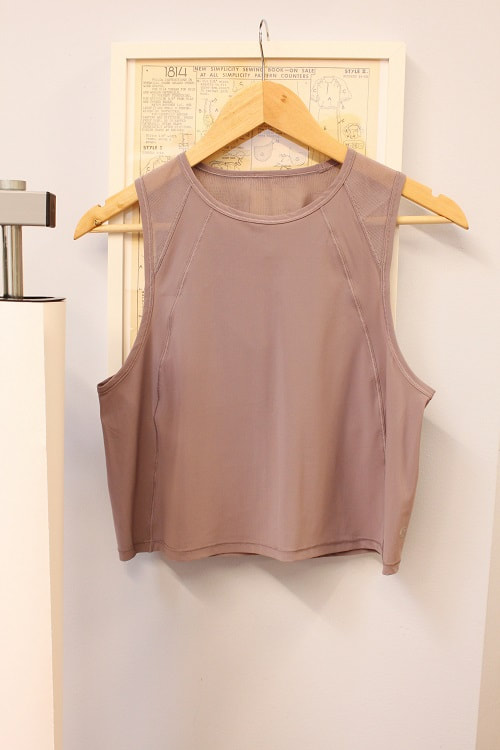
This draft-a-long has been a long time coming. March 2020 to be exact. Due to Covid, my Reverse Pattern Drafting workshop at Maiwa School of Textiles got cancelled. Many students reached out wishing to still learn digitally. Some signed up as clients to learn one on one with our studio, while others waited for this draft-a-long. Thank you so much for your patience. Reverse Pattern Drafting (what we call it in our studio), is the process of extracting out a 2D pattern from an already sewn 3D garment. This is a great way to learn basic guidelines in garment drafting, and you get exposed to what pattern shapes look like. When I was younger, this was the way I learned how complex patterns like sleeves, plackets and collars looked like. In this draft-a-long, we are going to keep things simple with a sleeveless knit top from Lululemon. You can use a knit or a woven. This draft-a-long is just for the main front and back sections of the top. Hem finishing's will be addressed in another detailed draft-a-long. Here are a few important things to keep in mind before starting.
Drafting SuppliesOnce you have a sleeveless top picked out, get your drafting station prepared. 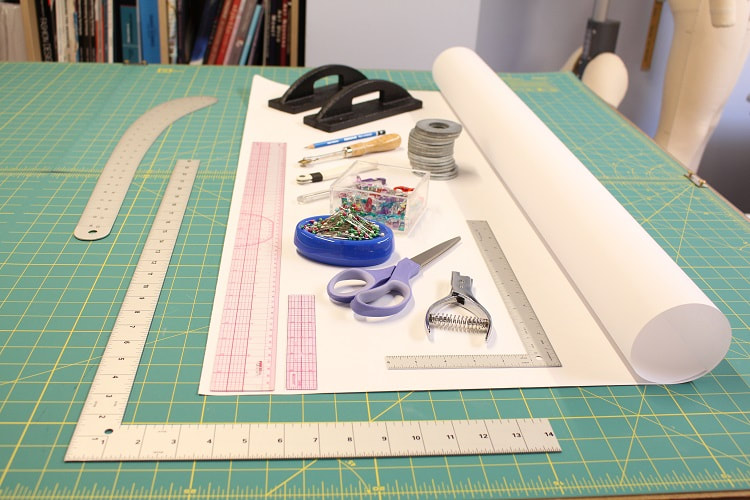
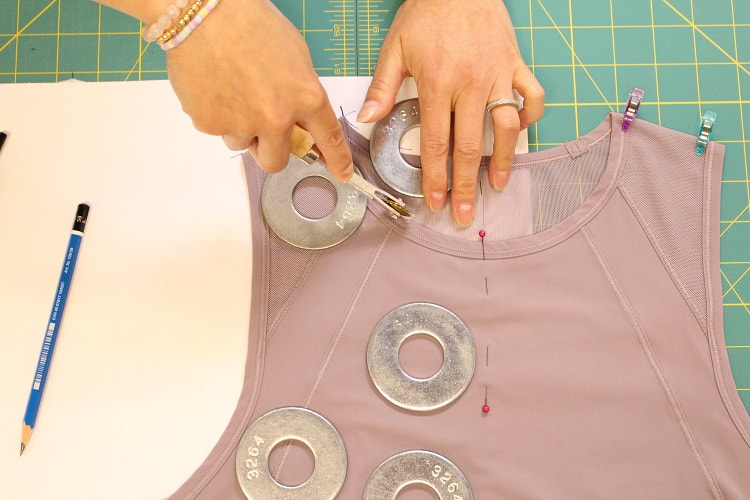
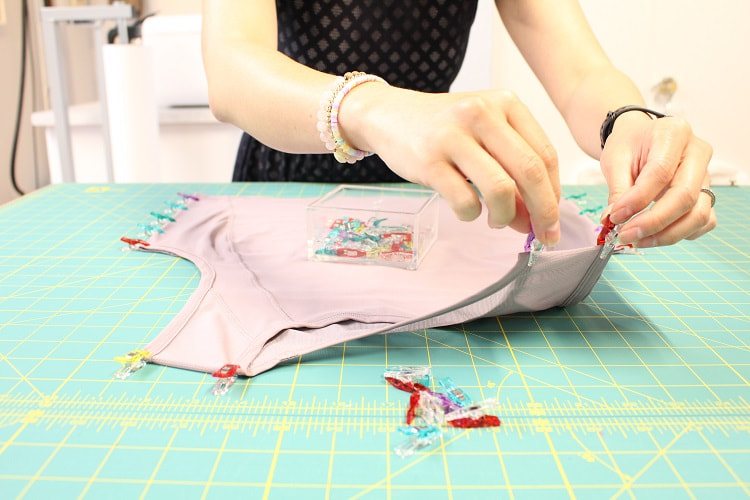
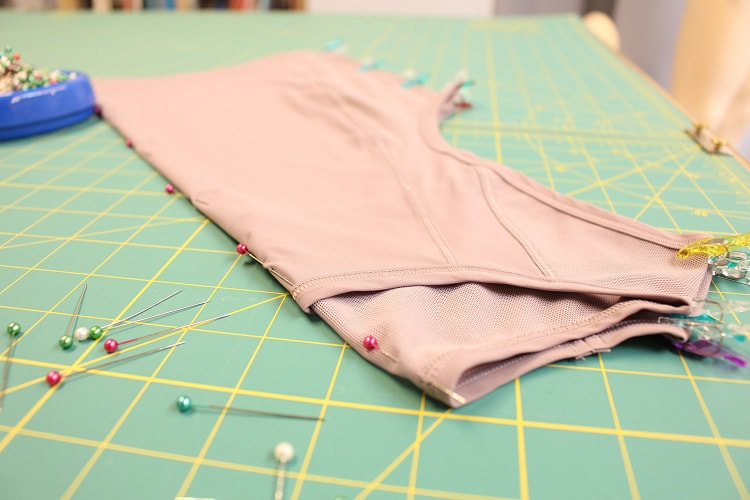
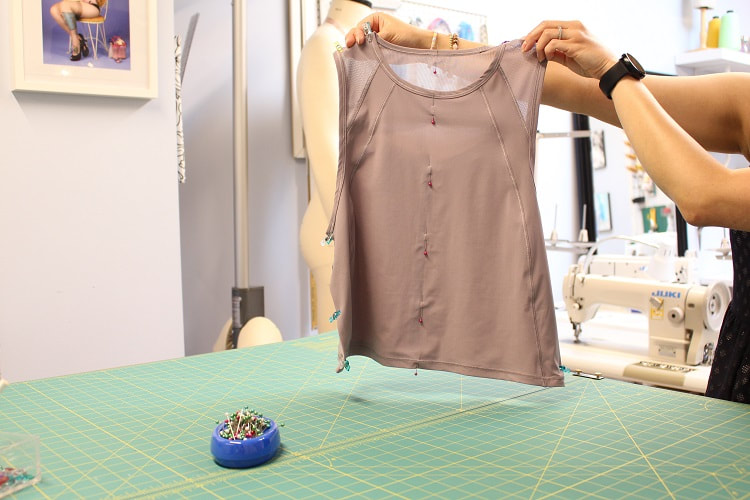
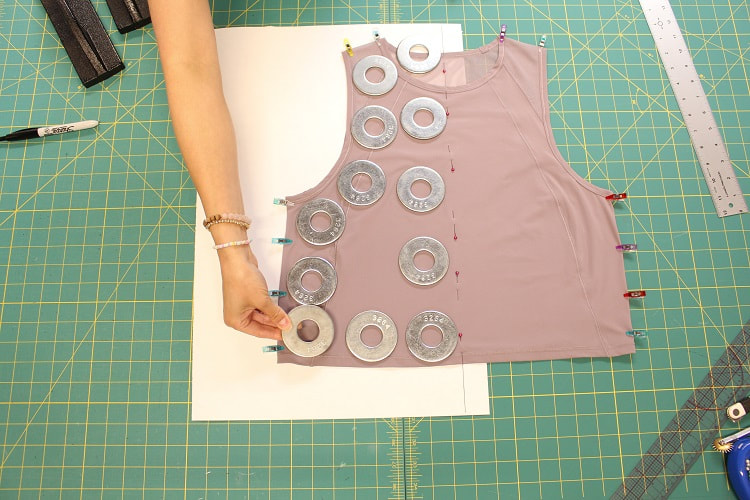
Step 1Establish side seams and shoulder seams by laying garment flat and pinning seams balancing the front and back of the garment. This will stabilize the garment during the next few steps. A great alternative to pins are mini wonder clips. I can be seen using them below.
Step 2Fold the garment in half along the center front (CF)/center back (CB) line with the front side of the garment facing out. Mark the fold line with either chalk, pins or thread basting. Establishing CF and CB lines are one of the starting points in pattern drafting. In this example we will pin the center line.
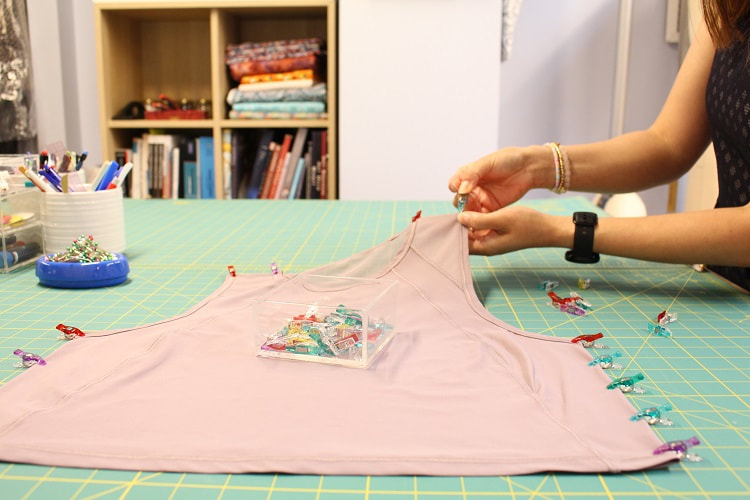
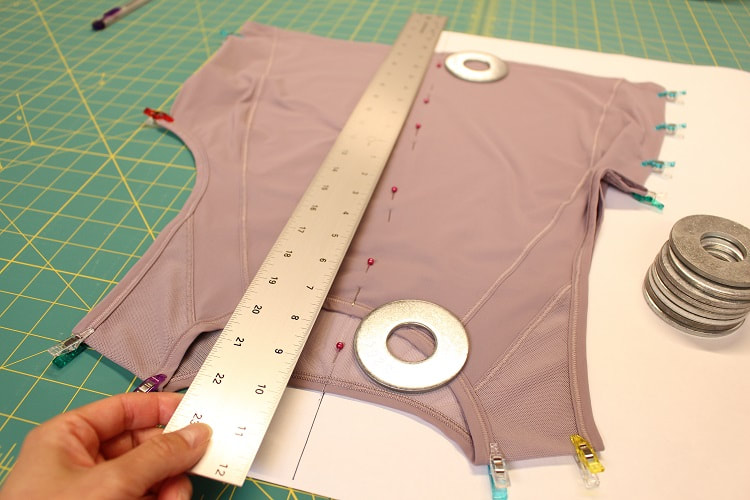
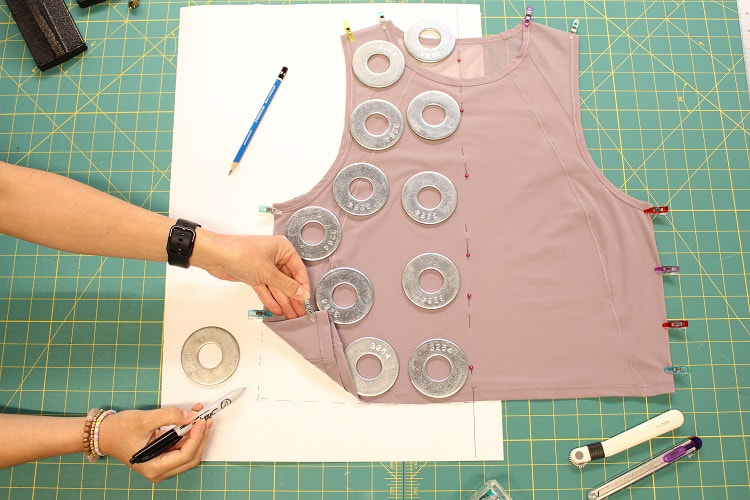
Step 3On drafting paper, draw in a line a few inches longer than the center back length of the garment. Label this line CF/CB GUIDELINE. This guideline can be drawn close to the edge of the paper. 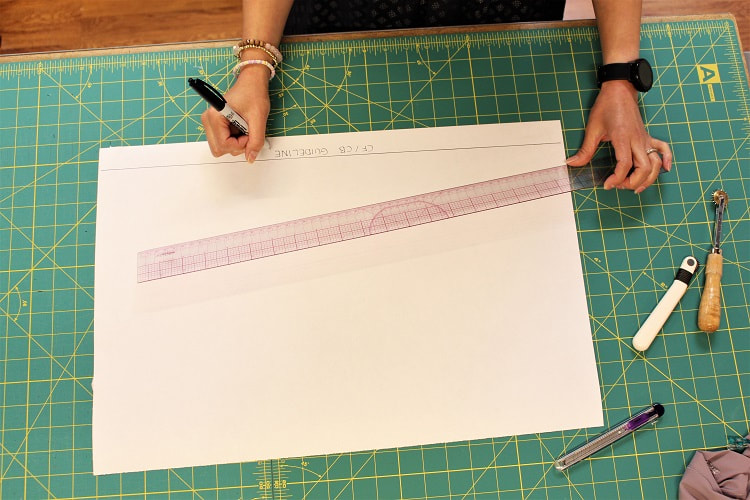 Step 4With the garment unfolded and the front side facing up, lay the garment on top of the drafting paper, lining up the pinned CF/CB GUIDELINE on top of the line marked on the paper. Start by lining up the back neckline and the hem. Hold in place with weights. Use a ruler to help ensure the remainder of the center line is straight. Once straight, weigh the remainder of the center line down to secure garment from moving off its center.
Step 5Weigh down the remainder of the garment. Smooth out any wrinkles in the garment, but avoid stretching. Be sure to check on the center line as it needs to remain stable or subsequent angles will be distorted.
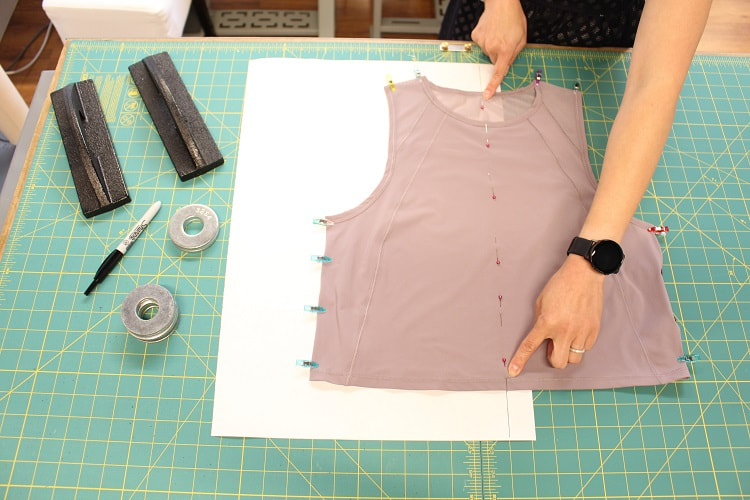
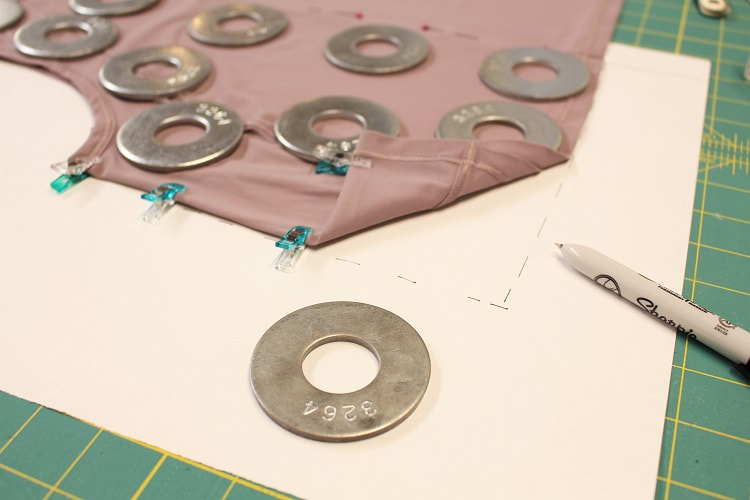
Step 6We will be creating a working pattern with the front and back shirt nesting on top of each other. Using either a sharp tracing wheel or a pencil, extract out the necklines, shoulder seam, armholes, side seam and hem. A pencil can be used for the edges that are exposed to the paper. For areas like the front neckline that have fabric right under the edge, a tracing wheel will need to be used to allow you to transfer shape onto paper.
If the openings (armhole and neckline) have bound seam finishes or just a turned in seam allowance, extract outer most edge. If the openings have a ribbing finish, extract along the seam where the main garment and the ribbing are attached. Drafting for binding and ribbing will be drafted separately and based on true front and back main body pattern pieces at a later step.
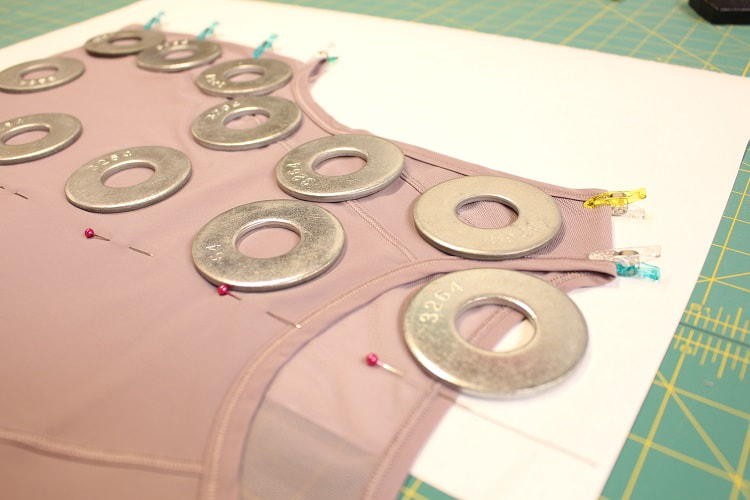
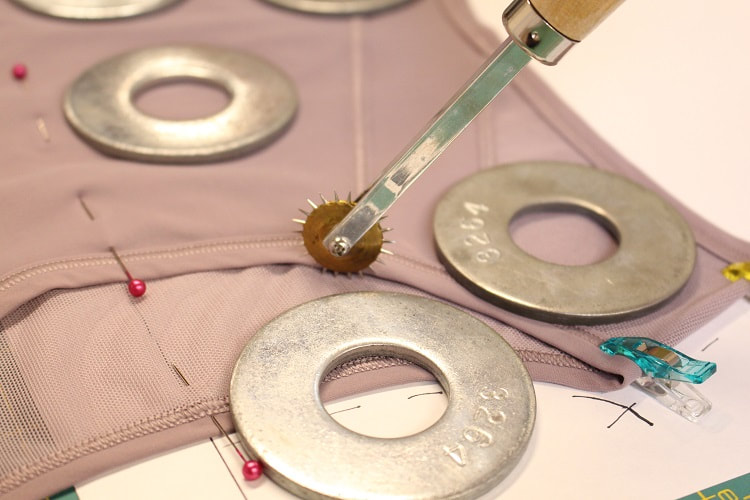
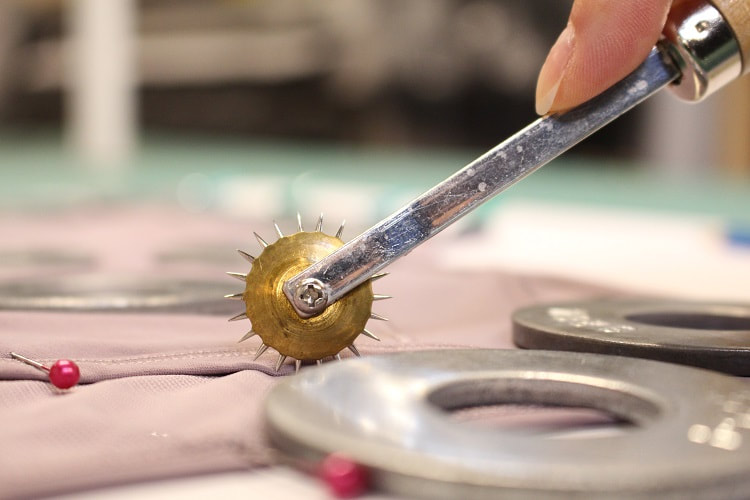
When using the tracing wheel, avoid pulling the fabric. Use opposite hand to help hold flat the garment. We really like using a super sharp tracing wheel while reverse pattern drafting. If you do not have one, simply use a large hand sewing needle to create the necessary markings.
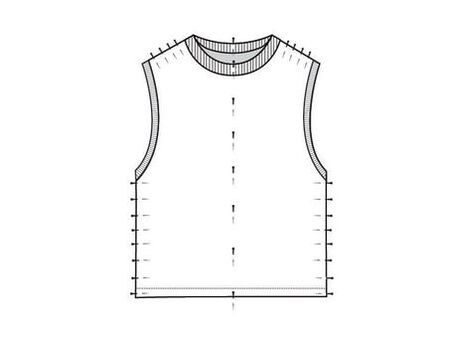
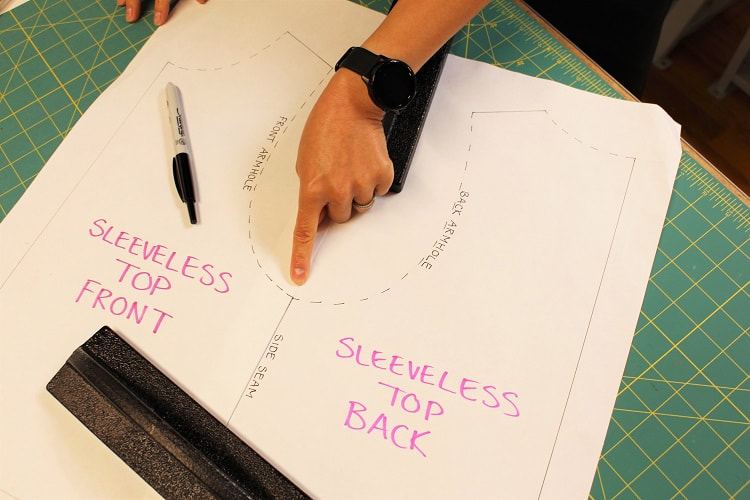
Step 7Remove garment from tracing area, but keep it close by for reference. Using a pencil roughly mark in traced edges in using a dashed line. It will be easier to see for future steps. For demonstration purposes we are using a sharpie. Please use a pencil. 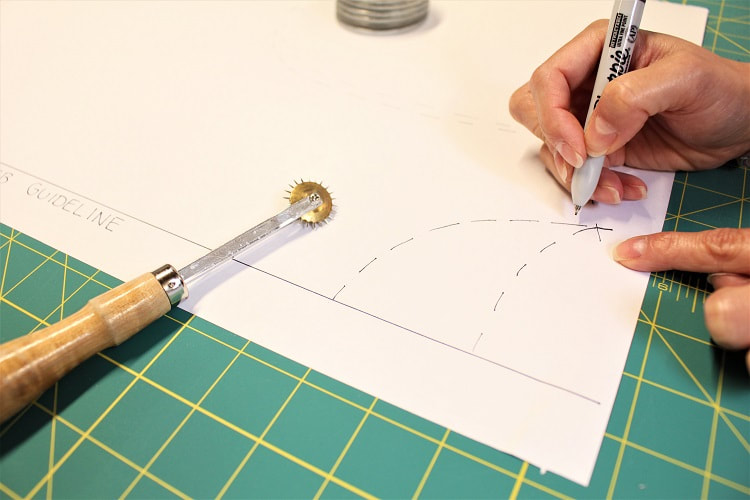 Step 8Label all edges. This is especially important for necklines, armholes or asymmetrical hems.
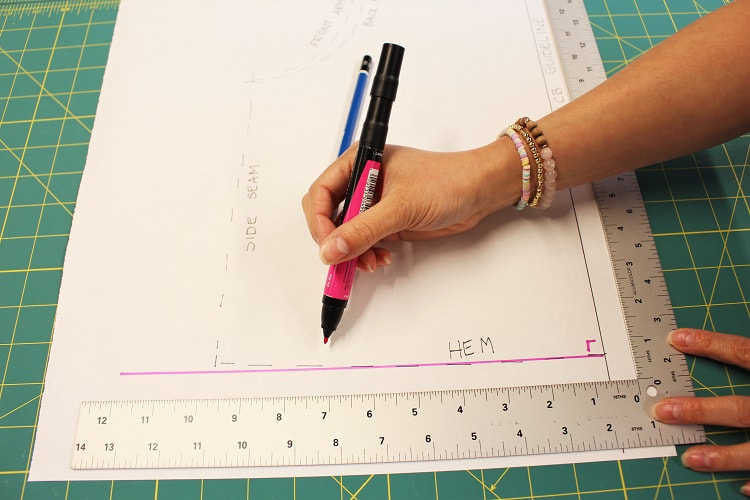
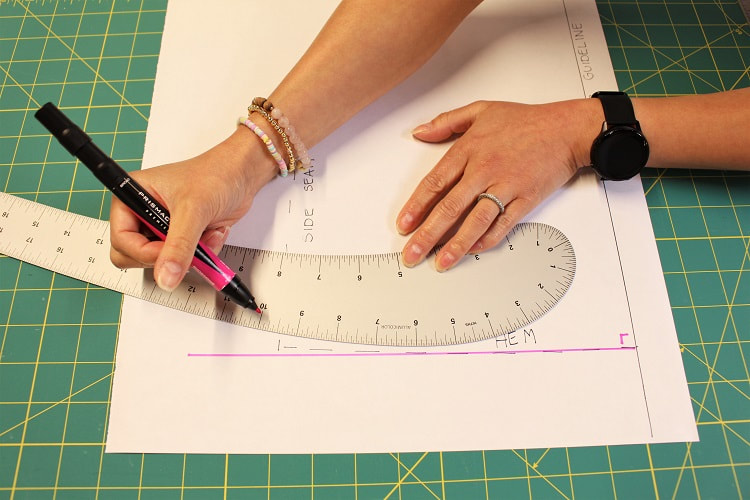
Step 9After initial extraction of edges from the garment, it is time to clean up all the edges using our drafting rulers. The initial extraction is roughly drawn/traced and should not be used as the final edges of the pattern pieces. The CF/CB GUIDELINE is already established. All edges that intersect with the CF/CB guideline should be cleaned up first. Using the L ruler to square out a guideline along the hem, front neckline and back neck. This will help ensure that as those edges pass through the center of the body, they are sitting perpendicular and balanced. The only time that it is not necessary to square out a guideline, is if you have a V neckline.
Hem: If you know the hem is straight, just make sure the hem is 90 degree to the CF/CB GUIDELINE. You may notice the side seam pulls up slightly. Do not work this into your pattern. This occurs during the sewing and laundering process and is natural in the end product. If you know the hem is slightly curved as a design feature, just ensure the hem runs along the squared out guideline for a few inches as it directs towards the CF/CB GUIDELINE. Using a French curve, slide ruler in to fit as best into the extracted curved section of the hem. Your goal is to have the curved and straight section of the hem look like one gentle line.
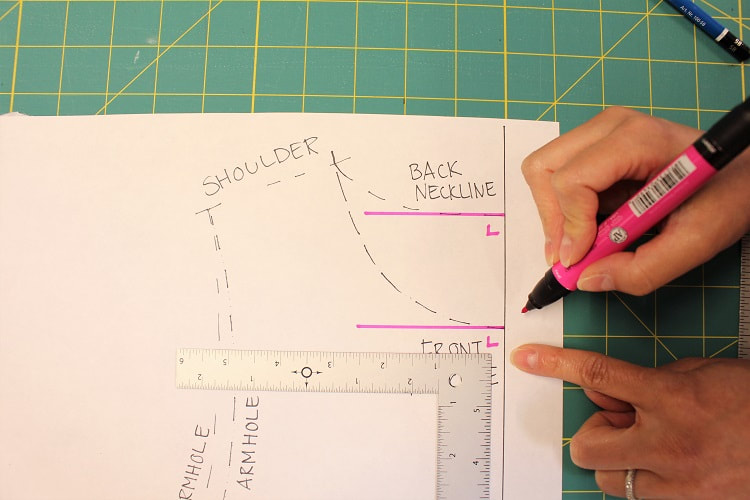
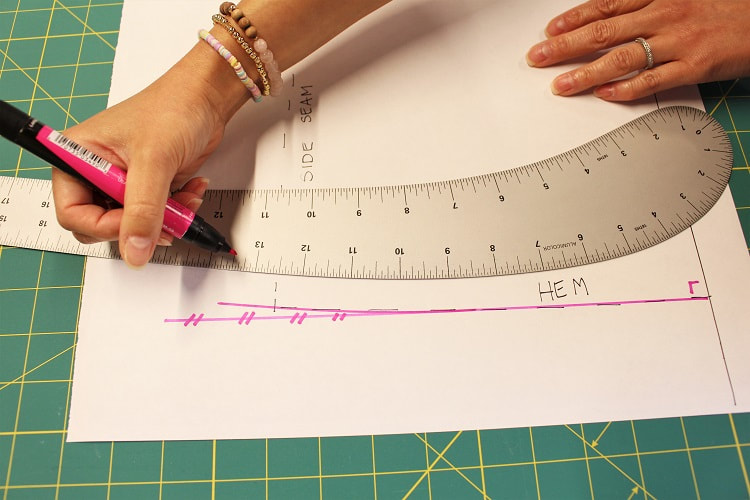
Front Neckline: Using a French curve, slide ruler in to fit as best into extracted neckline. Stop when bottom of curve hits the squared out guideline. The curve should blend into the guideline to remain perpendicular for approximately ¾” to ¼” prior to CF/CB GUIDELINE. Unless you have a V neckline. Line up ruler to hit the shoulder neck point.
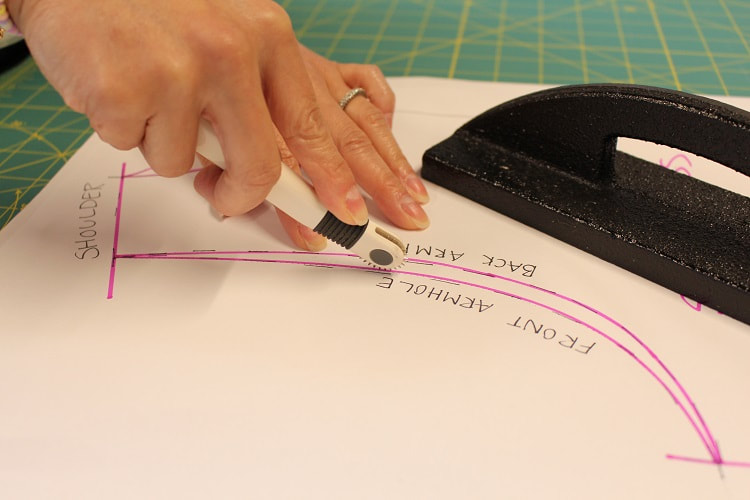
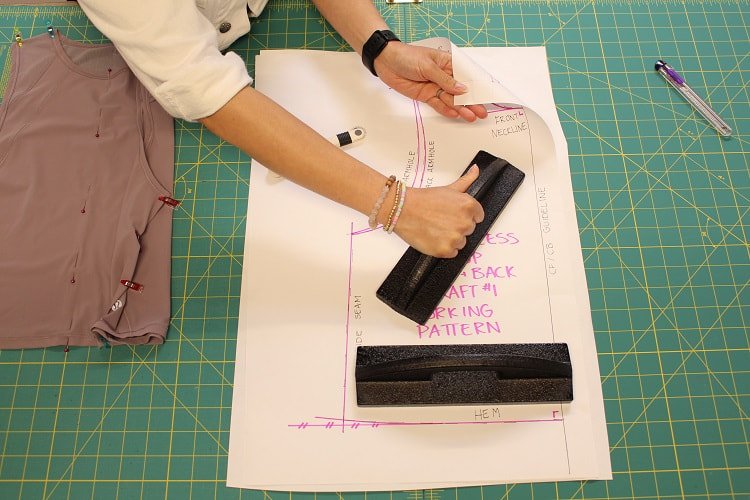
Back Neckline: Use the same concept as the front neckline except a traditional back neckline will not be as deep and will run along squared out guideline for approximately 1 to 2”. Line up ruler to hit the same shoulder neck point the front neckline hit. Step 10Using a straight ruler draw in shoulder seam starting at the shoulder neckline point. Extend line slightly out to allow for any adjustments that may need to be made to shoulder length. Feel free to measure shoulder seam on garment and reflect this exact measurement on the pattern, or just use the shoulder tip point as the end of the shoulder edge. 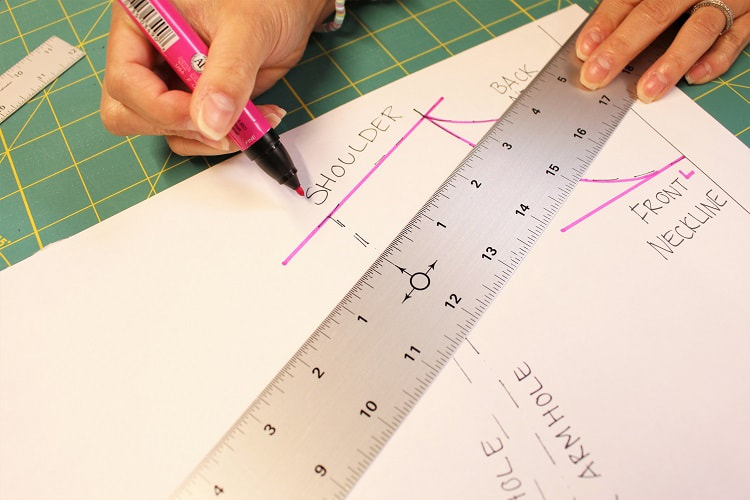 Step 11A side seam is typically straight or has a gentle curve coming in towards the body around the waist. Draw in accordingly with a straight ruler or French curve. Be sure to hit your marks at the hem and the underarm points. 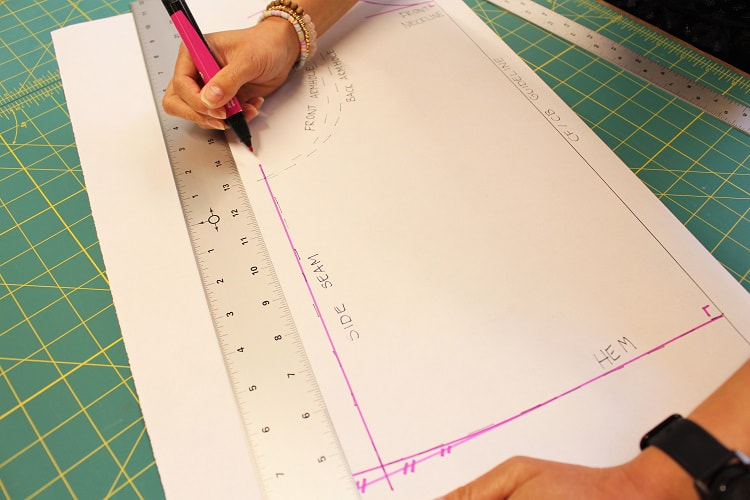 Step 12Using a French curve, clean up the armhole(s). Be sure to hit your shoulder tip and top of side seam points. 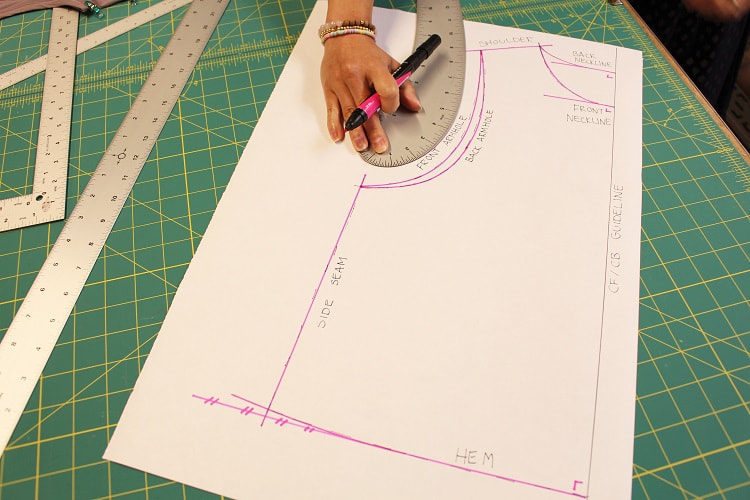 Step 13Label this pattern with the following items. The more you pattern draft, the more you will be thankful for organized and labelled patterns. SLEEVELESS TOP WORKING PATTERN DRAFT #1 FRONT AND BACK TODAYS DATE Step 14Place additional drafting paper below working pattern and trace out front and back of shirt separating the two. Using pattern weights and a tracing wheel to transfer shapes to below paper.
Step 15Remove working pattern from tracing area, but keep it close by for reference. Using a pencil, draw in all edges using rulers. It is very important to flip one pattern piece prior to drawing in, to ensure we can true pattern pieces in the next step. If you flip, you will be truing pattern pieces on the same side of the body. Your pattern pieces should look something like below. 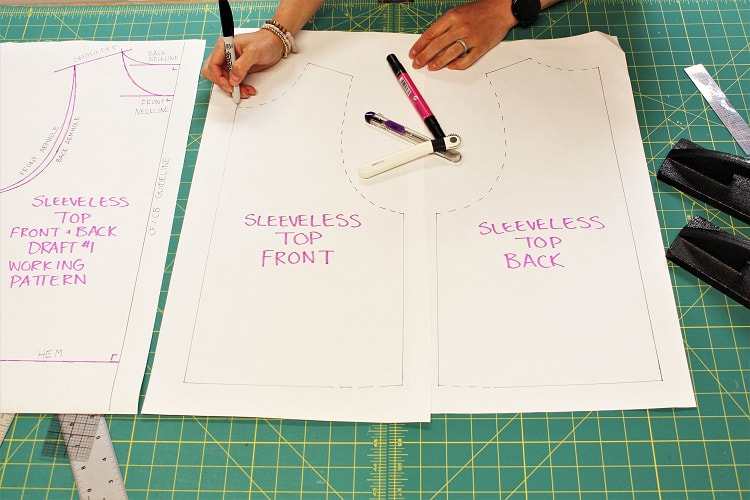 Step 16Now it is time to 'true' the pattern pieces. This is the concept of ensuring the pattern pieces can be sewn together, and any curves or lines intersecting or running from one pattern piece to the next, will look good together. I like to think of this as— ensuring my puzzle pieces will fit. With this sleeveless top, there are only two major seams that will get sewn together between the front and back pieces. Side seams and shoulder seams. Side Seam: Fold under the excess paper along one of the side seams. Place the side seam edges of the front and back, on top of each other. Pretend they have been sewn together. First, check that they match in length. Adjust if required. Next, check that the armhole front to back looks smooth. I always imagine a wine glass shape. A reminder that some armholes can look more red wine, white wine or even a champagne flute. With extremely dropped armholes, the front and back armholes may come to a point or create a V at the base of the armhole. Next, check that the front and back hem run smoothly into each other. If the side seam has a gentle curve, just fold under the excess paper for a few inches below the armhole to allow you to true the armhole. Unfold, then just fold the last few inches above the hem to allow you to true the hemline.
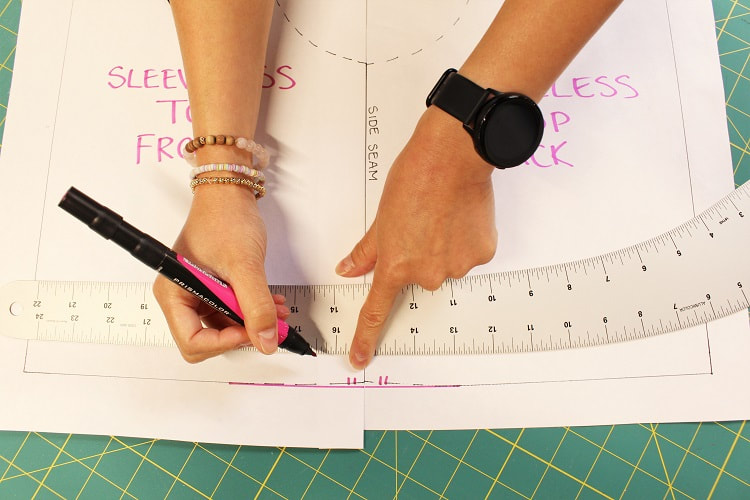
Shoulder Seams: Fold under the excess paper along one of the shoulder seams. Place the shoulder seam of the front and back on top of each other. First, check that they match in length. Next, true the neckline and armhole. As these curves pass over the shoulder seam they should blend into each other smoothly. Adjust if required. It is common for there to be a little bit of blending to correct the run of the curves, front to back. 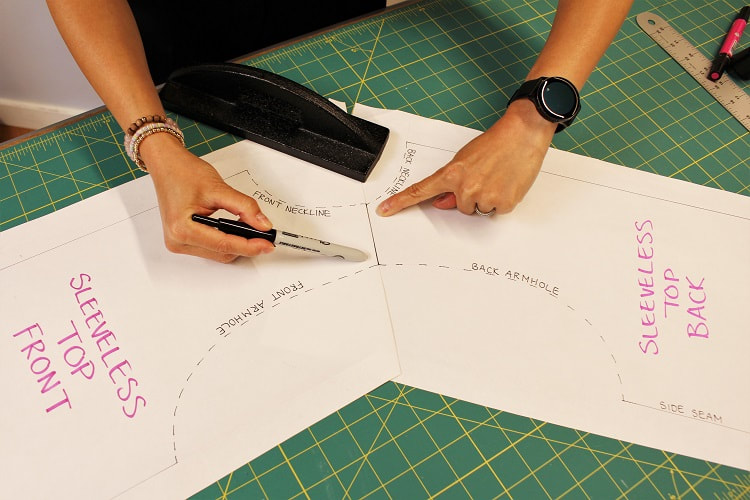 Once the front and back pattern pieces are true, you can decide how to finish off the openings of the shirt. Openings include the neckline and armholes. You can draft a ribbed, bound, turned in, facing, or even fully lined finish. Stay tuned for another draft-a-long in the works, going over these hem finishes. Step 17Lastly, please add seam allowance, notches, grainlines and labels. In our example, we have added 1/4" seam allowance along the shoulder seams and side seams. 1/4" is a normal knit seam allowance width. When a serger machine is set up for two needles, the stitch width is 1/4", perfect! 1/2" seam allowance is used along the neckline and armholes, as we intend on drafting a ribbing hem finish to these areas. 1/2" will allow for the raw edges of the ribbing to be basted together with an overlock stitch first. Then, when stitching the ribbing onto the garment opening, the blade will cut away the basting stitch (1/4") to reduce overall bulk. I always try to avoid to overlock stitches on top of each other. 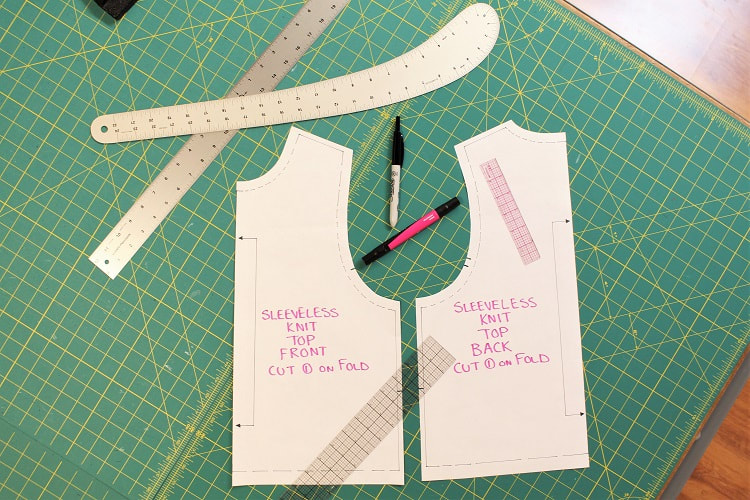 A sleeveless top does not require many notches. One notch matching the front and back side seam mid-way is great for alignment. Even though we do not have sleeves, placing one notch on the lower front armhole and two notches on the lower back armhole provide an immediate visual cue while sewing, especially when the neckline depths are similar. The armhole notches will be important in our next draft-a-long when we cover hem finishes.
If you want to learn more about pattern drafting, contact us for one on one lessons.
Happy Drafting! Designed, photographed and written by Sheila Wong Studios
2 Comments
12/10/2022 08:14:43 pm
Find a remote place, such as a bathroom, and try to loosen the mucus from your throat by coughing or hacking. Make sure not to cough too hard or too much, as it can do some damage. Leave a Reply. |
Archives
November 2022
|


 RSS Feed
|
|
Copyright © 2024 Sheila Wong Fashion Design Studio Ltd. All rights reserved.