 My latest design was pretty time intensive. I gained a lot of new knowledge and had fun making mistakes along the way. In this post I take you through the entire journey from shopping at Fabricana to hammering in the final metal snap. I also provide you with step by steps for fraying fabric and sewing a hidden patch pocket. As usual you get tons of helpful tips for drafting and sewing. We all love videos! We filmed the entire process of creating this frayed denim jacket. Check out our YouTube video for the full Fast Forward Edition.
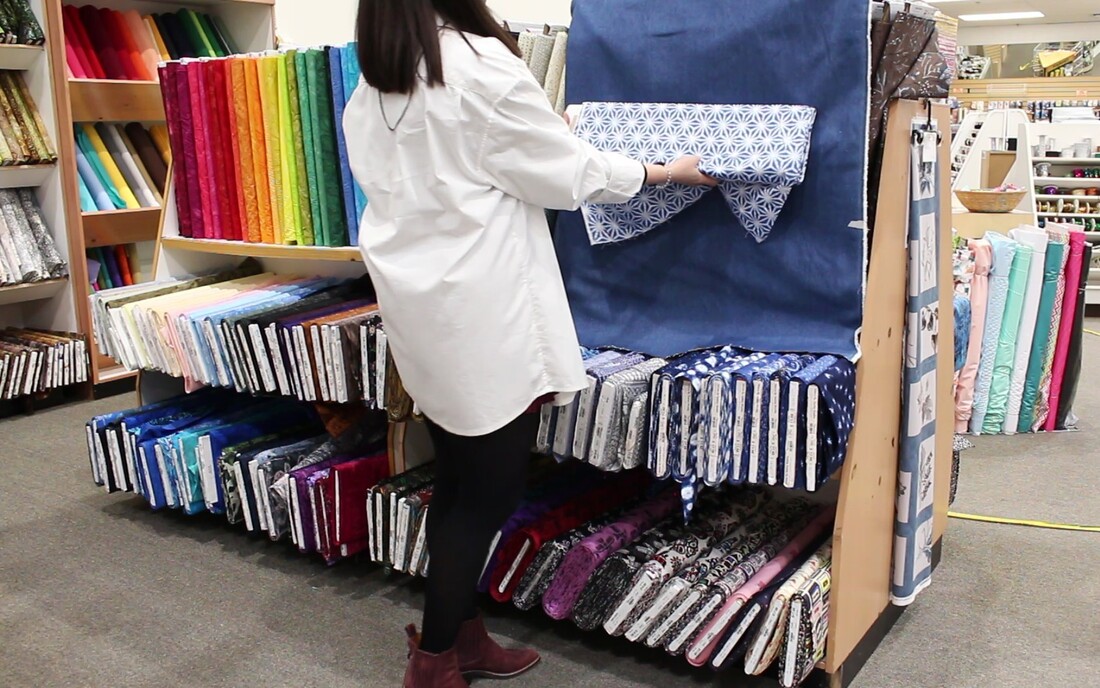
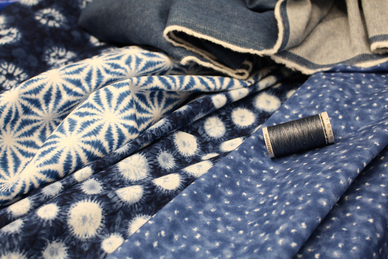
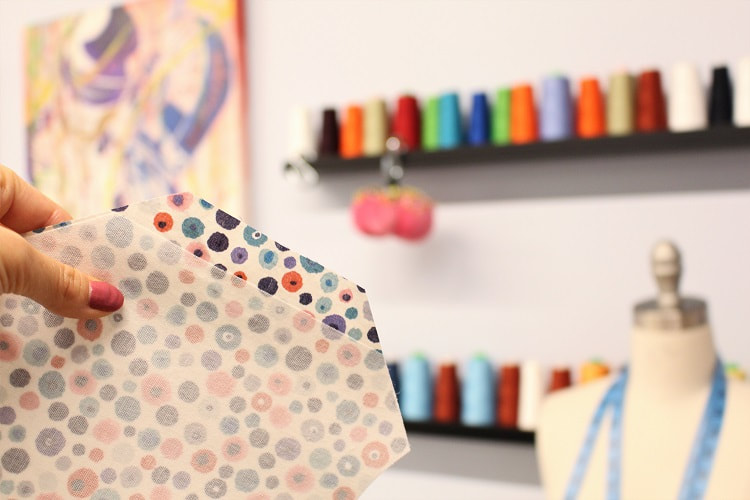
Fabric & InspirationAll fabric, thread and snaps from Fabricana. Click on below fabric links to purchase. Please note the quilting cotton prints may no longer be available. But you could take 3-5 different fabric prints in a similar color palette to create the same vibe of this lining. Fabricana carries some really fun Ruby Star Society prints that would work beautifully! I'm really digging the Stay Gold by Melody Miller series for Ruby Star Society they are selling right now.
Project Stats
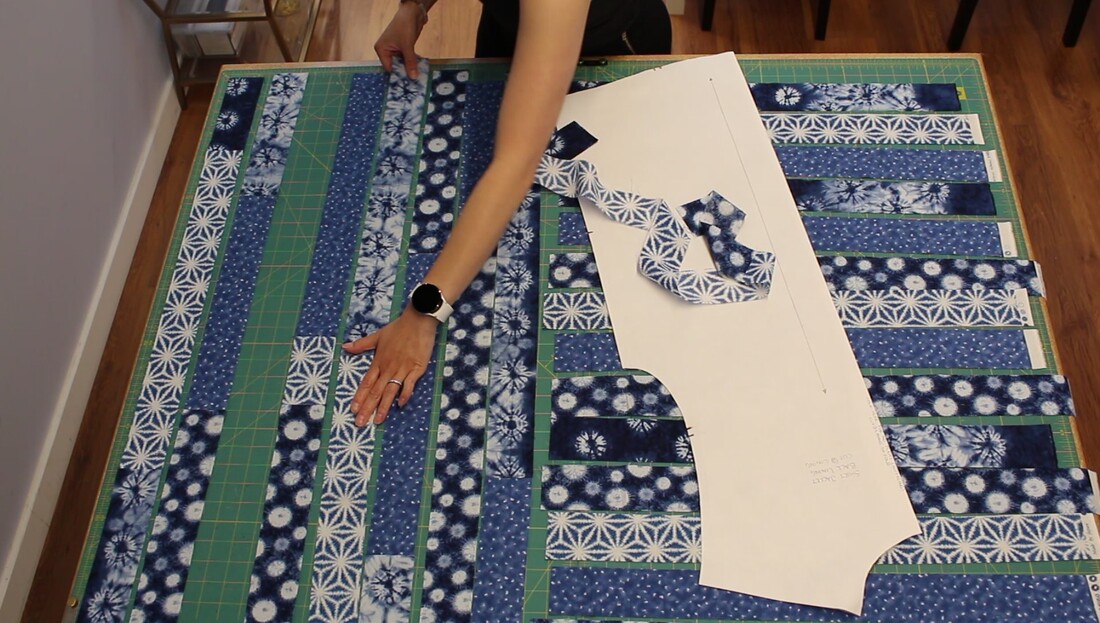
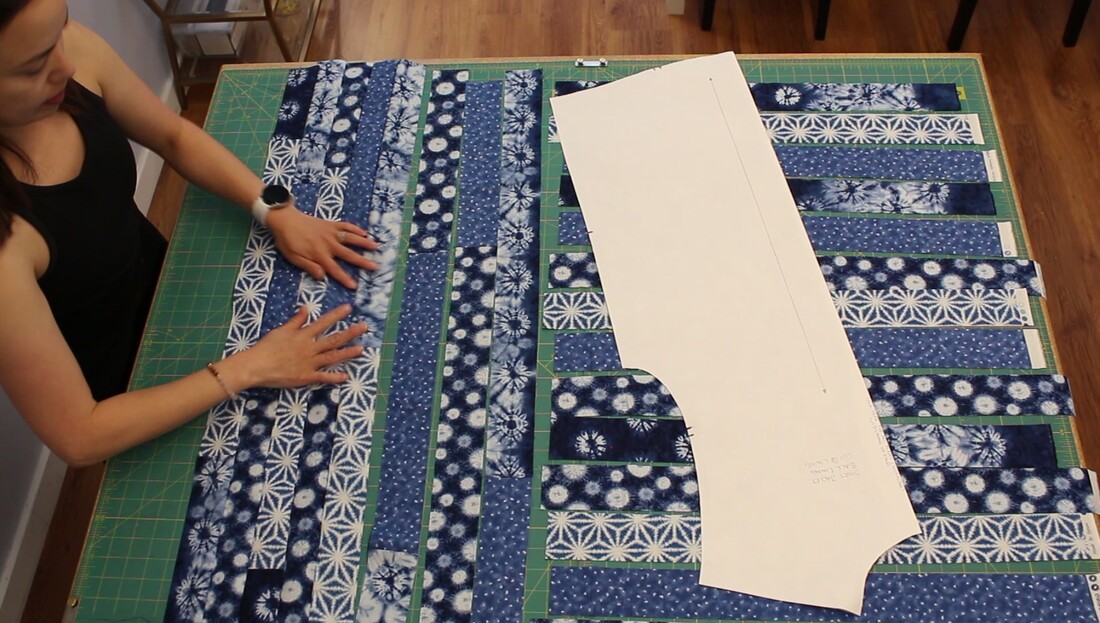
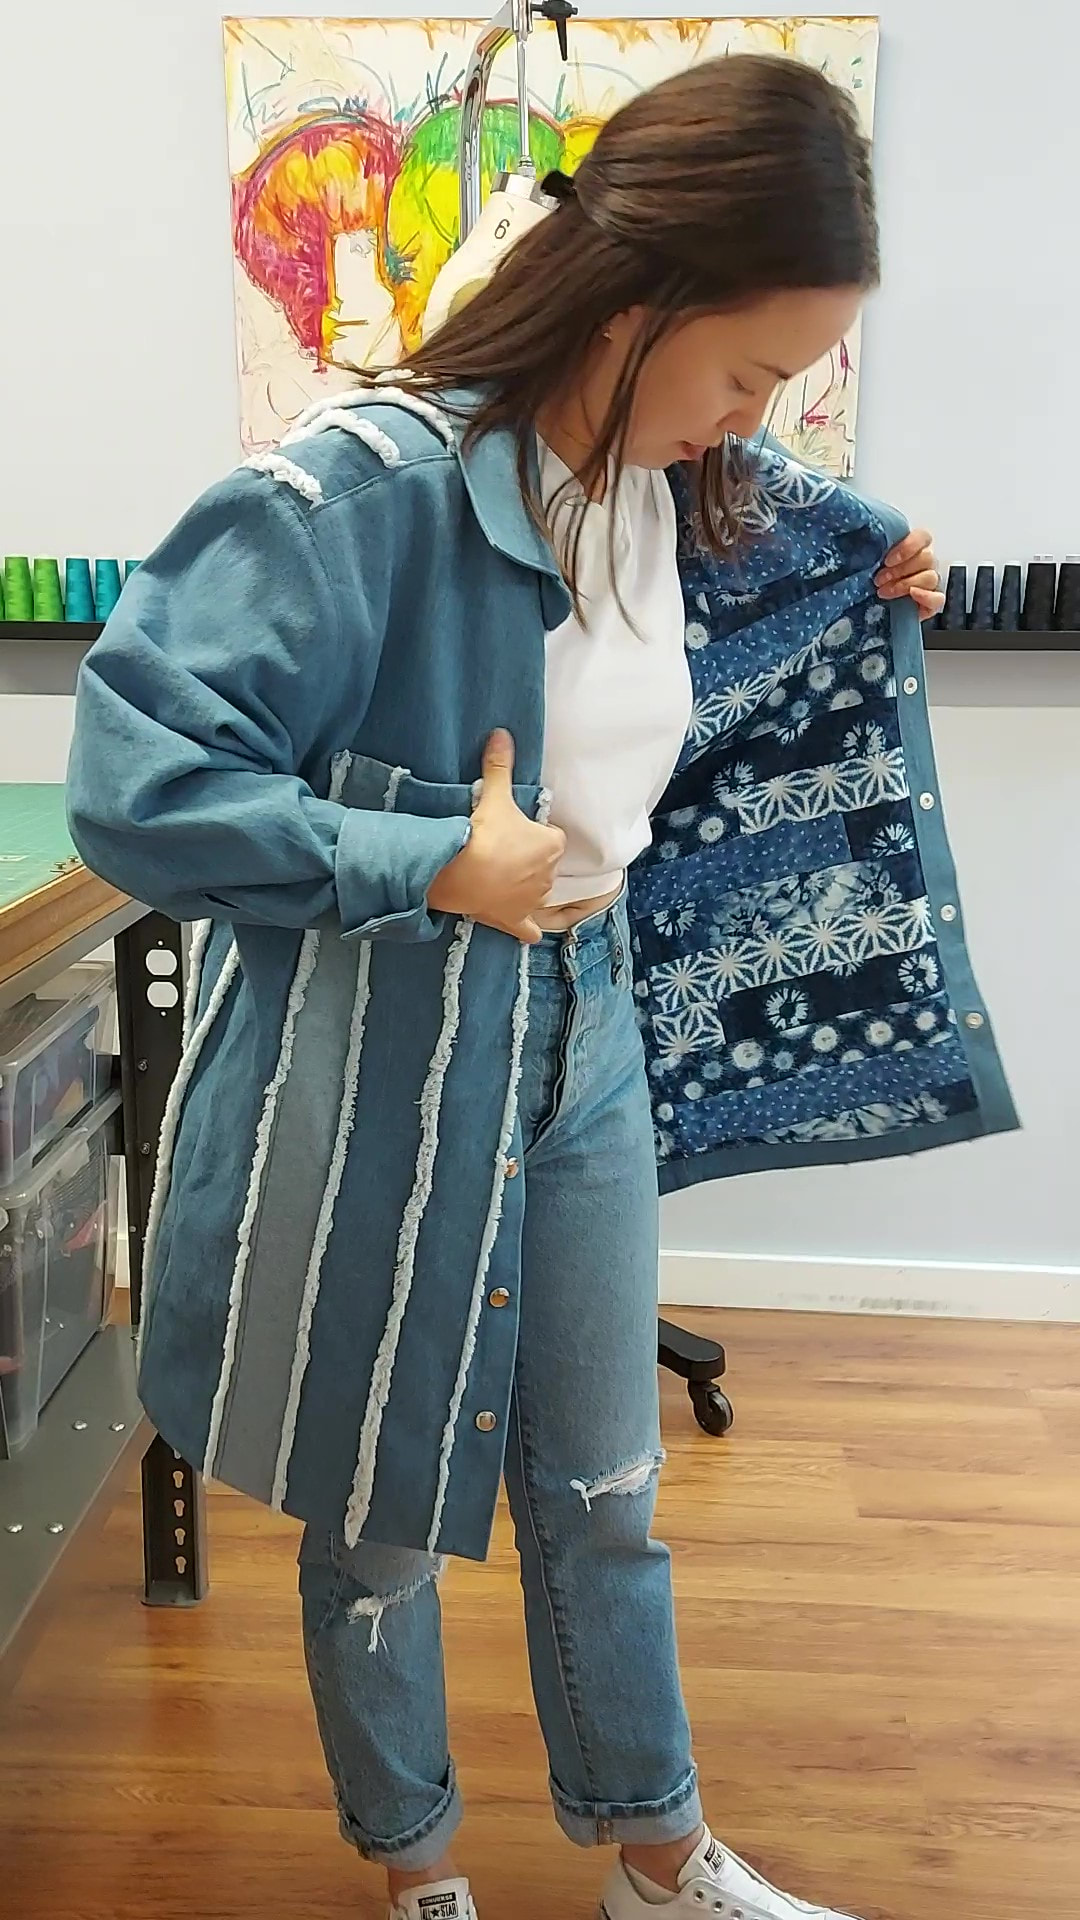
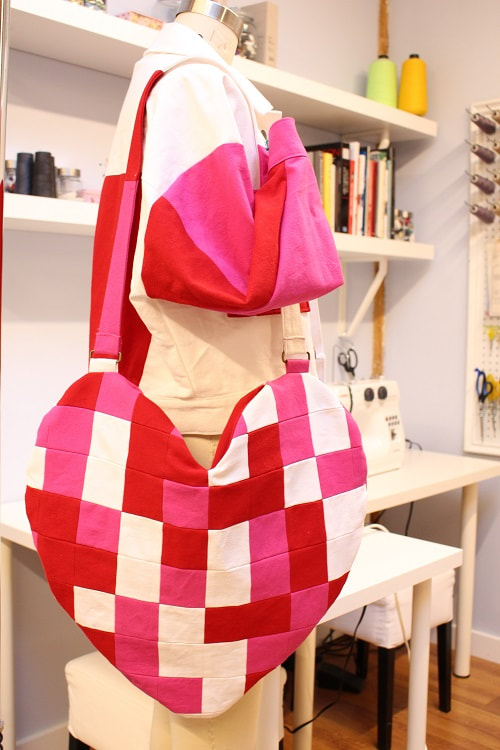
I quite often say to my clients "talk to your fabric" or "what is the fabric telling you?". It sounds crazy but if we listen closely, the fabric will dictate how it wants to be pressed, folded, draped or manipulated. I started first with the lining. The quilting cotton prints made it easy to quilt in any formation I wanted. I really wanted to re-explore subway tile quilting but on a larger scale. We did this in the past with a Valentines Heart Shaped Bag. Initially the concept for the exterior jacket had no fraying element. Just keep it simple and let the lining shine was what I was going for. But the lining was so intricate and cool, that I had to make the exterior just as interesting. I'm sure we have all been there where a design evolves so much from initial concept. Quilting Process
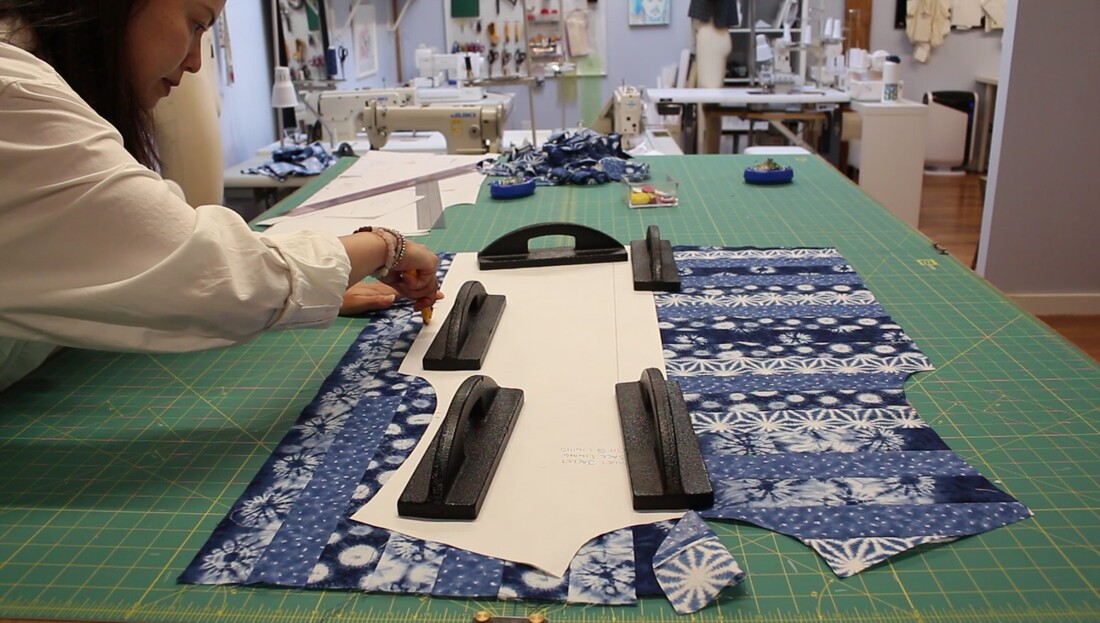
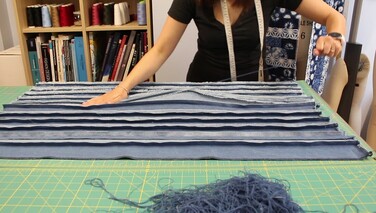
I have said it before, I am by no means a quilter. I just enjoy the visual of a "quilt" within a garment. The lining pattern pieces consisted of a BACK, FRONT x 2, UPPER SLEEVE x 2, LOWER SLEEVE x 2, and POCKET BAG x 4. I first mapped out which pieces I wanted the subway tiles to run vertically or horizontally. I started cutting out many many long strips of fabric. Some on grain and some cross grain (read on below why this is important under tips). I then just started sewing strips together with no particular order. I let the fabric speak to me! I ended up creating an asymmetrical look to the tiles which I love. 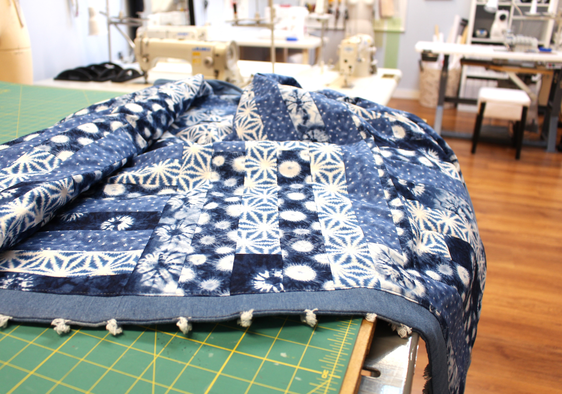 Sewing up the lining of this jacket took up the majority of hours on this project. My guess is between 18-22 hrs. It involved cutting out strips, sewing strips, pressing each seam, cutting out each lining pattern piece, and securing edges. 150 strips in the end. Here are a few things I learn during this process I would love to pass an to you. Subway Tile Quilting Tips
For more quilting tips check out our Quilted Heart Bag blog post. I couldn't resist trying on the layers of the jacket before them came together. Anyone else give in to this?
Fraying Process
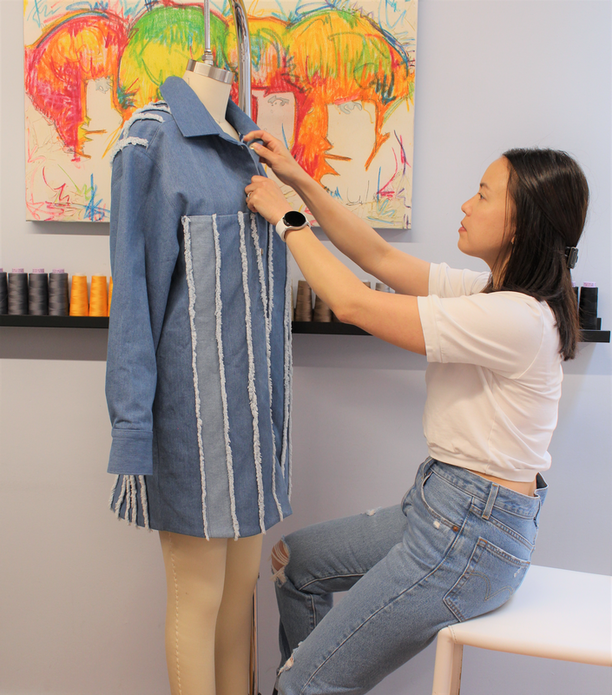
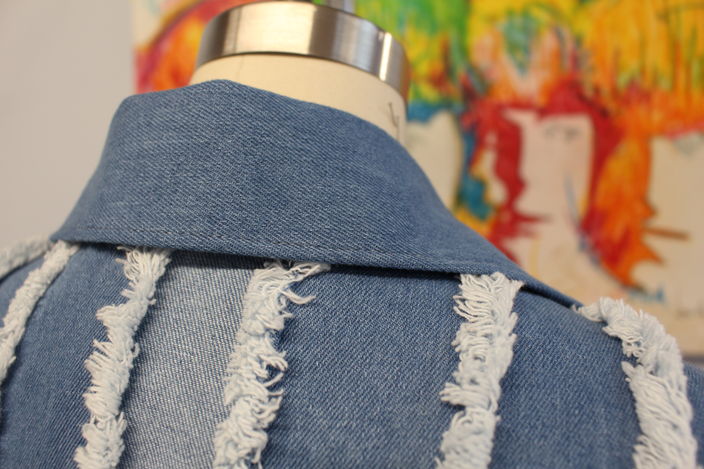
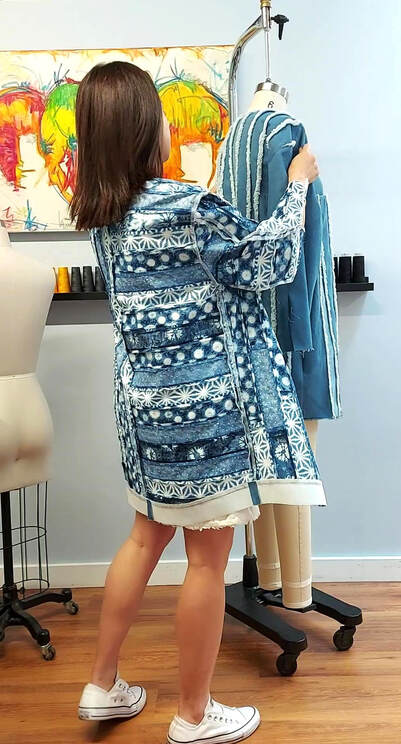
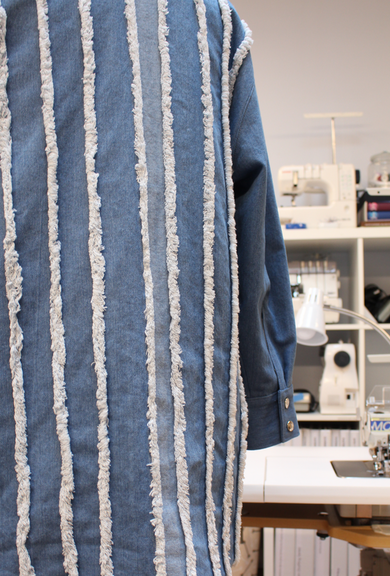
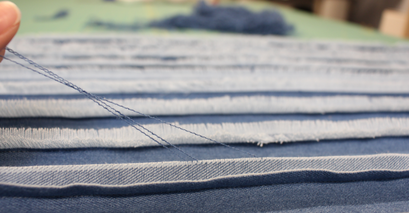
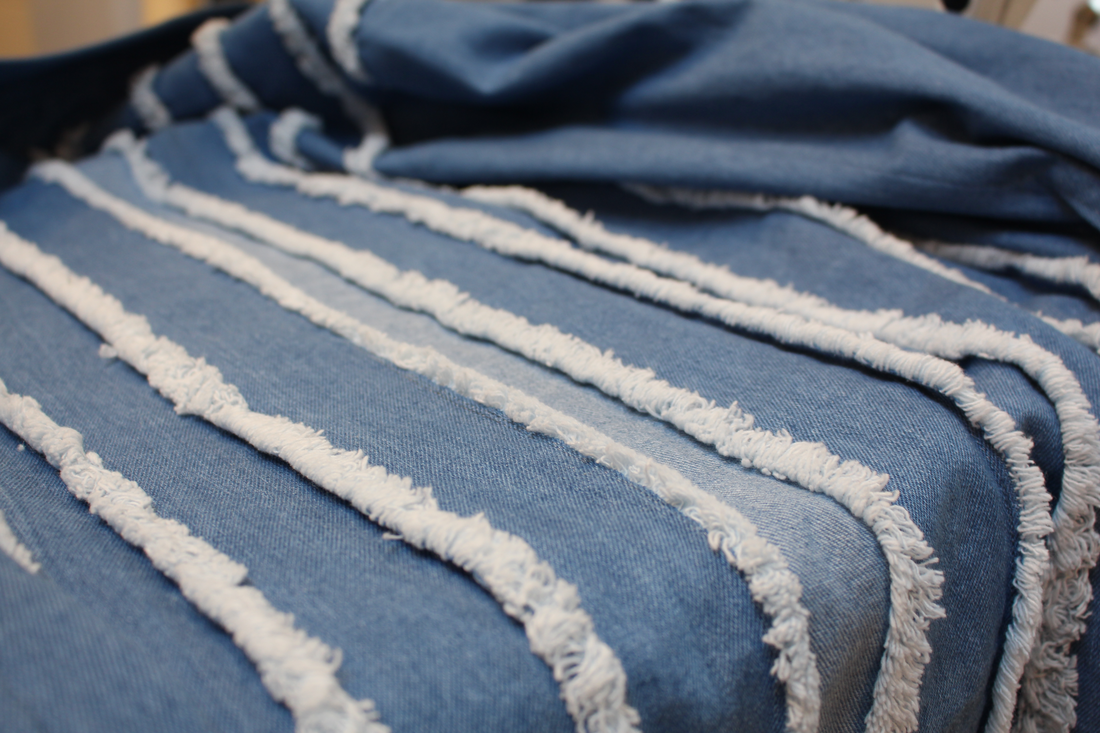
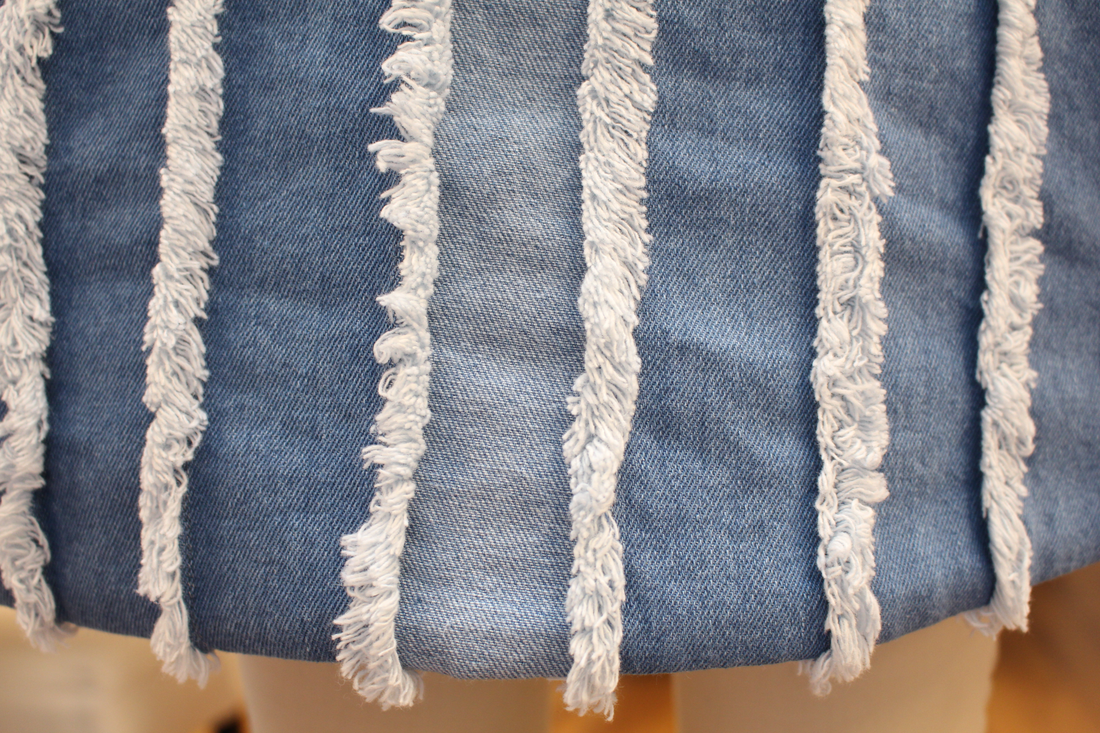
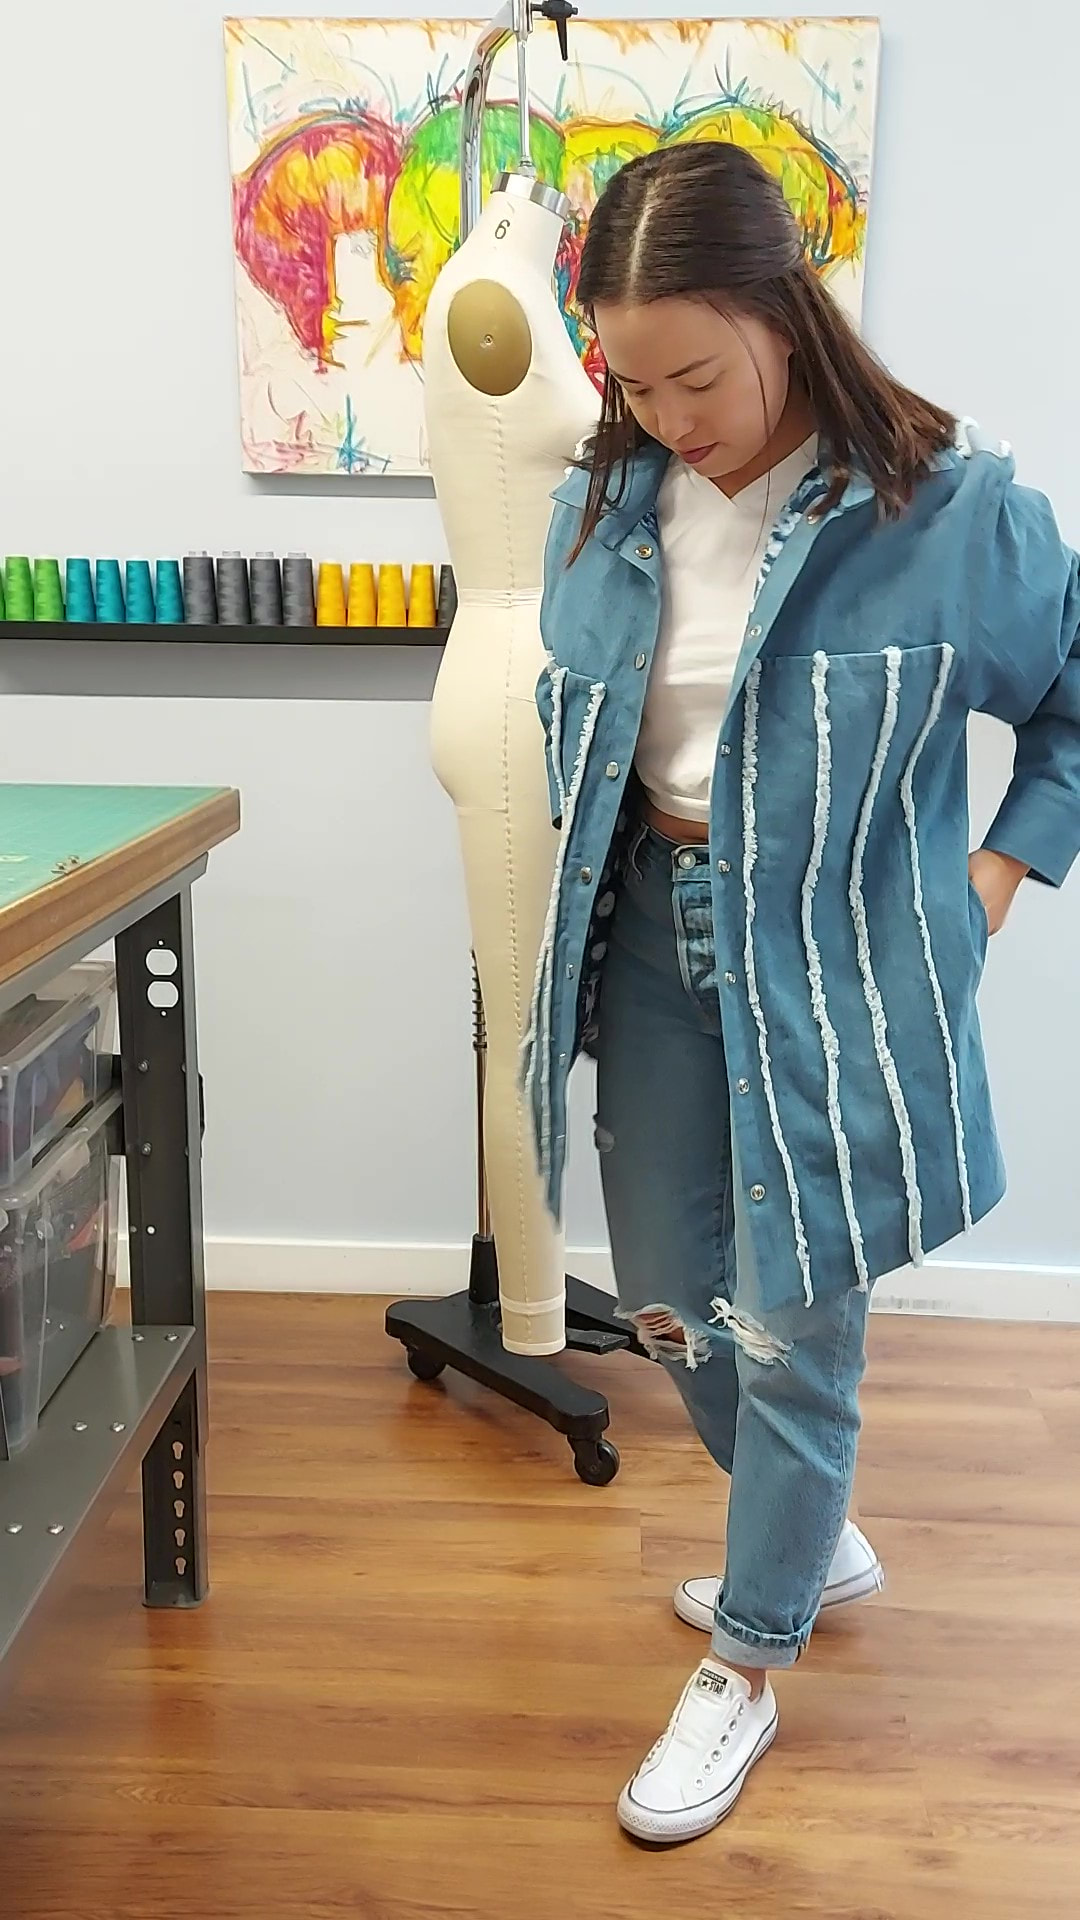
This was my first time intentionally fraying lines into a design. I made so many mistakes, but learned so much that made me wanting to make more designs with frayed seams. As I mentioned earlier, I also had no intention of creating any fabric manipulation to the denim but the lining looked so nice that the denim needed its own special treatment.
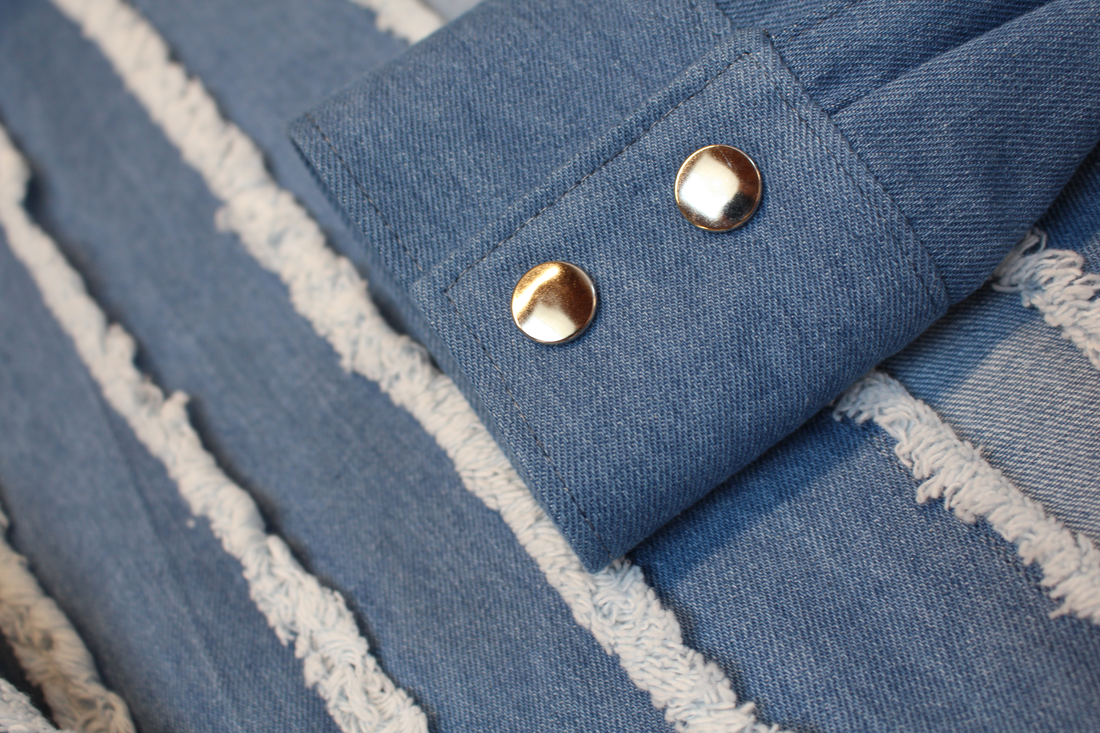
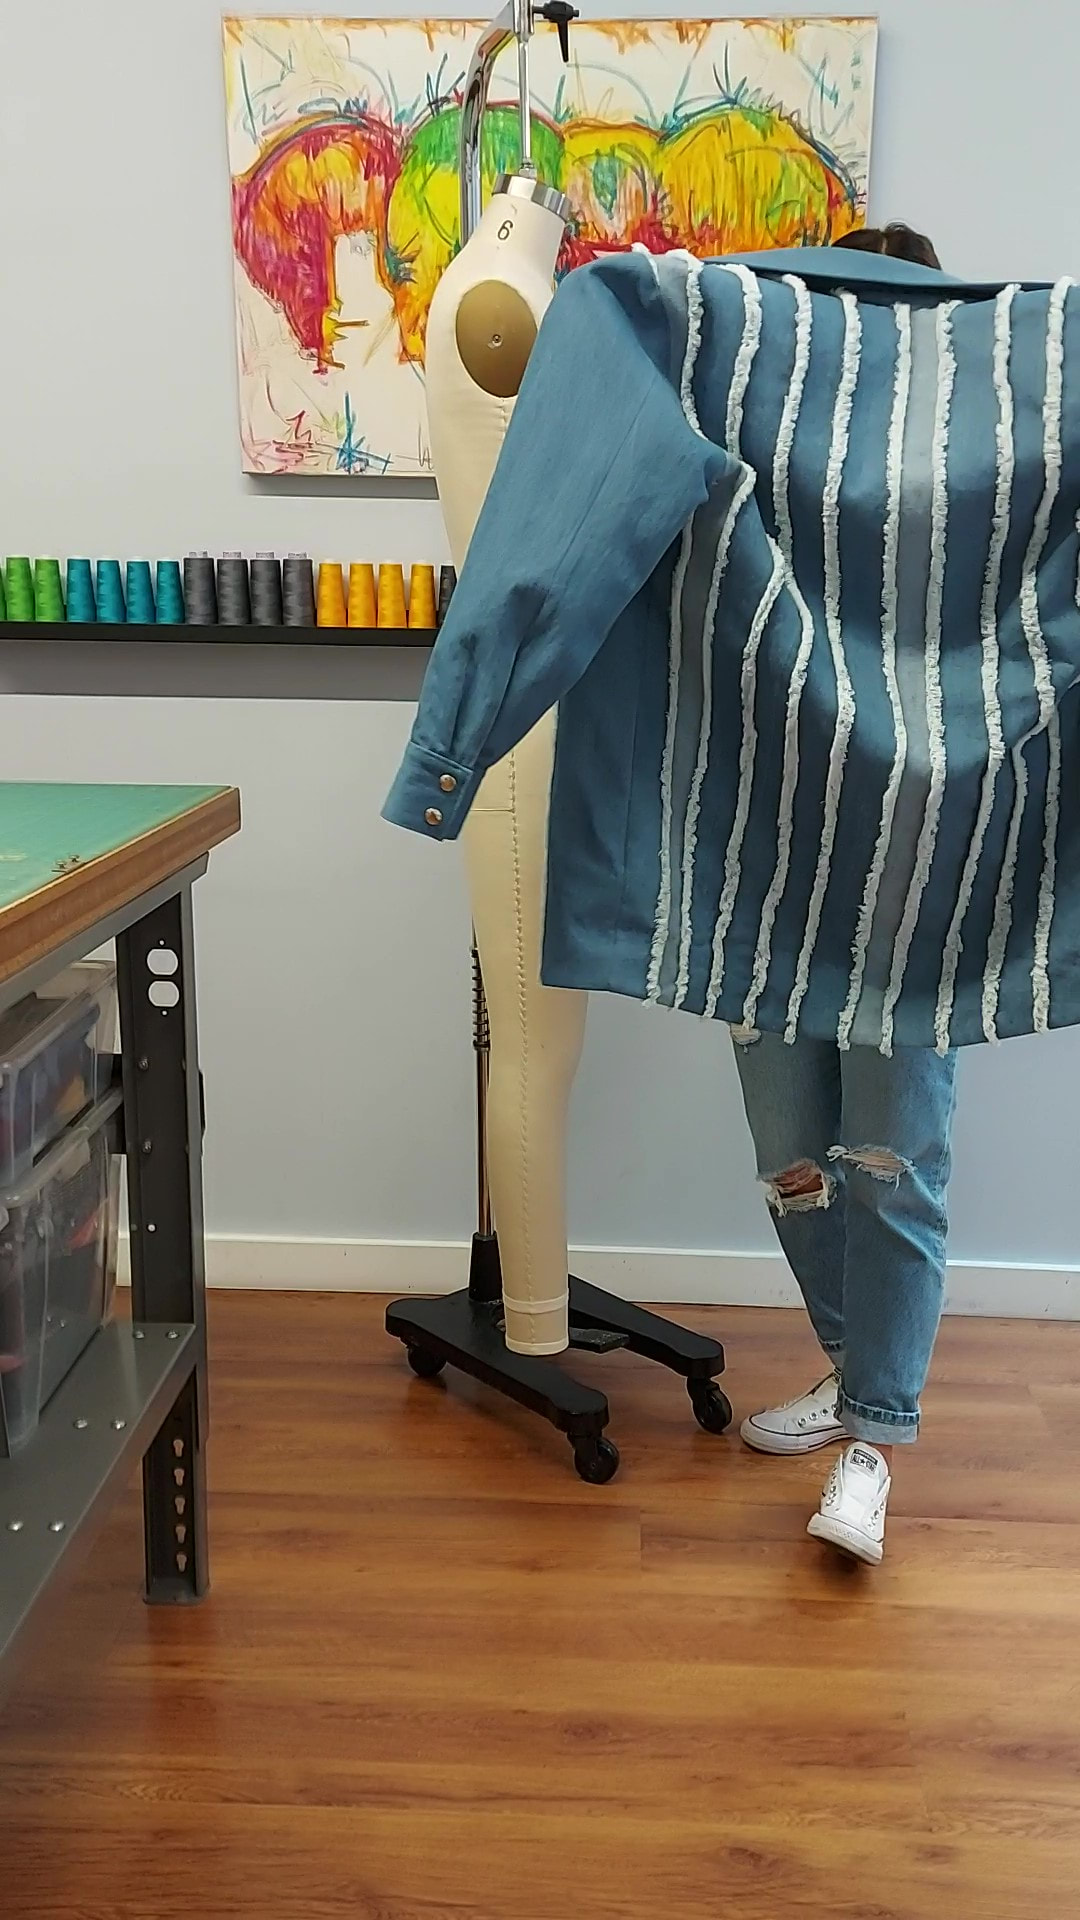
The front pocket panels and the entire back of the jacket had the vertical frayed edges. I took these steps to make it happen. I'm pretty proud of the outcome and look forward to applying this technique again. Step by Step Fraying Denim
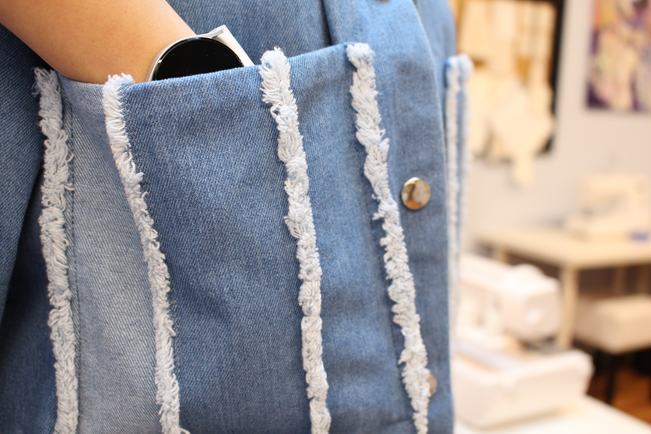
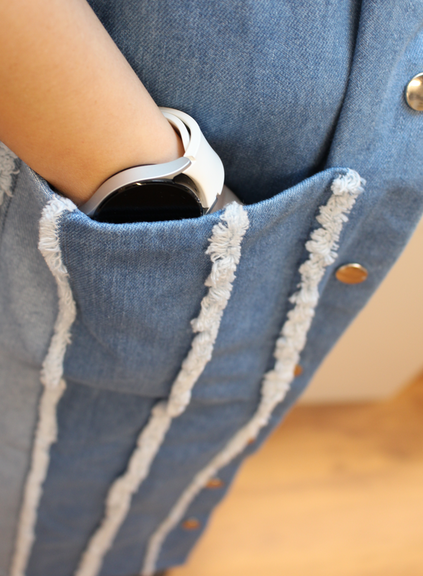
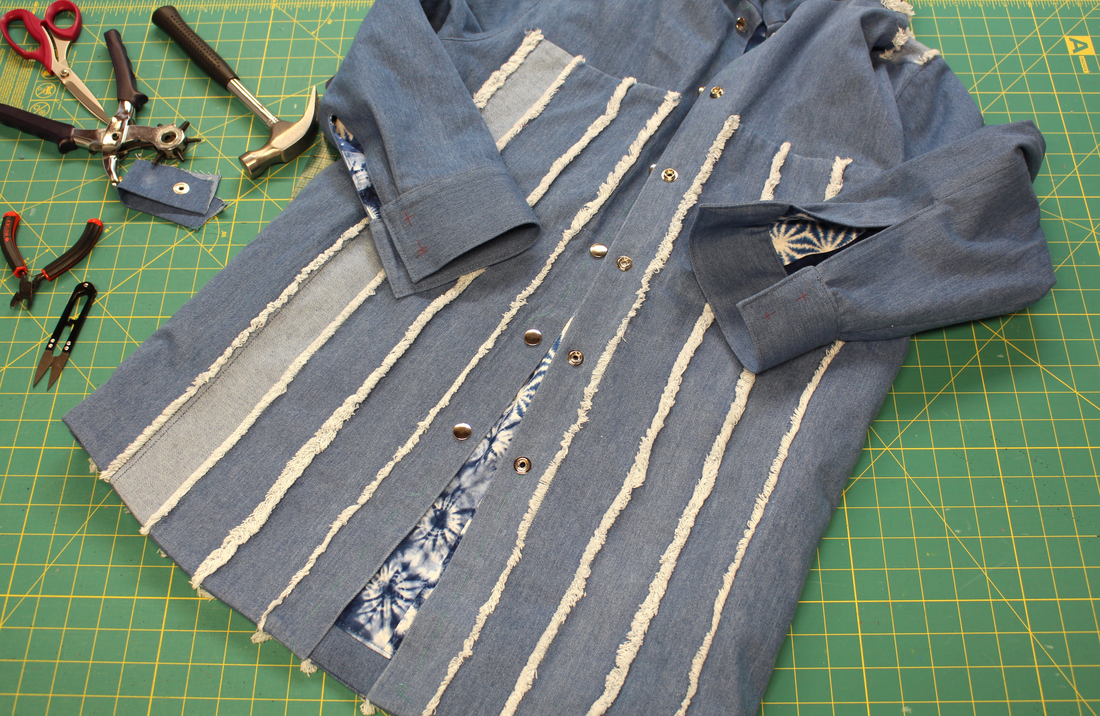
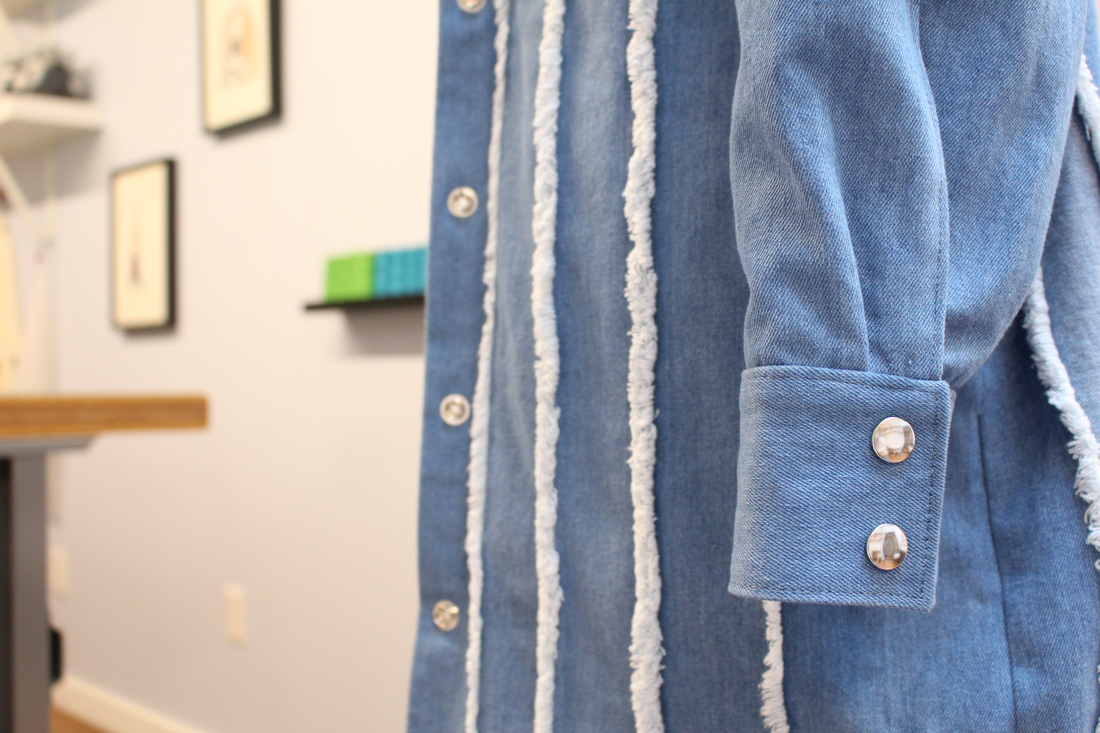
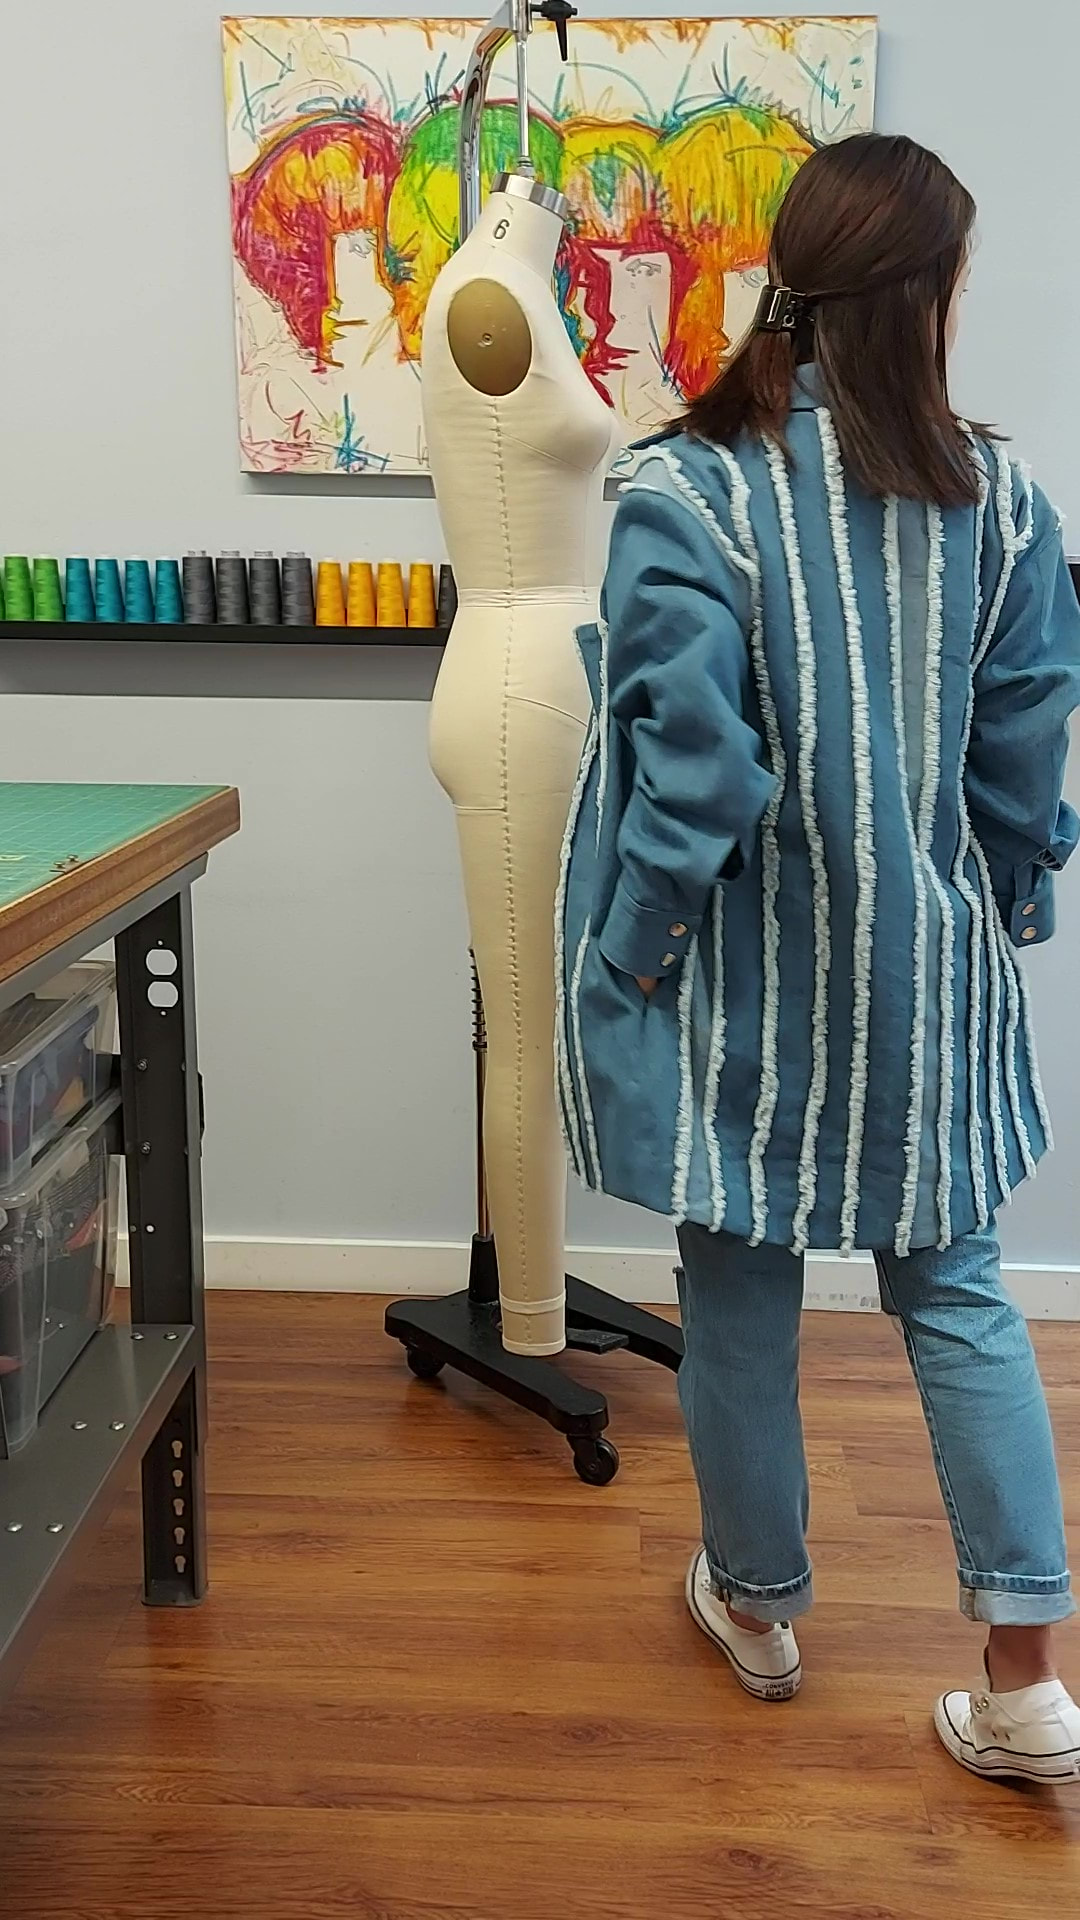
Design ElementsThe quilted lining and the hand frayed edges of the denim are major design elements in this jacket. But elements such as pockets, metal snap closures, topstitching and a hanger hook are so useful. Read on about the unique approach I took to some and things I learned along the way. Pockets This jacket has four not so obvious pockets. Two deep in-seam pockets along the side seams and two patch style pockets at the front chest. I took more of a non traditional approach to the patch pockets. I wanted frayed vertical lines to be present in the front but not the full shoulder to hem length, and I did not want a pocket to interfere or lay on top of the frayed edges. This pocket consists of two major pattern pieces- EXTERIOR POCKET PANEL and a HIDDEN PATCH POCKET. If you want to create a hidden pocket like I did, here is a step by step.
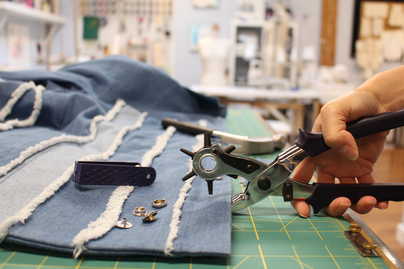
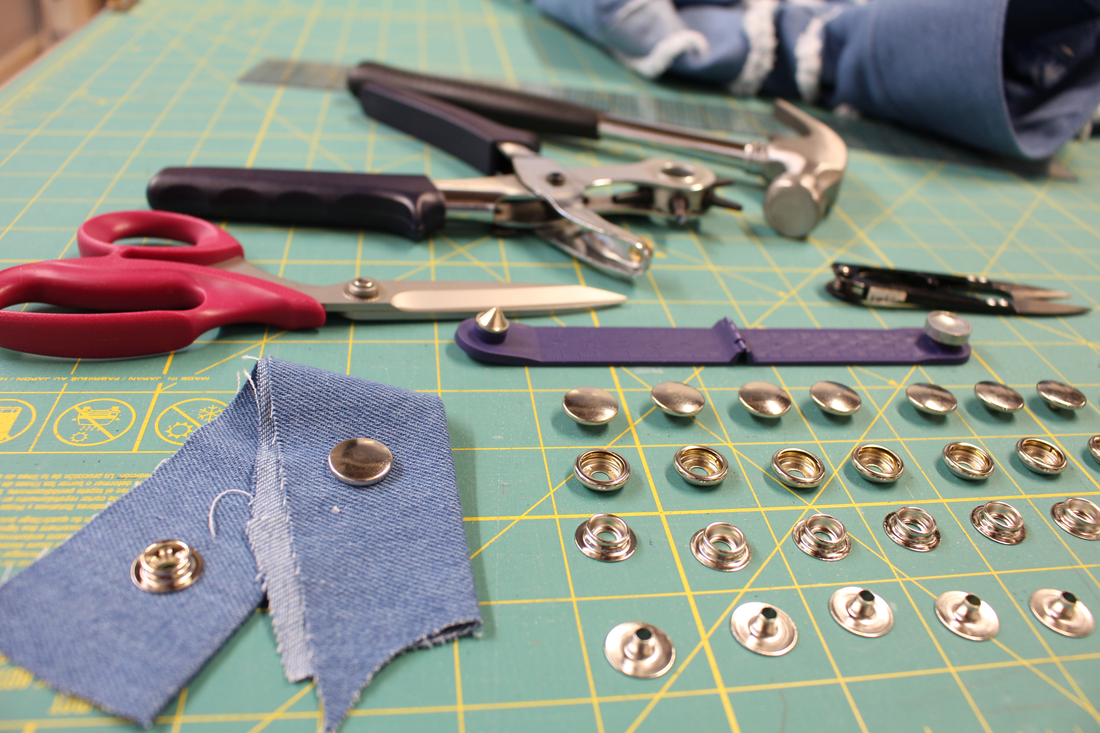
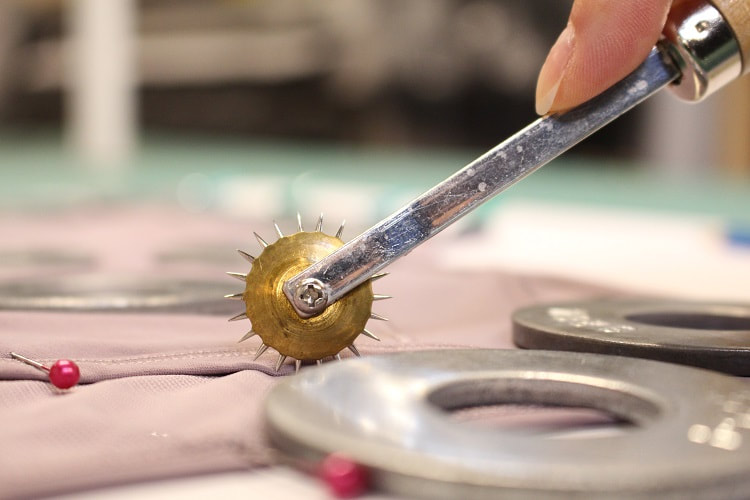
 Metal Snap Closures In my opinion, metal hardware like snaps are suited for denim over traditional buttons. I initially had darker colored snaps. But as I have learned, designs evolve and it is best to go with it. The frayed edges of the denim seams needed a lighter colored snap to balance the white of the fray. Honestly, if there was a way to make invisible closures for this jacket that would have been my preference. I wanted the frayed edges to be the star. I could experiment with magnets, but I am afraid of how the laundering process would effect the fabric.
Tips for Installing Metal Snaps
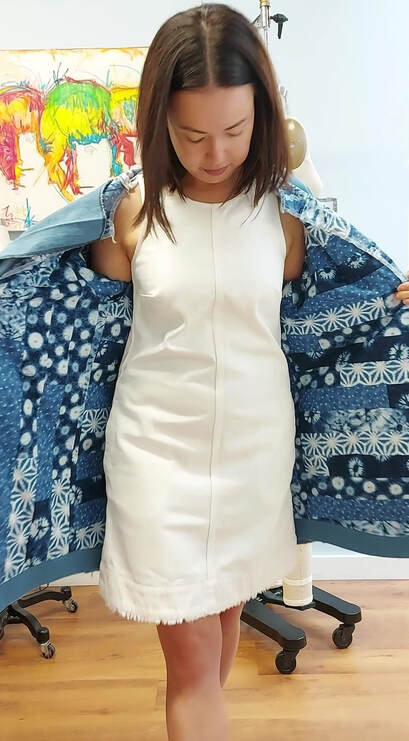
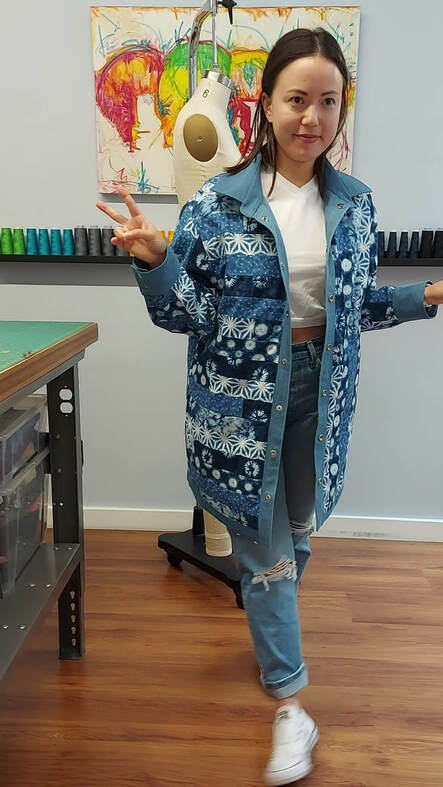
Top Stitching Super underrated element in most garments. Top stitching makes garment seams sit flat, provides extra stability, allows layers to launder easily and looks damn good when done well. I've made this jacket in the past, and the hem was always top stitched. I proceeded to top stitch this hem as well, but took it out the same day. It interfered with the vertical lines made by the frayed edges. A lesson that you don't always need to follow traditional rules. 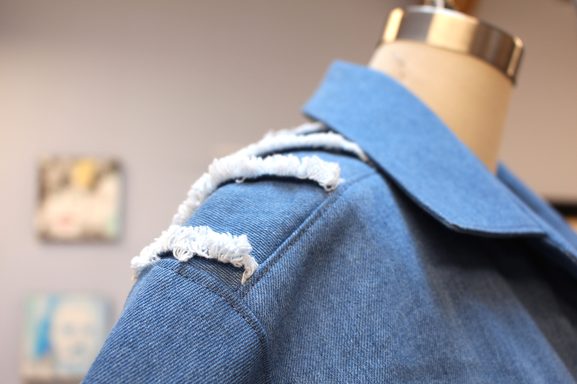 Hanger Hook Hand downs the most useful element in the jacket. Hooks are not in enough jackets. I am making it my mission to put them in all designs going forward. The only issue is if I want to make this a fully reversible jacket in the future, how can I incorporate a hook? Let me know in the comments if you have any ideas please. 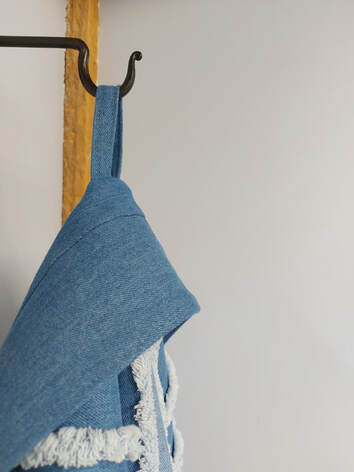 Trying on the JacketI absolutely love the weight of this jacket. It feels heavy without being weighed down. I attribute that to the many many seams involved in the creation of it. This was also my first time (that I can recall) creating 3D with the fabric. It is not going to be my last. I already have another jacket cut in a darker denim color. The fraying I played around with vertical and horizontal lines and not lining! I will share that jacket soon.
I know we are all wondering what the jacket would look like inside out right?! So yup, I tried it on that way out of curiosity. It is nice with exception of the snaps being backwards and the hook being exposed. I think in the future I will try this design again, but with the intention of it being fully reversible. Let me know in the comments if you would wear this inside out.
1 Comment
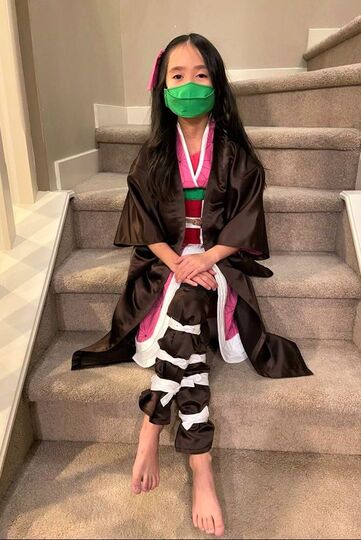
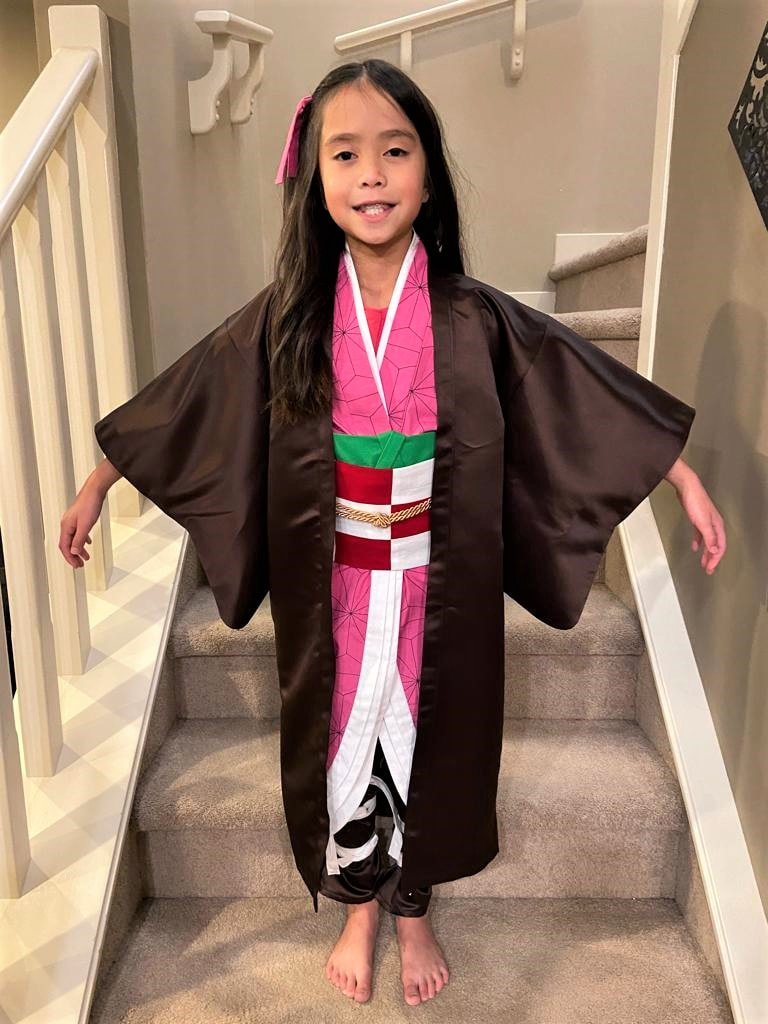
As many of you know, my studio offers fashion design instruction. I assist my clients in creating many beautiful designs. I rarely have time to create personal designs for either myself or a loved one. It has been at least 8 years since I last created a Halloween costume. My last one was Sailor Jupiter if you are curious. My niece recently got into Japanese Anime, in particular Demon Slayer. There where no 'great' costumes online, so I did what any Aunt who could design would do. Create a custom cosplay outfit from scratch. In my late teens, I was obsessed with creating costumes for dancewear. So to be pulled back into creating a costume was a really nice treat this year. This was by far my favorite design project this year.
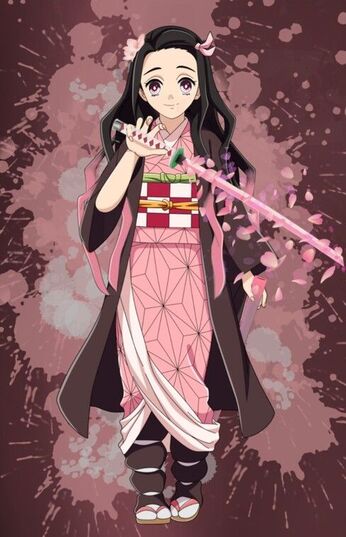
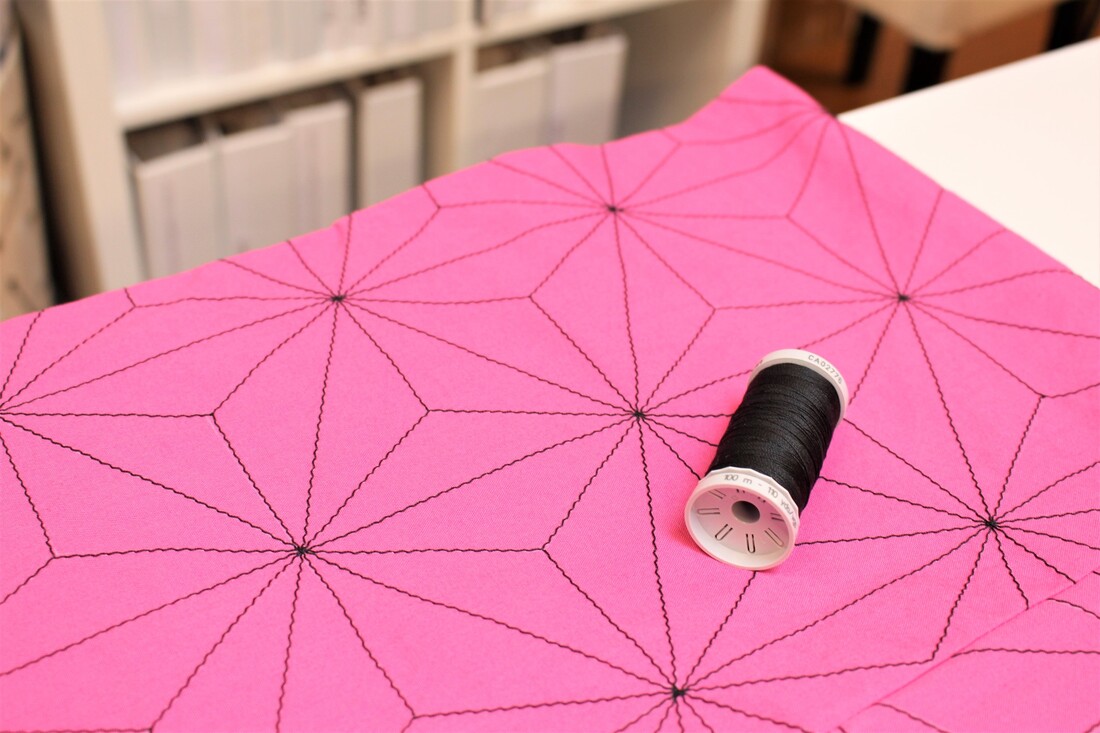
The Demon Slayer character I was venturing out to design was Nezuko Kamado. Her outfit consists of a pink geometric printed kimono, a haori style coat, a checkered obi, a corded obijime, a green obiage, leg coverings (aka kyahan), a pink hair ribbon, and a face mask. Nezuko normally wears a bamboo muzzle, but I thought a face mask would be more appropriate. Above is the inspiration photo taken from Reddit website. It seems like a lot of elements to create, but I have constructed haori style kimonos in the past so was up for the challenge. In this blog post, I'm going to show you each element of Nezuko's outfit and insight into how I created them. I hope you enjoy! Project StatsIn early Sept I was able to take full body measurements of my niece. So set with her measurements and an inspiration image of Nezuko I got to work. I was unable to do any fittings during this process, so guessed a bit in regards to ease and proportions. All fabric purchased from Fabricana in Richmond.
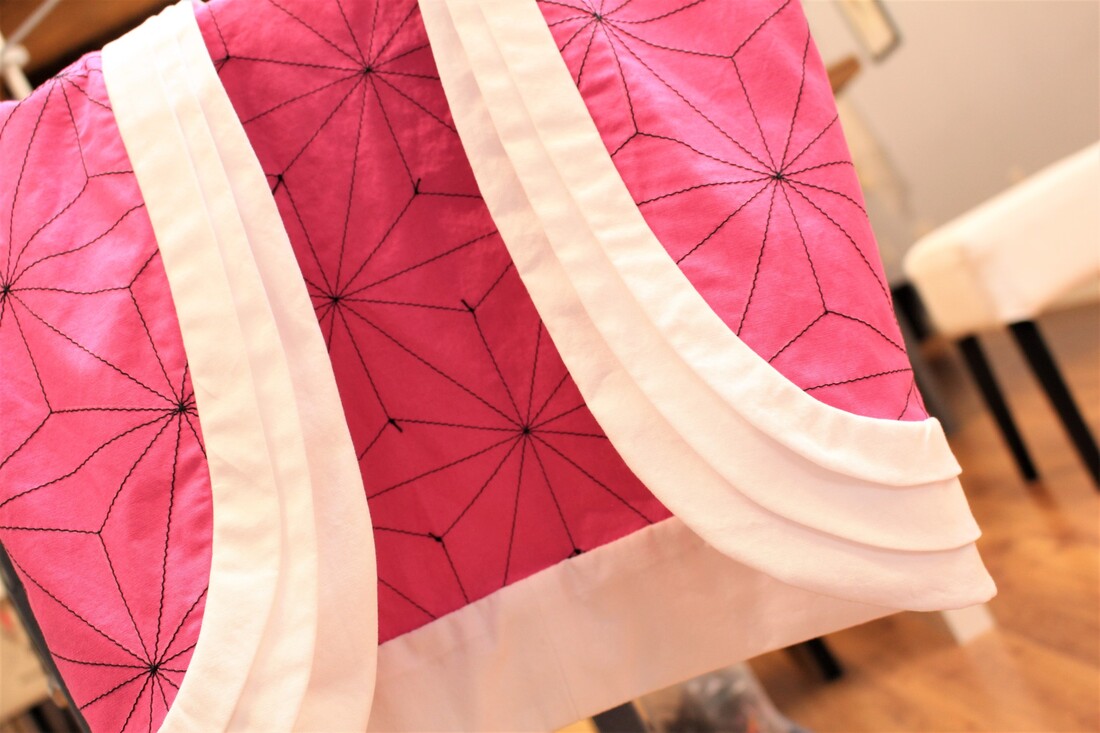
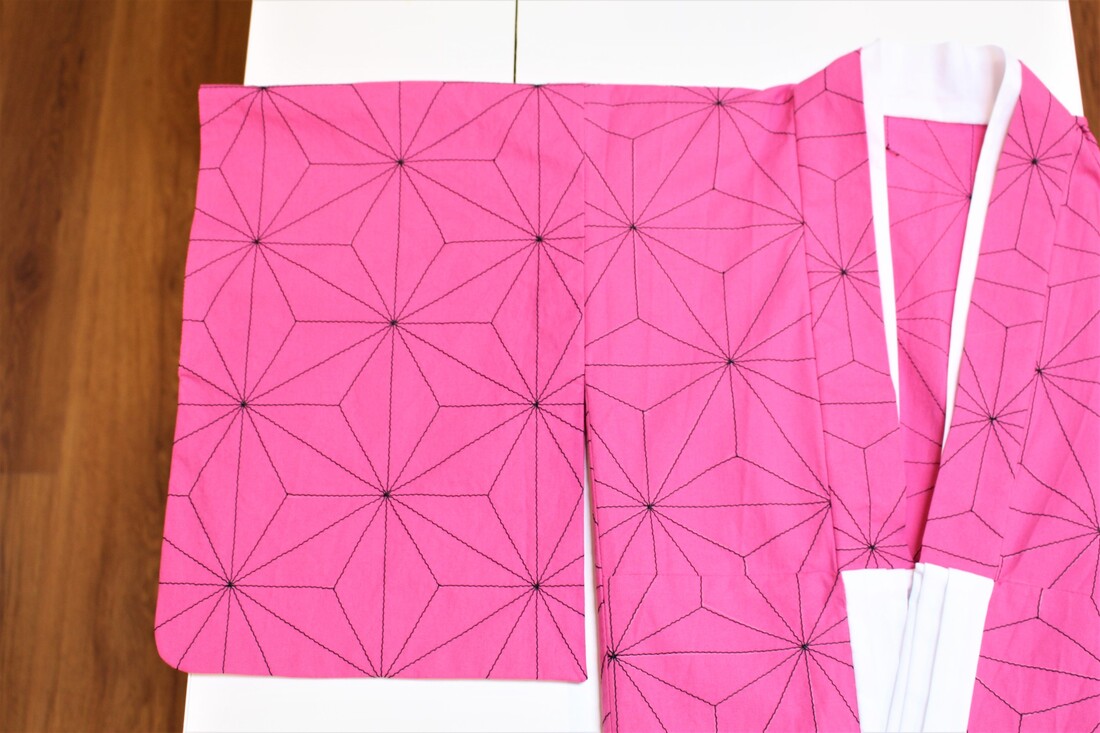
Pink Interior KimonoHands down the pink kimono was my favorite part of the Nezuko costume to design. It was also the most challenging part. I have made similar kimono's in the past, but in adult size. I had to guess the amount of ease, length and proportions. I used my experience with drafting past ones. I had to imagine my niece beside me as I drafted the armhole depths and collar widths. Good thing I just spent a good chunk of time with her recently (we live in separate provinces). For the most part, the pattern pieces where rectangles, with exception of the back neckline, front hem and sleeve hem. 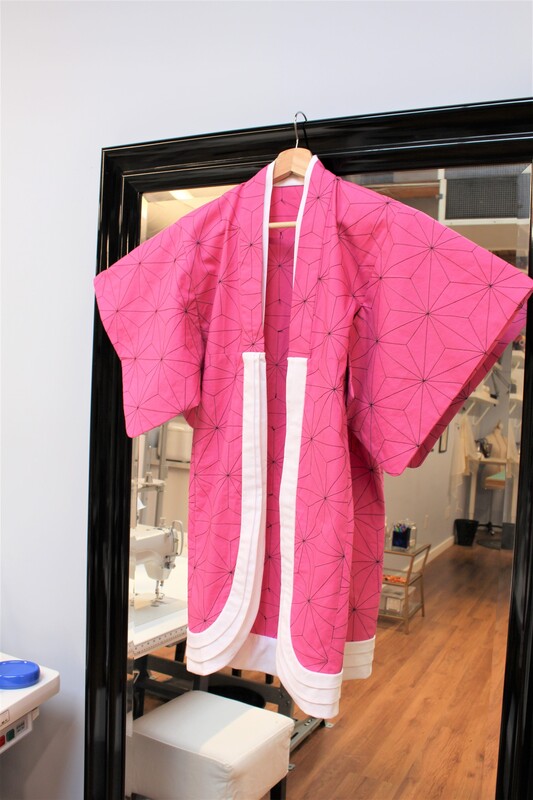 I was confident in my calculated guesses for the drafting of this kimono, but when it came down to the geometric print I had to really think the process through. Do I paint the lines, top stitch the lines, or just find fabric already pre-printed with this exact geometric star lines? I initially was going to paint, but if you know me well I like things extremely precise. In fact, it was a client who prompted me to stitch the lines. First, I had to draw out a template for the star. It is a repetitive print, which made it rather eye boggling while trying to transfer those repetitive lines on the fabric with chalk. I had to really take my time with this step. 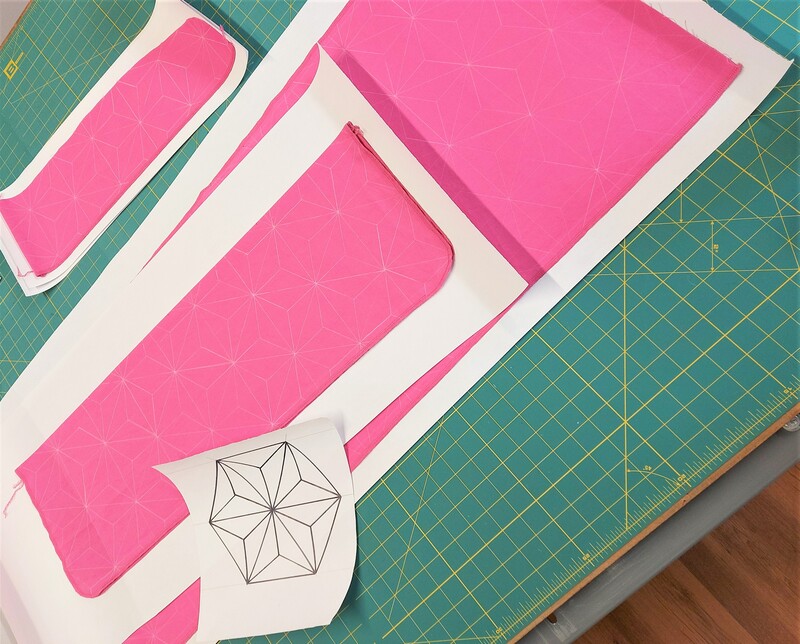 I spent a full three days (long weekend) top stitching the lines and stitching the kimono together. Most of the lines could run into a raw edge thus avoiding backstitching but in the center of each star there was a line that forced me to have to reinforce the ends. I could either have visible backstitching or leave long tails and hand knot at the back of each of these lines. I chose to work the tails to the inside and hand tie each. There where over 60 hand tied knots. It was so worth it!
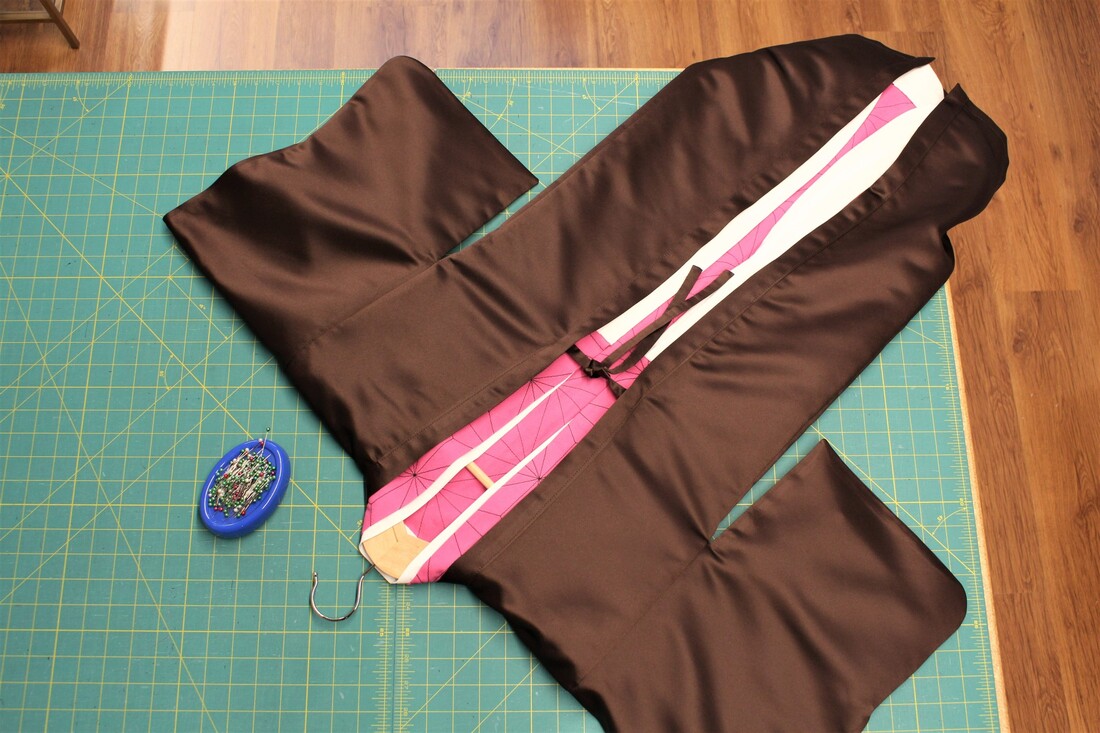
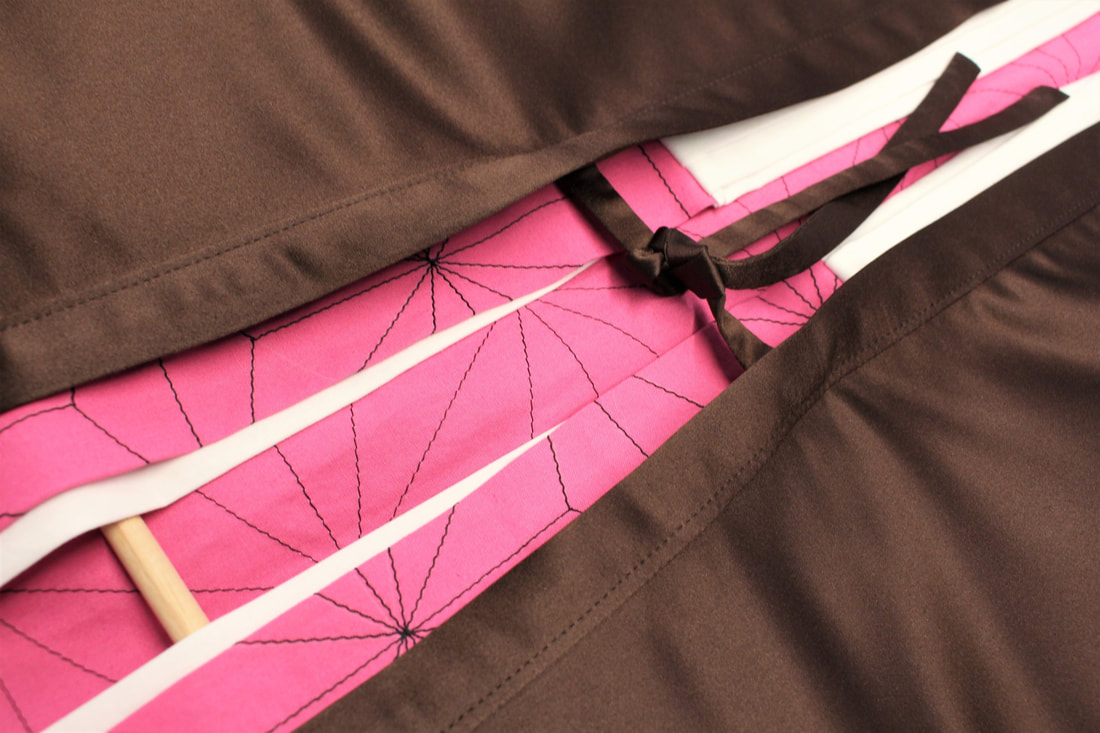
Brown Haori KimonoThe brown overcoat (aka haori) was designed to fit perfectly on top of the pink kimono. I drafted the sleeves and body to be 3/4" larger all around to have the pink kimono sit inside with out any pulling or peeking through. On a traditional haori, waist ties can be found at the front facing to hold the jacket closed. I hand stitched the ties to avoid top stitching and maintain softness. Even though this was just a Halloween costume, maintaining some tradition and quality is always important to me while designing.
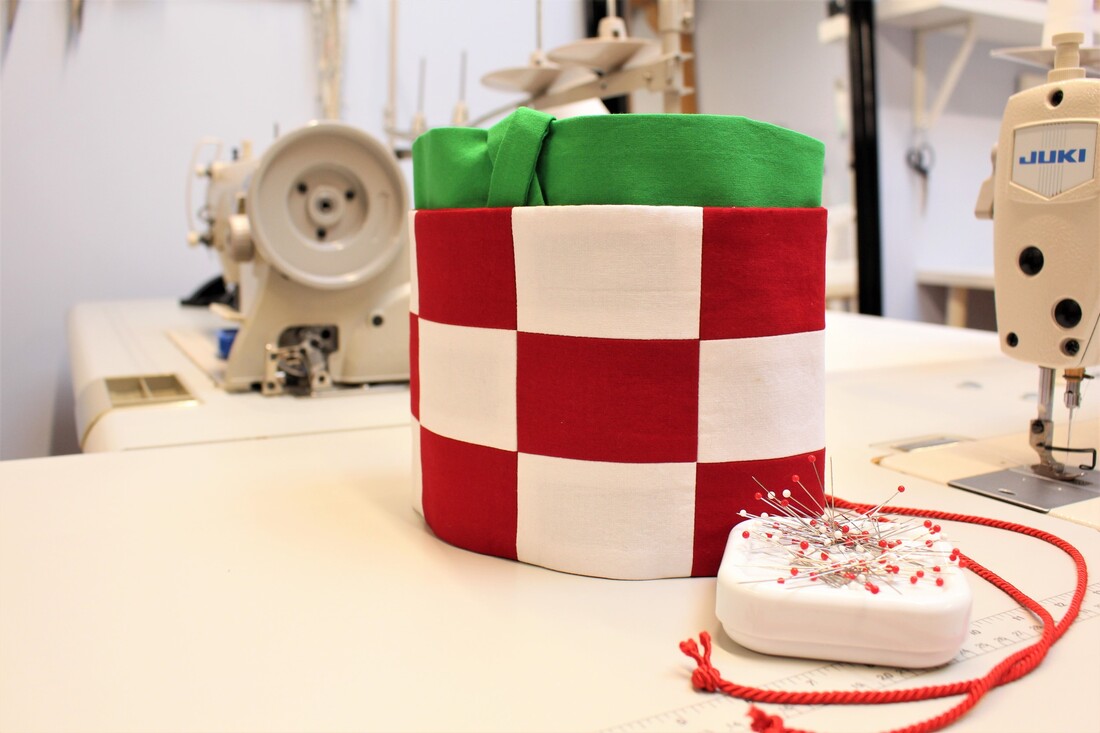
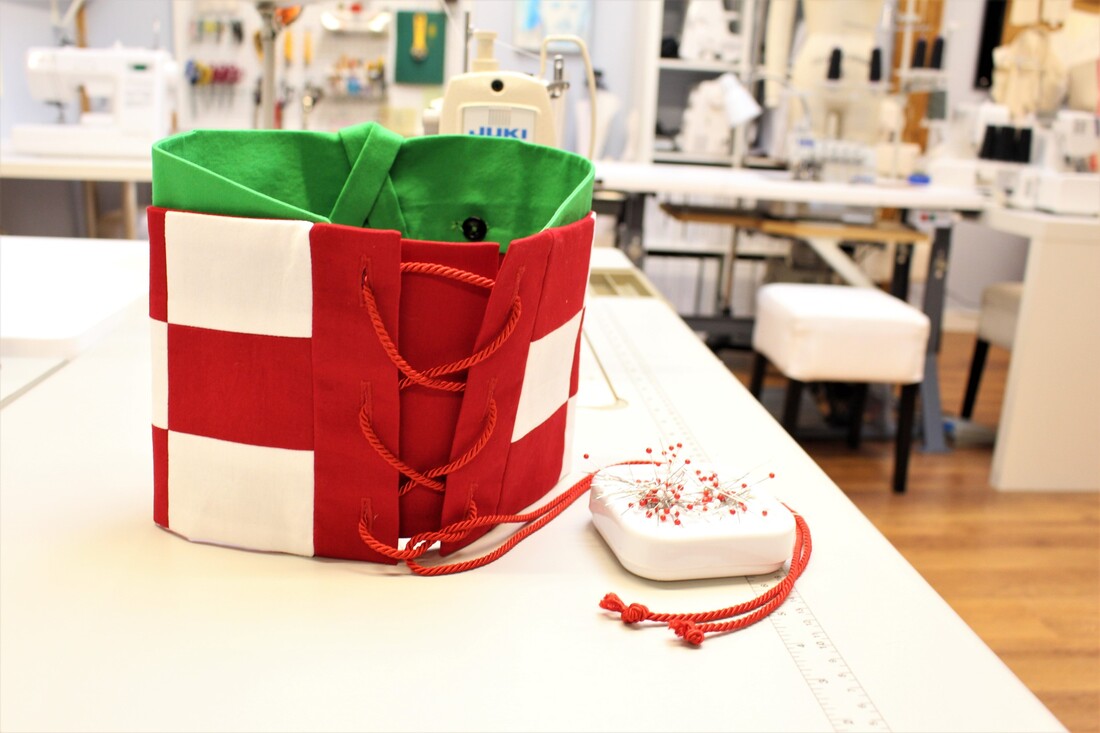
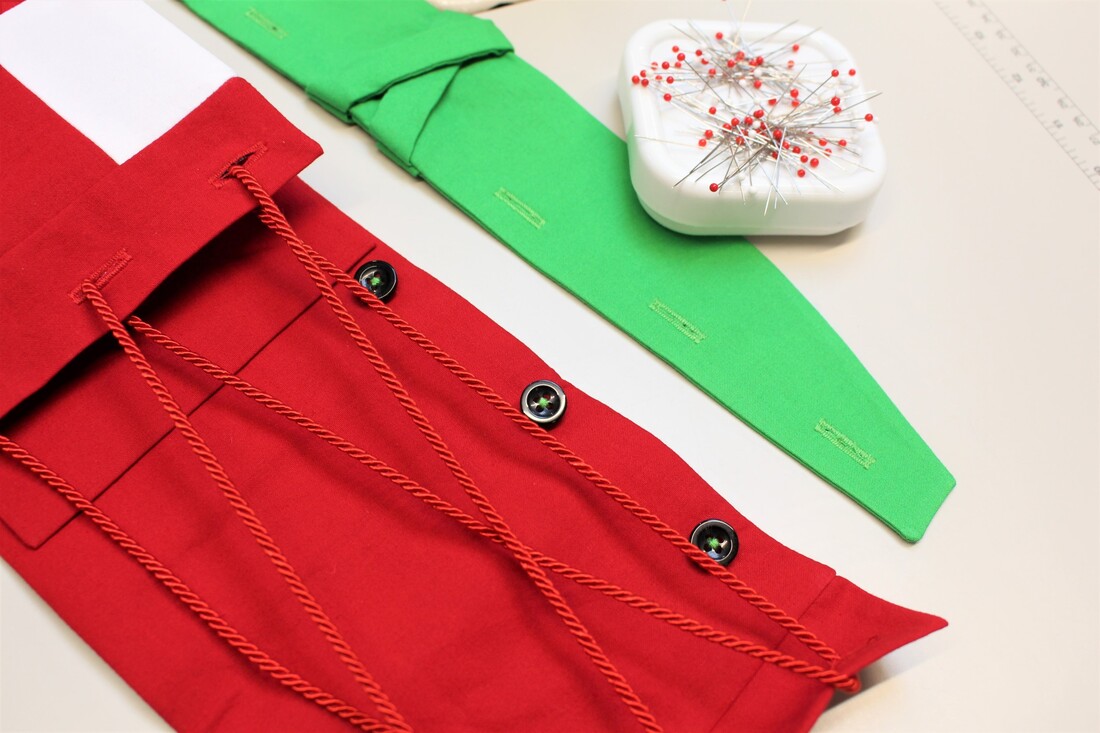
This was simple to design in comparison to the pink kimono. In fact, I find it kind of a shame that it is covering up all the hard work put into the pink kimono. Obi Belt with Obiage and ObijimieFor some reason the checkered obi spoke to me first. It was the first thing I designed. I have designed an obi similar to this one back in 2006 for my fashion design grad collection. I decided to take a similar approach, but used a tie back closure instead of snaps to allow my niece to tighten at her own comfort level. I also included a discreet panel along one side of the center back to allow her to still wear it beyond this year. Cutting out the rectangles and quilting them together was so satisfying. A few tips for this checkered obi.
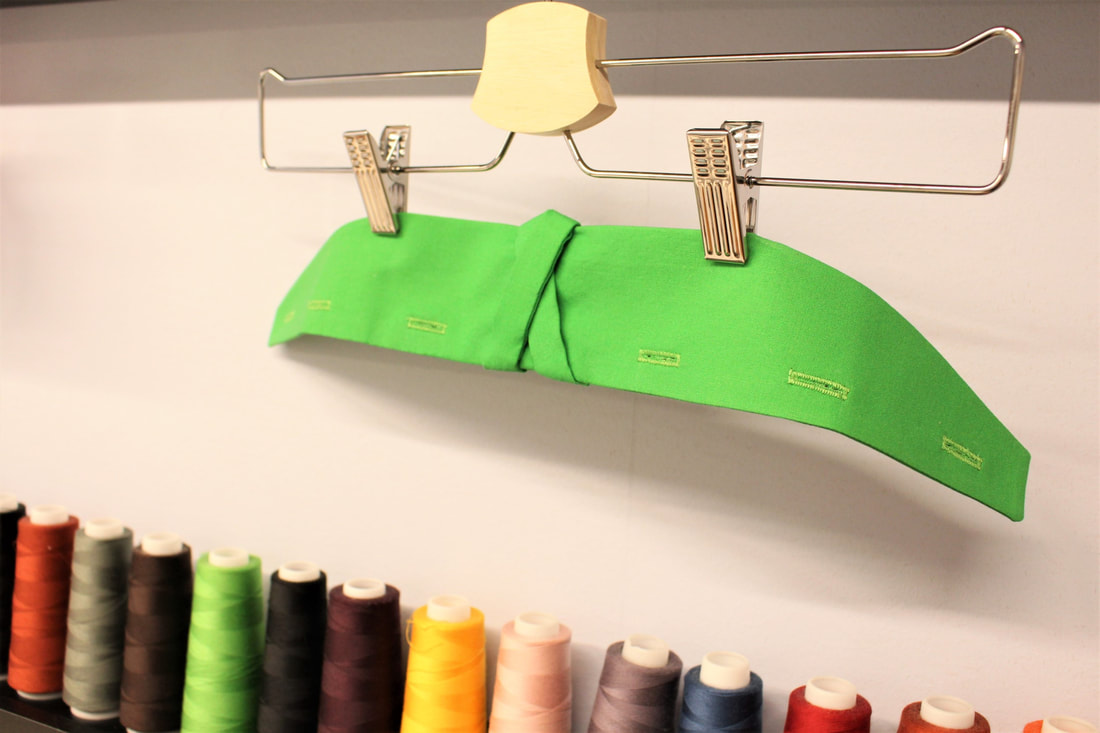
The upper obi section called the obiage was quite simple in design. Having it button on is far from traditional. But traditionally it is a separate element to the main obi. I wanted my niece to have the ability to wear the obi alone or with the obiage. The entire obiage was interfaced to maintain the structure of the entire obi section. To keep a clean appearance (no top stitching), the small front knots, where hand stitched. I applied this same hand stitched technique in a variety of spots in this costume.
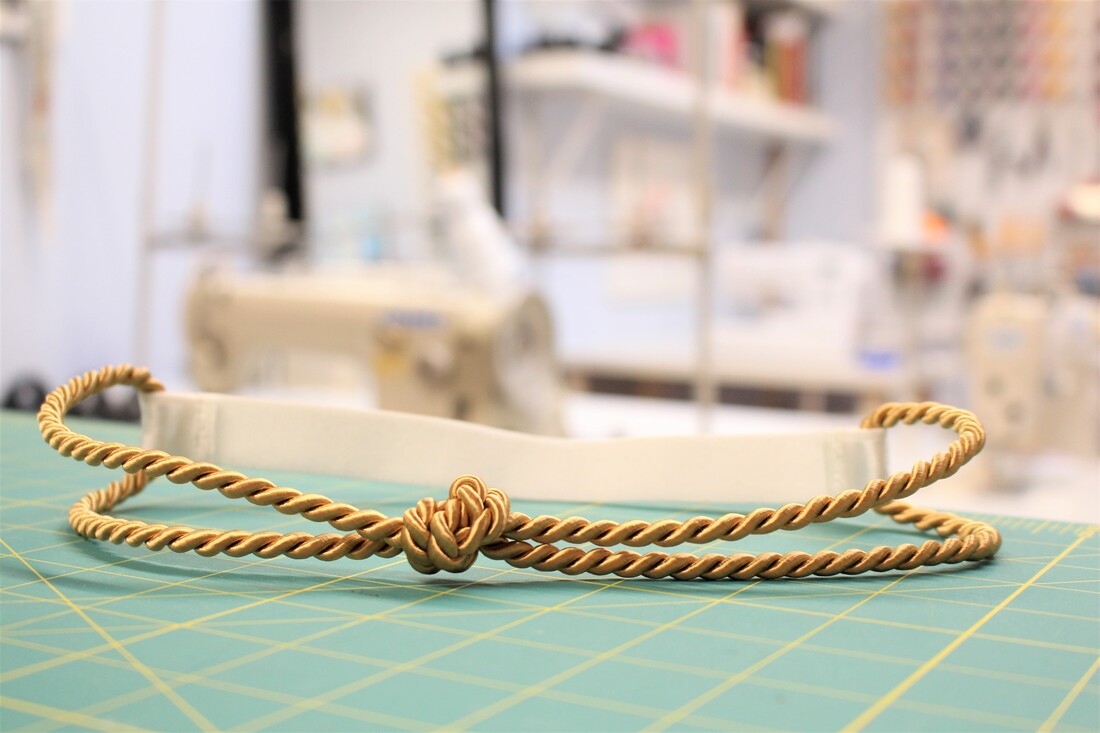
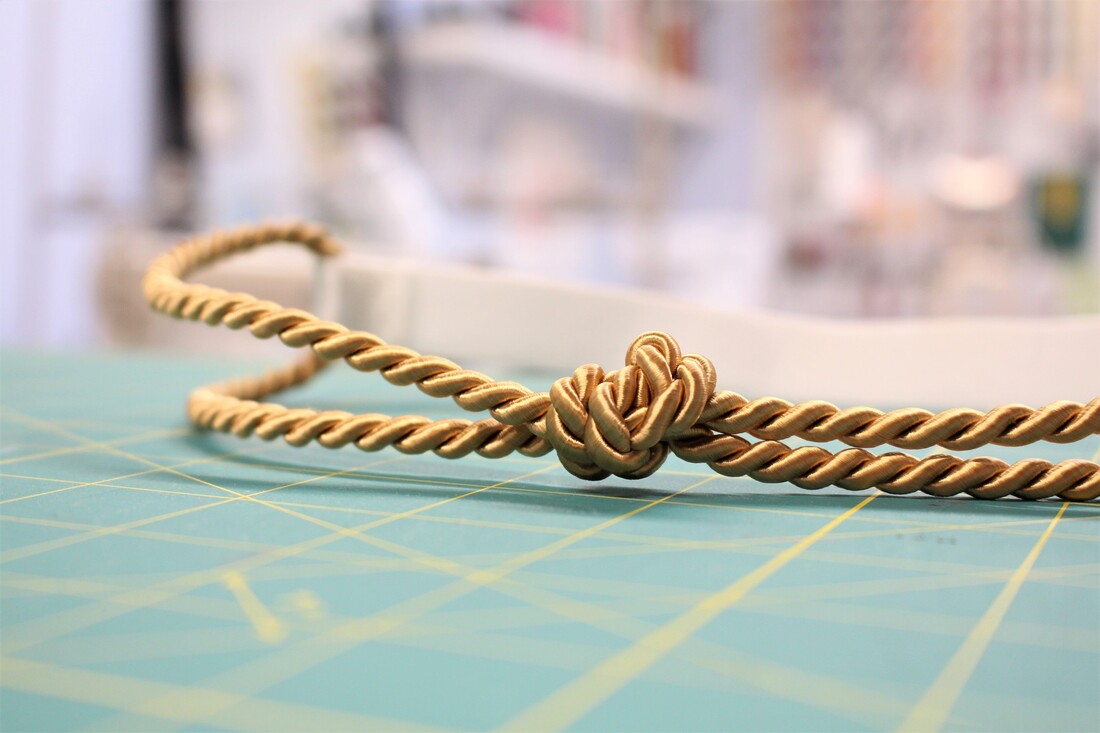
The gold obijimie was the very last thing I created. Initially I thought it could just be tied around the body. But for a 10 year old, that would be extremely uncomfortable. I carefully looped the gold rope into a white glittery elastic to create a belt that could be worn right over the obi. Looking back it would have made more sense to have the gold cord stitched into the back seam of the obi. I figure now my niece has a pretty cool belt she can wear with another costume in the future.
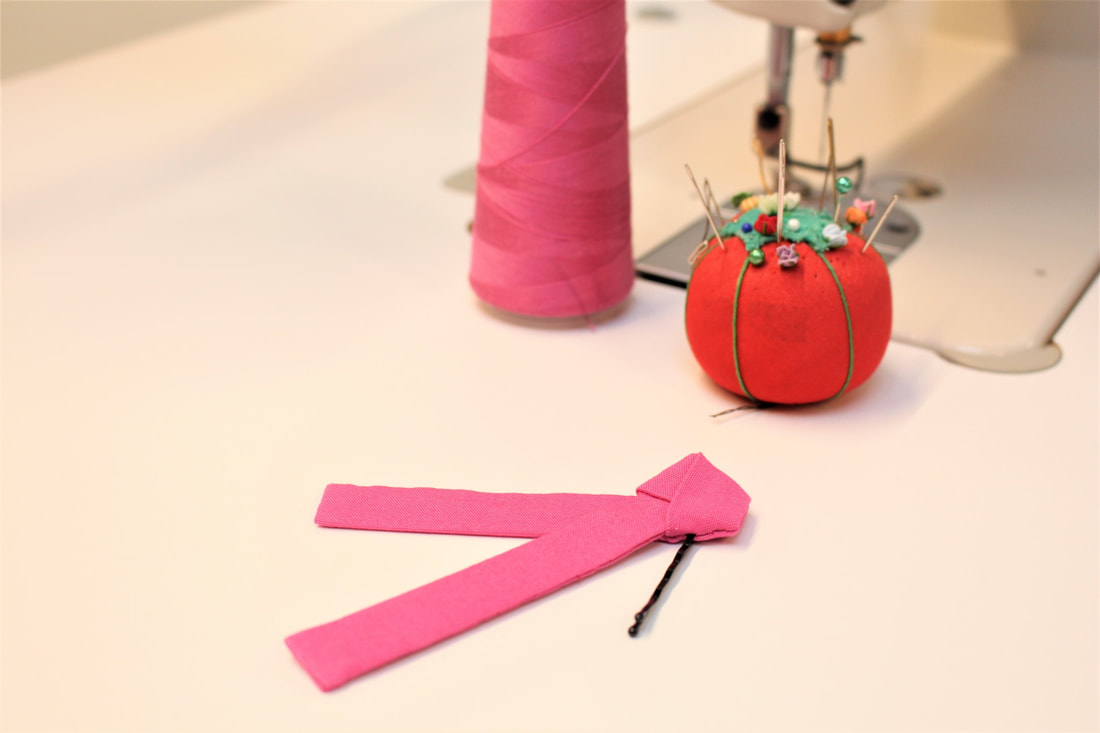
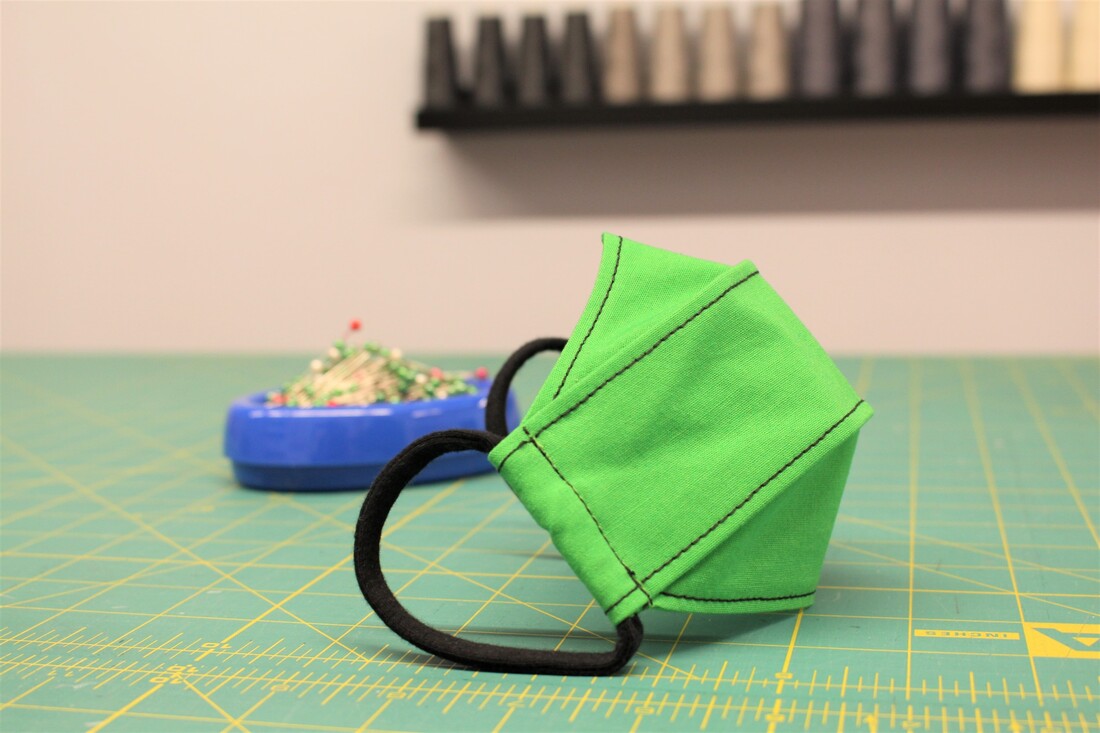
Leg Coverings (aka Kyahan)The leg coverings where the least interesting part of this entire costume for me to design, but I knew it pulled the entire look together. I learned that kyahan are cloth leggings worn by the samurai class. Fitting as Nezuko is a demon slayer. The leg coverings are traditionally padded for extra protection. I decided not to pad them. I figured this was more cosplay than a functional kyahan. To keep the kyahan sitting properly on the legs, I placed a hidden elastic at the top. The ties essential just became decoration. The 12 ties where cut, pressed into place then top stitched prior to sewing into the center back seam. This was rather time consuming, but hey I already spent days top stitching the pink kimono! This was a breeze in comparison. 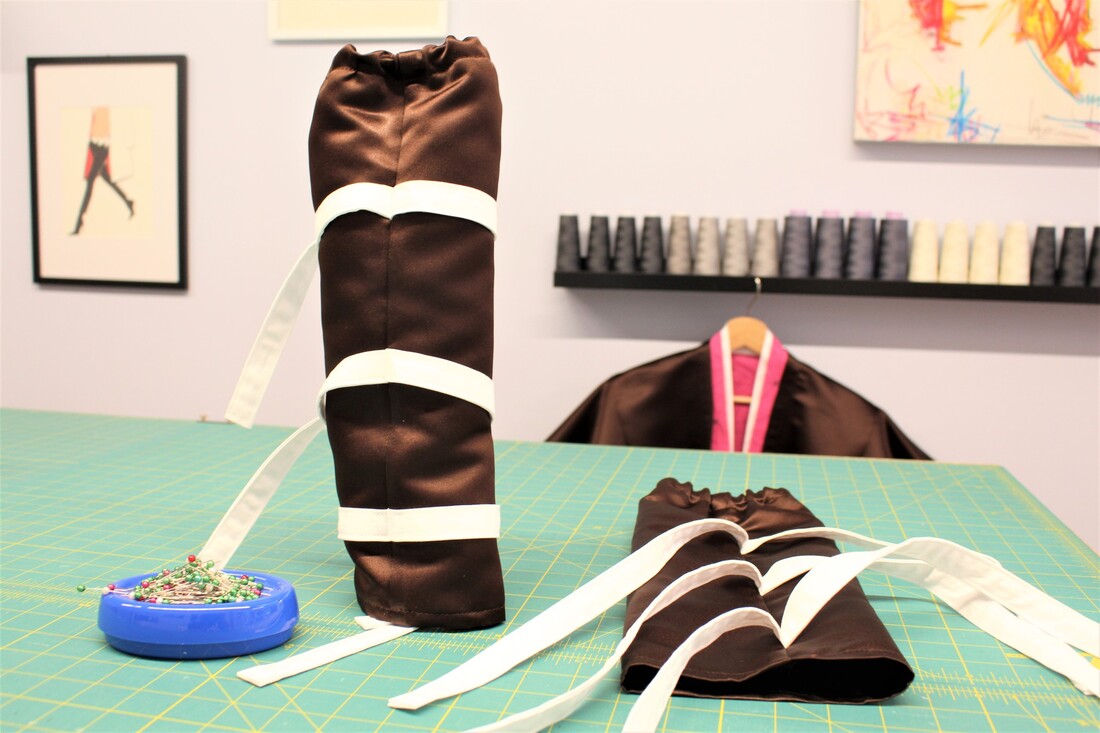 AccessoriesFinal touches included a distinct pink hair ribbon and a face mask. I hand stitched the hair ribbon to ensure no top stitching was visible. Nezuko technically wears a bamboo muzzle. I opted for a face mask with the same colors so my niece could wear the costume to school.
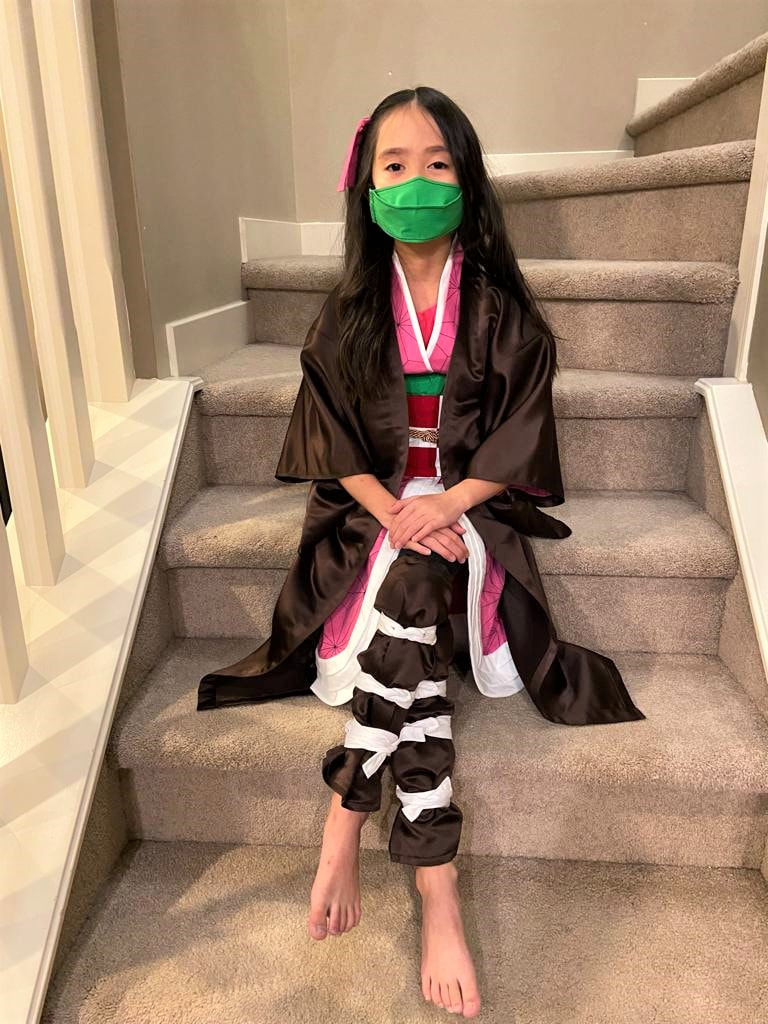
Final LookI started this project on Sept 24 and finished it on Oct 20. Just in time to have it shipped out to my niece for Halloween. I am happy to report that it fit perfectly! When she wore it to school, kids would yell out "Nezuko!" in the hallways. This melted my heart.
A big shout out to my amazing sister in law for taking the final look shots. Let us know in the comments if you want to see more costume related posts.
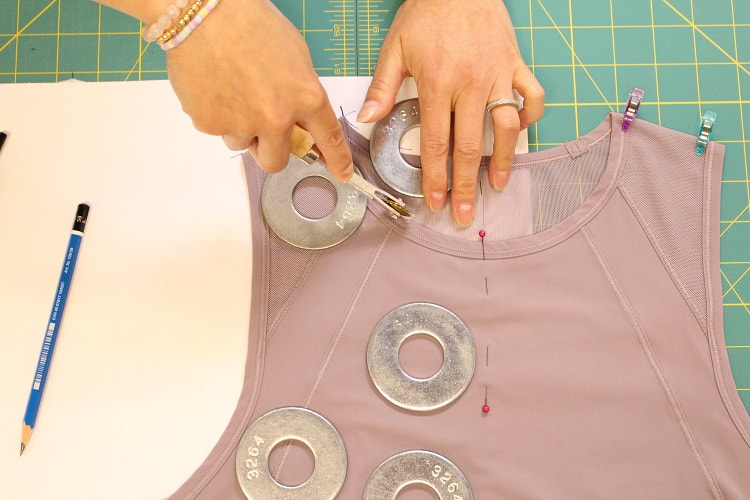
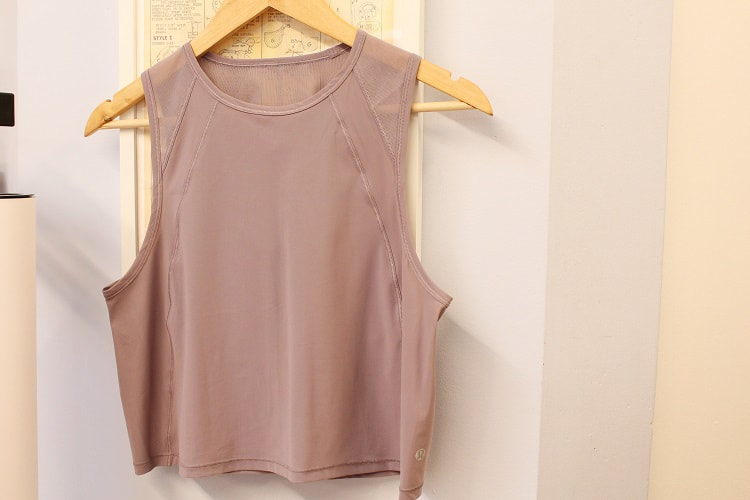
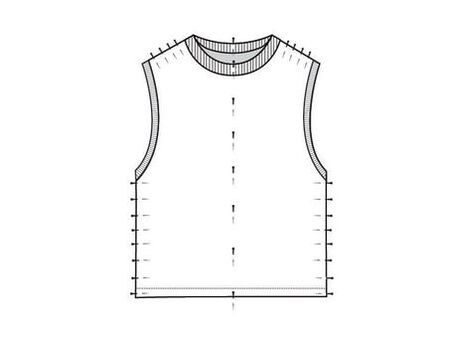
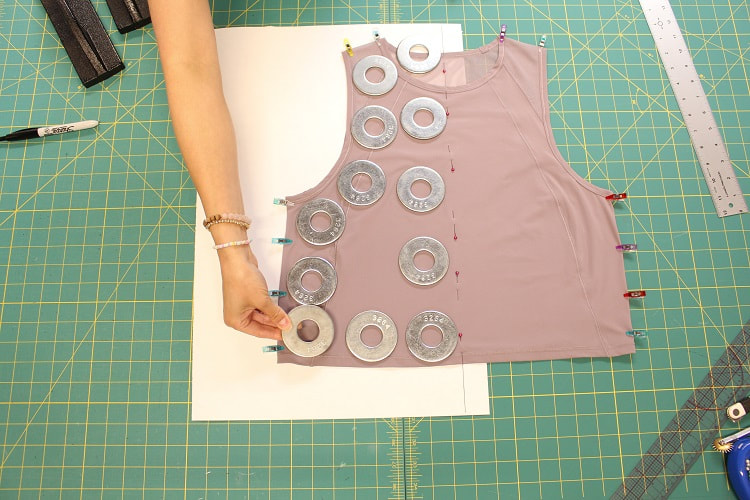
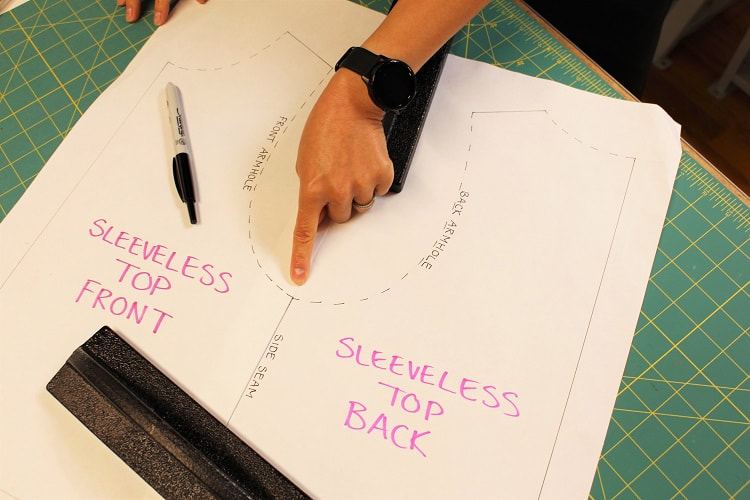
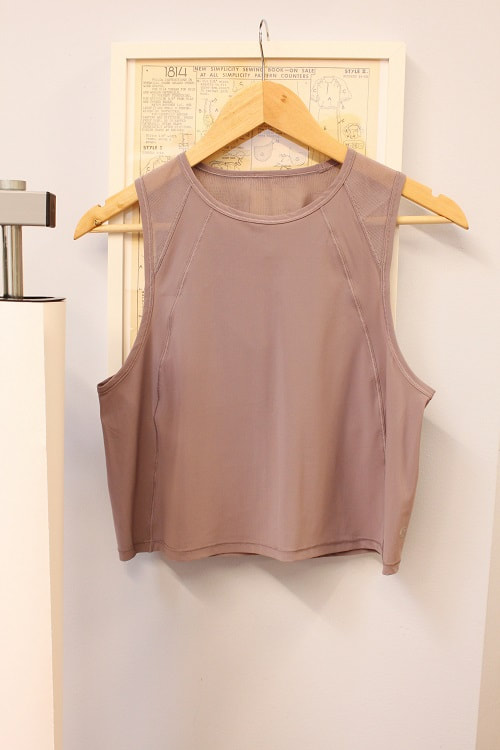
Happy Sewing! Created by Sheila Wong Studios. This draft-a-long has been a long time coming. March 2020 to be exact. Due to Covid, my Reverse Pattern Drafting workshop at Maiwa School of Textiles got cancelled. Many students reached out wishing to still learn digitally. Some signed up as clients to learn one on one with our studio, while others waited for this draft-a-long. Thank you so much for your patience. Reverse Pattern Drafting (what we call it in our studio), is the process of extracting out a 2D pattern from an already sewn 3D garment. This is a great way to learn basic guidelines in garment drafting, and you get exposed to what pattern shapes look like. When I was younger, this was the way I learned how complex patterns like sleeves, plackets and collars looked like. In this draft-a-long, we are going to keep things simple with a sleeveless knit top from Lululemon. You can use a knit or a woven. This draft-a-long is just for the main front and back sections of the top. Hem finishing's will be addressed in another detailed draft-a-long. Here are a few important things to keep in mind before starting.
Drafting SuppliesOnce you have a sleeveless top picked out, get your drafting station prepared. 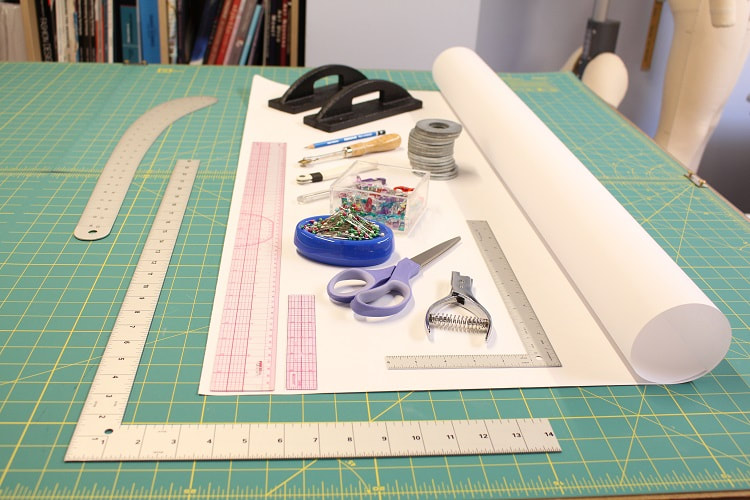
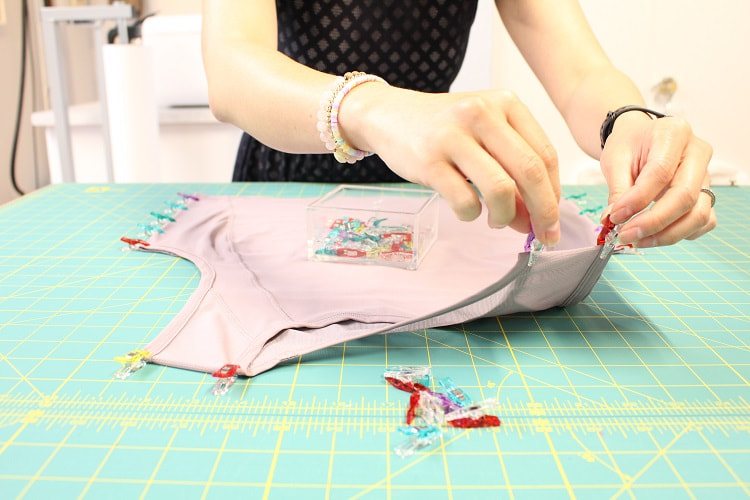
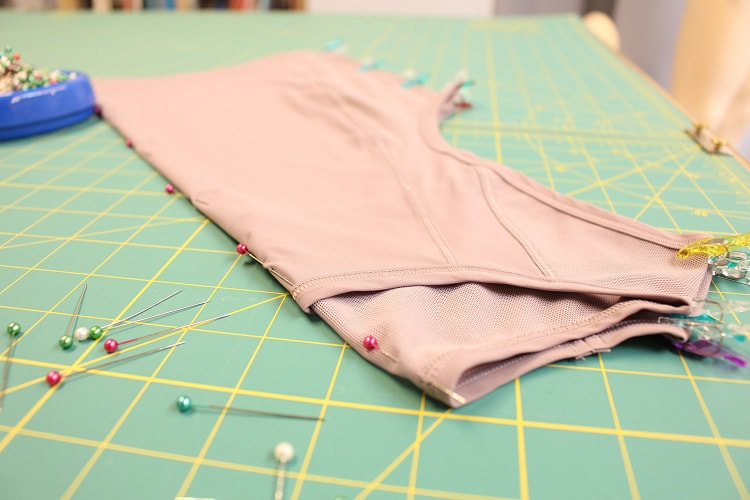
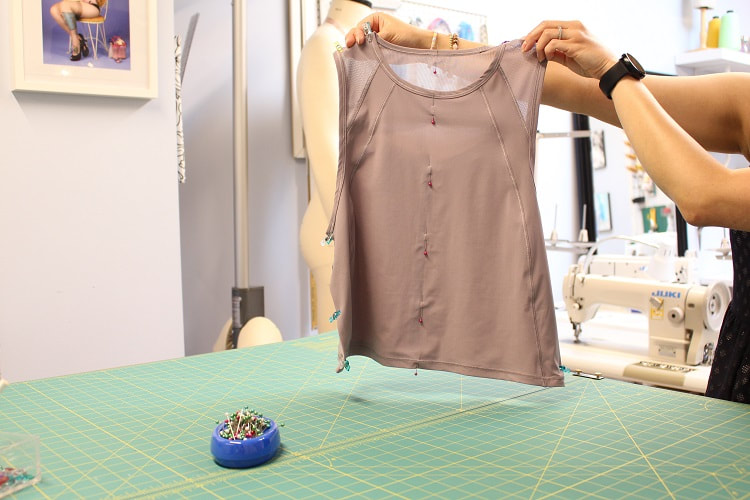
Step 1Establish side seams and shoulder seams by laying garment flat and pinning seams balancing the front and back of the garment. This will stabilize the garment during the next few steps. A great alternative to pins are mini wonder clips. I can be seen using them below.
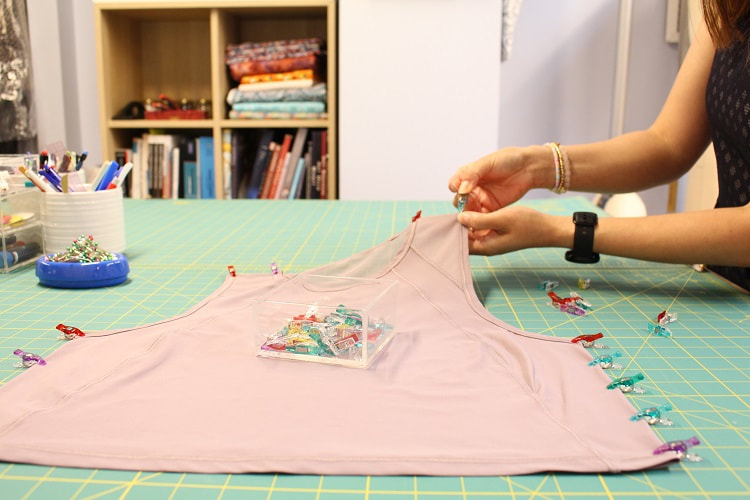
Step 2Fold the garment in half along the center front (CF)/center back (CB) line with the front side of the garment facing out. Mark the fold line with either chalk, pins or thread basting. Establishing CF and CB lines are one of the starting points in pattern drafting. In this example we will pin the center line.
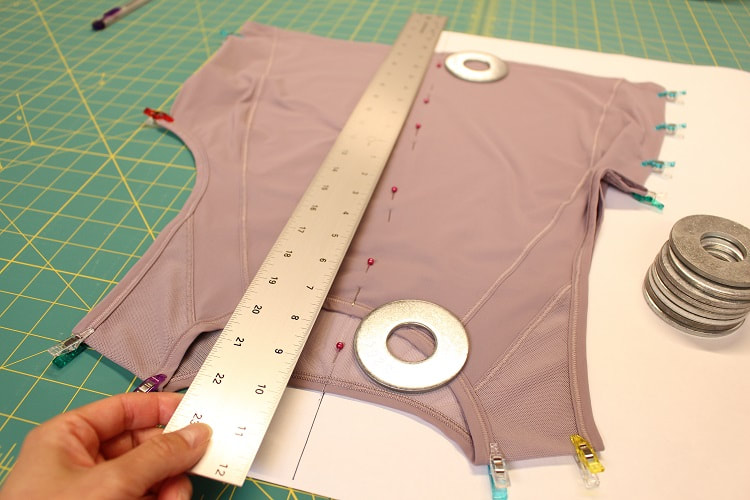
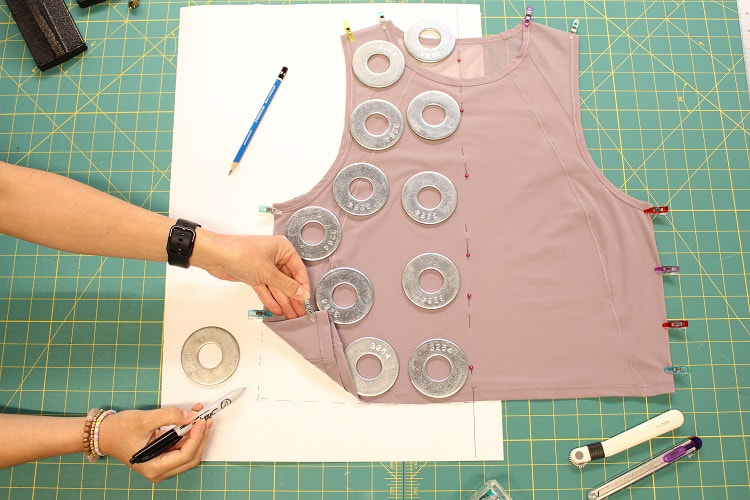
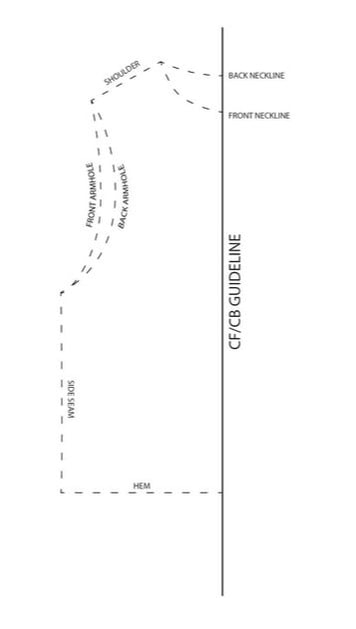
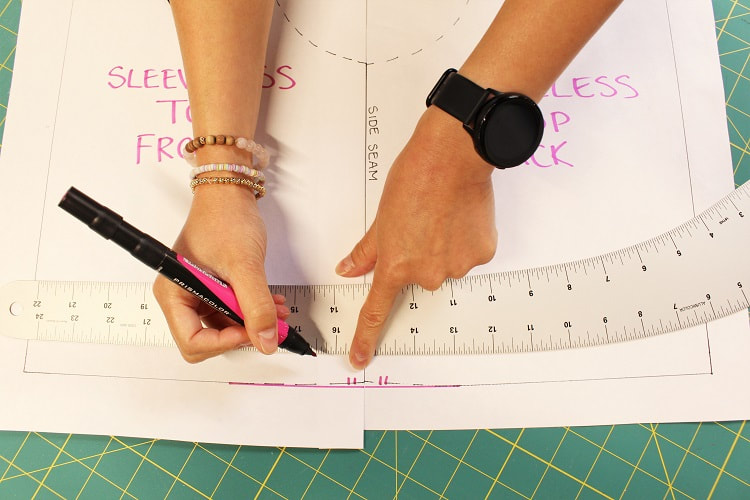
Step 3On drafting paper, draw in a line a few inches longer than the center back length of the garment. Label this line CF/CB GUIDELINE. This guideline can be drawn close to the edge of the paper. 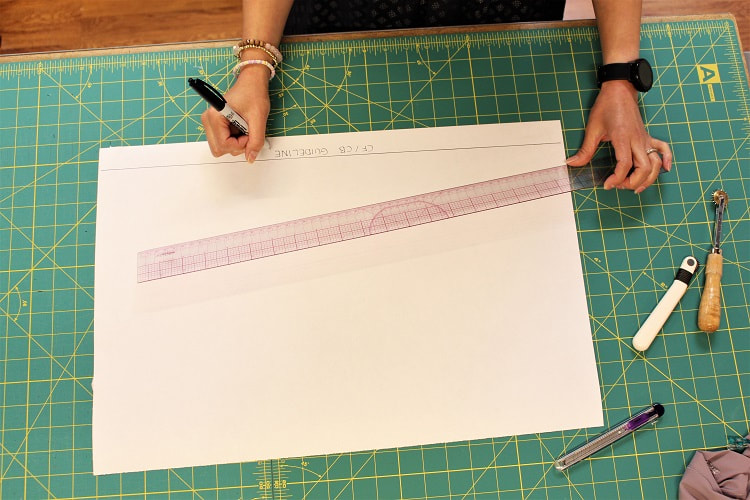 Step 4With the garment unfolded and the front side facing up, lay the garment on top of the drafting paper, lining up the pinned CF/CB GUIDELINE on top of the line marked on the paper. Start by lining up the back neckline and the hem. Hold in place with weights. Use a ruler to help ensure the remainder of the center line is straight. Once straight, weigh the remainder of the center line down to secure garment from moving off its center.
Step 5Weigh down the remainder of the garment. Smooth out any wrinkles in the garment, but avoid stretching. Be sure to check on the center line as it needs to remain stable or subsequent angles will be distorted.
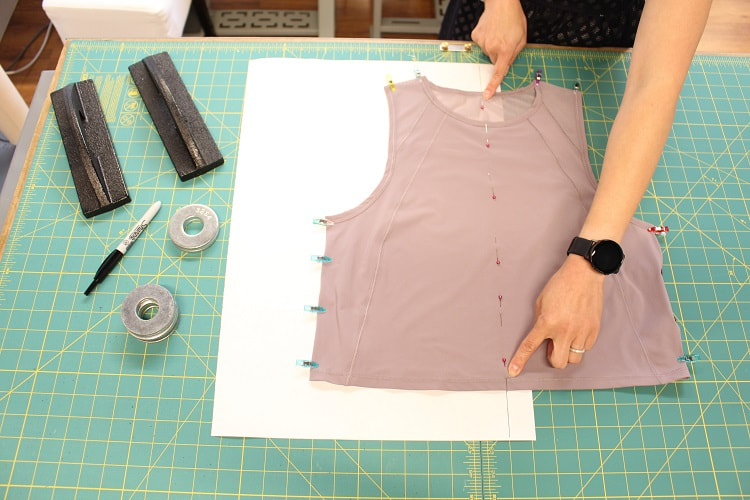
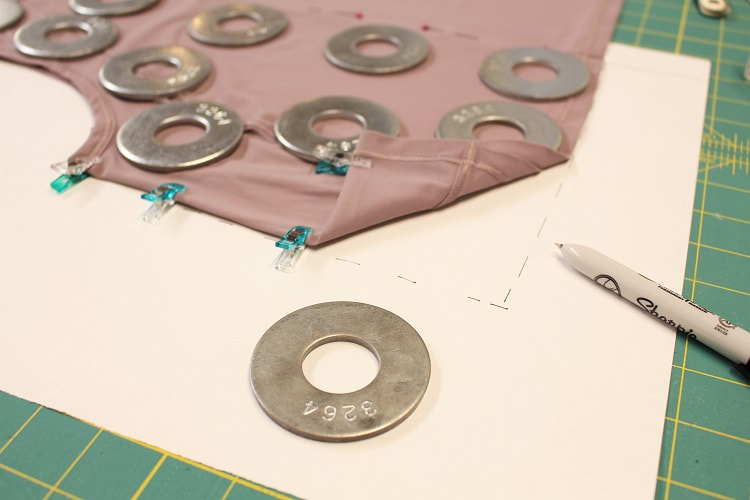
Step 6We will be creating a working pattern with the front and back shirt nesting on top of each other. Using either a sharp tracing wheel or a pencil, extract out the necklines, shoulder seam, armholes, side seam and hem. A pencil can be used for the edges that are exposed to the paper. For areas like the front neckline that have fabric right under the edge, a tracing wheel will need to be used to allow you to transfer shape onto paper.
If the openings (armhole and neckline) have bound seam finishes or just a turned in seam allowance, extract outer most edge. If the openings have a ribbing finish, extract along the seam where the main garment and the ribbing are attached. Drafting for binding and ribbing will be drafted separately and based on true front and back main body pattern pieces at a later step.
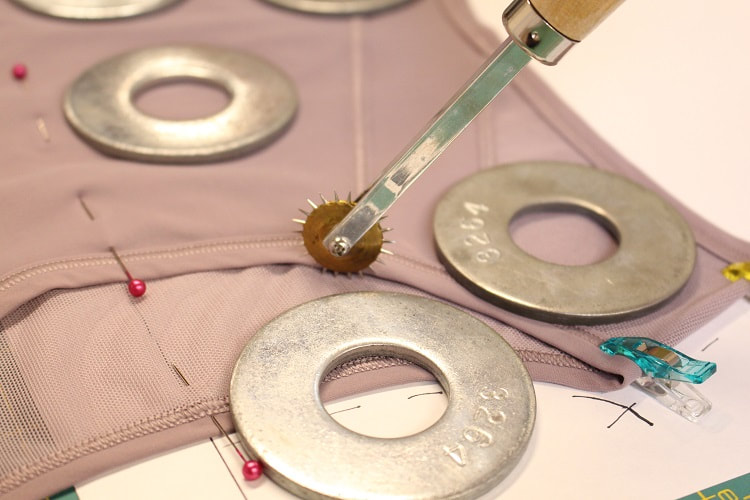
When using the tracing wheel, avoid pulling the fabric. Use opposite hand to help hold flat the garment. We really like using a super sharp tracing wheel while reverse pattern drafting. If you do not have one, simply use a large hand sewing needle to create the necessary markings.
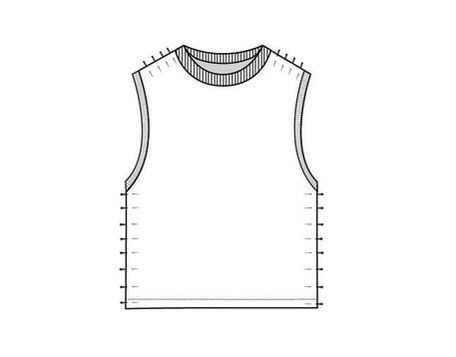
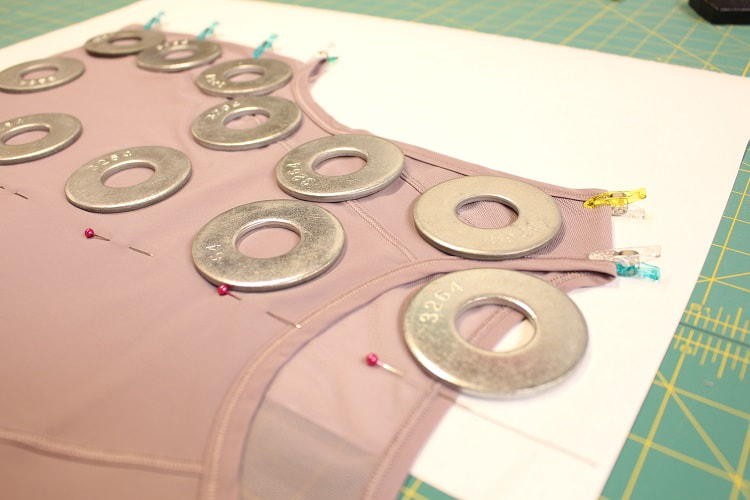
Step 7Remove garment from tracing area, but keep it close by for reference. Using a pencil roughly mark in traced edges in using a dashed line. It will be easier to see for future steps. For demonstration purposes we are using a sharpie. Please use a pencil. 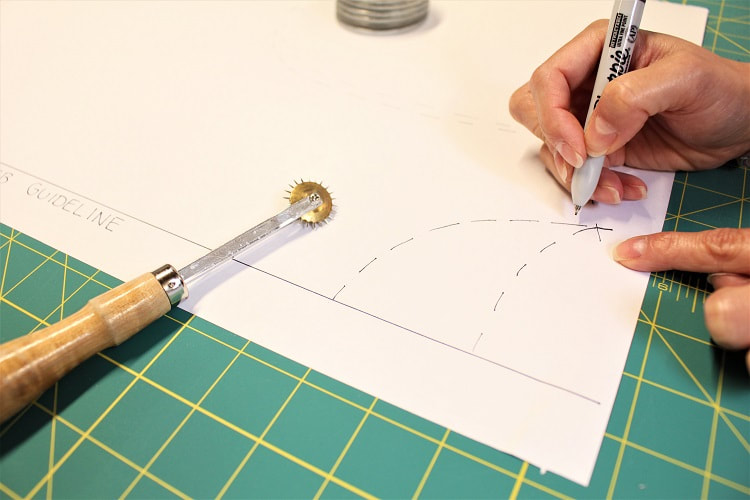 Step 8Label all edges. This is especially important for necklines, armholes or asymmetrical hems.
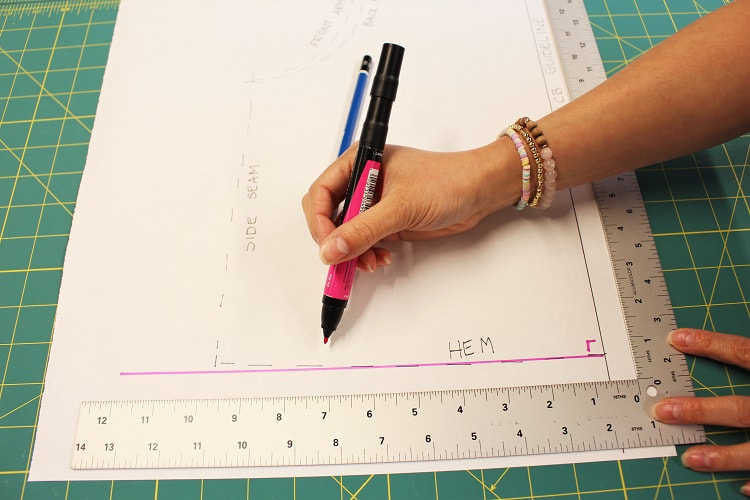
Step 9After initial extraction of edges from the garment, it is time to clean up all the edges using our drafting rulers. The initial extraction is roughly drawn/traced and should not be used as the final edges of the pattern pieces. The CF/CB GUIDELINE is already established. All edges that intersect with the CF/CB guideline should be cleaned up first. Using the L ruler to square out a guideline along the hem, front neckline and back neck. This will help ensure that as those edges pass through the center of the body, they are sitting perpendicular and balanced. The only time that it is not necessary to square out a guideline, is if you have a V neckline.
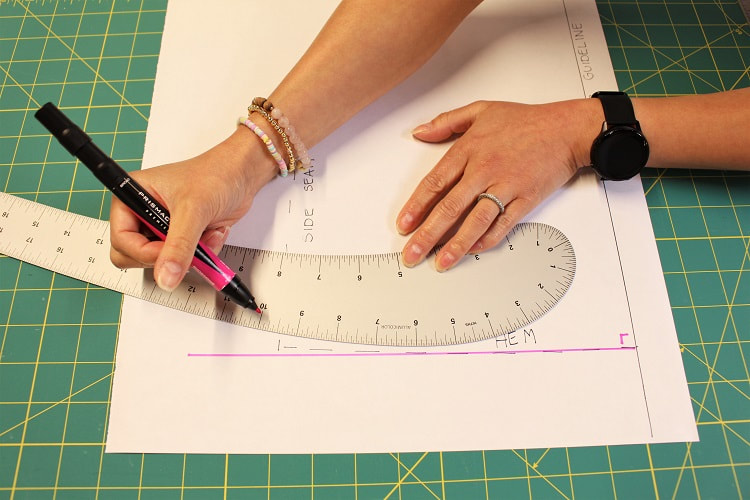
Hem: If you know the hem is straight, just make sure the hem is 90 degree to the CF/CB GUIDELINE. You may notice the side seam pulls up slightly. Do not work this into your pattern. This occurs during the sewing and laundering process and is natural in the end product. If you know the hem is slightly curved as a design feature, just ensure the hem runs along the squared out guideline for a few inches as it directs towards the CF/CB GUIDELINE. Using a French curve, slide ruler in to fit as best into the extracted curved section of the hem. Your goal is to have the curved and straight section of the hem look like one gentle line.
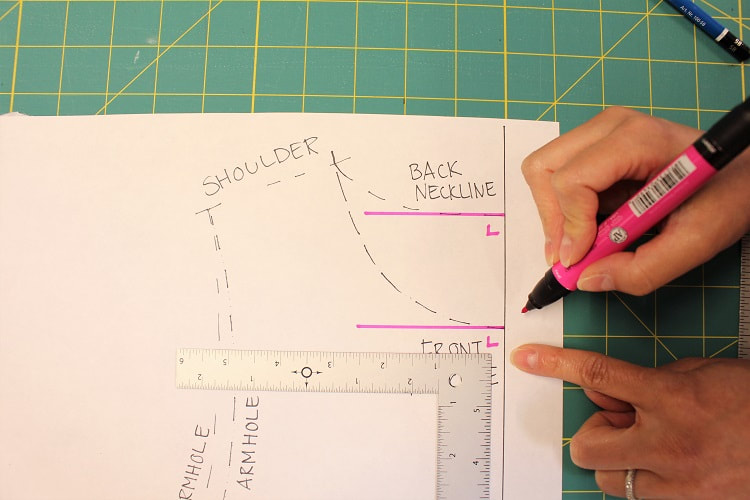
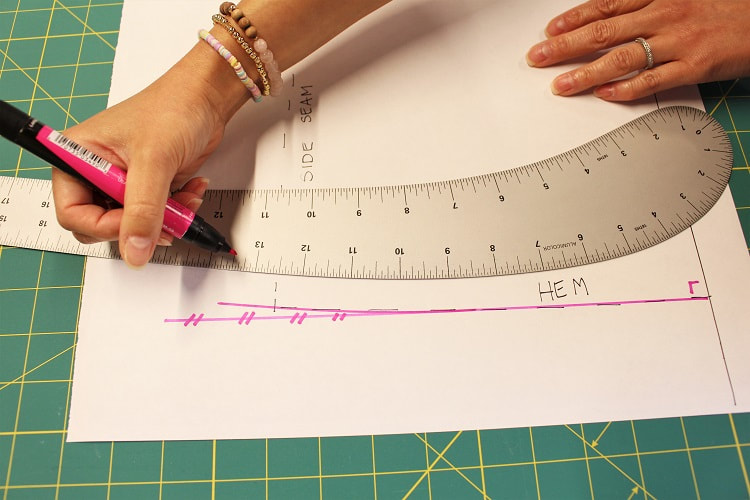
Front Neckline: Using a French curve, slide ruler in to fit as best into extracted neckline. Stop when bottom of curve hits the squared out guideline. The curve should blend into the guideline to remain perpendicular for approximately ¾” to ¼” prior to CF/CB GUIDELINE. Unless you have a V neckline. Line up ruler to hit the shoulder neck point.
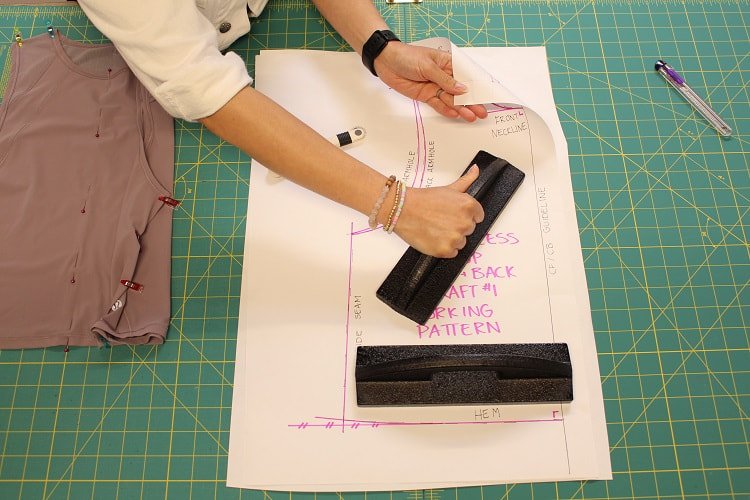
Back Neckline: Use the same concept as the front neckline except a traditional back neckline will not be as deep and will run along squared out guideline for approximately 1 to 2”. Line up ruler to hit the same shoulder neck point the front neckline hit. Step 10Using a straight ruler draw in shoulder seam starting at the shoulder neckline point. Extend line slightly out to allow for any adjustments that may need to be made to shoulder length. Feel free to measure shoulder seam on garment and reflect this exact measurement on the pattern, or just use the shoulder tip point as the end of the shoulder edge. 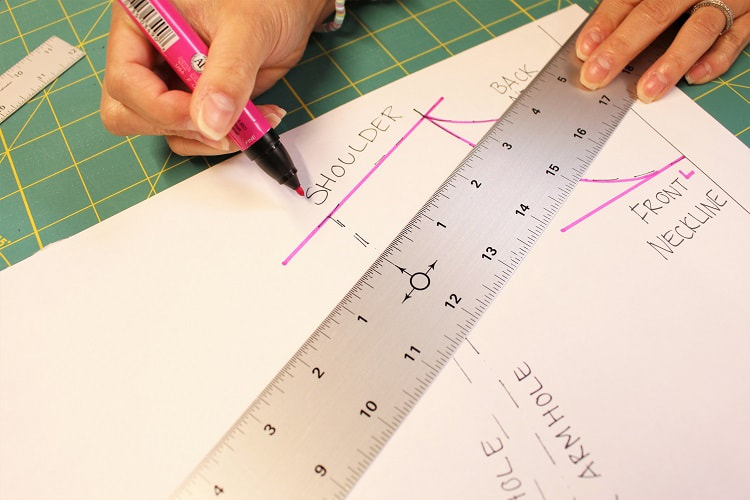 Step 11A side seam is typically straight or has a gentle curve coming in towards the body around the waist. Draw in accordingly with a straight ruler or French curve. Be sure to hit your marks at the hem and the underarm points. 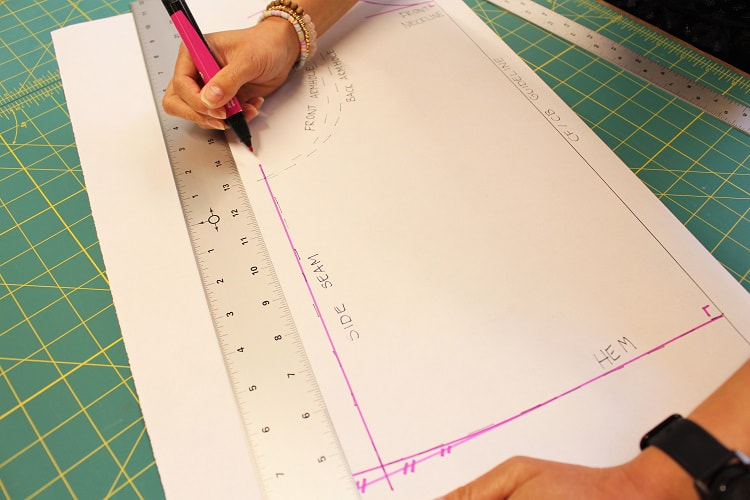 Step 12Using a French curve, clean up the armhole(s). Be sure to hit your shoulder tip and top of side seam points. 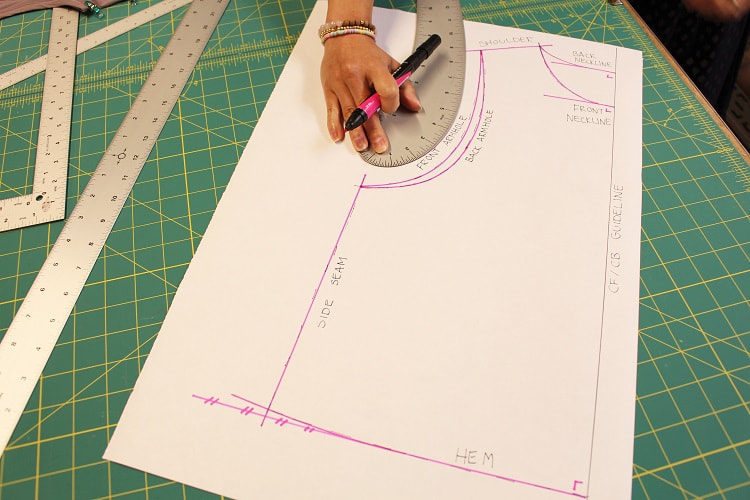 Step 13Label this pattern with the following items. The more you pattern draft, the more you will be thankful for organized and labelled patterns. SLEEVELESS TOP WORKING PATTERN DRAFT #1 FRONT AND BACK TODAYS DATE Step 14Place additional drafting paper below working pattern and trace out front and back of shirt separating the two. Using pattern weights and a tracing wheel to transfer shapes to below paper.
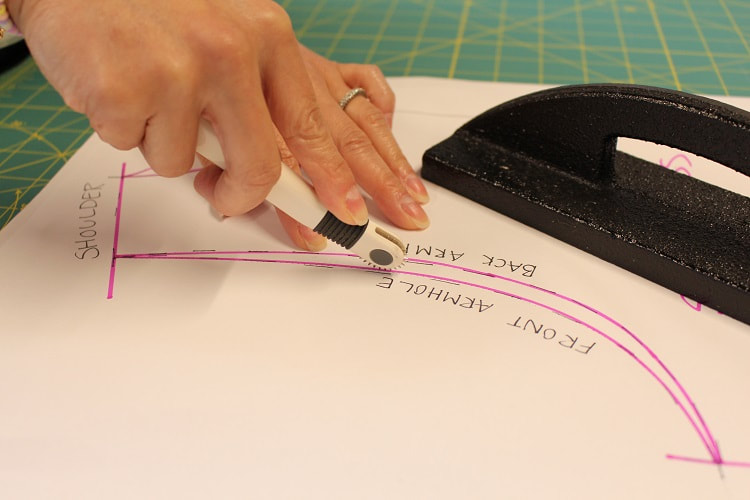
Step 15Remove working pattern from tracing area, but keep it close by for reference. Using a pencil, draw in all edges using rulers. It is very important to flip one pattern piece prior to drawing in, to ensure we can true pattern pieces in the next step. If you flip, you will be truing pattern pieces on the same side of the body. Your pattern pieces should look something like below. 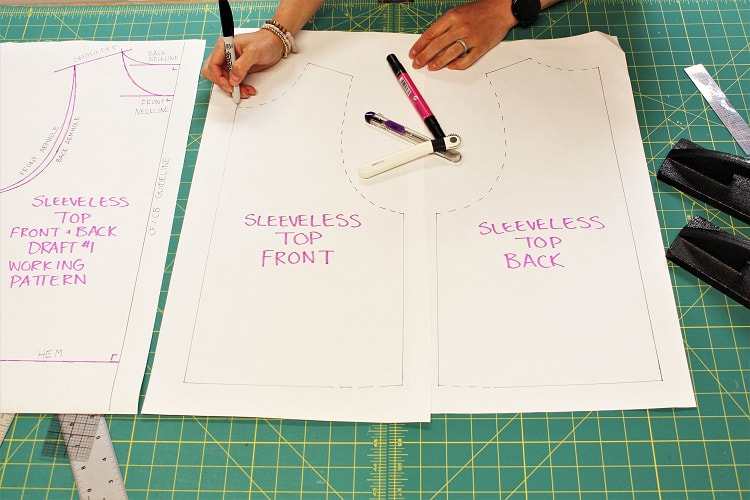 Step 16Now it is time to 'true' the pattern pieces. This is the concept of ensuring the pattern pieces can be sewn together, and any curves or lines intersecting or running from one pattern piece to the next, will look good together. I like to think of this as— ensuring my puzzle pieces will fit. With this sleeveless top, there are only two major seams that will get sewn together between the front and back pieces. Side seams and shoulder seams. Side Seam: Fold under the excess paper along one of the side seams. Place the side seam edges of the front and back, on top of each other. Pretend they have been sewn together. First, check that they match in length. Adjust if required. Next, check that the armhole front to back looks smooth. I always imagine a wine glass shape. A reminder that some armholes can look more red wine, white wine or even a champagne flute. With extremely dropped armholes, the front and back armholes may come to a point or create a V at the base of the armhole. Next, check that the front and back hem run smoothly into each other. If the side seam has a gentle curve, just fold under the excess paper for a few inches below the armhole to allow you to true the armhole. Unfold, then just fold the last few inches above the hem to allow you to true the hemline.
Shoulder Seams: Fold under the excess paper along one of the shoulder seams. Place the shoulder seam of the front and back on top of each other. First, check that they match in length. Next, true the neckline and armhole. As these curves pass over the shoulder seam they should blend into each other smoothly. Adjust if required. It is common for there to be a little bit of blending to correct the run of the curves, front to back. 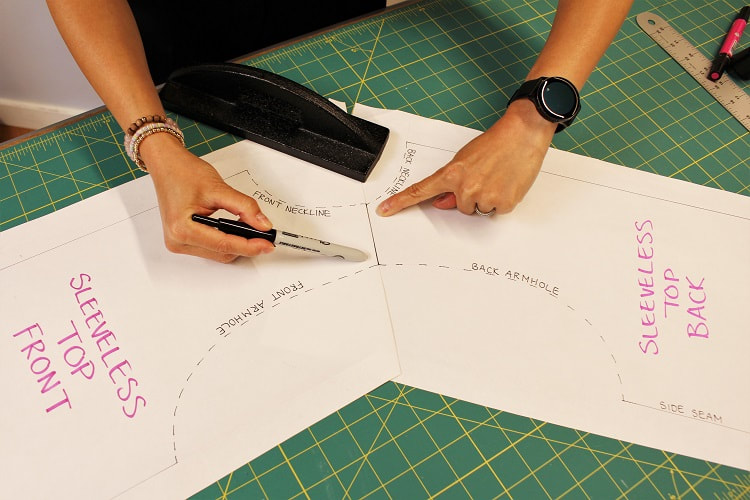 Once the front and back pattern pieces are true, you can decide how to finish off the openings of the shirt. Openings include the neckline and armholes. You can draft a ribbed, bound, turned in, facing, or even fully lined finish. Stay tuned for another draft-a-long in the works, going over these hem finishes. Step 17Lastly, please add seam allowance, notches, grainlines and labels. In our example, we have added 1/4" seam allowance along the shoulder seams and side seams. 1/4" is a normal knit seam allowance width. When a serger machine is set up for two needles, the stitch width is 1/4", perfect! 1/2" seam allowance is used along the neckline and armholes, as we intend on drafting a ribbing hem finish to these areas. 1/2" will allow for the raw edges of the ribbing to be basted together with an overlock stitch first. Then, when stitching the ribbing onto the garment opening, the blade will cut away the basting stitch (1/4") to reduce overall bulk. I always try to avoid to overlock stitches on top of each other. 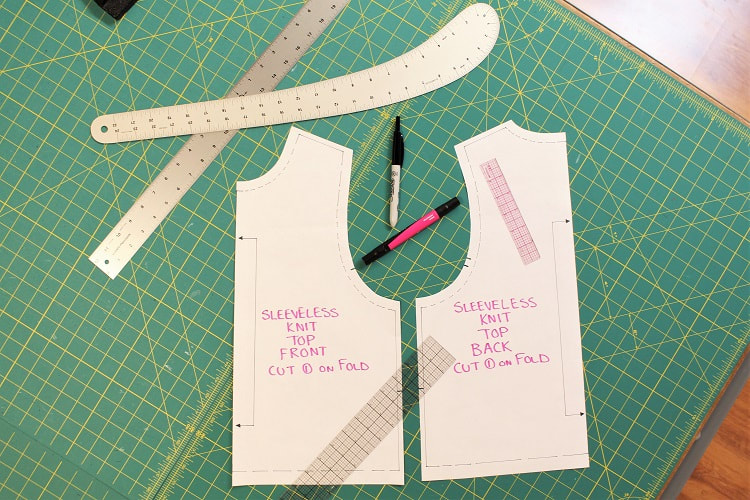 A sleeveless top does not require many notches. One notch matching the front and back side seam mid-way is great for alignment. Even though we do not have sleeves, placing one notch on the lower front armhole and two notches on the lower back armhole provide an immediate visual cue while sewing, especially when the neckline depths are similar. The armhole notches will be important in our next draft-a-long when we cover hem finishes.
If you want to learn more about pattern drafting, contact us for one on one lessons.
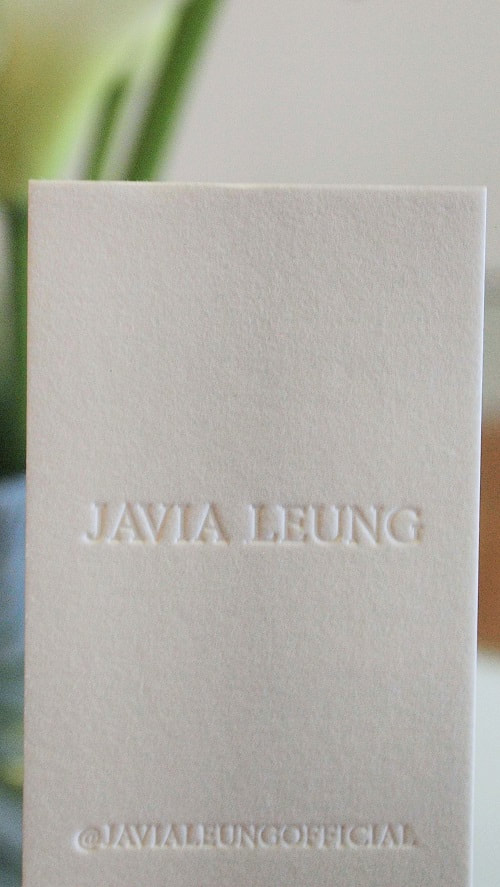
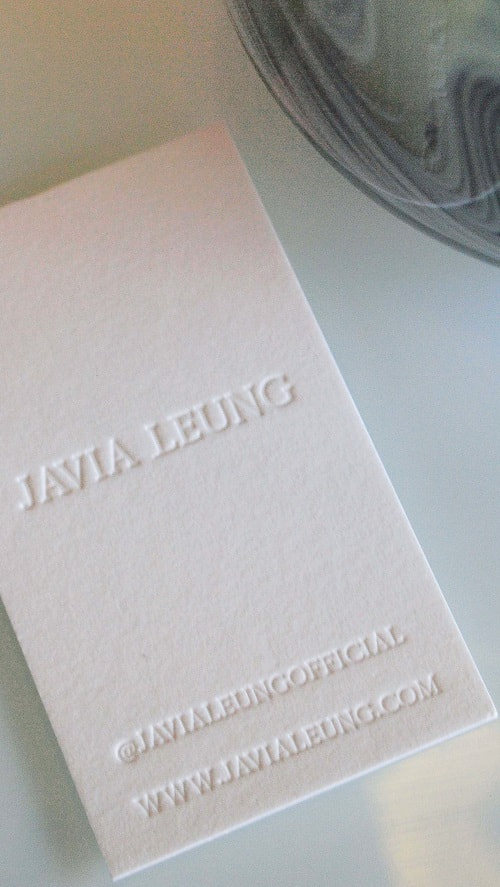
Happy Drafting! Designed, photographed and written by Sheila Wong Studios Welcome to a new series where we feature our amazing clients! For over a decade we have been able to build up a community of clients who continually amaze us with their creativity and drive to create thoughtful garments. For this series, our intention is to share their design story, how they started their clothing labels or personal journey into a custom wardrobe, and inspire you to be creative. This month I sat down with Javia Leung, who has been a client in our studio since May of 2017. In the four years, I have assisted Javia through a variety of pattern drafting, draping, fitting and garment construction techniques. Providing Javia with the necessary skills to create designs such as a pleated dress, denim jacket, pleather pants, pleather skirt, dolman top, bow dress, gathered linen skirts, silk bow top, block drafting, and a variety of wool coats- to name a few.
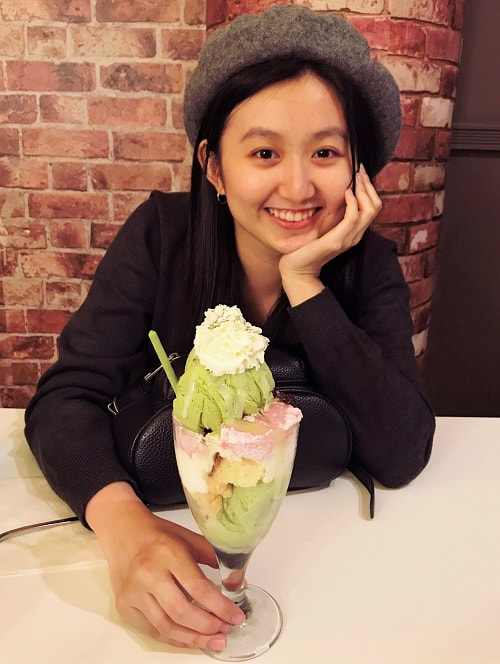
Photo Credit: Miguel Paulo Campos Javia attended the Fashion Design program at LaSalle College. Graduating in 2020. In 2019, Javia spent the summer with our studio to complete a Digital Marketing work term in association with LaSalle College. She worked directly with Natasha, our Digital Media Assistant in creating digital marketing content for our blog and socials. She even pitched the idea for our Bubble Tea Tote: Sew-a-Long. In 2021, our focus with Javia has been more on developing new designs for her clothing label and gaining a better understanding of digital pattern drafting with Accumark software. Chatting with JaviaRead on to learn more about Javia’s thoughtful clothing label and a Q & A that will hopefully inspire you to thread up your sewing machine. Q: How did you get started sewing? A: I was always interested in fashion but was never good at sewing, so instead I went to a fashion design camp when I was 18 years old where we were taught more on the design development process of fashion. I attended a similar program when I was 21 years old and the instructor there told me that a good designer needs to understand how garment construction works. Once I finished my undergrad degree, the first thing I did was sign up for private sewing lessons (with Sheila), and my love for sewing started there. Q: What is your favorite design you have created? A: I don’t have a single favorite design but my current favorite designs are the pieces for my upcoming collection. The theme of my collection discusses self-growth and discovery from grief and loss, so I took classic silhouettes and added twists to them to symbolize transformation.
Photographer: Ignatius Tam Q: What part of the design process do you find the most rewarding? A: Seeing the finished garment come to life is the most rewarding part and always feels surreal to me.
Q: Machine or hand sewing. Which one is your preference and why? A: Both! I like to include a mixture of both machine and hand sewing in my designs— machine sewing for its clean lines, and hand sewing for a personal touch.
Q: What are your favorite fabric stores? A: For local fabric shopping, I love Atex Designer Fabrics. For online shopping, I like browsing Mood Fabrics and Swatch On. If you ever get a chance to visit Tokyo, Nagato and Momo Fabrics are my favorite fabric stores in Nippori Textile Town for high-quality fabrics. Nagato also does overseas shipping and can assist you in English. Q: Working for yourself has many challenges. Have you ever found time(s) when you have lost motivation? What do you do to gain motivation? A: Yes, definitely— working for yourself is so different in many ways. Being a very visual person, I often get inspired by looking at my surroundings and the people around me. Sometimes I would see a cool design detail and try to sketch it down or sneak a photo of it. I also feel the most inspired during my travels. However, all of that was impossible due to the pandemic. Luckily, I do have a habit of keeping inspirational images categorized by theme on my phone, as well as having a physical scrapbook of images I collect. Going through them helps me feel inspired and excited to create. Staying connected with my peers from fashion design school has also been very helpful for keeping me motivated. We spent endless nights working together and experienced the same hardships while designing, so we know and understand each other well. We’re always rooting for each other and happy for each other’s successes. Coming to the design studio and working with Sheila also inspires me a lot— she is honestly one of the most nonjudgmental instructors/mentors I’ve met and pushes me to challenge myself. Overall, I think that having a strong support system is so important. Q: You recently started your clothing label. Do you currently have a full or part-time job in addition to your label? If you do, how will you decide to go full-time with your clothing label? If you do not, please share why. A: To be perfectly honest, running a label is expensive, and I believe that it would be easier to have a full or part-time job to help fund business expenses and to have more capital to expand the label. Attending the fashion design program was very physically and mentally intensive. By the time I finished the program, I experienced burnout. The pandemic also started in March 2020, which was when I finished school, so in the end, I took some time to rest. I focused on what I really wanted to design mindfully and slowly, something that wasn’t possible for school projects due to tight deadlines. I am happy to say that my health is in a much better state now. Going forward, I want to look for technical and design-related jobs that will help me to gain more knowledge and skills in this industry. However, I also want to keep working on my label because it keeps me passionate, curious, and inspired. Q: What skills do you wish you already possessed or been stronger before starting your own business? A: I wish that I had better budgeting skills because there are so many hidden costs of running a business. I’m generally a free-spirited person and not too business-oriented, and that has proven to be difficult for creating strategic and consistent social media content. The whole idea of planning what to post ahead of time and thinking of captions etc. sometimes feels exhausting, but marketing is an area that I would like to improve on. Interestingly enough, this seems to be a common concern for other designers I know, so many of them have hired someone else to manage the marketing side of the label. At school, I was very grateful to have learnt how to use Photoshop, Illustrator and Indesign. However, I do want to learn more about the design aspect of graphic design— I do all the packaging design for the label, which is one of my favourite parts of making a brand. I really wanted to go into packaging design when I was younger so getting to design my own labels fulfills this dream.
Q: If you could give advice to your past self before you started your label, what would it be? A: Advice that I would give my past self, or anyone who is considering becoming a fashion designer: You don’t have to start big—take small steps and celebrate the small accomplishments. Your first collection doesn’t have to be your best collection (and probably won’t be) so don’t be afraid to get started— I believe in you!
Javia Leung is a womenswear label that focuses on timeless, minimalist, and sculptural designs. Our brand was born out of the desire to create high-quality and functional garments that are meant to be collected, cherished, & worn for a long time. We hope that our clothing helps to accompany others on their journeys of self-exploration.
Photographer: Grace Liu
We hope you have enjoyed this new Client Feature series. We will continue to showcase more of our talented clients. Please let us know if you have any questions you want us to ask in our next interview.
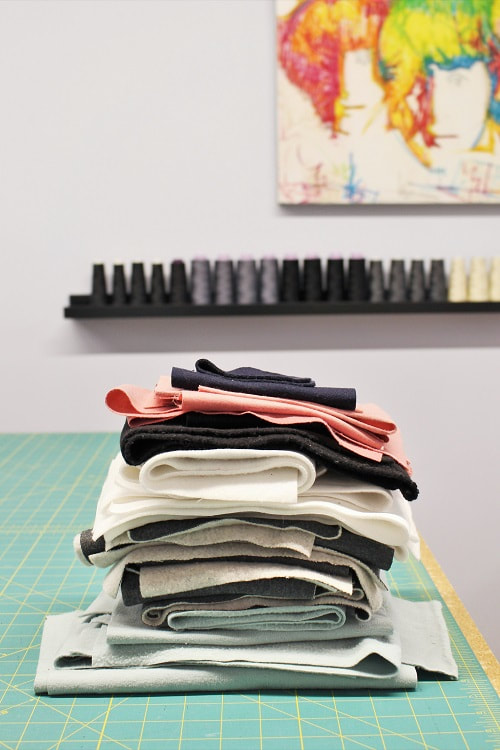
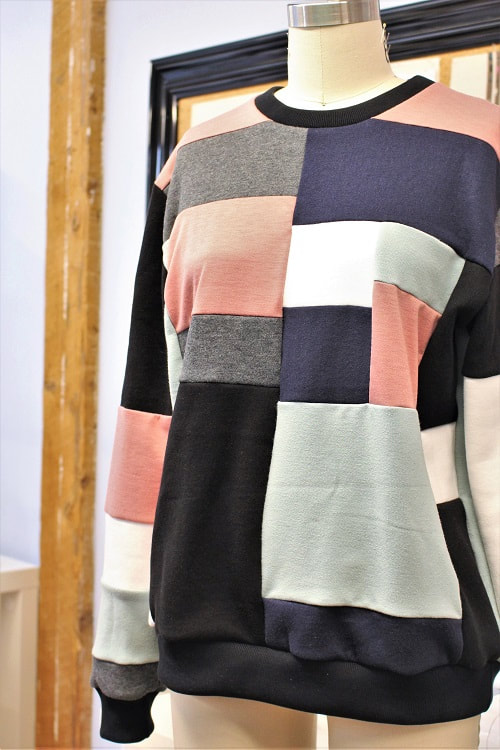
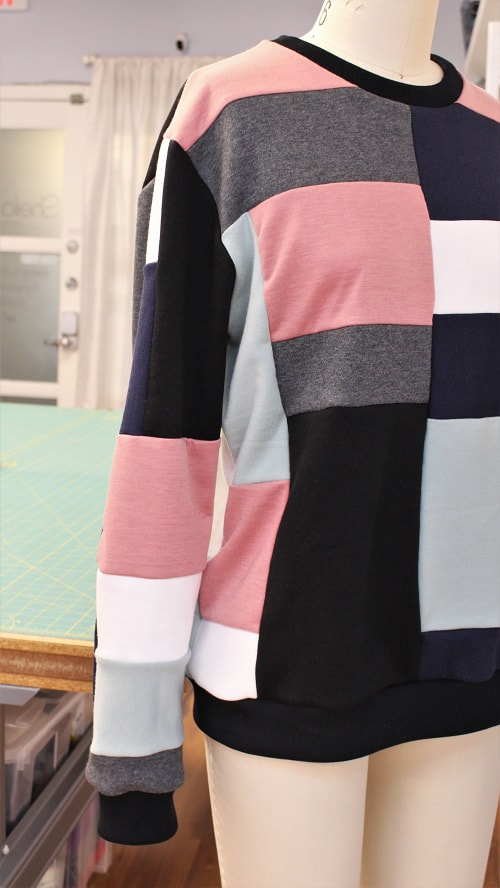
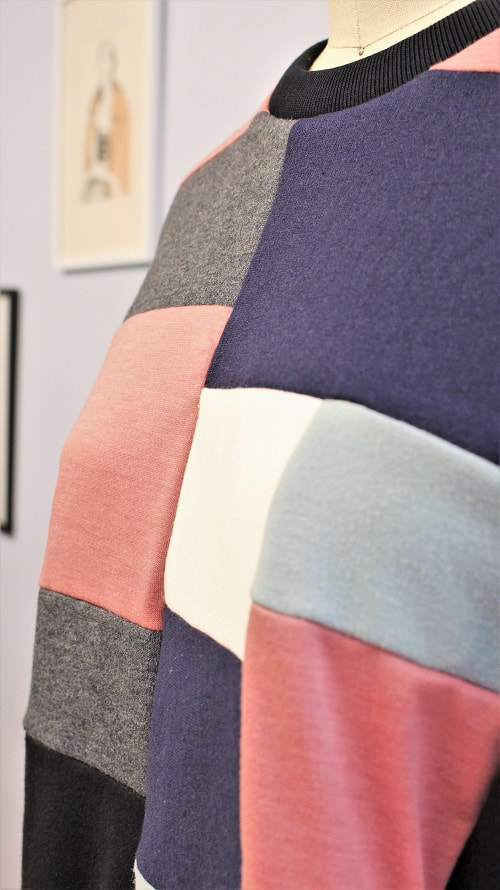
Starting a clothing label in 2021 looks a lot different than 10, or even 5 years ago. It is not good enough to just create sellable designs and produce thousands of garments each season. Well, it might be good enough for some, but here in the studio, we have found many new designers struggle with this ethical dilemma. Consumers want to be more informed about the businesses they are purchasing from, sometimes even part of the process. Designers need to be more mindful of their potential environmental impact. Some are finding the balance of how many units sold is enough to live but not harm our planet. There is no absolute solution to this balance, but finding what you think as a designer is right and what you can stand by is a start. Happy Sewing! Sheila Wong Studios. Incorporating patchwork and quilt work into designs can be seen all over social media right now. Not only is it popular, but it has the ability to decrease leftover scraps otherwise thrown out from past designs. Patchwork is a composition of pieces of fabric in a variety of shapes, colors and sometimes fabric weights. Kind of like a hodgepodge. Patchwork is similar to quilting, but I feel like quilting is more calculated- less hodgepodge. But! I am not an expert at quilting, so feel free to share your insights in our comments below. You can read more about incorporating quilting techniques into designs in our Latest Design: Quilted Heart Bag. 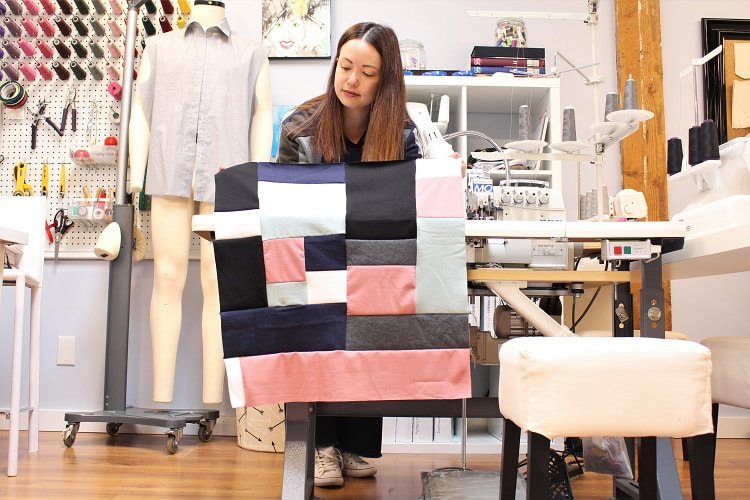 Your feedback has been so positive on our Instagram when we shared our patchwork sweatshirts last year. It is now time to share with you our process for creating patchwork fabric, sewing with patchwork fabric, and tips to make it enjoyable! Read on to gain a better understanding of how we take a pile of scraps and turn them into in this case, a knit sweatshirt. You can incorporate patchwork fabric into your fabric pattern. Bonus for you is we made a Fast Forward Edition video going through the steps.
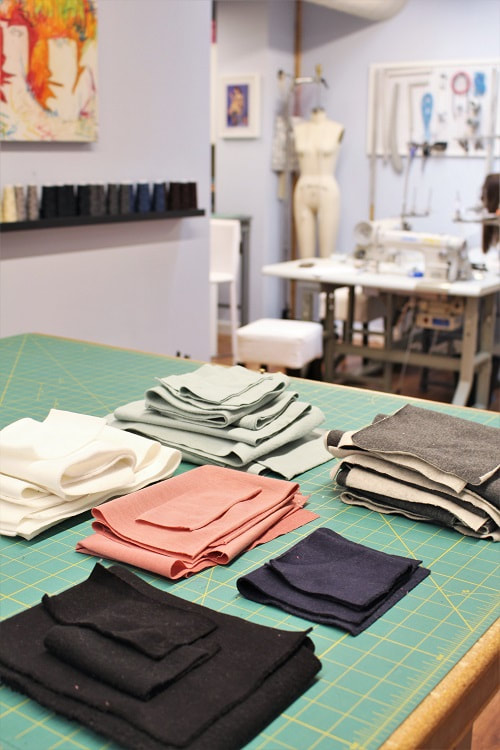
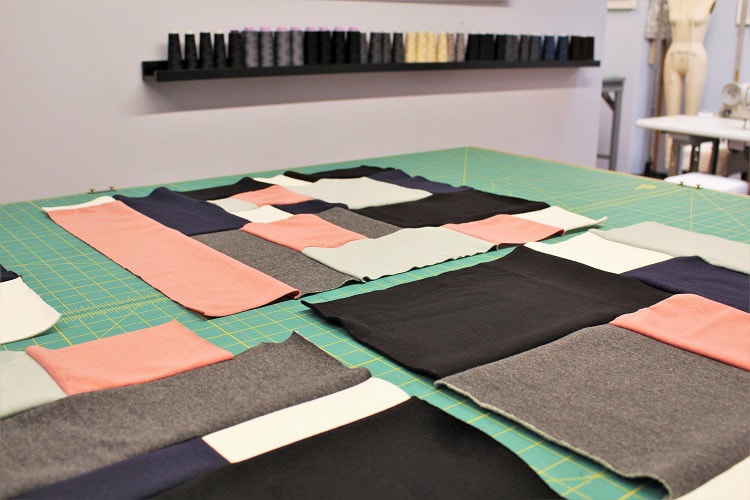
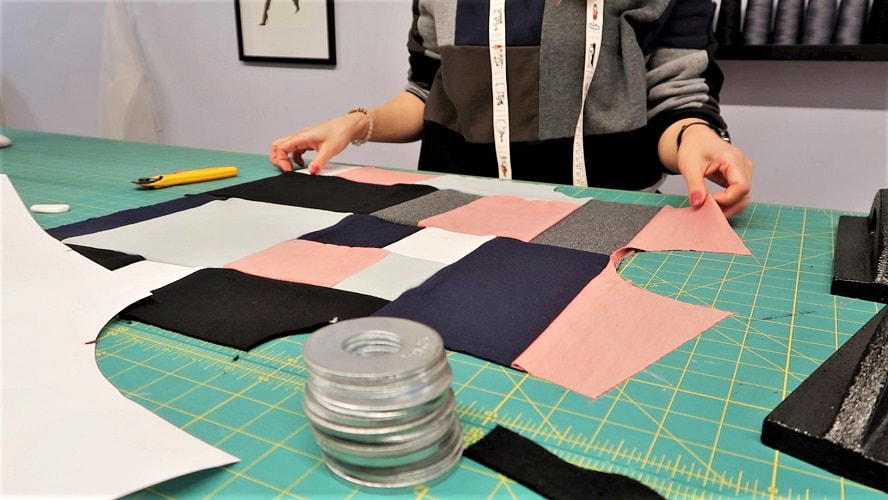
Creating patchwork fabric can be as easy or complex as you would like to make it. You could keep things simple with 2-3 colors and maintain the same dimensions for each patch cut out. You could get as complex as us, with up to 6 different colors and patch together a variety of cut out dimensions. In this section I will go over the steps you should take to create patchwork fabric for your next design! 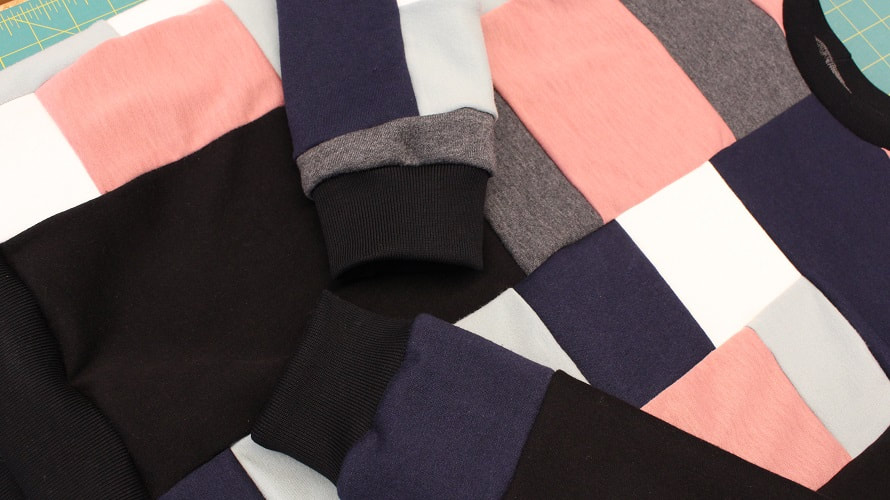 STEP 1Go through your fabric scraps to see which ones are suitable for the design you have in mind. It is important to have the pattern of your design close by to ensure you have enough fabric. Decide upon your color palette at this time. You can always remove a color if it doesn't feel right during layout. If you tend to hold on to your fabric scraps, it is best to keep a bin for wovens and a bin for knits.
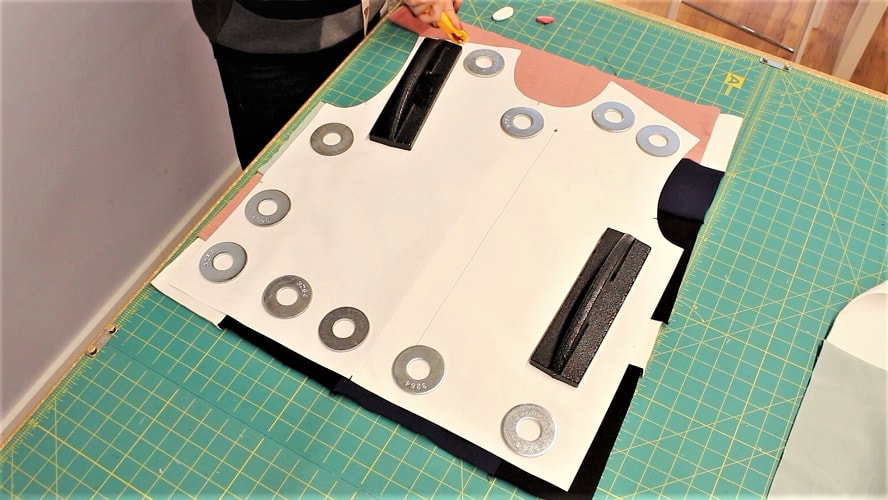
STEP 2With your paper patterns handy, mark out a box on your table approximately 4-6” larger than the current pattern piece you are about to lay the patchwork for. We recommend using draping tape, painters tape, or washi tape! Something you can easily remove. 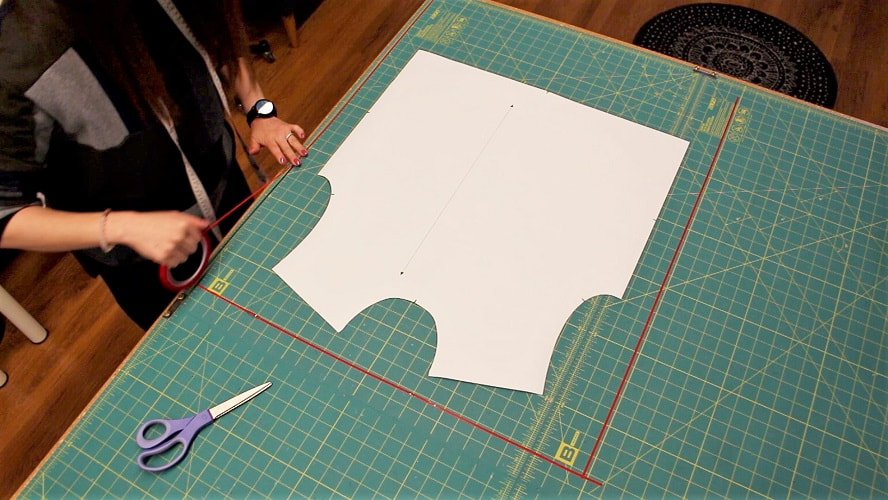 STEP 3Clean up all of your scrap edges to be straight and squared off. Using a quilting ruler and a rotary blade is the easiest way to achieve straight lines. 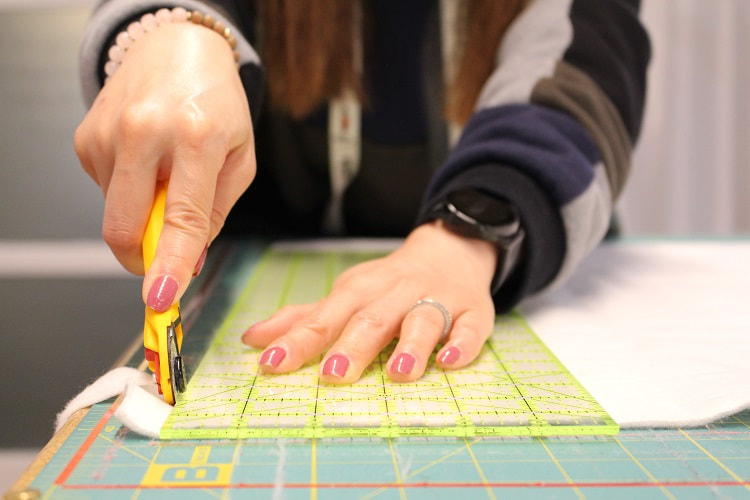 STEP 4Working inside your marked box on the table, lay out possible patch formations. You can trim down large scraps to make more patches. Start thinking about where the corners or seams of the garment may hit on the patchwork fabric you are creating. It is best to avoid seams of the patchwork in these areas. It is not the end of the world, but when you can avoid bulk it is nice. 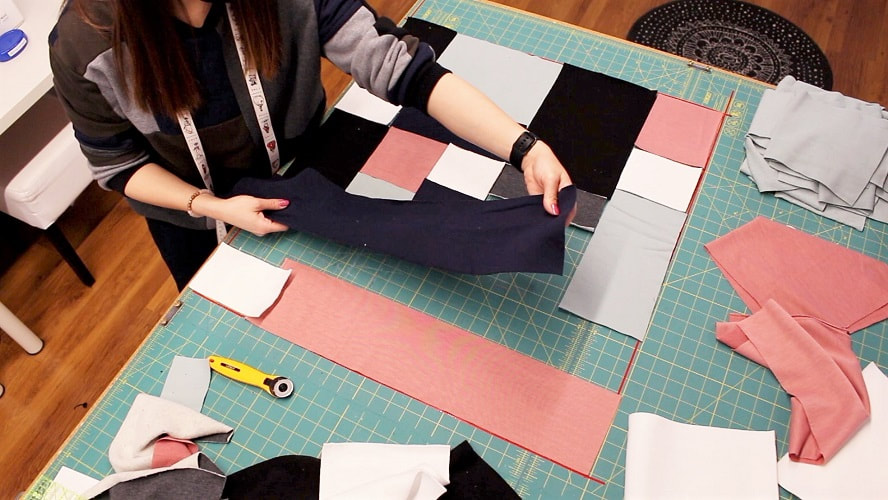 STEP 5Stitch together each piece of fabric to create your patchwork fabric for each pattern piece. Be mindful to not set yourself up for any in-set corners.
Please note in our example, we are working with knit fabric and will overlock our seams with a ¼” seam allowance. If you are working with a woven fabric, you will need to accommodate for your desired seam allowance. Press seams as you go along if you are working with a woven.
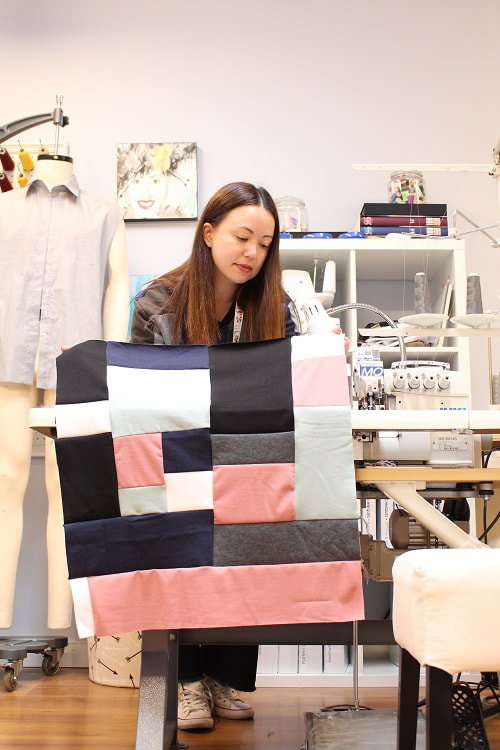
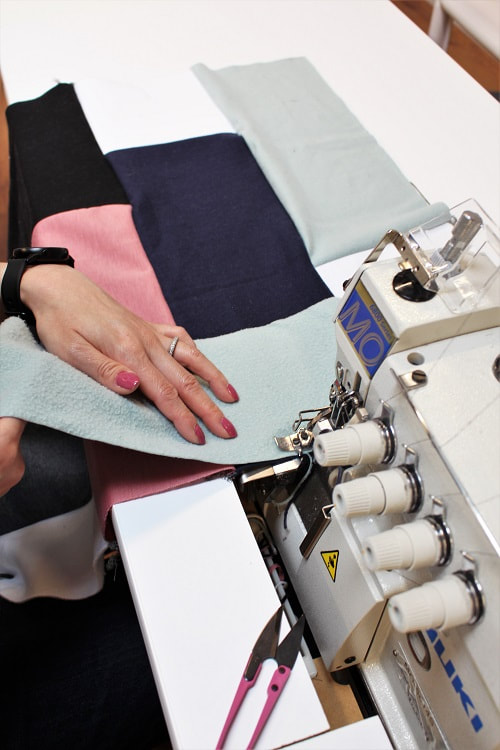
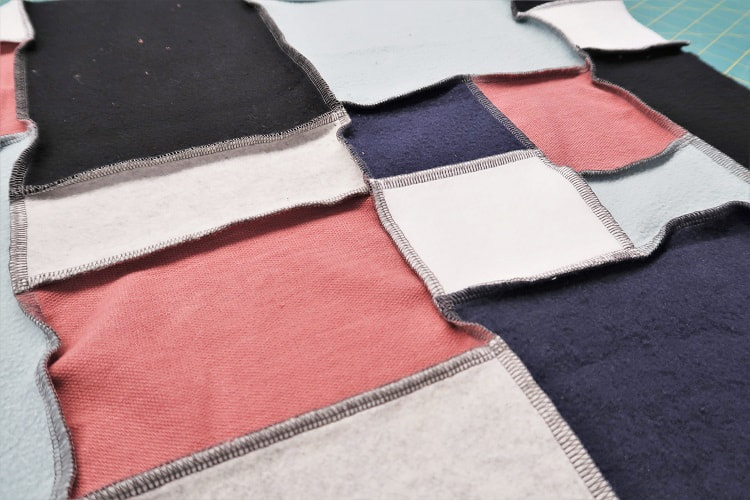
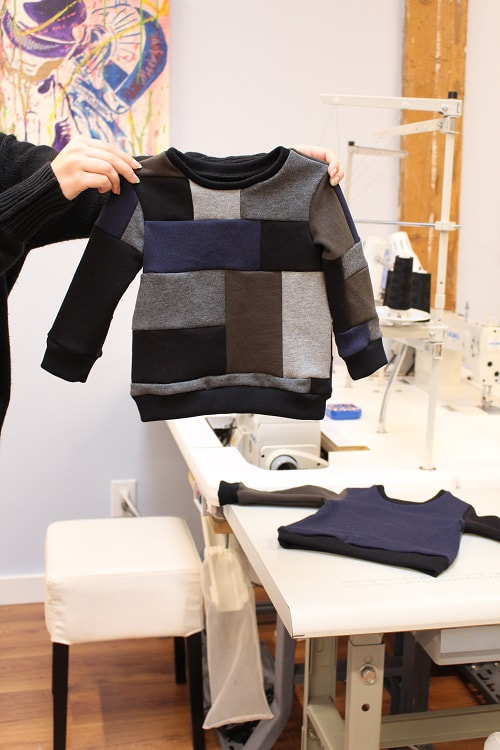
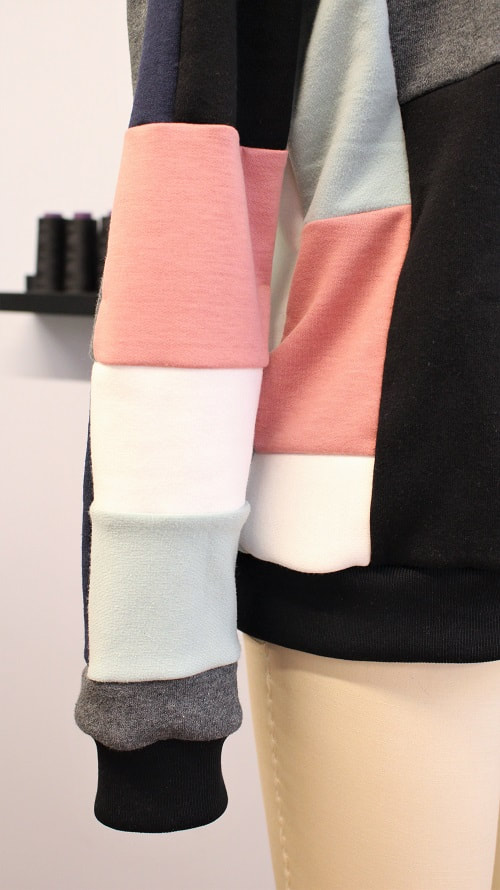
STEP 6Cut out each pattern piece. Our sweater has a front, back, and two sleeves. Be mindful of not placing patchwork seams on garment seams.
STEP 7Mark all necessary notches. Now you are all ready to sew up your design! 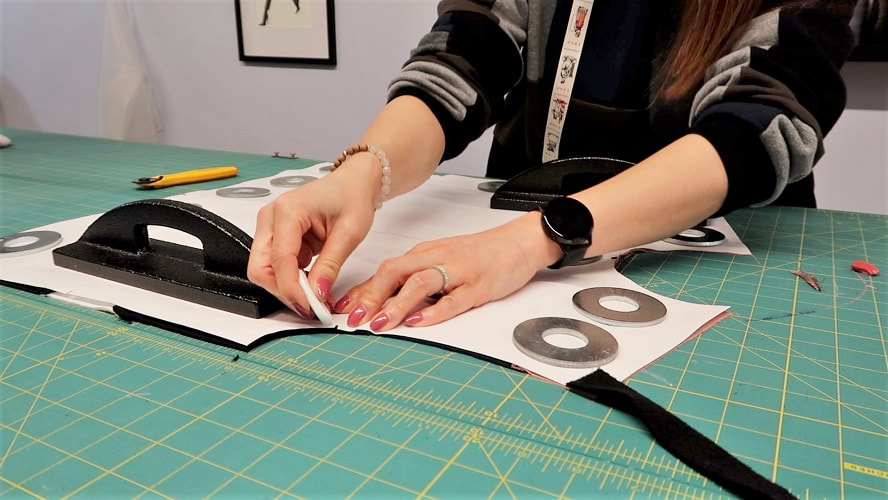 For fun, we filmed the entire process of creating patchwork fabric for a knit sweatshirt, including stitching up the design. Check out our YouTube video for the full Fast Forward Edition. Using what we have is a great way to be sustainable and slow down consumption rates of new materials. Our variety of patchwork sweatshirts were created entirely out of scrap fabric from Fabricana and Atex Designer Fabrics. This was by far our favorite way to recycle those scraps!
Be sure to follow us on Instagram or join our mailing list for insider tips and inspiration.
Happy Sewing!
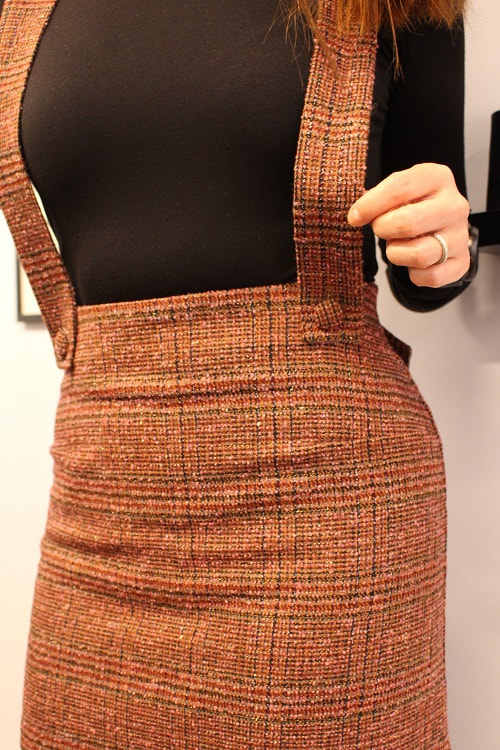
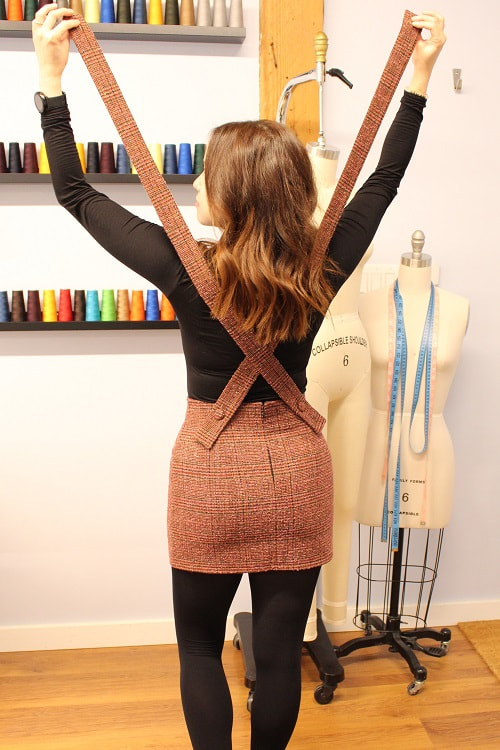
Designed, photographed, and written by Sheila Wong Studios. A straight woven skirt is an item all novice beginners learn while entering into the world of garment construction. You learn a variety of skills from darts, zipper installation, seam finishing, hemming, and basic hand sewn finishes. Our clients in our Intro to Garment Construction course learn just that in one of two projects.
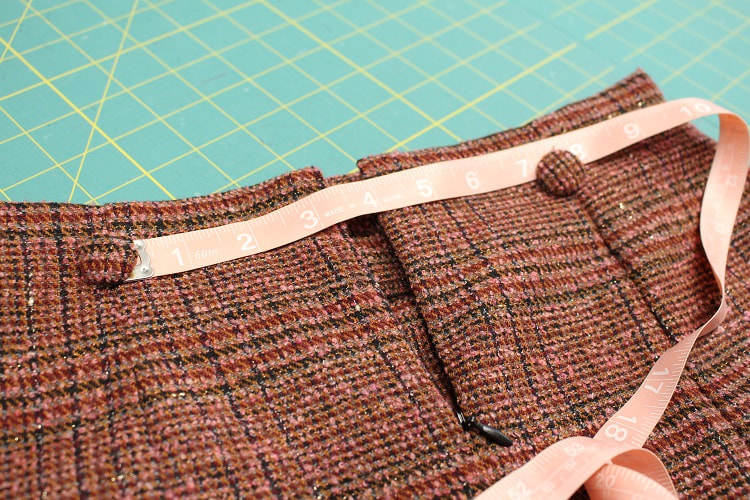
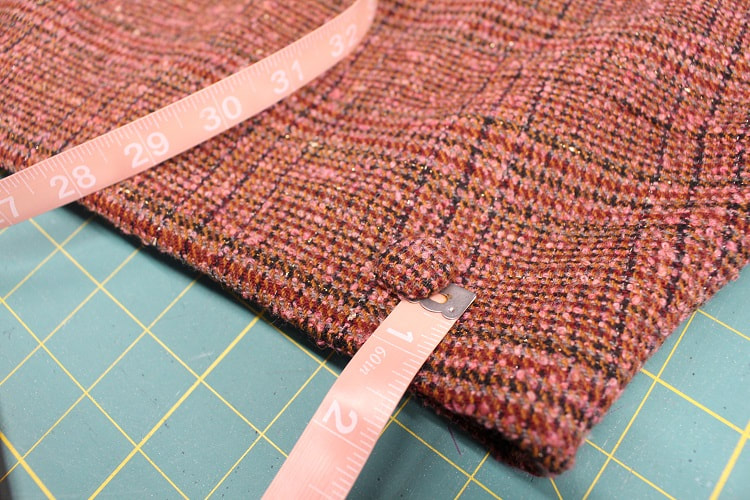
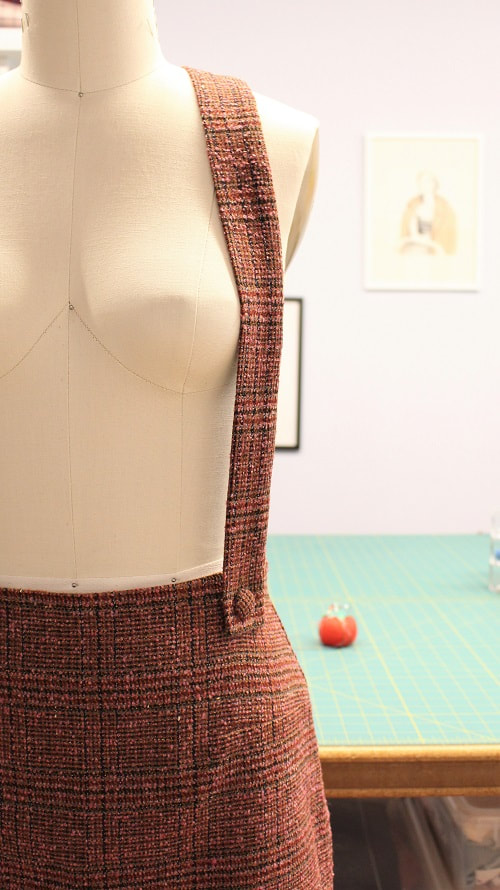
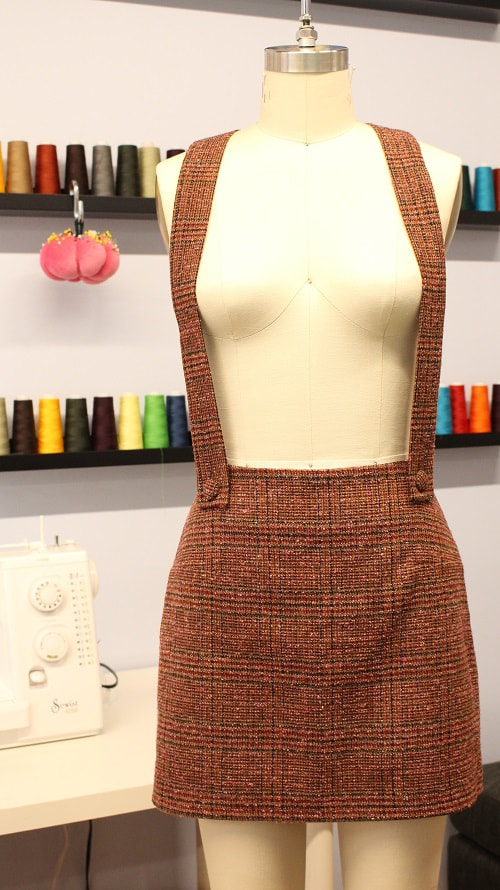
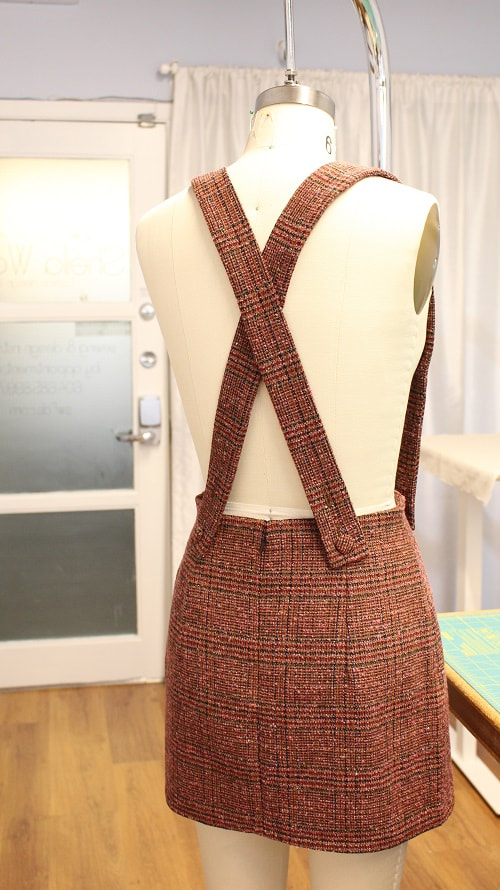
While working with one of our latest clients in Intro to Garment Construction, we demonstrated using a beautiful plaid from Atex Designer Fabrics. Our team really felt the retro color palette and vibe of the skirt could be elevated with some fabric suspenders. I had to share with you the step by step process for many reasons. Fabric suspenders are so easy to construct, it uses up scrap fabric, and you get a whole new look for a skirt. Here is a tutorial on how to measure, draft and stitch up your very own fabric suspenders. Go grab yourself a skirt you think needs an upgrade!  Step 1Decide where you would like buttons placed on the front and back of the skirt. In our example the buttons are approximately 3- 3 ½” away from the CF and CB of the skirt and 1 ¼” down from the waistline.
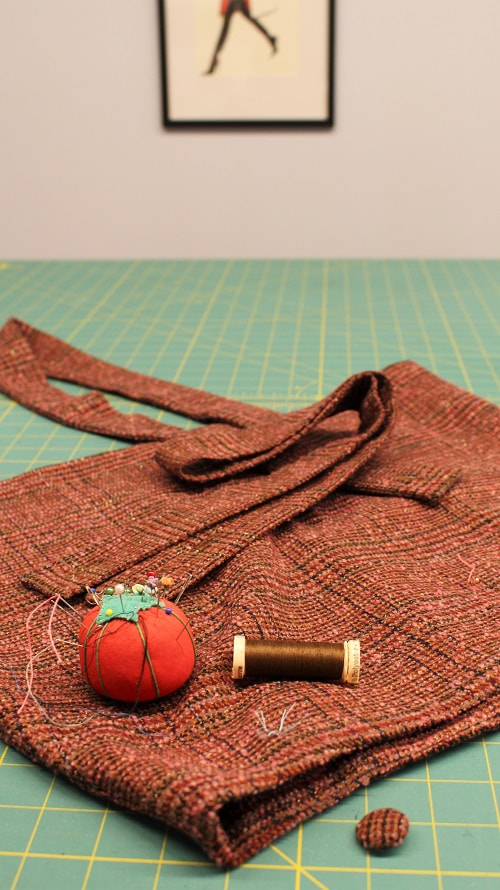
Mark with a pin or thread mark button placement. Feel free to hand sew buttons on at this point or wait until the end when suspenders are fully constructed. 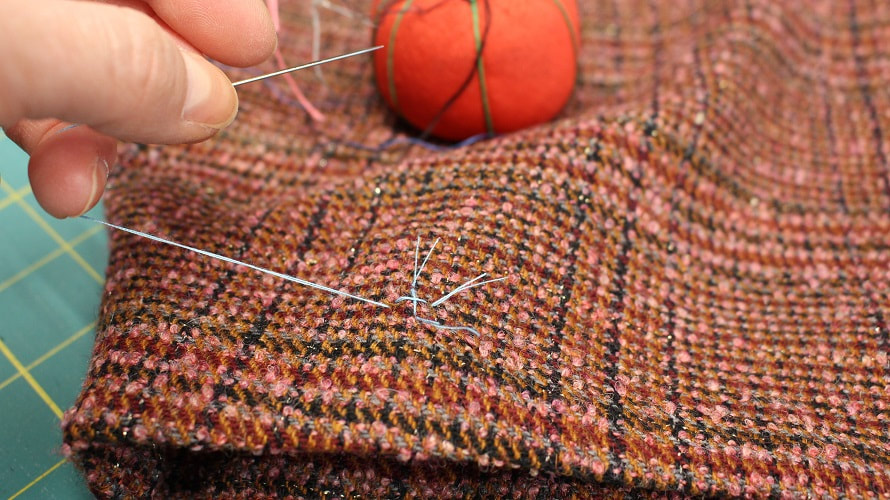 Step 2While wearing the skirt, measure from front button placement around shoulder to back button placement. Record measurement. Our length is 36” with a cross-back formation. 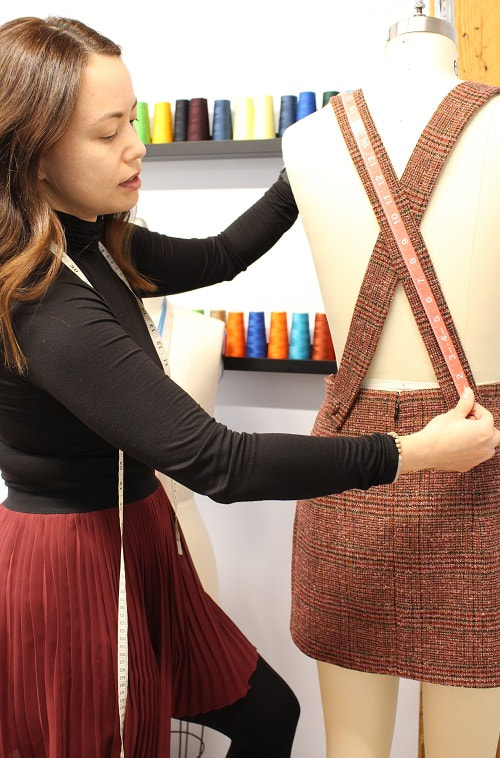 Step 3Draft out the suspender pattern as follows.  Length= Button to button measurement (from step 2) + 3” (back extension) + 1” (front extension). The back extension will allow space for two buttonholes and the front will allow for one buttonhole. Example: 36” + 3” + 1”= 40” Width= Desired suspender width x 2. Example: 1 ¾” x 2= 3 ½” Add desired seam allowance around the entire pattern piece. We are using ⅜” in our example. Step 4Cut out fabric. If you have loosely woven or unstable fabric feel free to fuse a small piece of interfacing to the backside of where the buttonholes will be stitched. Step 5Fold along the middle fold line with the right sides of the fabric facing each other, pin around three edges. Stitch around three edges using one stitch line. Drop down to a smaller stitch around corners. Leave a 5-6” opening anywhere along the longer edge. Trim away excess bulk in seam allowance, flip and press. 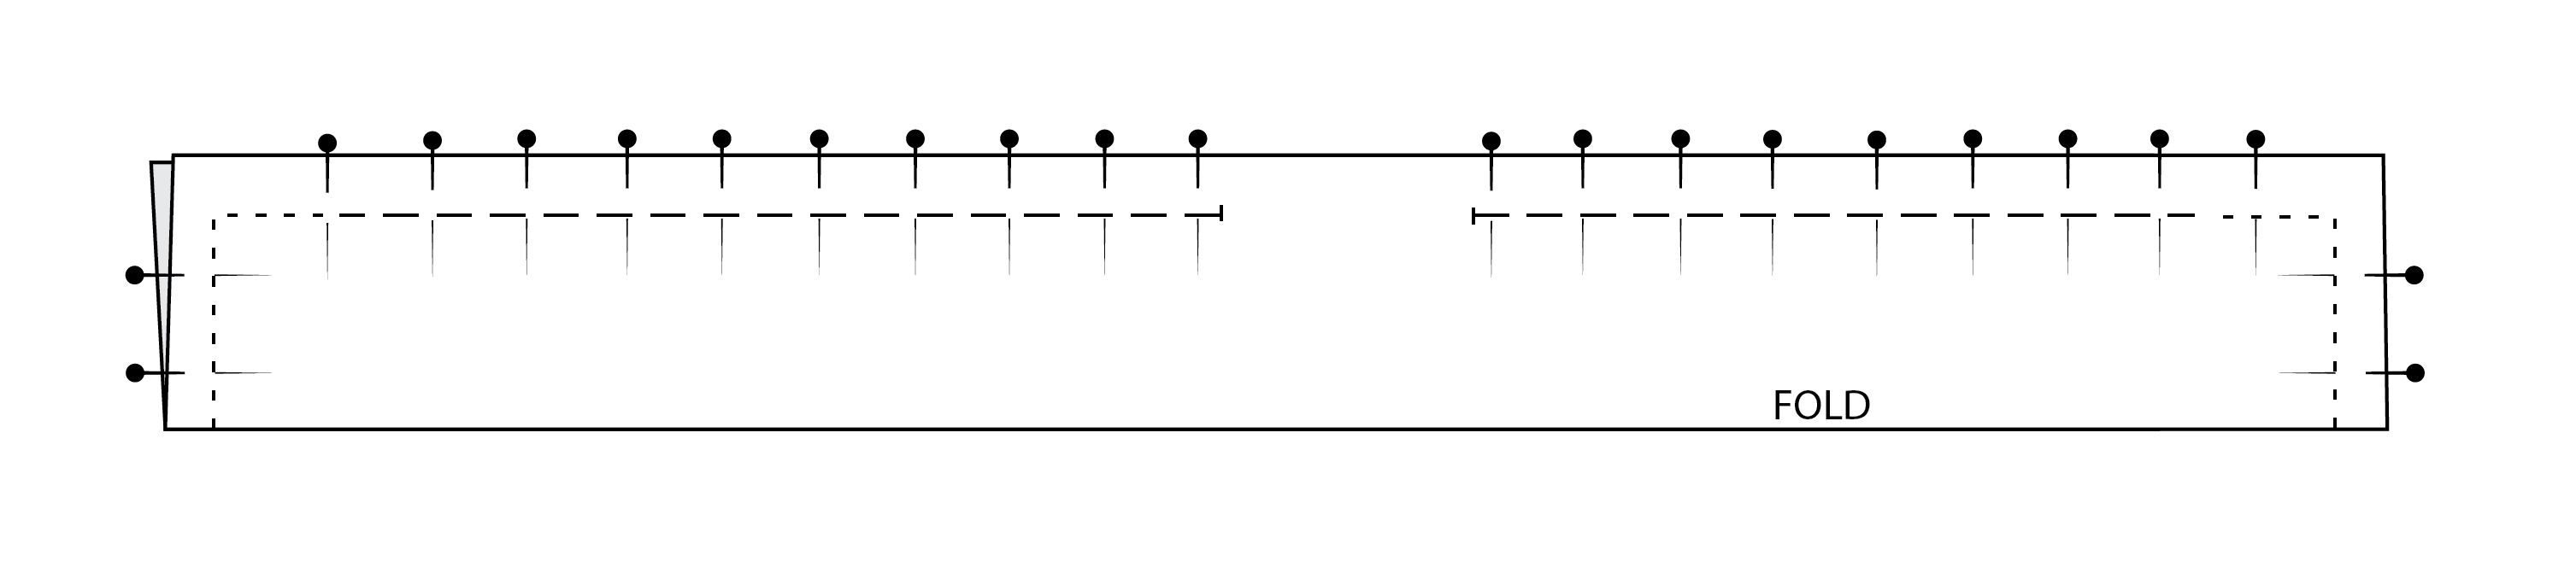 Step 6Mark and stitch buttonholes using a sewing machine or by hand. 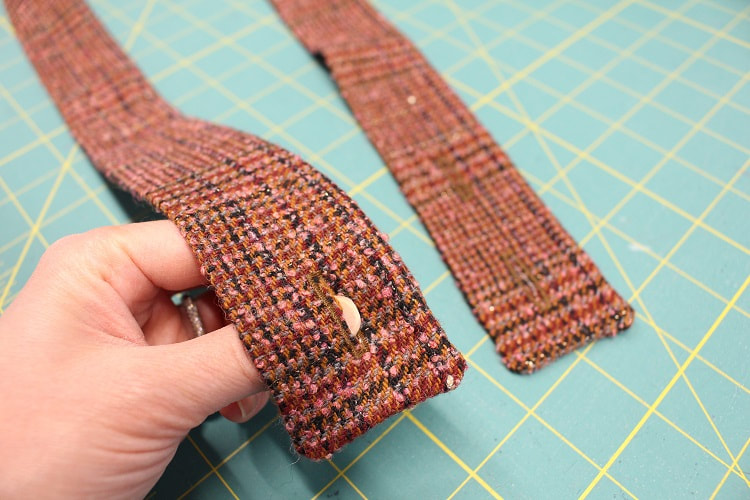 Here is our placement for buttonholes. We used two buttonhole options on the back to allow for a variety of tops to be worn under with ease. Feel free to personalize. 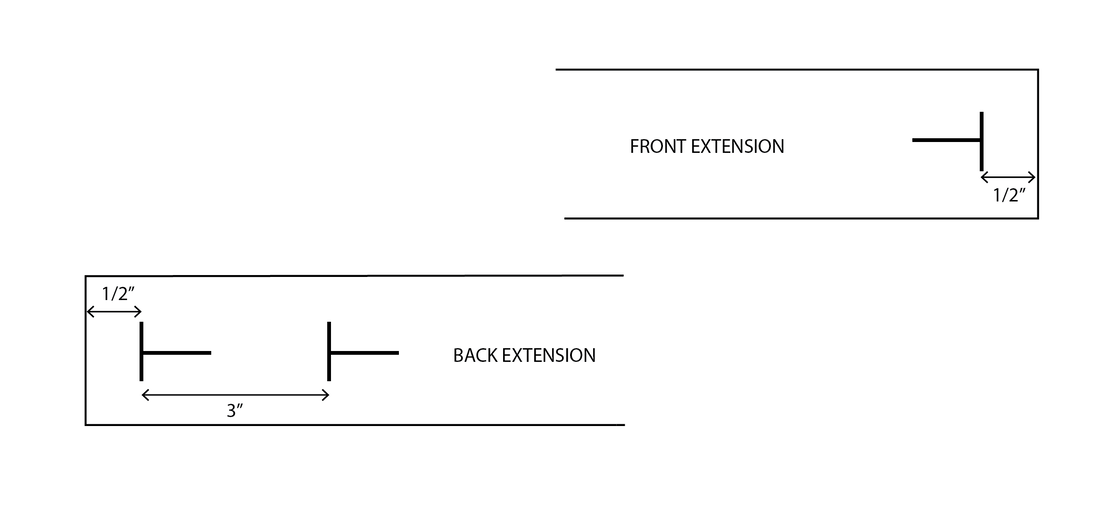 Step 7Hand sew buttons onto the skirt and hand sew closed the 5-6” opening. Draw stitch works well.
Final ThoughtsThis 60’s inspired retro skirt and suspender set was fully stitched on one of our Juki industrial machines and took just over 6 hours of sewing while instructing. We still have two meters of this lovely plaid in the studio. Let us know below if you think we should evolve this design into a pinafore with the remainder.
If this fabric looks familiar to you it's because we designed a Plaid Button-up Dress back in January of 2020. Be sure to follow us on Instagram or join our mailing list for insider tips and inspiration.
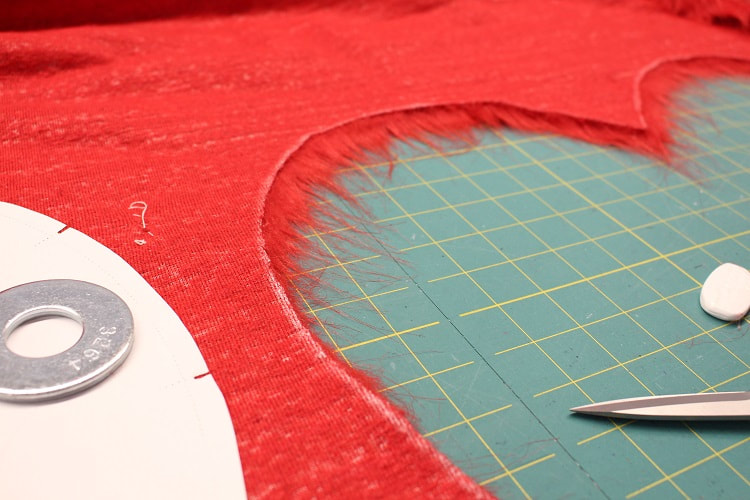
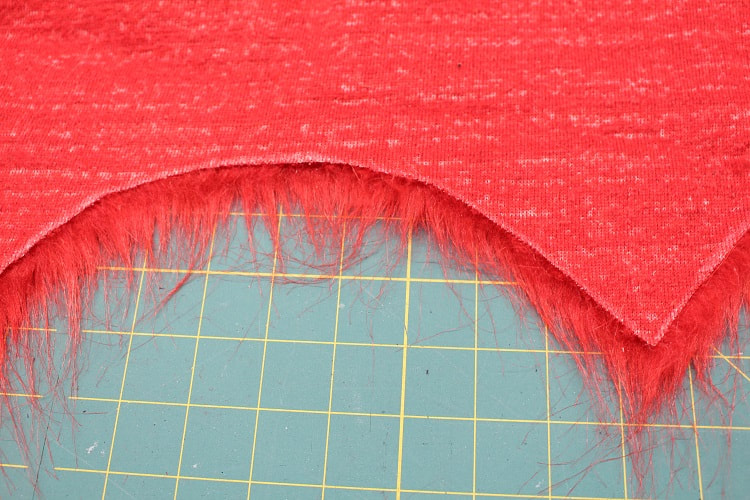
Happy Sewing! Designed, photographed, and written by Sheila Wong Studios. For Valentines Day our studio celebrated love by creating an intricate Quilted Heart Bag. The love continues with our latest design- Faux Fur Heart Bag. Full disclosure, I adore sewing with faux fur, so I jumped at the opportunity. This adoration all started as a teenager where I experimented with faux fur dance costumes. I still have a bin of faux fur I work with occasionally. This bright red from Fabricana is definitely the boldest color I have ever worked with. 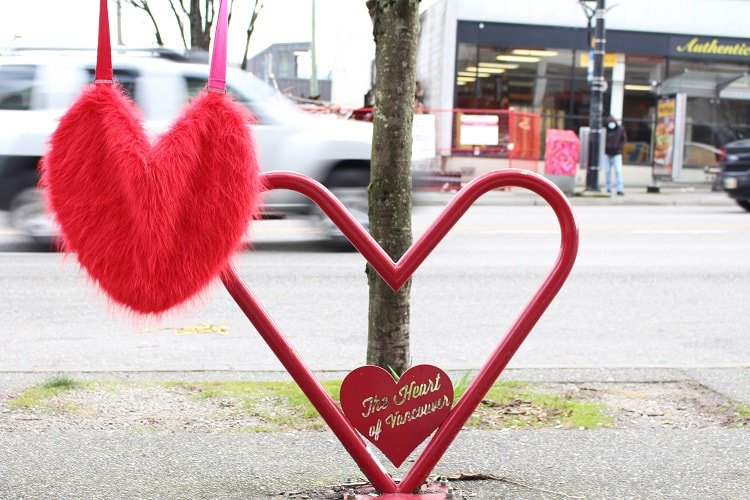 In this blog post, I will dive in-depth into how to cut out faux fur without creating a fuzzy mess. You even get a short YouTube video of my must-do steps. Please let me know in the comments below if you would like a second blog post focusing on sewing with faux fur. 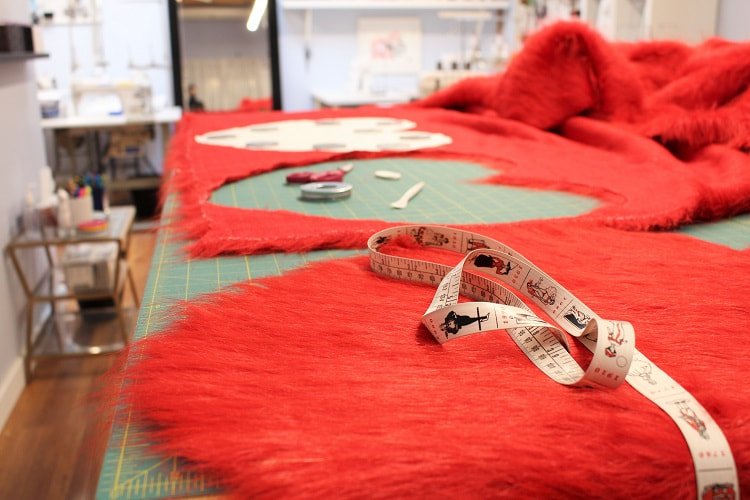 Cutting Faux Fur TipsIf you have ever cut into faux fur you have probably experienced fur fibers flying in the air, sticking to the walls, your clothes, and possibly in your mouth. The mess deters many of us from cutting into this fun fabric. After two decades of working with faux fur, I now implement a few essential steps. 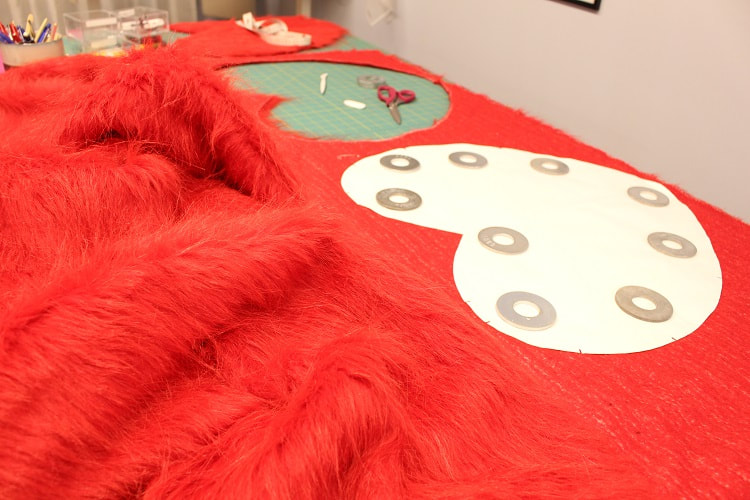 Here is a step-by-step how to cut faux fur on your own. Video and photo options available below. Step 1Layout fabric with the wrong side (backside) facing up. Be aware of the fur direction (nap). You can even chalk in an arrow on the wrong side for guidance. Once you have your pattern pieces on grain, weigh down the pattern and begin marking around the pattern and the notches. Avoid pinning pattern pieces down as it will distort the pattern edge shape. Once marked, remove weights and pattern. 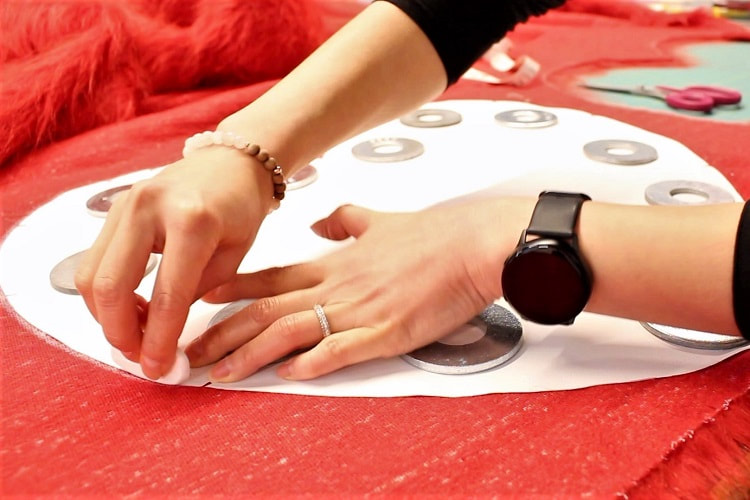 It is important to note we will be cutting one layer at a time. If you are cutting out any asymmetrical pattern pieces, ensure you flip your pattern pieces as you proceed cutting out any more than CUT 1 patterns. Step 2Cut through just the backside of the fabric along your marked lines, avoiding the fur pile. DO NOT cut through any fur. You want to maintain the length of each fur fiber.
With high-quality faux fur, you can glide your fabric scissor edge along the backside of the fabric avoiding any closing of the scissors on the fur itself. Once cut, pull out each pattern piece. This is where the magic happens! If you have cut correctly, there will be minimal fur stray bits. 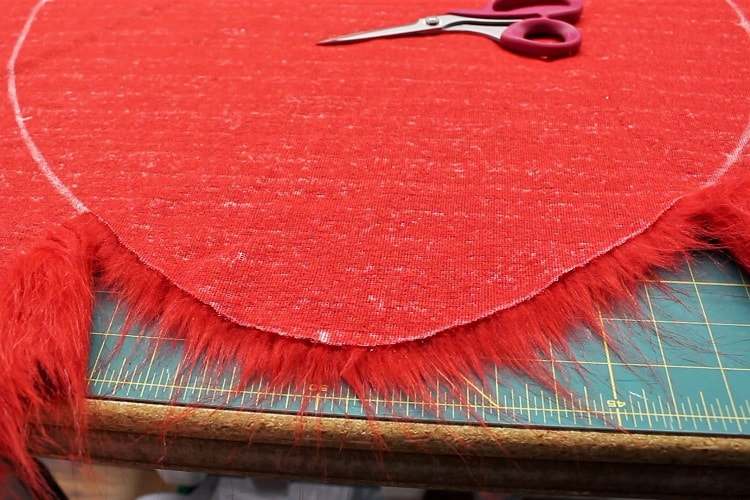 Step 3Keep a vacuum handy. Vacuum all the edges of each piece after cutting to remove away any excess dust or fibers hanging on. If you have leftover fabric, be sure to vacuum the cut edges before storing them away.  Bonus TipAlways wear a mask when cutting out high pile fabrics like faux fur. For years, we have kept N95 masks in the studio for this purpose. Here I am in 2015, cutting out faux fur for a fully lined vest. 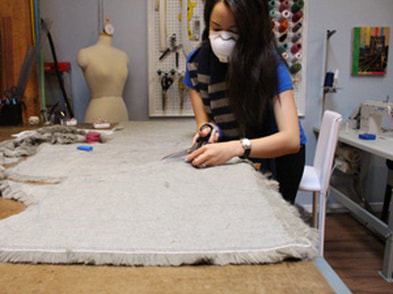 Project Specs Final ThoughtsI hope this blog post provided you with the confidence to cut into faux fur fabric. Fun fact, items I have made using faux fur include a vest, stole, bolero, skirts, dresses, crop tops, triangle tops, boot coverings, and bags. 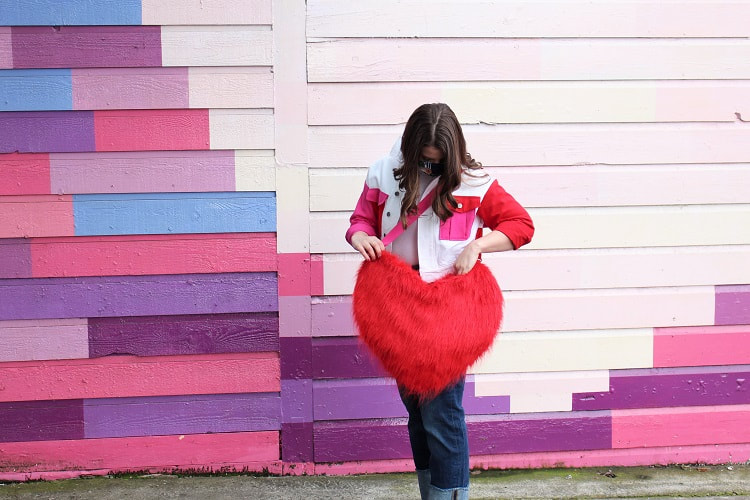 Happy Sewing!
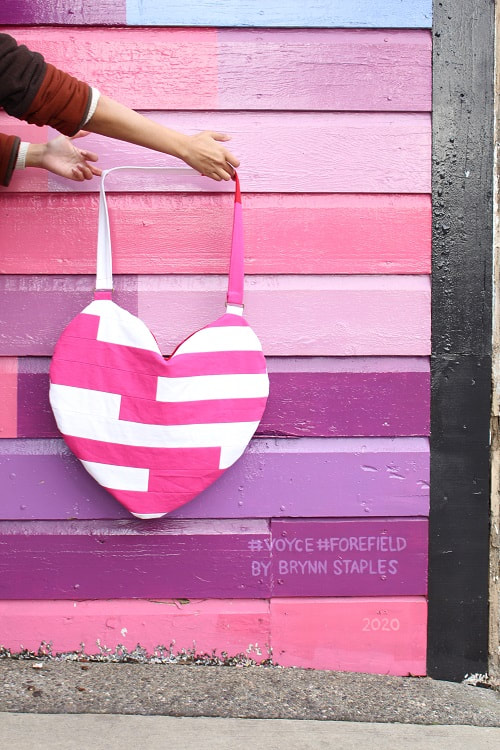
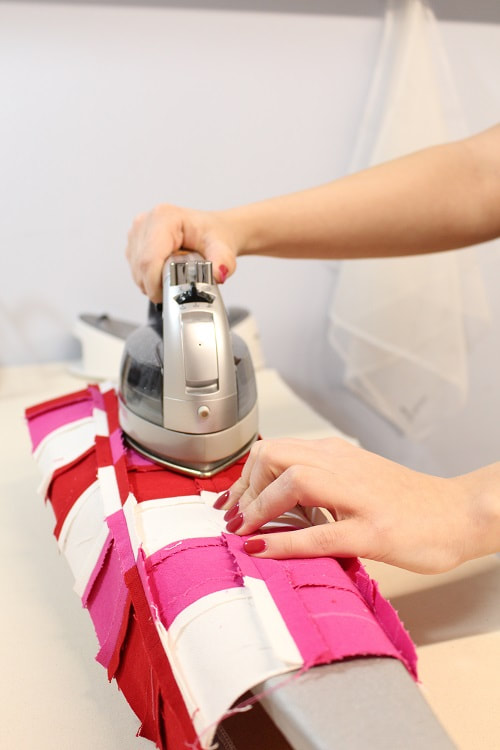
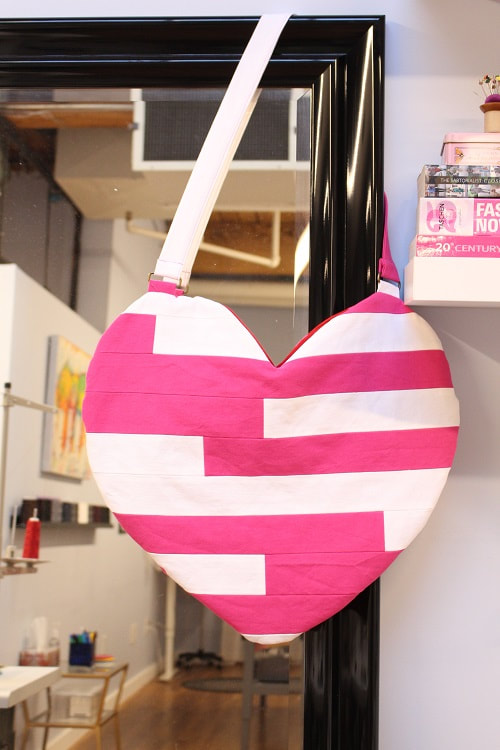
Designed, photographed, and written by Sheila Wong Studios. Spreading some community love with our latest design! Our team decided a heart-shaped bag would be the perfect project to celebrate Valentine's day.
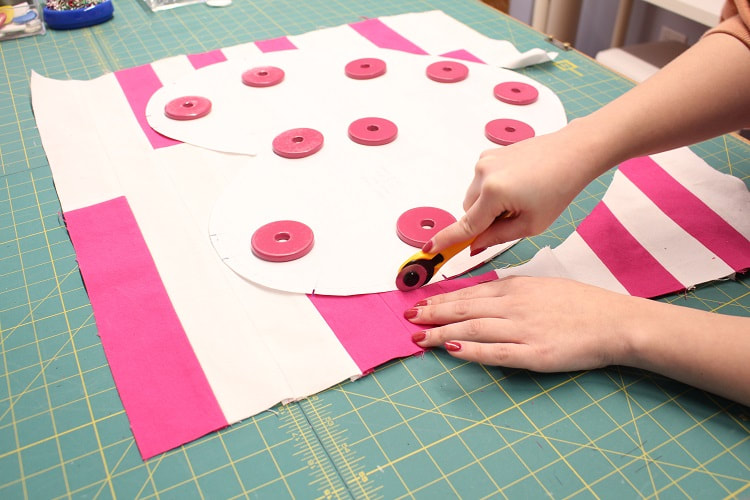
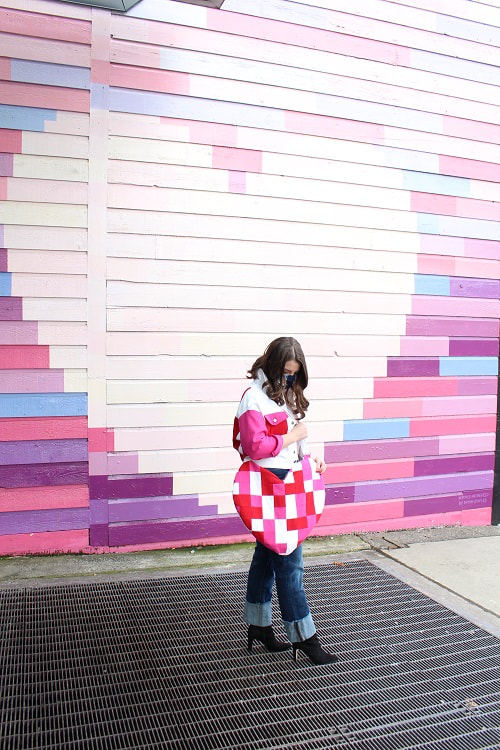
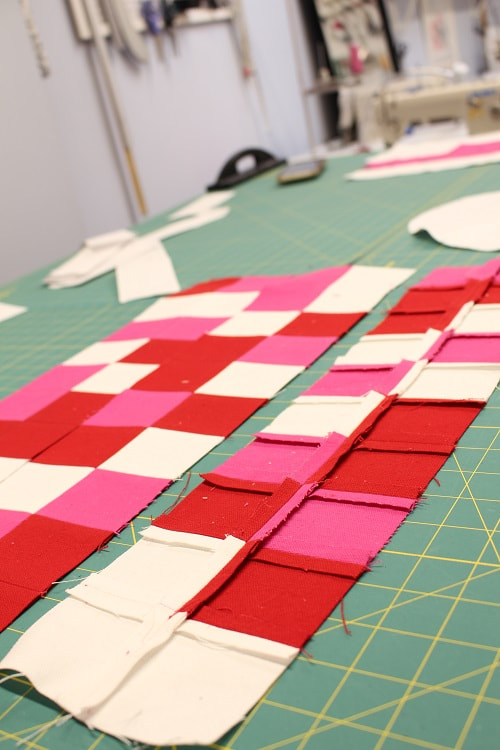
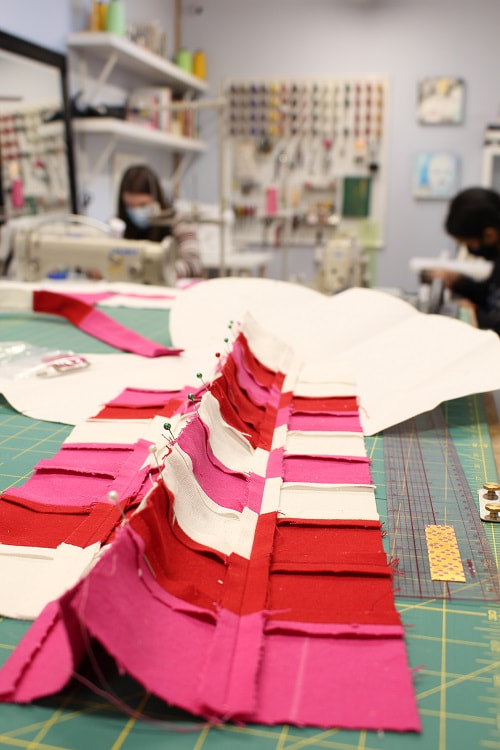
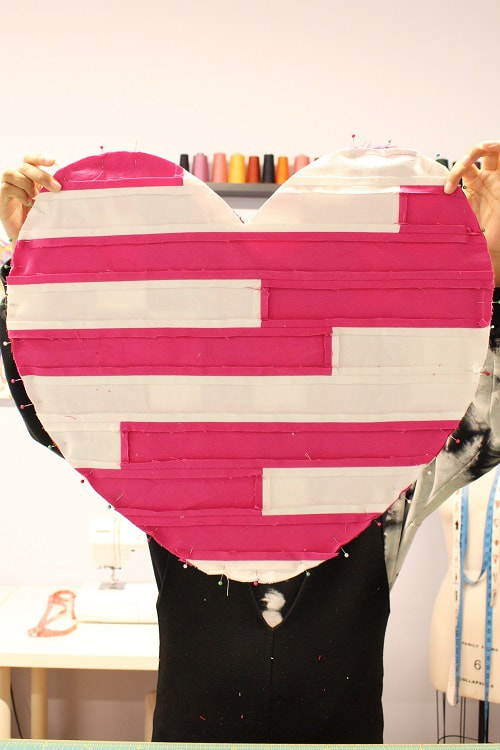
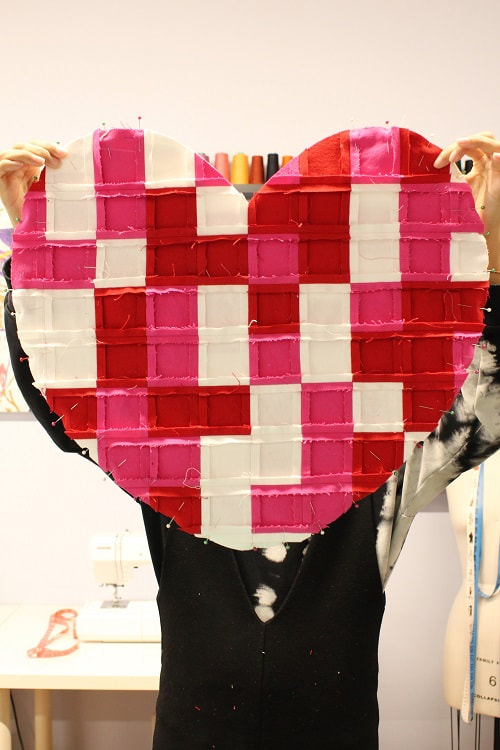
Our bag drew inspiration directly from a local mural created by Vancouver artist Brynn Staples. We drive by this mural every day on our commute to work and find ourselves drawn to the colors and the positive feelings it evoked. As Brynn put it herself, this mural was meant “to be a symbol of the community that can bring people together”, and we were inspired to do the same. The mural can be found on the corner of Cambie and King Edward. 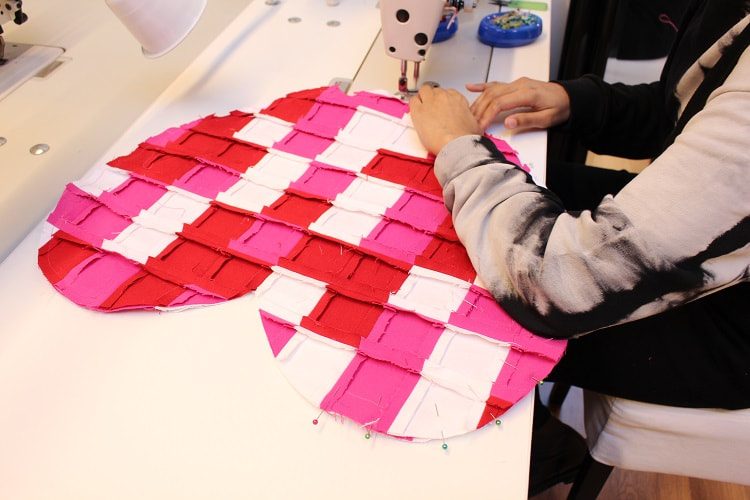 With leftover fabric from our Color Block Denim Jacket, we are giving a go at creating two styles of quilted fabrics. Fabric is from Fabricana. This blog post will discuss our process, how to incorporate quilted fabrics into a design (that is not a blanket), and what we learned. QuiltingCreating fabric from scraps comes naturally to us in the studio. We have patchworked a number of designs in the past, so quilting was inevitable. Our team experimented with two different styles of quilting. One style required more perfection (perfect square tiles), while the other was more forgiving (asymmetrical subway tiles). We know they are not called “tiles” in the quilting world, but we thought it was much more exciting! 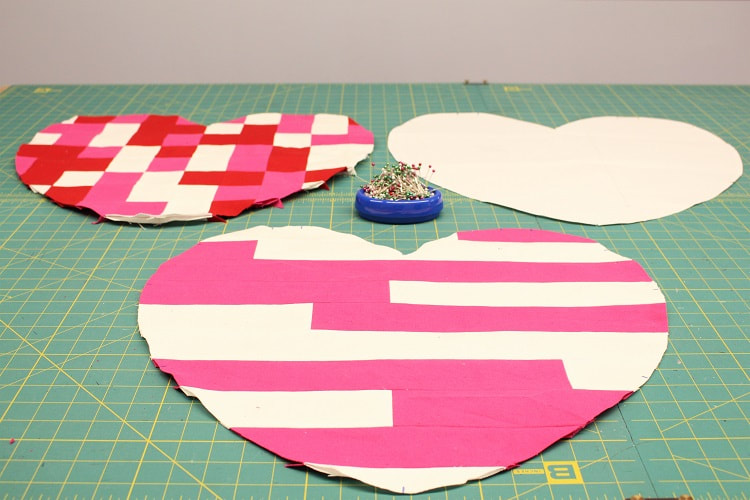 SIDE A: Asymmetrical Subway TilesThe final dimensions for our heart bag pattern are 21” x 20”. With this in mind, a bit of math was involved in figuring out how many strips (tiles) we needed to cut. We decided to keep the height of each time the same 2”. The tile length varied from 2” x 6” up to 2” x 24”. You can really play around with this depending on how much of one color of fabric you have or how much vertical seams you wish to sew. 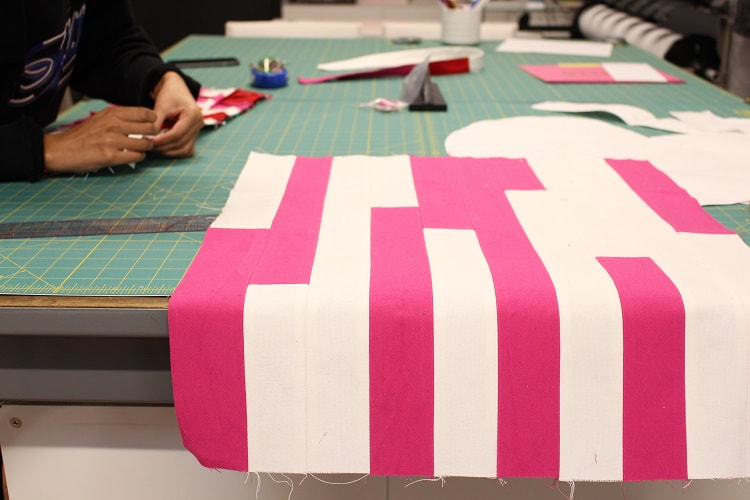 We made sure we had a 24” x 24” final box of fabric in the end, to be able to cut out the heart pattern. Be sure to sew each row first, press the vertical seams, then proceed with sewing rows in the desired order. Keep reading on helpful tips like taking photos of the tile layout prior to sewing. SIDE B: Perfect Square TilesWelcome to side B! We leveled up with the accuracy required for cutting and stitching on this side compared to side A. We determined each individual square would be 3”x3” for a total of 80 squares. You can really choose your own sewing journey with this style. Larger the tiles, less effort in sewing. Smaller the time, the more sewing and accuracy required to maintain the perfect square look in your final piece.
With three colors to work with, the color blocking took on a life of its own, creating a pixelated effect. 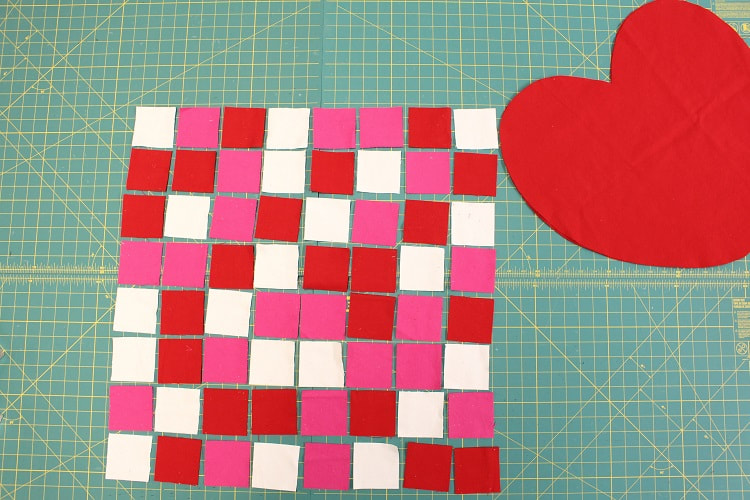 Quilting TipsWhen incorporating self quilted fabric into a project, there are many details to consider to make the process easier. We wanted to share with you what we learned, and boy, did we learn a ton.
Planning the tile dimensions, cutting and stitching them up, we think you should consider the following.
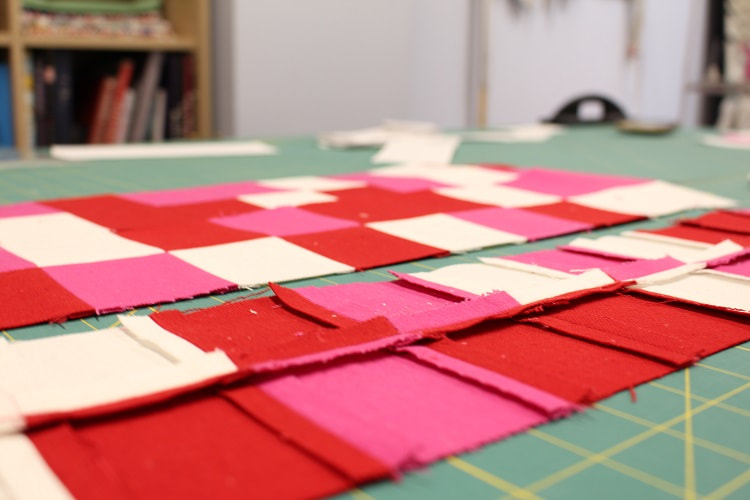 After the quilted fabric has been created, keep in mind these helpful tips we learned.
 Final ThoughtsWe are absolutely mesmerized by our Heart Tote Bag. You might even say we have fallen in love with it. Quilting is a fun and creative way to elevate a design. We were able to achieve two completely different yet cohesive aesthetics to the same bag. This entire project took approximately 10 hours to complete, so you know it’s made with love!
We completely see the fascination with quilting and are starting to see why some of our quilting clients are in love with the process. It involves a great deal of organization, planning and accuracy in its execution. For us, you will only see quilting incorporated into our designs. 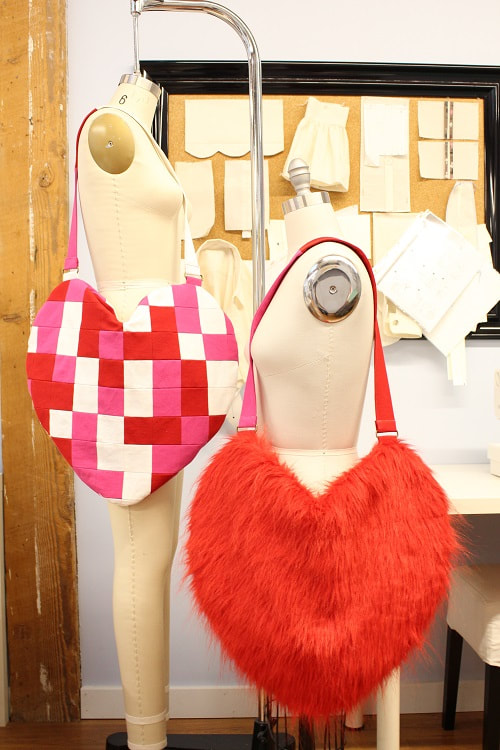 Stay tuned for our bonus Heart Bag sans quilting. In our blog post- How to: Cutting Faux Fur Fabric, we will provide you insight into working with faux fur and an insider look into our Heart Bag's construction. To learn more about how to incorporate quilting techniques into clothing, contact us to book lessons. Happy Sewing!
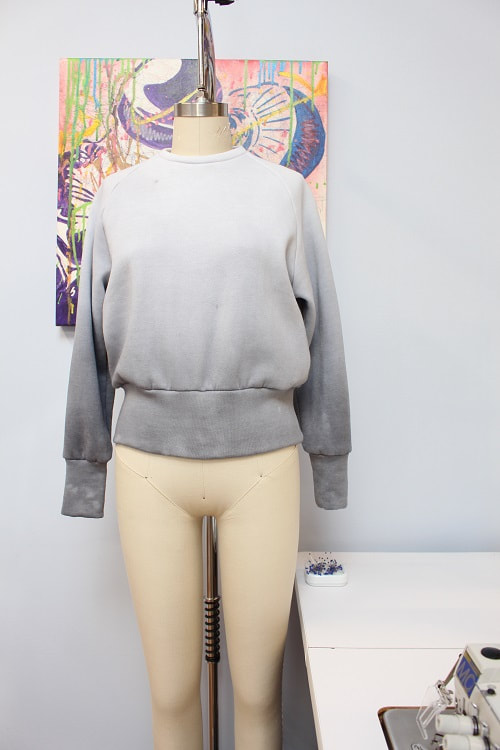
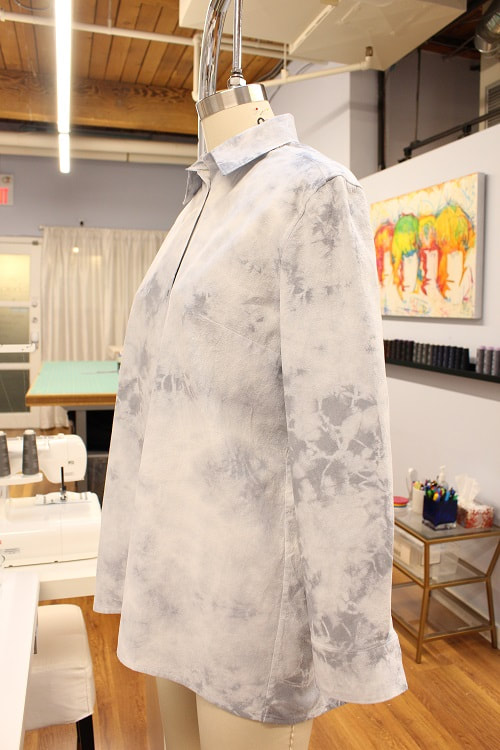
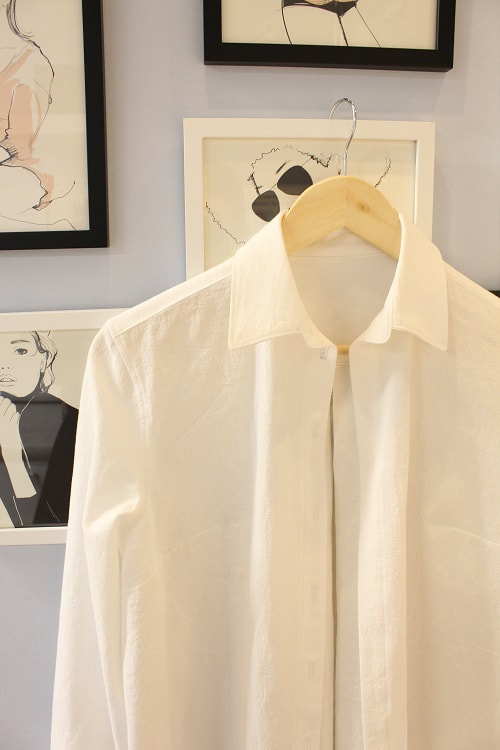
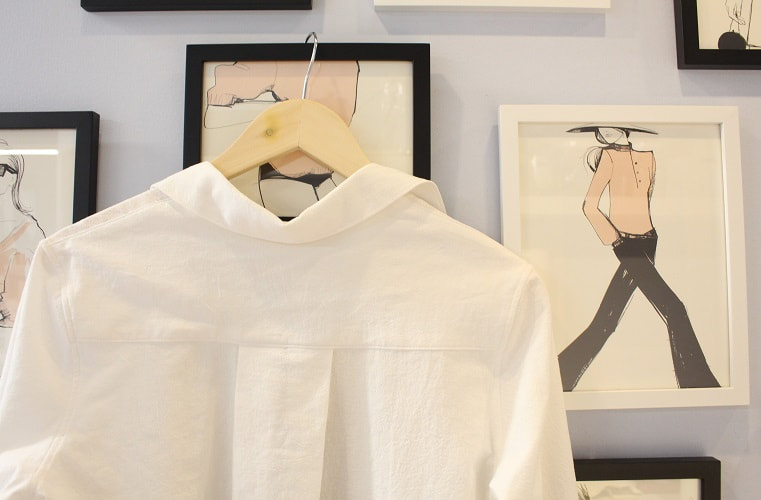
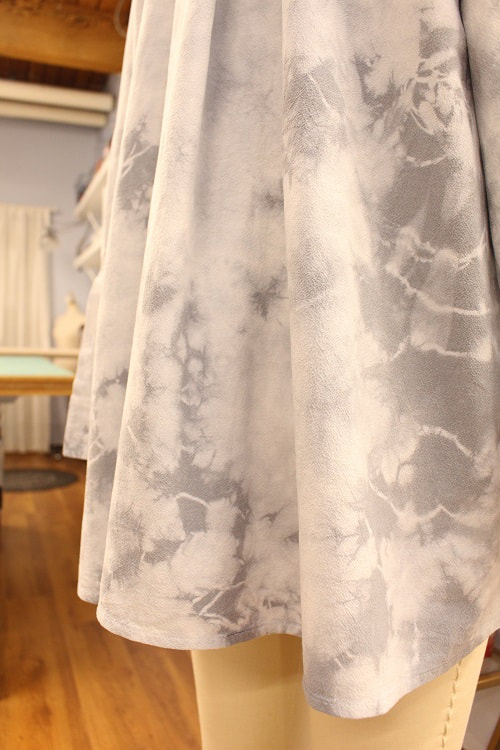
Designed, photographed, and written by Sheila Wong Studios. I have absolutely no recollection of tie-dyeing anything as a youth. I started sewing at a very early age. From the get-go, I was in awe of the variety of fabrics one could design with. It was my mission to feel, cut, sew, and understand the nature of textiles and how they could be manipulated into a 3D form. It is only in the past few years, I have slowly started taking an interest in using paint or dye to manipulate textiles.  I have always wanted to stitch up a complex design and chuck it in a dye bath. So let's do it! I had some leftover black stock solution from my Ciba Washfast Acid Dye. Obviously, I am not going all tie-dye rainbow colors on you. I’m sticking to more subtle colors, or in this case, lack of color. Read on to learn more about my inspiration, tie-dye process, before and after shots, and what I will be dyeing or painting next. InspirationThis tailored shirt design comes full circle for a number of reasons. First, the pattern/silhouette is the same as our Rainbow Faces Tailored Shirt. I love the way that the original shirt sits when worn, but the colors were too much for me to wear often. 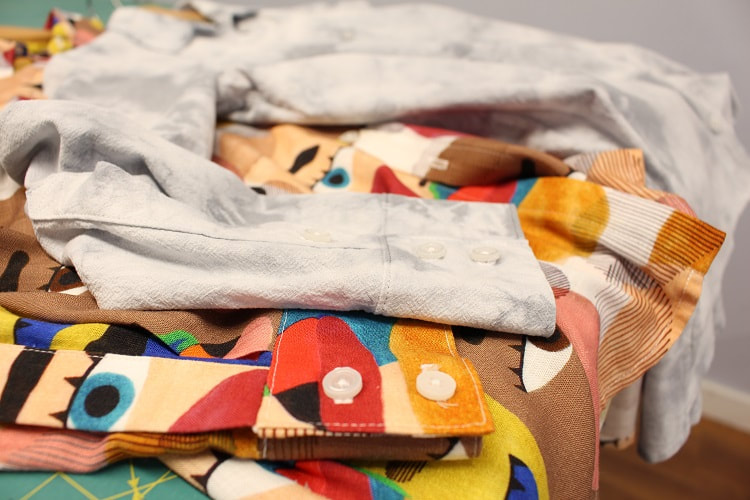 The white and grey vibes may feel familiar to you because back in October 2020, our team experimented with a White Sweatshirt Dye Project. My sweater was inspired by rainy days in Vancouver. That sweater was very time consuming to achieve the ombre dye. As I mentioned earlier, I am all about chucking this tailored shirt into a dye bath. So if the Rainbow Faces Tailored Shirt and the Rainy Day Sweatshirt had a baby...VOILA! I present the baby.
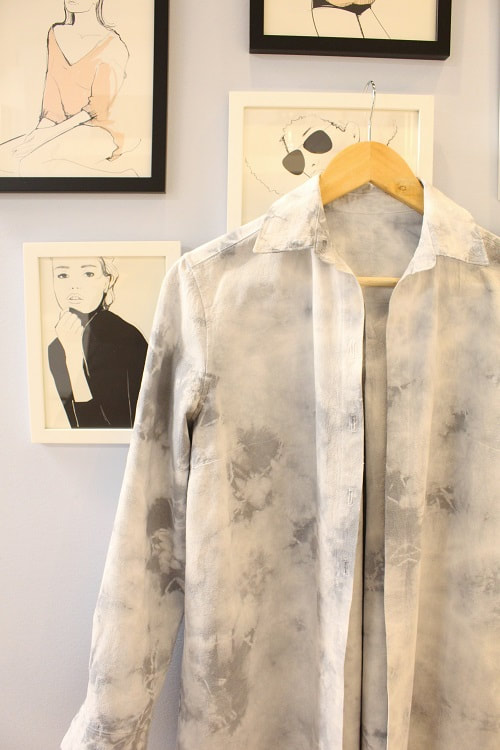
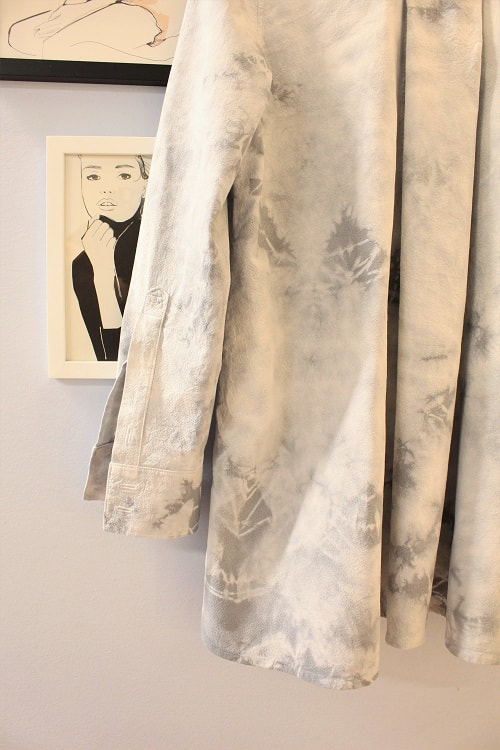
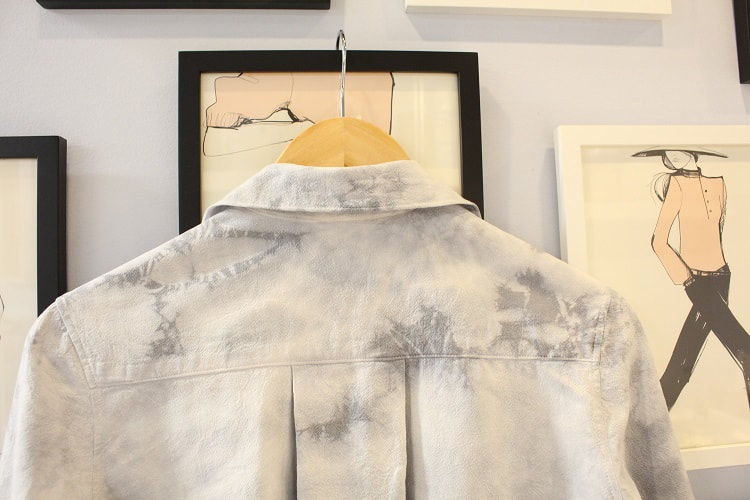
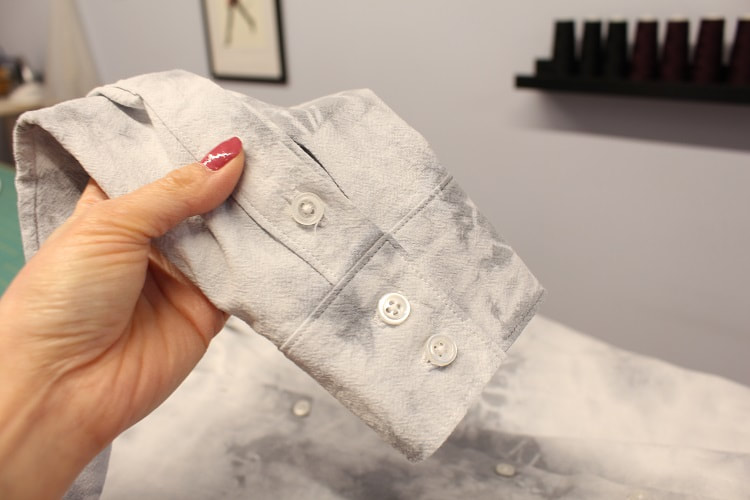
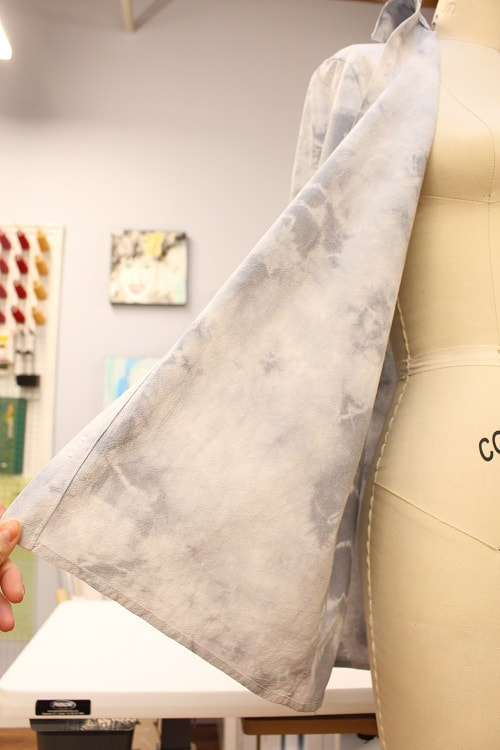
Tie-Dye ProcessMy experience with resist dyeing is limited to shibori. Shibori is the art of folding, clamping, or manipulating fabric in either a calculated or organic way to resist dye. The outcome of shibori is beautiful. Check out Ombre Slip Top Post to see the outcome of my shibori dyed slip dress. 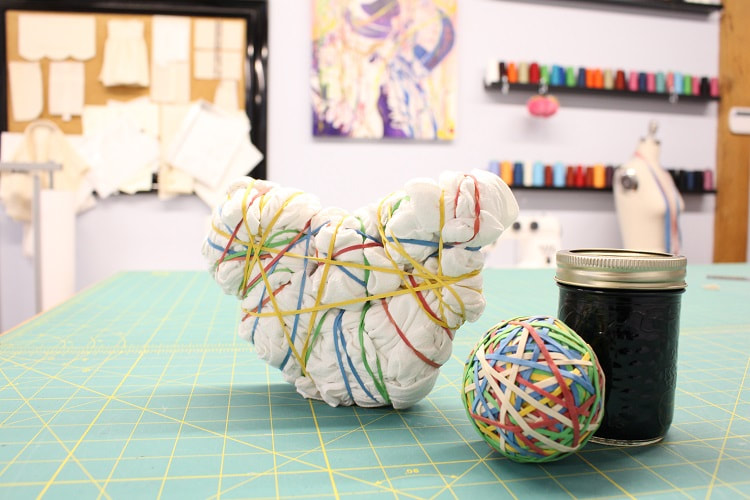 The only thing I had in the studio to create dye resistance on the fabric was a ball of elastics. So tie-dye it had to be! I had no rhyme or reason when wrapping this white tailored shirt with elastics. I started scrunching up the sleeves tightly, then slowly worked towards the middle of the garment and up to the collar. I wanted the collar to be darker if possible, so I left this area last so it could potentially have the most exposure in the dye pot. 27 elastics were used to tie this shirt. Unexpected was the heart shape created in the end. The tops of the heart were made by the sleeves being tied in. Perhaps this was a gentle reminder that beauty can be found anywhere. After approximately 1 hour in the dye pot with my black Ciba Washfast Acid Dye from Maiwa, what emerged was a very subtle tie-dye result. Here are some before and after shots for you.
Project Stats
Final Thoughts I still have one more jar of the black stock solution. I know that this particular type of dye (Ciba Washfast Acid) works best on wool and silk. So, I am thinking the next project will need to be a wool cropped coat, a silk dress, or a silk skirt. I will continue with the tie-dye technique. Let me know your thoughts below.
Want to keep up to date on how our dye projects evolve? Sign up for our Insider Newsletter.
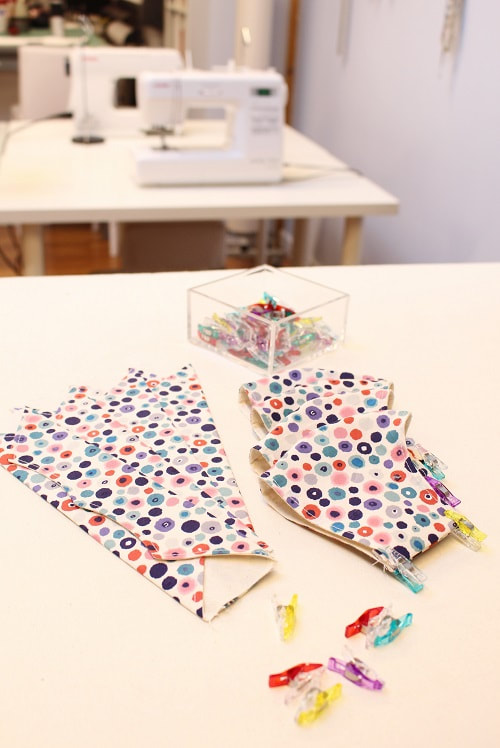
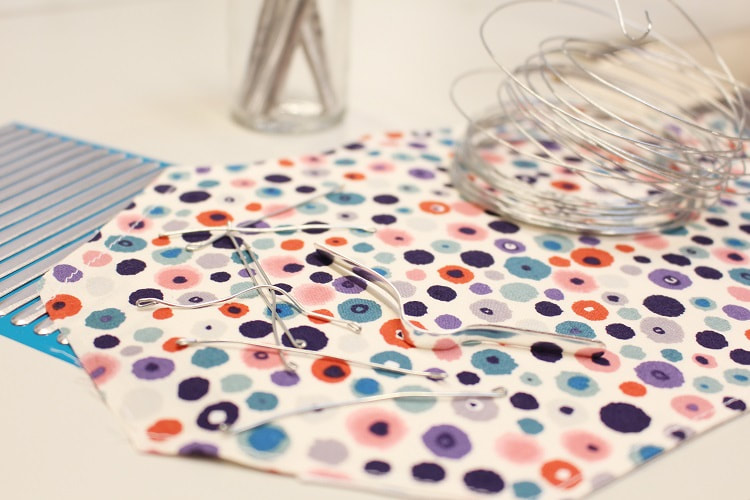
Happy Sewing! Designed, photographed, and written by Sheila Wong Studios. For any designer, 2020 has been a year of sewing countless face masks. I have waited to post anything about face masks for a number of reasons. Digitally, we are bombarded with a variety of how-to-sew, what-to-buy, and how-to-wear face masks. Furthermore, our health officials have evolved the necessities when it comes to protective materials for face masks. So after months of observation, research, experimentation, and wearing masks for long hours every day while in the studio- here is my blog post on face masks. I will cover the following.
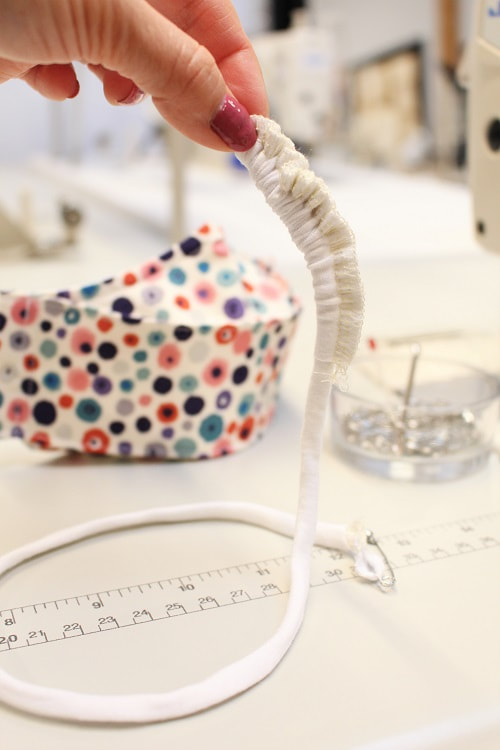
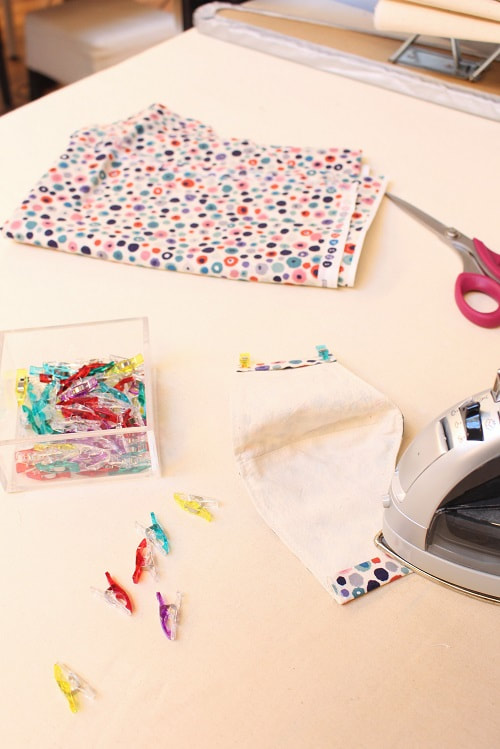
 Comfy DIY Ear Elastic for Face MasksIf you have ever worn a face mask for a full day, you know the importance of a very comfortable ear elastic. I absolutely despised using the ¼” elastic trim everyone was stitching into their masks, so I dug into my large pile of knit jersey leftovers to create my own ear elastics. I really like to use bamboo knit jerseys for added softness but any jersey knits will work well. You can even cut up old t-shirts! Just remember to pre-wash your fabric prior to cutting as knits shrink dramatically. 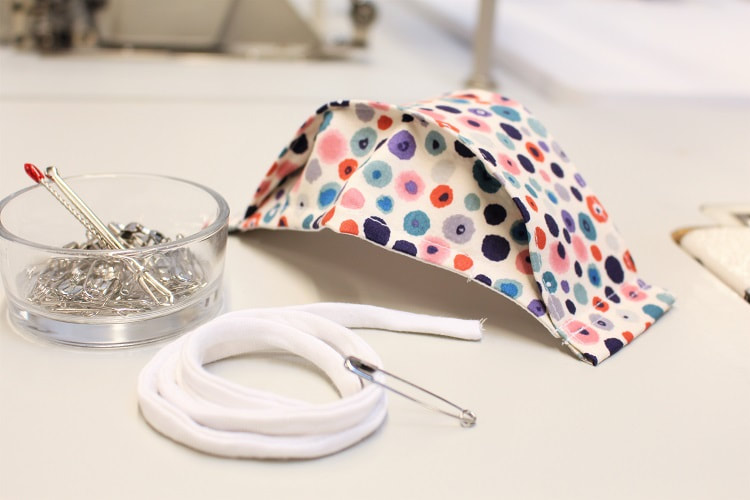 Here is a step by step tutorial on how to create your own comfy ear elastics for face masks. Video and photo options available below. Step 1Cut out 1 ½” width strip of fabric on the crossgrain or stretchiest part of the knit fabric. If you are cutting out of a 2 way knit then you can cut on grain or crossgrain. No need to cut on bias. Best to work with a long strip so you can create multiple ear elastics at once. So the full width of the fabric from selvage edge to edge will work well.
Step 2Fold right sides of the fabric facing each other along the long edge, line up the raw edges, and pin/clip in place. 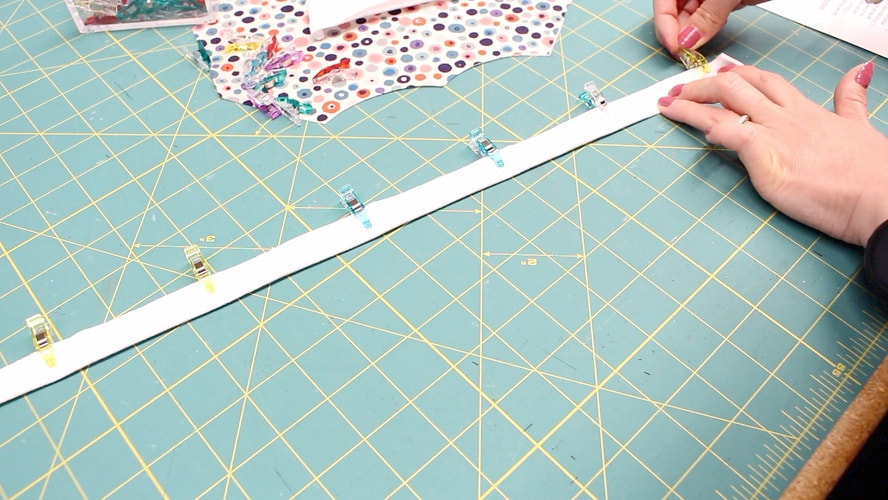 Step 3Overlock between ¼” to ⅜” in from the folded edge. There is some fabric being cut off during this process. If you do not have an overlock sewing machine, just use a medium width zigzag stitch and trim away excess seam allowance. 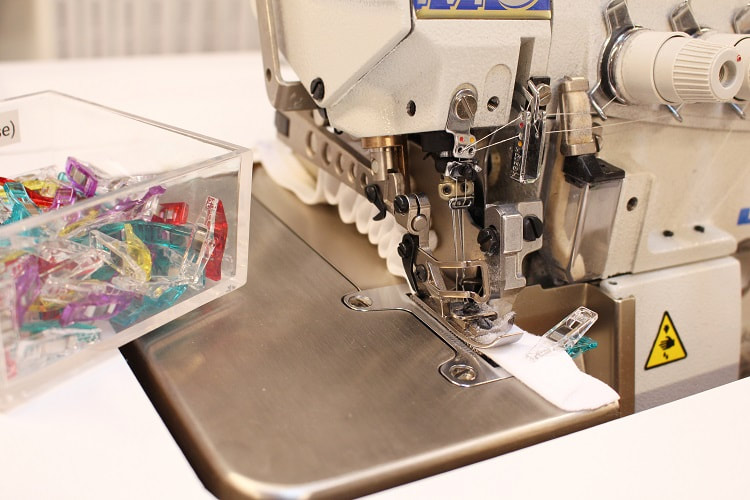 Step 4Approximately ½” in from the end of one strip, cut into the fold, creating a hole. Attach a safety pin around the fabric loop you just created. 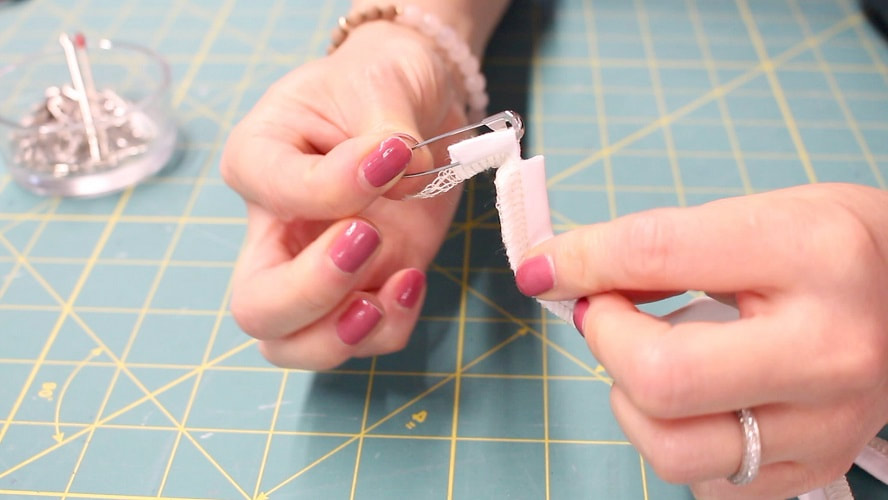 Step 5Feed the safety pin into the tube to help flip it inside out.
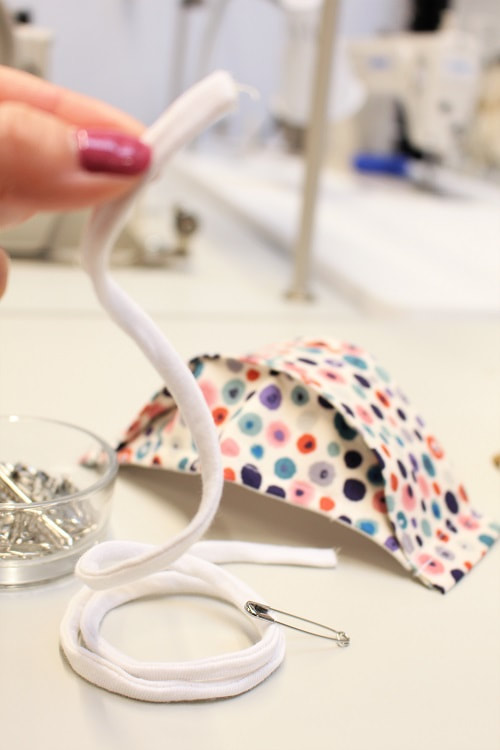
To finish, cut elastic according to the length you require. Strap lengths are approximately 7-9” for adults and 6” for children. But you will need to fit accordingly, as each knit fabric will have a different stretch capacity. Feed the elastic through the mask tunnel, stitch the elastic ends together then turn the elastic into the mask tunnel to hide connecting stitches.
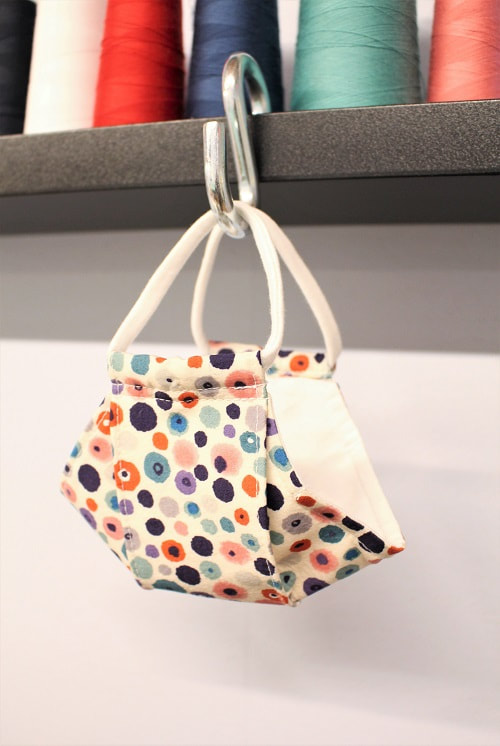
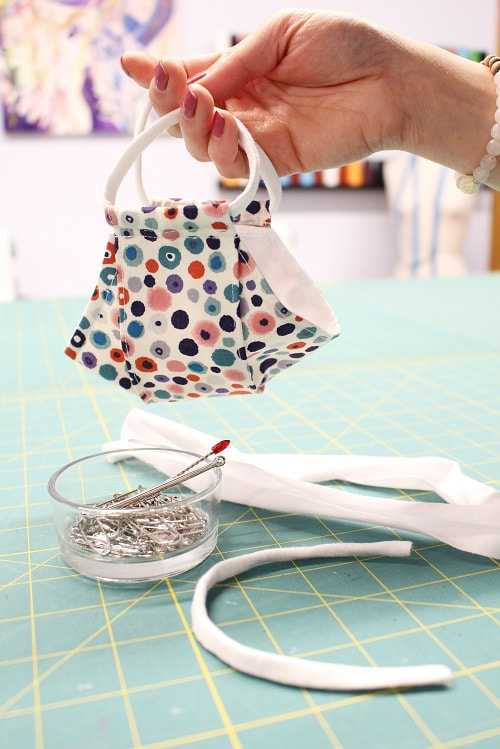
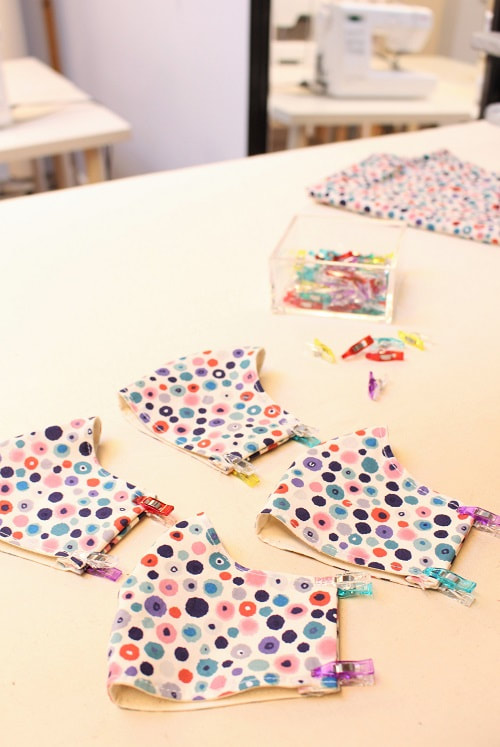
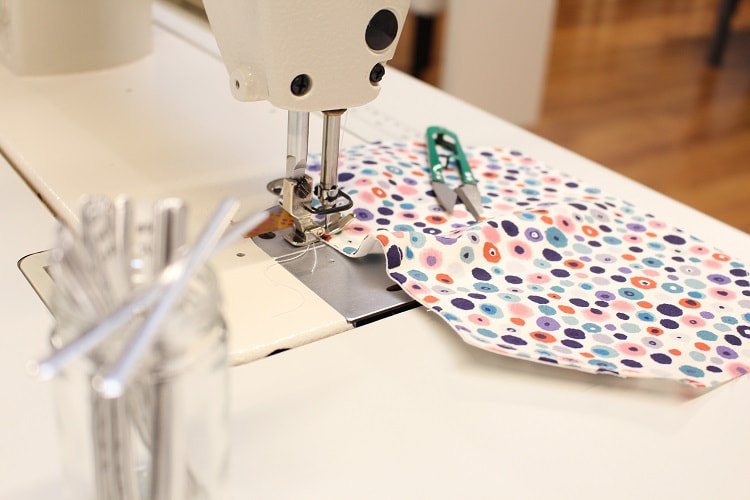
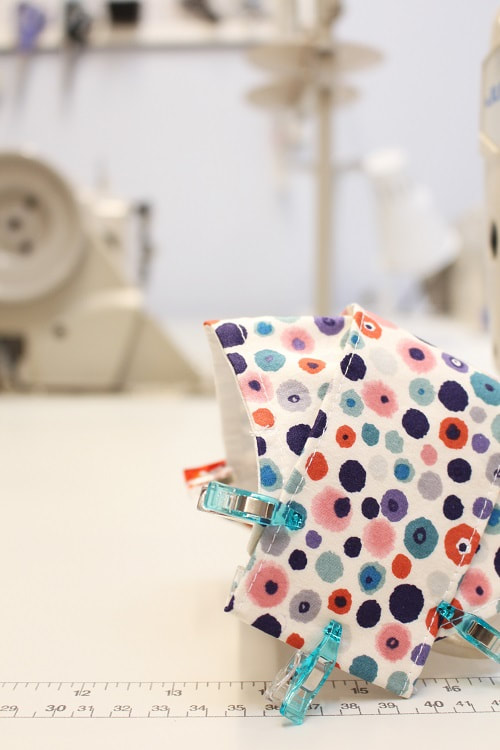
Mask Style RecommendationsI have stitched up a variety of mask silhouettes to find the best shape. I have experimented with 2D and 3D shapes, with vertical and horizontal pleating. I even considered gathers at one point to create structure. My key factors- the masks must provide little to no exposure, I could breathe in them, and be stylish. Be sure to read on for material and trim recommendations, as picking out the right fabric to match a silhouette is just as important!
My first favorite shape is a 2D center front seam mask I found on Craft Passion. After my first toile, I made the following pattern adjustments and design changes to better suit my face shape and improve construction.
My second favorite mask shape is a 3D horizontal seamed mask I found on Japanese Sewing Books. This is probably one of my favorite silhouettes so far as it provides space inside the face for you to breathe yet seals the edges along your face, so you feel safe! 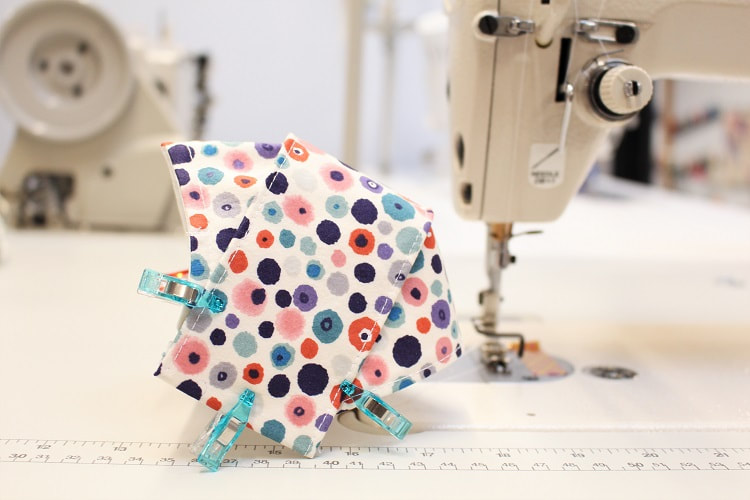 As usual, after my first toile, I made some adjustments to the 3D pattern. Just like the 2D pattern, I lengthened the back edge by ½” to make it easier to sew the ear elastic tunnel and insert in the elastic with ease. 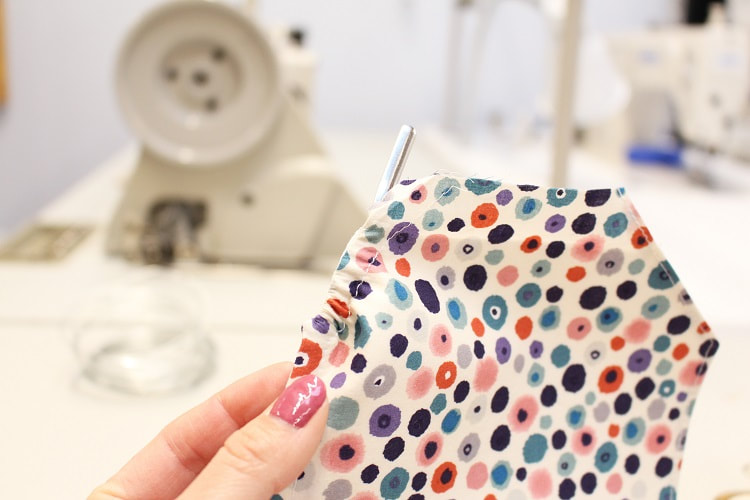 To allow space for a nose wire, I topstitched the upper edge at ¼” instead of the recommended edgestitch (1/16” - ⅛”). I have tried two different kinds of moldable nose wires. One is a thin galvanized free molding wire from Canadian Tire. I used 24 gauge and cut them at 2 ½” in length. I then used pliers to carefully twist back the raw edge of the wire.
The other is a flat 5mm moldable bridge you can purchase from several online shops. A simple Google search will yield a hundred sites for you to pick from. It was important for me to perfect the art of the nose wire, as many of my loved ones wear glasses and need to wear masks for long periods of time. Their favorite combo so far is the 3D mask with the flat nose wire.
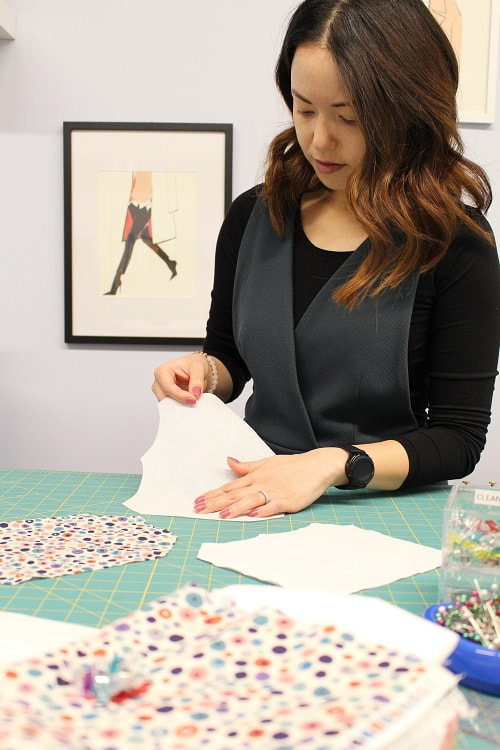
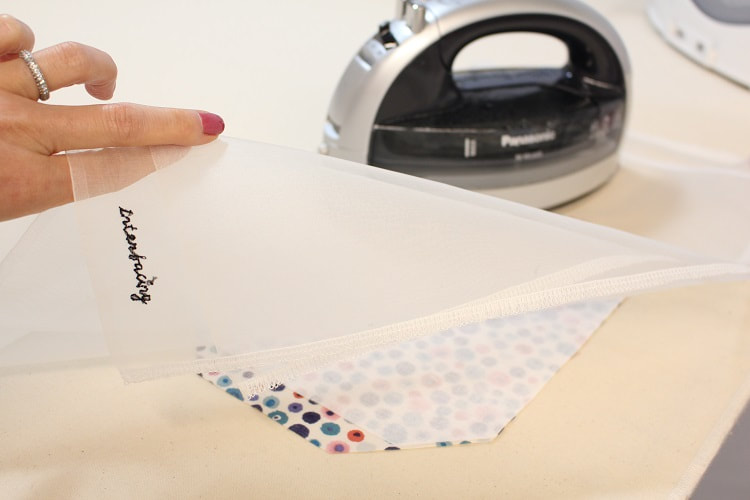
Recommendations for Mask Materials To maintain a 3D shape, the fabric choice is so important. The more structured your fabric, the easier it will be to wear. You want to avoid sucking in fabric with each breath. I've found that a cotton canvas fabric works the best, as it is tightly woven and provides structure. If you just want to use lightweight 100% cotton, that is fine, but try to back it with a fusible non woven interfacing to provide structure and decrease particle penetration. 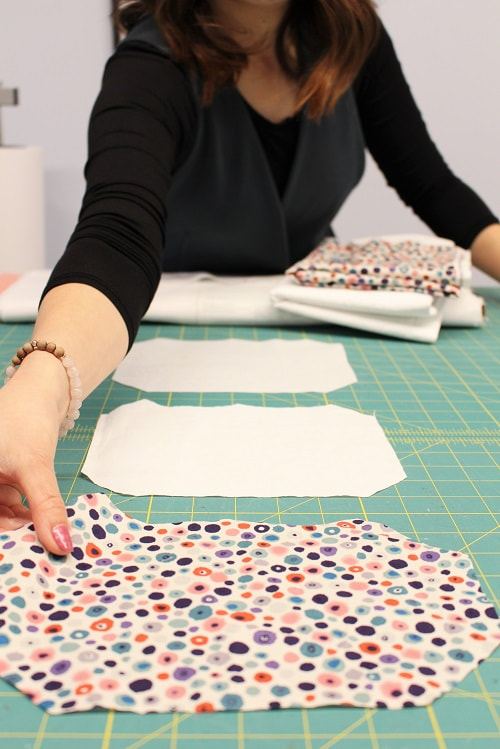
Final ThoughtsWearing a mask is not going to be forever. I support mask wearing and feel we should do our part by using our creative skills to keep our community safe. I will continue to improve on the fit and comfort of face masks and share when possible. A reminder that all the face masks shown in this post are non medical grade. If you love the printed cotton fabric shown, it can be found at Fabricana. 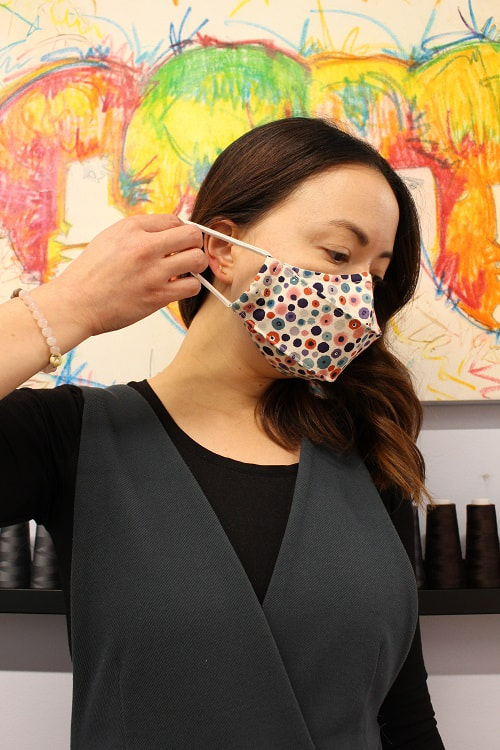 Let us know of any sewing tips, pattern modifications or material recommendations in the comments below, and be sure to sign up for our Insider Newsletter to keep up to date with our designs.
Stay safe and happy sewing! Designed, photographed and written by Sheila Wong Studios. |
Archives
November 2022
|


 RSS Feed
|
|
Copyright © 2024 Sheila Wong Fashion Design Studio Ltd. All rights reserved.