|
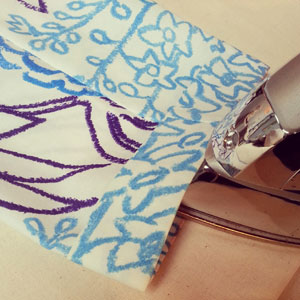
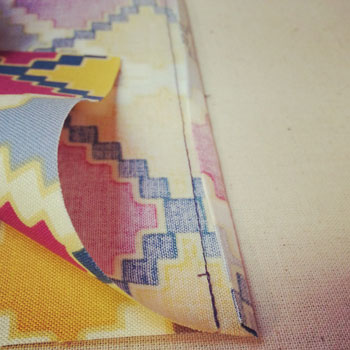
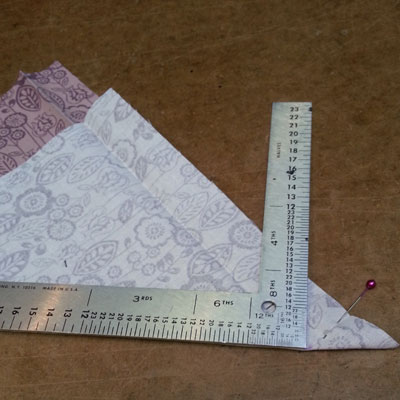
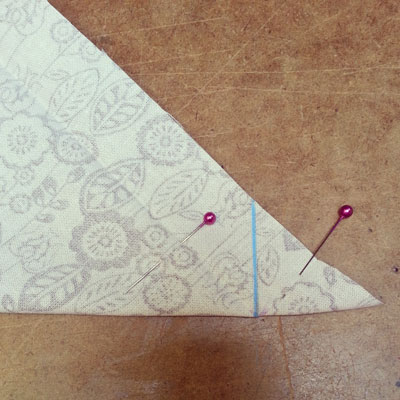
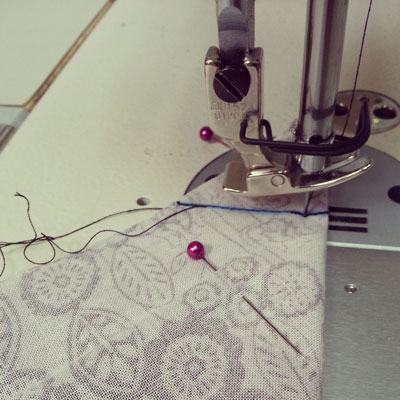
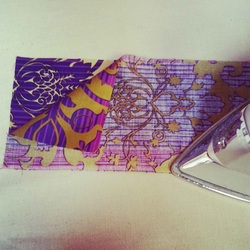
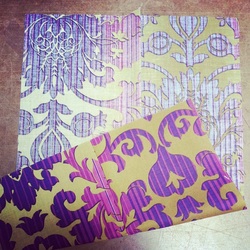
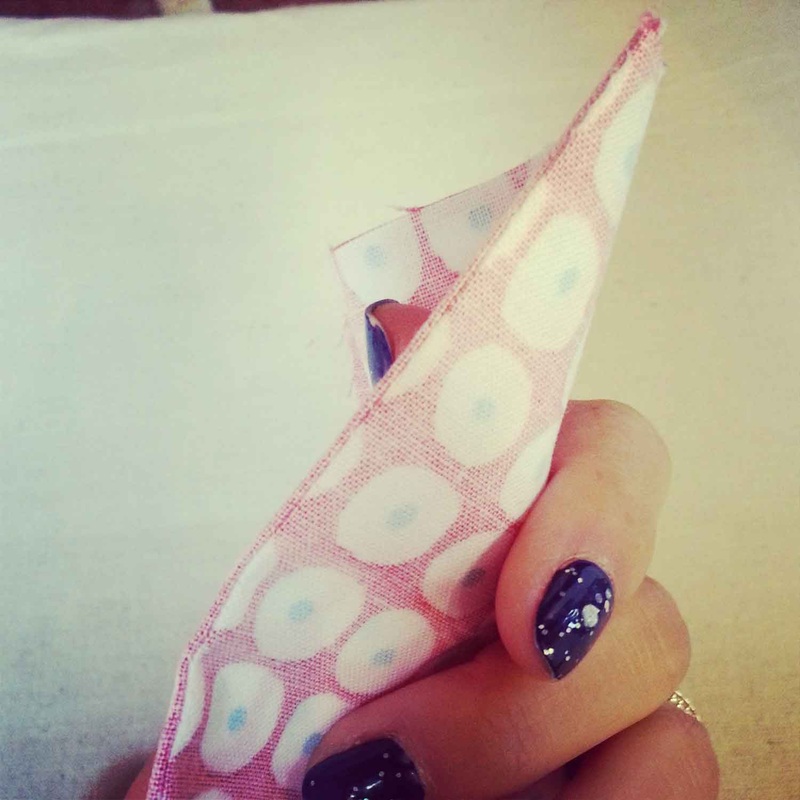
Rolled up pants are everywhere right now. For a more permanent and tailored version, create your own cuffed hem. In this tutorial, learn step by step how to draft a pattern to a cuffed hem and how to sew it. 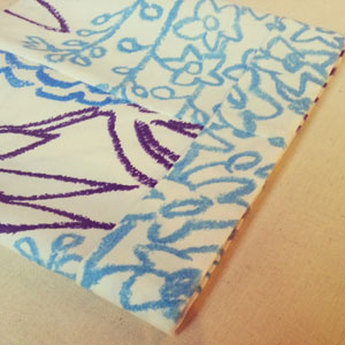 Step 1Prior to cutting out fabric, you need to take into consideration that you are making a cuffed hem during the pattern drafting stage. Here is a diagram on the measurements required to create a cuffed hem. First, you will need to decide the height of your cuff. In this example, I have used 1.5" as the final height of the cuff. This is average height for a pant/short cuffed hem. 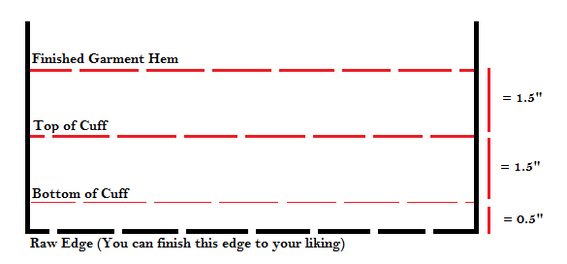 The Finished Garment Hem line is the final length of your complete garment. We must add length to create a cuffed hem. I want my cuff height to be 1.5" thus I add 1.5" twice, as the cuff needs to be folded up to create a front and back. You will also need to include a seam allowance for the raw edge to be hidden away inside the garment. I added a 4/8" seam allowance. I suggest finishing off the raw edge accordingly to your fabric choice and garment. In this example, I have applied a serged edge. Step 2Now onto the sewing part of a cuffed hem. A hem is completed at the very end of the construction process. Sew the side seams first. 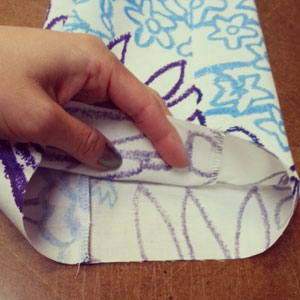 Step 3Take the time now to finish off the raw edge at the bottom. I have applied a serged edge. 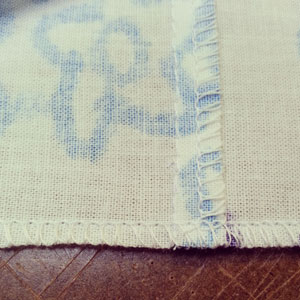 Step 4On the right side of your garment, mark the above lines as per Step 1. Mark all the way around the hem to ensure a balanced cuff. 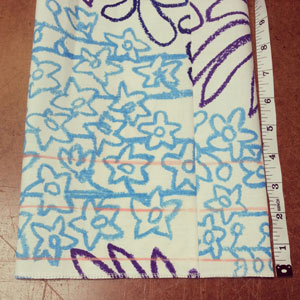 Step 5Press hem in at Top of Cuff line. Please refer to Step 1 to see lines. 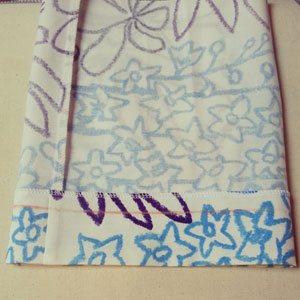 Step 6To keep bottom of hem clean and upright, sew a line 1/4" away from raw edge (serged edge in this example).
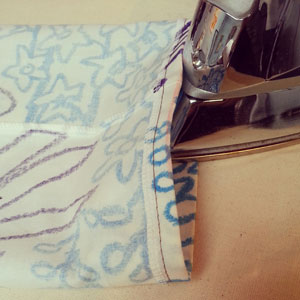
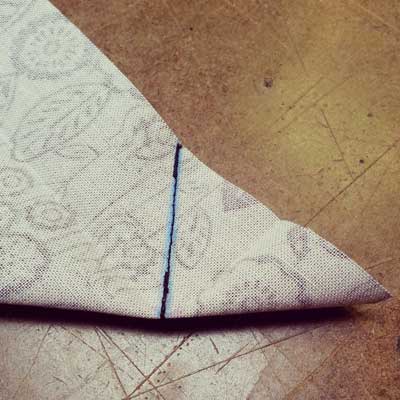
Step 7Press cuff up at Bottom of Cuff line. Once pressed, the hem will start to resemble a cuffed hem.
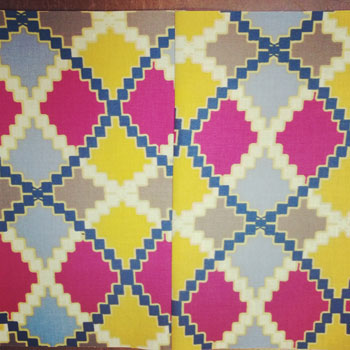
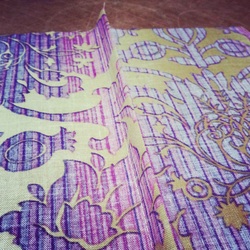
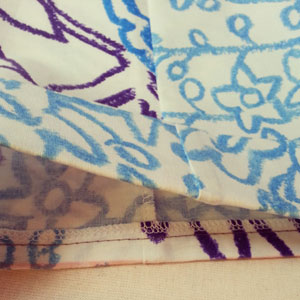 Step 8To finish, at the seams, tack the body of the garment to the cuff. Tacking is a hand-sewing technique used to keep two areas of a garment attached/secure without any visible stitching on the exterior of the garment. Each tack is approximately 3-5 stitches is one small area, just enough to hold the two areas tight. 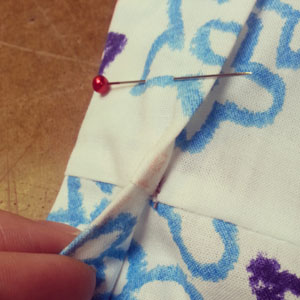 Completed Cuffed Hem Please note for the purpose of instruction and clear photos, I have used a contrasting thread color. You will want to use a matching thread color.
Happy Sewing! Photographed and written by Sheila Wong Studios
0 Comments
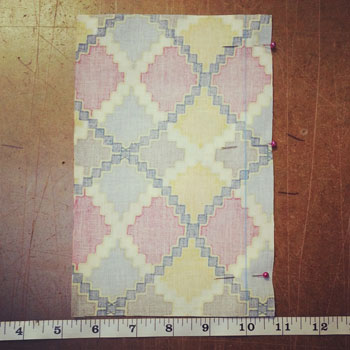
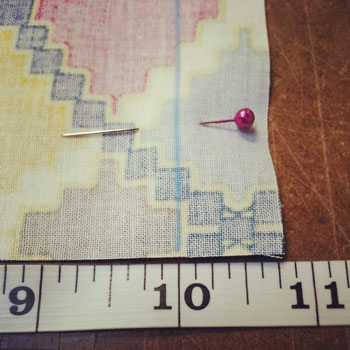
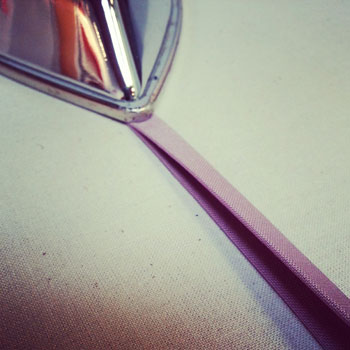
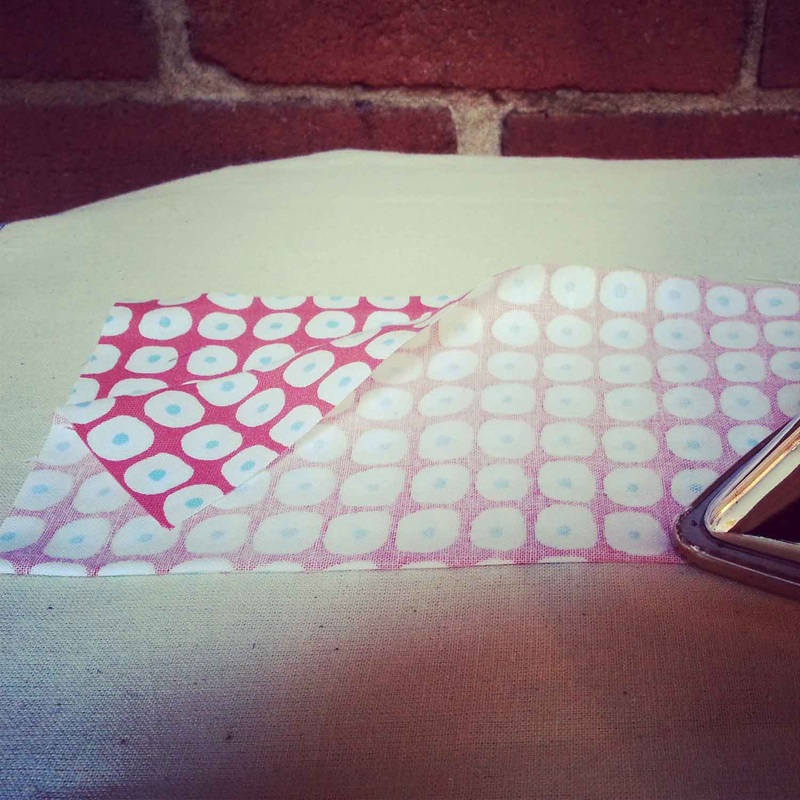
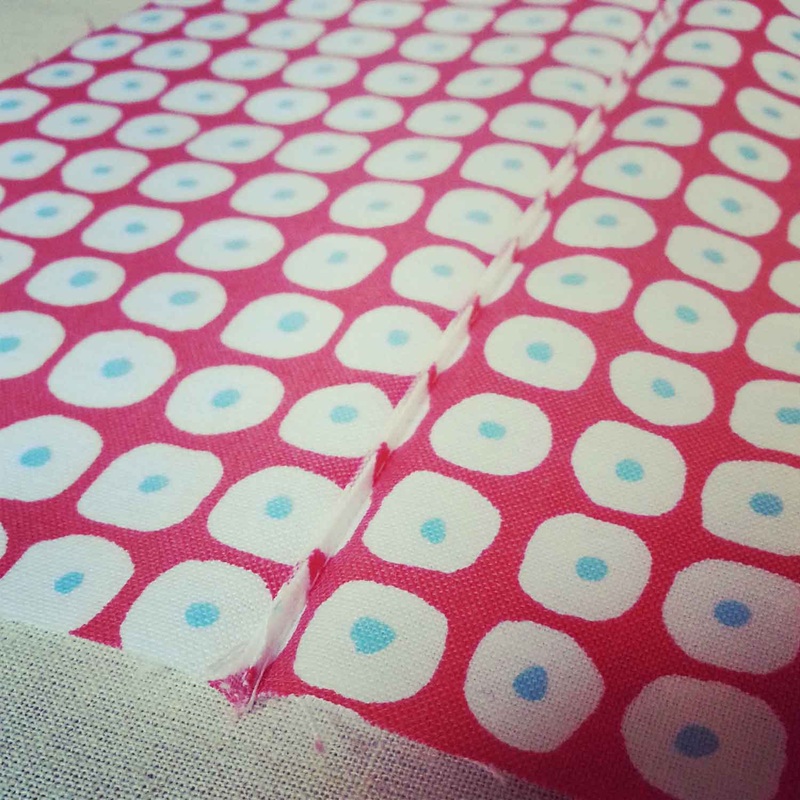
A self bound seam finish is a variation on a bound seam finish. But it does not require you to prepare an extra piece of bias/straight tape to enclose the raw edges of your seam allowance. Its best used when you want to bind both seam allowances together and for light to medium weight fabrics. Also works better on straight to slight curved seams only. For a step by step sewing tutorial on a bound seam finish click HERE. 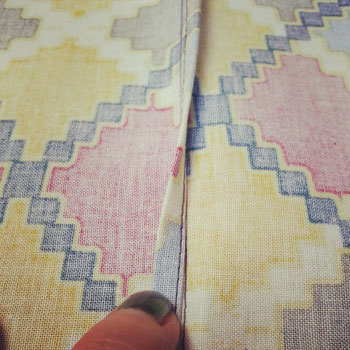 Step 1If you are familiar with a regular bound seam finish, you know that either bias or straight tape is used to bind the raw edges of the seam allowance. In a self bound seam finish we need to allow for extra seam allowance to self bind. A 3/4" seam allowance is required to have a 1/4" finished self bound seam. Sew at a 3/4" seam allowance.
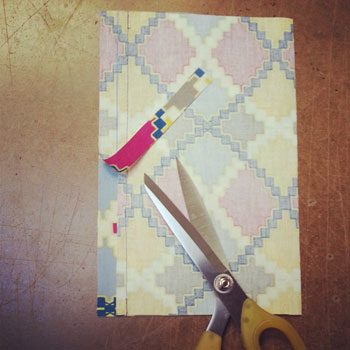
Step 2Trim one of your seam allowances down to 1/4".
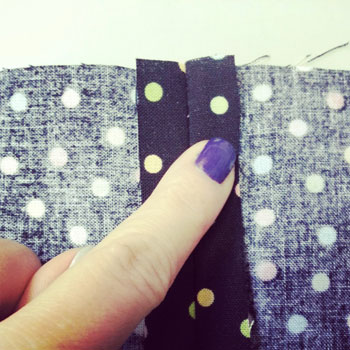
Step 3Press the raw edges of the longer seam allowance in to line up with the raw edge of the shorter one.
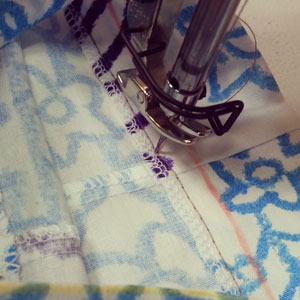
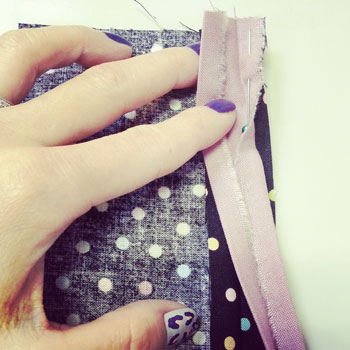
Step 4Press the folded edge in to meet up with the original sew line. Leave a 1/16" or smaller space in between the edge and the sew line to ensure the seam lays flat.
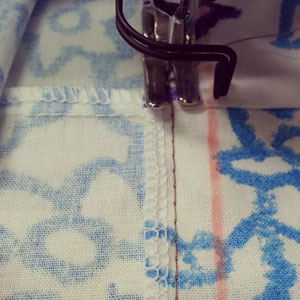
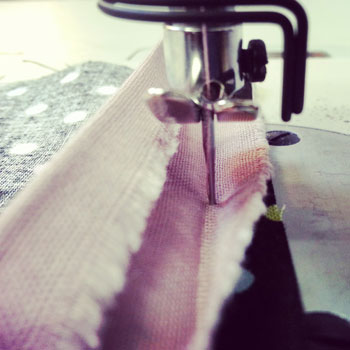
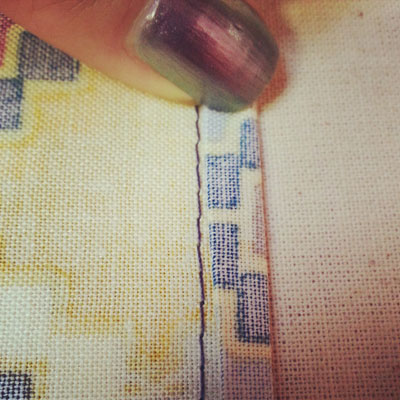 Step 5Edge stitch down your pressed seam allowance as shown in photo above. Edge stitch is approximately 1/6" away from the folded edge. 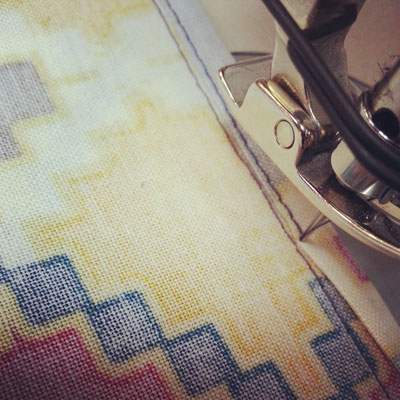 Step 6On the right side, press seam allowance to one side. 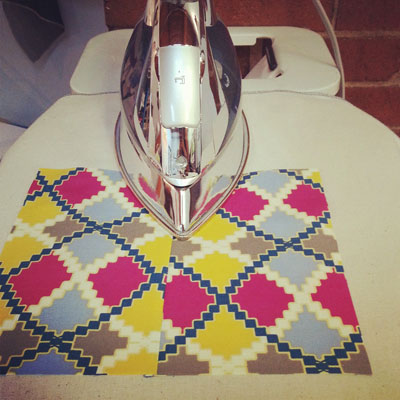 Completed Seam
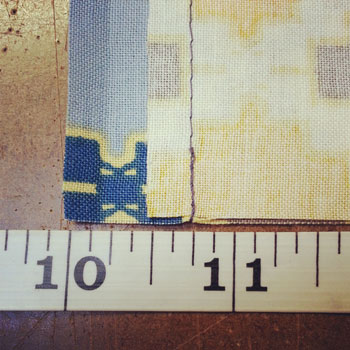
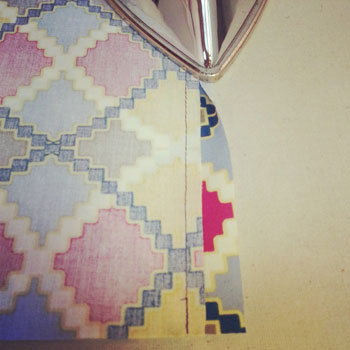
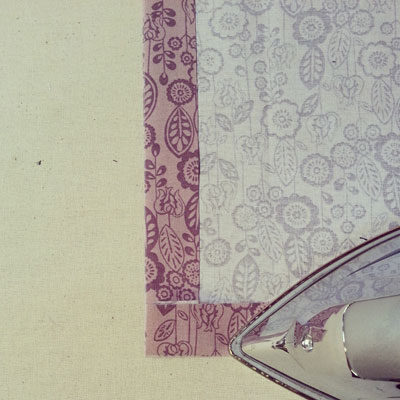
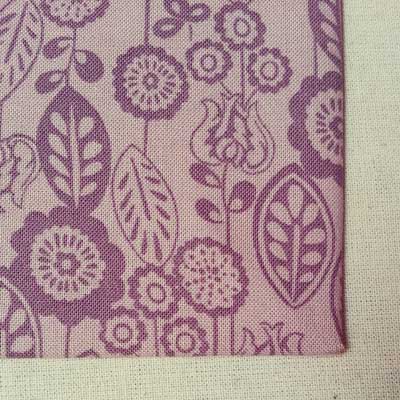
Happy Sewing! Photographed and written by Sheila Wong Studios Corners in sewing are tricky, they can look clean and professional if you put the effort into them. Here is a step by step sewing tutorial on how to sew a mitered corner. A mitered corner can be sewn in a variety of areas in a garment. Commonly seen at the hem intersecting with the center front opening of a garment or perhaps at the hem at the back opening vent.  Step 1On the right side of your garment, mark your hem seam allowance or your fold in line. It is OK if the two are not the exact same measurement. Most likely your hem is larger in measurement. Please refer to your pattern for hem seam allowance. In this example, I am using 1". 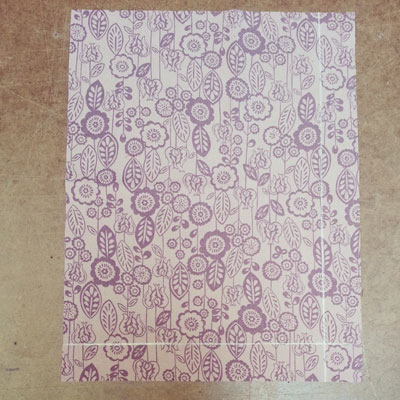 Step 2Press your marked hem seam allowance back, one at a time. Once pressed, you will get an intersecting point or what will become the corner of the garment.
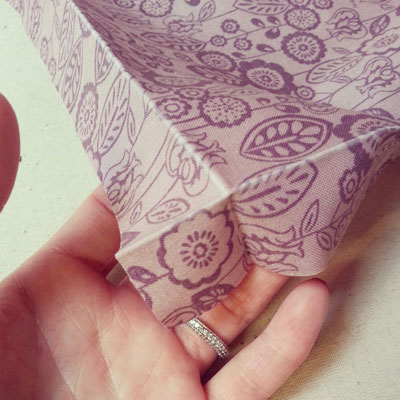
Step 3Right sides of fabric facing each other, line up pressed lines as shown below. 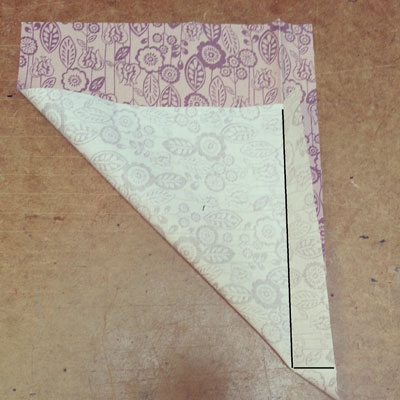 Pin pressed lines in place, and mark where the intersecting point is exactly. 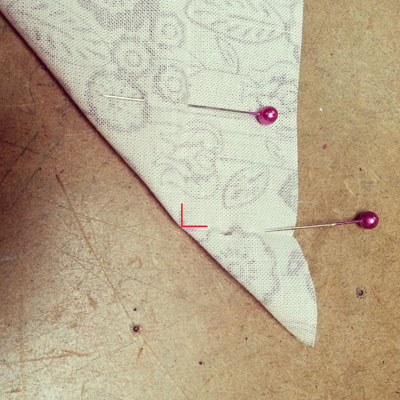 Step 4With an L ruler or anything that will give you a right angle, line up 90 degree corner to intersecting point as shown below and mark sew line.
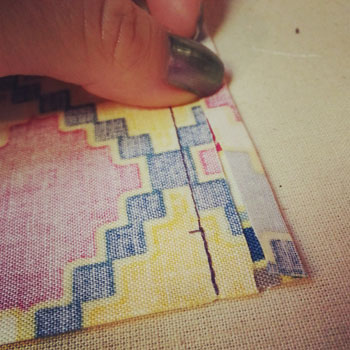
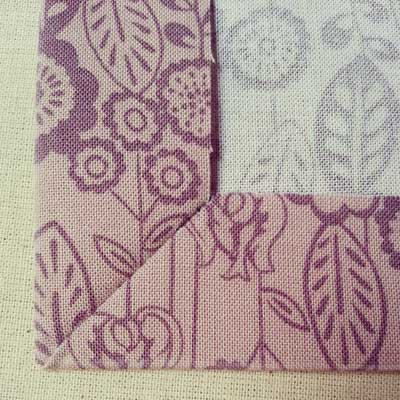
Step 5Sew marked line at 1.5 stitch length. Ensure you sew all the way to the intersection point exactly.
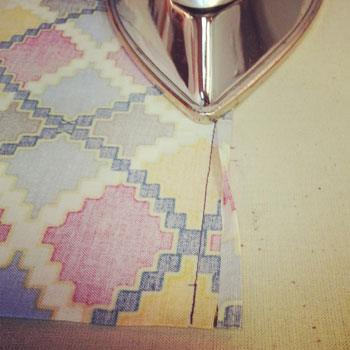
Step 6Trim seam allowance down to 1/8". 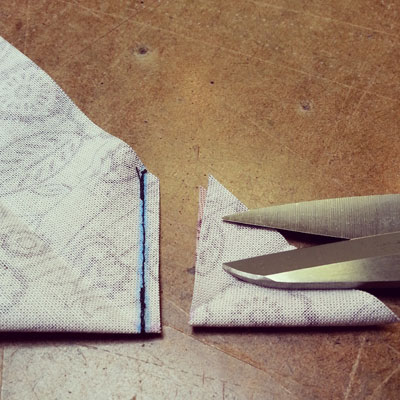 Step 7Flip corner inside-out and poke corner until it looks as close to a right angle as possible. If it is looking bulky, go back and trim off more seam allowance from step 6.  To create a super clean look to easy fray fabric, finish the raw edges prior to completing any of these steps. An easy way to finish the raw edges would be to serge.
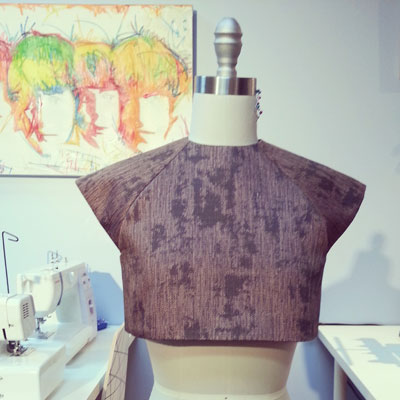
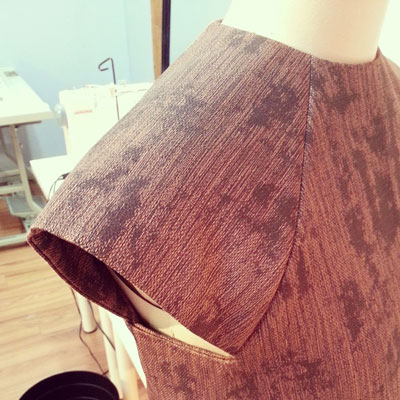
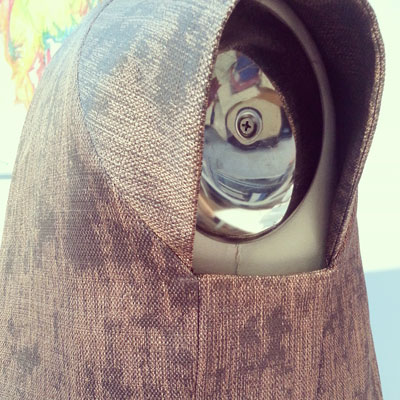
Happy Sewing! Photographed and written by Sheila Wong Studios My latest design is a structured crop top made from a Cotton blend fabric. The inspiration really originated from the fabric, as most of my designs do. I wanted to maintain clean straight lines. With only one curve in the pattern at the neckline, as required.
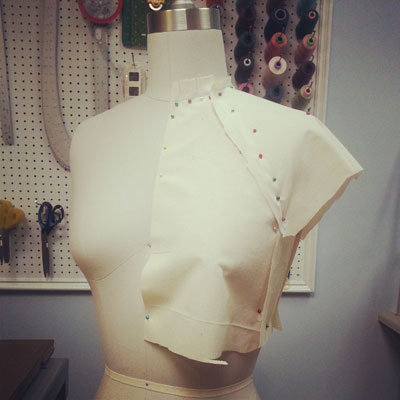
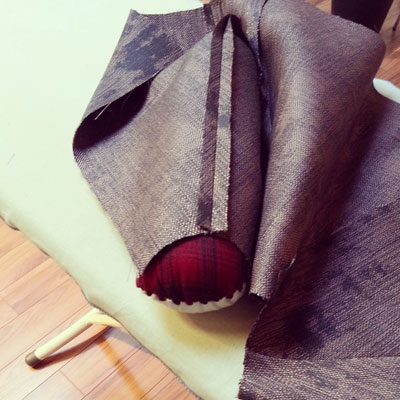
I wanted to give you an inside view into my design process, so I have documented with photos along the way. Materials cost approximately $15 and 0.9M of fabric was used. The total process took a total of 9.5 hours, over the span of 2 weeks, from conceptualization to completion of construction. Concept & Inspiration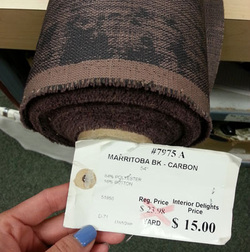 I was shopping in the interior fabrics section at Fabricana, when this print caught my eye. Here is a lesson for you, do not ignore the interior fabrics just because it was originally designed to be used for home decor projects. Some of my favorite designs are made from "interior" fabrics. At the time of purchase, I had no clue what I would design from it yet, but knew it had to be structured due to the stiffness of the fabric. Almost a year later....here we are. DrapingThis crop top called for draping as I wanted the raglan sleeve seams to hit certain spots and I wanted a side panel in the design. You will notice I left ample seam allowance to create my first muslin.
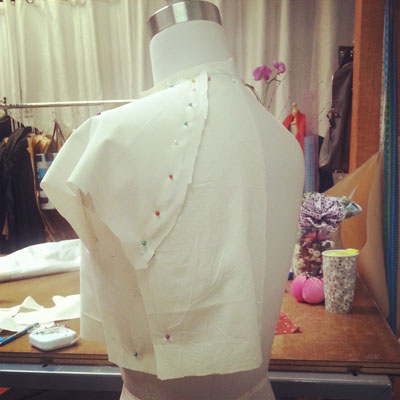
Fit Sample (Muslin) #1Based on my draped pieces prior, I sewed them together and turned in the hems to get a real feel to what the top would look like.
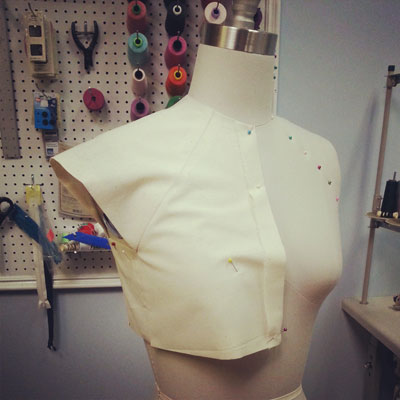
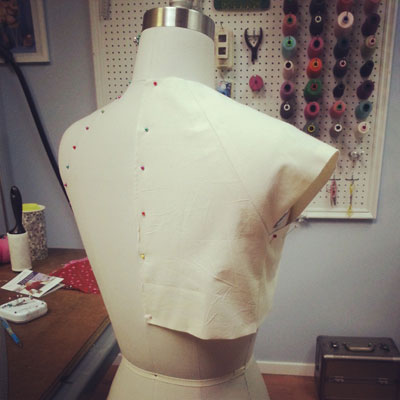
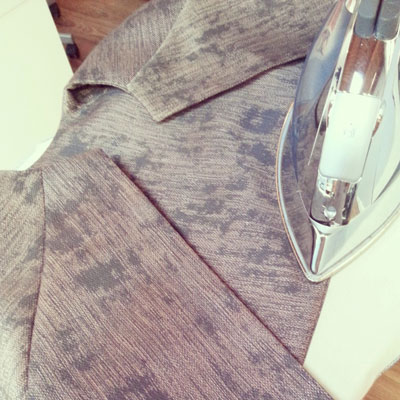
I had to make a few adjustments by marking the muslin with chalk. I dropped the armhole by 1/2" to give room for movement. Did not want to walk like a robot. I also re-curved the hem to make up for the bust lifting up the hem. Pattern Drafting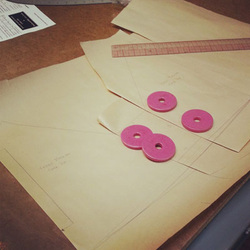 From the draping and fitting, I created 2D paper pattern pieces reflecting the fabric pieces. Fit Sample (Muslin) #2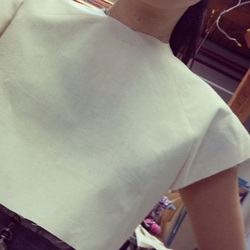 A second muslin was created from the paper patterns to make sure the adjustments sat correctly. I decided to try this on since I will be wearing the final design. As you can tell from the photo, the neckline was a tad tight, so I marked that appropriately. Final Pattern Drafting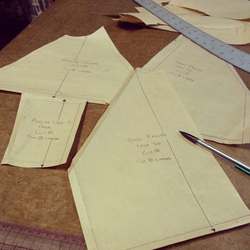 Once I was happy with the neckline correction, I finalized all the pattern pieces with seam allowances, grain-lines, titles and notches. Cut out Fabric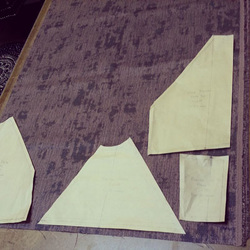 Paper pattern pieces down, pin and cut. 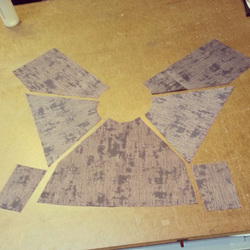 Prepping for the garment sewing stage, I had to show you what this top looks like all lined up. Garment ConstructionThe sleeves are a combination of a raglan and cap sleeve. I wanted to stay away from an inset sleeve to create the sleeve hem flare.
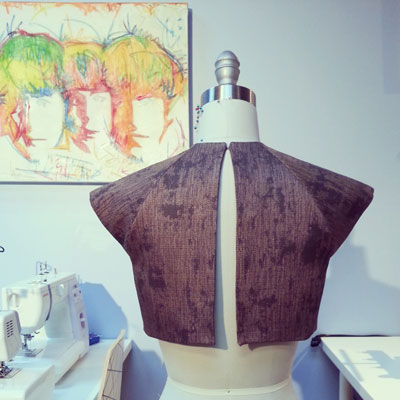
The most challenging part sewing this top would be where all the seams collide under the armhole at the corners of the side panel. Eight seam allowances converging at one point, four from the exterior and four from the lining. In this situation it is important to mark the exact point that all should converge, so you don't sew over. Patience was key here.
This top is fully lined with the same fabric as the exterior. This means I have to make two tops first, then bring them together. Because of all the style lines and seams, it is fairly important that I pressed open each seam along the way prior to bringing the exterior and lining tops together. A fully lined garment means no raw or exposed fabric edges are visible. A small opening is left un-sewn at the hem to flip garment right side out. Hand sew a slip stitch to close up opening.  After a good final press, I hand sewed a hook and eye to the top center back. I wanted to maintain an airy feel to the design but not have it fall off, so only one hook and eye was required.
For those curious and not familiar with the design process, all the step leading up to construction usually take longer than the actual garment sewing. In this case, it was approximately 30% sewing to 70% pattern creation and prep. Wondering what I will wear this top with? Check out my Instagram feed. Happy Sewing! Designed, photographed and written by Sheila Wong Studios A bound seam finish is not often seen in mass produced garments. Its a beautiful way to finish off raw edges inside of a garment. It is typically used to finish unlined garments in which the fabric has a high fray rate. Follow this step by step tutorial on how to apply a bound seam finish.  Step 1
Right sides facing sew your seam at 1/2" seam allowance and press seam open. Please note for this tutorial I will be using a 1/2" seam allowance, please check your pattern prior to sewing to see what the allocated seam allowance is. You have the choice to bind the seam allowances together, or bind them separately. Consider the thickness of your fabric, where the seam is located in the garment, and what style you desire. For this tutorial, I will demonstrate how to sew them separately. Step 2Now its time to create the binding tape. For a straight seam, cut a strip of fabric on grain or on the crossgrain as per sketch below. If you are applying a bound finish to a curved seam, cut your strip on bias. If you are unfamiliar with the terms: grain-line, crossgrain and bias please click HERE to learn. Its best to use light to medium weight 100% cotton for the binding tape. 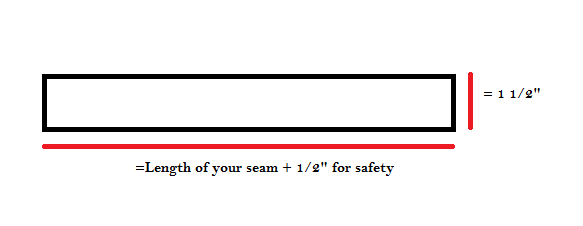  Step 3This is a 3 part pressing process to create the binding tape. Follow photos from left to right.
Once the 3 part pressing steps are complete, you will have 4 sections measuring 3/8" each. This fits the original 1/2" seam allowance from step 1.  Step 4Pick one side of your seam allowance, right sides facing pin the binding tape to seam allowance.
Sew binding tape to seam allowance on first fold line.
Step 5Wrap binding tape around seam allowance to the back, lay flat and edge stitch (approx 1/16") tape down. This sew line should capture the back of the binding tape too. Click on my video link below to see the TOP and BOTTOM views.  YoutubeHere is a clip I took on what the Bound Seam Finish should look like from the top and bottom view of the seam allowance. Happy Sewing!
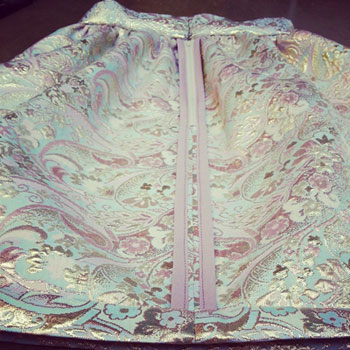
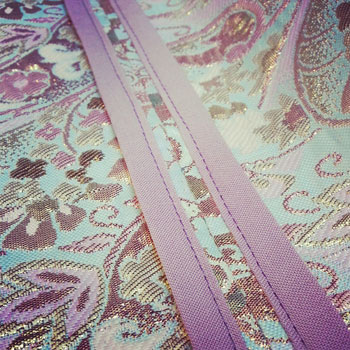
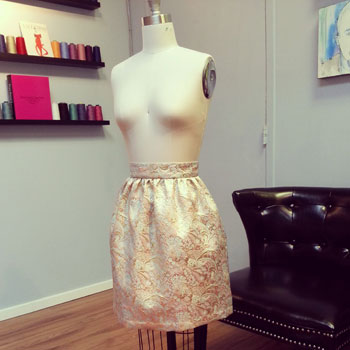
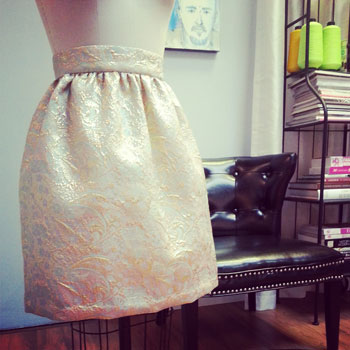
Photographed and written by Sheila Wong Studios My latest sewing project is a holiday party skirt. What makes it holiday? Definitely the fabulous fabric. What makes it a party skirt? Every skirt is worthy of a good party in my eyes.  The following are some of the design elements and techniques used to construct this holiday party skirt. Design ElementsCentered Zipper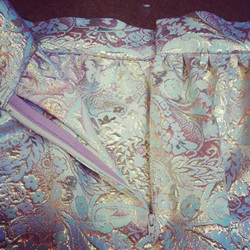 Inserted in the center back seam to avoid bulk, a zipper is the easiest skirt closure out there. Hook & Eyes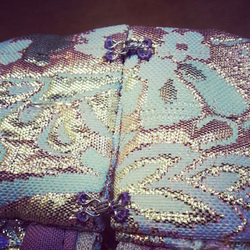 Hook & eyes are a fantastic closure choice on top of a zipper to ensure the opening lies flat. I used two sets as my waistband is 2 inches in height. These are fully hand sewn. Fully Enclosed Waistband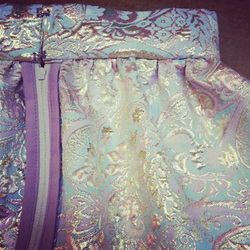 Top of waistband was cut on fold of fabric, then all seam allowances pressed in and slip stitched shut to avoid any exposed raw edges. If you are not adding any lining to the skirt, this is the best technique to keep all your mess (threads, fraying fabric, etc.) hidden. Hand Gathering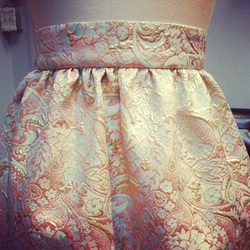 Prior to attaching waistband onto skirt, a running stitch in the longest stitch length possible was sewn in the seam allowance area. By hand, I pulled the ends of the threads until an even gather that matched the length of the waistband was achieved. My tip is to take your time so you don't snap the threads! Bound Seam FinishMy fabric frayed just looking at it, so the best way to hide ultra fray rate fabric is to apply a bound finish to the seams. In this case, I also bound the zipper tape to the seam allowance for a clean finish. PS-I will be releasing a blog post on how to create your own binding and how to sew a bound seam finish soon!
Slip-Stitch (Blind Hem)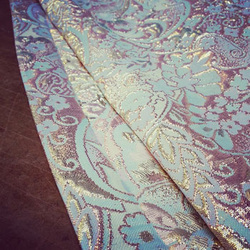 One of my favorite ways to finish a hem is a blind hem in a slip-stitch finish. Click HERE for my video tutorial. Final DesignI've sewn this entire skirt on my Juki industrial sewing machine and a hand sewing needle.
Want to learn how to create your own holiday party skirt? BOOK time in the studio now with me.
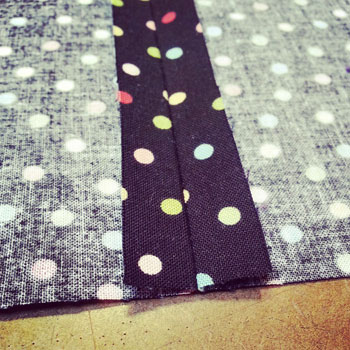
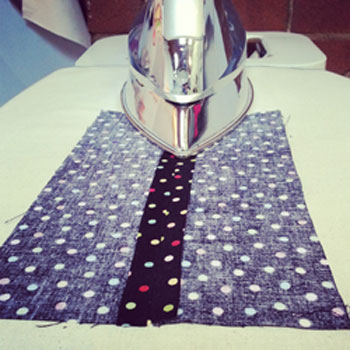
Happy Sewing! Designed, photographed and written by Sheila Wong Studios There are a few variations of a French seam: regular, narrow and faux. This tutorial is for a regular French seam. Watch out for the other 2 in the next few weeks. A French seam fully encases any raw edges and is fantastic for fabric that has high fray rate. It is best used for straight or slightly curved seams. Any seams with too much of a curve will be a nightmare to sew and also not lay flat against the garment. Step 1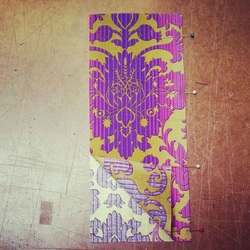 Wrong sides of fabric facing, line up your seam, pin, and sew at 1/4" seam allowance. Please take note that a total of 1/2" seam allowance has been allocated for this pattern. Step 2 Trim seam allowance down to 1/8" seam allowance. Step 3Press seam flat to look like a book spine. Right sides of fabric should be facing each other.
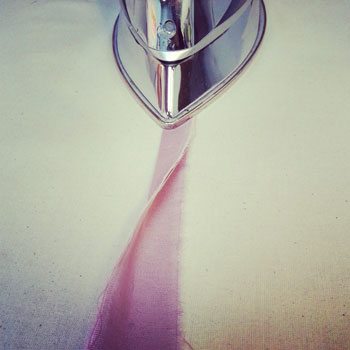
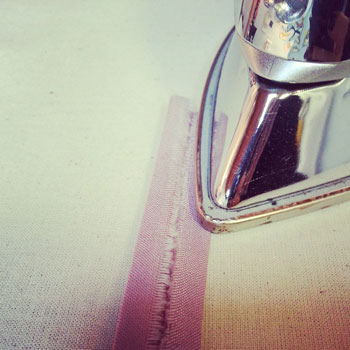
Step 4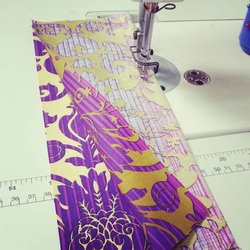 Right sides of fabric facing, sew at 1/4" seam allowance from book spine edge. This step fully encloses your raw edge. Step 5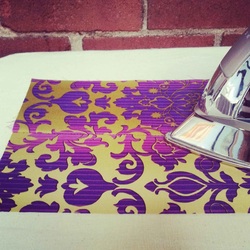 Pressing from the right side of your garment, press all seam allowances to one side. Pressing from the right side will allow the iron to naturally open your seam flat. Check out my Pressing Tips here. Finished SeamVoilà! You are done a regular French seam. From the right side of the garment, it should look like a regular sewn seam. From the wrong side of the garment, it should look like clean encased seam allowance.
Remember to check back for future tutorials on how to sew a Narrow and a Faux French seam.
Happy Sewing! Photographed and written by Sheila Wong Studios Part 2 of a 3 part series in sewing French seams, say hello to the narrow French seam. Please click HERE if you would like to view Part 1: How to Sew a Regular French Seam. The construction steps are very similar to the regular French seam except for certain seam allowances have changed to accommodate a narrow completed seam. A narrow French seam should be used for thin or sheer fabrics with medium to high fray rates. A narrow finished seam allowance will allow the seam to almost disappear in the garment. Remember, French seams are best used on straight to slightly curve seams. They will not lay flat for seams that are extremely curved. Step 1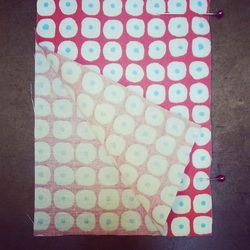 Wrong sides of fabric facing, line up your seam, pin, and sew at 3/8" seam allowance. Please take note that a total of 1/2" seam allowance has been allocated for this pattern. Step 2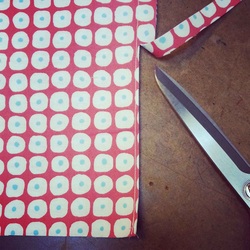 Trim seam allowance down to 1/16" seam allowance. Step 3Press seam flat to look like a book spine. Right sides of fabric should be facing each other.
Step 4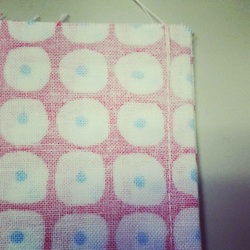 Right sides of fabric facing, sew at 1/8" seam allowance from book spine edge. This step fully encloses your raw edge. Step 5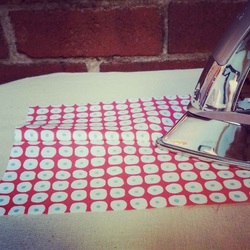 Pressing from the right side of your garment, press all seam allowances to one side. Pressing from the right side will allow the iron to naturally open your seam flat. Check out my Pressing Tips here. 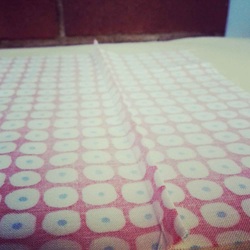 Your finished seam allowance inside your garment should look like this photo with a seam allowance of 1/8". Check back for Part 3: How to Sew a Faux French Seam.
Happy Sewing! Photographed and written by Sheila Wong Studios Welcome to part 3 of how to sew a French Seam. This tutorial will show you how to sew a Faux French Seam, also known as a False French Seam. Click HERE if you would like to start with the Regular French Seam and HERE for the Narrow French Seam. Why a Faux French Seam? The end product looks the same as a Regular French Seam, but the process is completely different and involves both machine and hand sewing. You would use this technique when working with extremely delicate fabrics like fine lace, which have no place near a machine. Step 1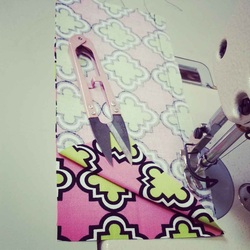 Right sides of the fabric facing either hand sew or machine sew at 1/2" seam allowance. I have used black thread so you can see it in photos. Ideally you should be using matching thread. 1/2" total seam allowance as been allocated for this example. Regular seam allowance ranges from 3/8-5/8". Step 2Separately, press seam allowances in half, folding raw edge in. Line up raw edge beside sewn line in Step 1. See video below for detailed instructions. Step 3Slip Stitch closed your seam allowance on the fold. See video below for detailed instructions. Step 4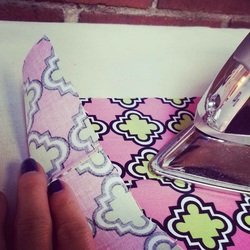 Pressing from the right side of your garment, press all seam allowances to one side. Pressing from the right side will allow the iron to naturally open your seam flat. Check out my Pressing Tips here. Happy Sewing!
Photographed and written by Sheila Wong Studios I always tell my clients that taking the time to press a garment along the ways of construction is essential. Why? Because it sets your designs apart in a more professional manner. I guarantee if you incorporate the following basic pressing techniques to your next design, you will not be disappointed! Before we get started...did you know that I have gone through 8 irons in the last 3 years. I press almost every day! Basic Pressing Tips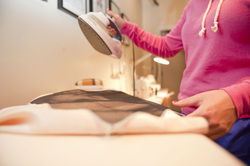 Ever wonder why you iron feels so heavy? Well the natural weight of the iron is just the right amount to press a garment. So please refrain from pushing down like hulk in the thoughts that it will assist in flattening a seam or a wrinkle. Also, no need to wiggle the iron while pressing. Steady heat in one continuous motion is plenty. 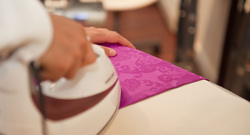 In my experience, I have found not all irons have the same heat levels. It is extremely important to test with a scrap of your intended fabric which level of heat to set your iron to. With a scrap, place your iron at a setting you think might be right and leave your iron on for 10 seconds. If there was any burning or shine created, your setting is too high. Pressing Seams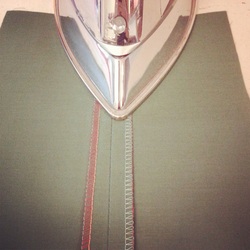 When pressing a seam that needs the seam allowances to be fully open, press from the wrong side of garment. This ensures a flat laying seam. 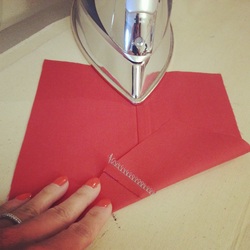 When pressing a seam that needs the seam allowances to be sitting to one side, press from the right side of garment. This lets you press the seam flat. Iron Maintenance Always be aware of the water level in your iron. Do not let it get too low or else you will not receive a clean press. Also the steam function that assistants in giving that flat appearance will not work. 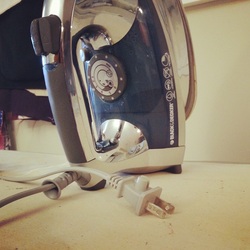 This one is really simple, yet I am still guilty of it. Turn off your iron when not in use. It extends the life of your iron. Keep an eye out for future blog posts on pressing difficult fabrics and attaching fusible interfacing with ease.
Happy Sewing! Photographed and written by Sheila Wong Studios |
Archives
November 2022
|


 RSS Feed
|
|
Copyright © 2024 Sheila Wong Fashion Design Studio Ltd. All rights reserved.